
Popular categories
Looking for a yarn?


Comments / Questions (82)
![]() Bernie35 wrote:
Bernie35 wrote:
Bonjour, je viens de commencer ce modèle Vous expliquez d'utiliser les trous de la bordure comme boutonnières, soit les trous au niveau des jetés sur la torsade, donc à 7 points du bord ? cela représente environ 7.5 cm, ça me paraît beaucoup. Or la photo montre boutons et boutonnières sur la bordure en point mousse. Est-ce que j'ai raté quelque chose ?
10.05.2019 - 17:10DROPS Design answered:
Bonjour Bernie35, les boutons vont se boutonner entre les mailles de la bordure du devant = les 3 m point mousse cf 2ème photo - les mailles sont suffisamment souples pour les attacher et les boutons tiendront ainsi très bien. Bon tricot!
13.05.2019 - 08:33
![]() Birgit Toelle wrote:
Birgit Toelle wrote:
Vielen Dank hatte es auch schon begriffen. Wohl ein kleiner Denkfehler bei mir😉
23.04.2019 - 15:19
![]() Birgit Tölle wrote:
Birgit Tölle wrote:
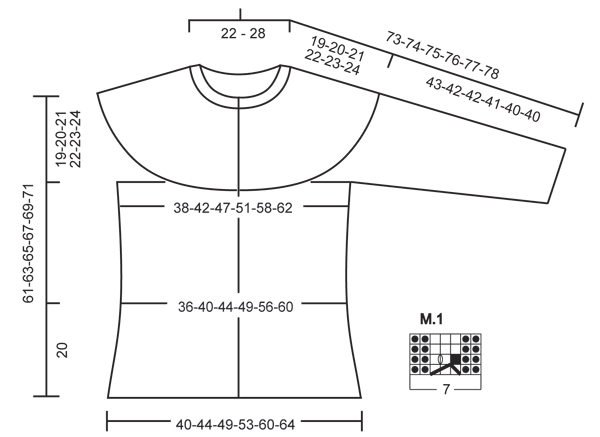
Die 4 Markierungen: 19Maschen zählen ab der 11. Masche? Und wenn ich in einer Reihe nach 10 cm auf beiden Seiten der 4 Seitenmaschen je 1 Masche abnehme dann sind das ja schon 70 M. Wenn ich das nach 20 cm wiederhole habe ich ja nur noch 62 M. Das verstehe ich nicht . Und wieso „Seiten,aschen“?
23.04.2019 - 06:14DROPS Design answered:
Liebe Frau Tölle, so sollen Sie die Markierer haben: 19 M, 1 Markierer, 4 M, 1 Markierer, 32 M, 1 Markierer, 4 M, 1 Markierer, 19 M = 19+4+32+4+19= 78 M. Es wird dann nur 2 M auf beiden Seiten abgenommen: 1 M vor dem ersten und 3. Markierer + 1 M nach dem 2. und 4. Markierer. Viel Spaß beim stricken!
23.04.2019 - 14:53
![]() Guusje wrote:
Guusje wrote:
Hallo, ik wil dit prachtige patroon graag omrekenen naar mijn steekverhouding. Kunt u vertellen hoeveel centimeter het achterpand en de voorpanden bij elkaar zijn voor maat xl? Dan kan ik uitrekenen hoeveel steken ik moet opzetten. Alvast bedankt!
16.01.2019 - 20:53DROPS Design answered:
Dag Guusje,
Onderaan het patroon staat een tekening met maten, daar kun je zien wat de afmetingen in jouw maat zijn. Houd er rekening mee dat er nog een overslag op het voorpand komt vanwege de knoopsluiting.
17.01.2019 - 09:36
![]() Gabriella wrote:
Gabriella wrote:
Salve questo modello è molto bello ma nella foto ci sono i bottoni e nella spiegazione del lavoro non sono indicate le asole.Si può sapere dove formare le asole?Grazie
24.10.2018 - 23:53DROPS Design answered:
Buongiorno Gabriella, nel paragrafo della confezione è indicato come allacciare il cardigan: i bottoni vengono allacciati tra le maglie sul bordo destro. Buon lavoro!
25.10.2018 - 06:37
![]() Giulia wrote:
Giulia wrote:
Salve. Come attaccare le maniche ho capito. Ma il corpo é a dritto e la manica a rovescio. Forse devo fare ancora un ferro sulla manica in modo che mi si presenti correttamente? Aiuto.
28.05.2016 - 17:15DROPS Design answered:
Buongiorno Giulia. L'ultimo ferro del davanti/dietro e delle maniche prima di unirli per lo sprone, deve essere lavorato sul rovescio del lavoro. Buon lavoro!
28.05.2016 - 18:27
![]() Kristina wrote:
Kristina wrote:
But the photo has the button holes in the K3 Button band, not the M1 chart. If you put the buttons thru the holes in the M1 chart, this would not work out properly, as the buttons would show in the middle of the M1 chart and the other M1 chart would be covered partially by the 3 st button band.
23.02.2016 - 19:59DROPS Design answered:
Dear Kristina, sorry my mistake, you are right, buttons have to be buttonned through sts on the right band (no sts bound off for buttonholes). Happy knitting!
24.02.2016 - 10:09
![]() Kristina wrote:
Kristina wrote:
I am not seeing in the 3 sts for the front band where the button holes are made. The finishing states to match buttons up with holes, but the only YOs are in the M1 chart, and that is not where they should be. Were the buttonholes eliminated? Thank you in advance.
22.02.2016 - 21:28DROPS Design answered:
Dear Kristina, the holes between sts on right band (in M.1) are used as button holes, place buttons evenly distributed facing the holes (YOs) in M.1. Happy knitting!
23.02.2016 - 09:05
![]() Jvonne Ravanelli wrote:
Jvonne Ravanelli wrote:
Ops!!!!!!!!! mi era scappato il video. Grazzzzzzie mille sempre molto molto gentili e molto pazienti
25.02.2015 - 09:09
![]() Jvonne Ravanelli wrote:
Jvonne Ravanelli wrote:
Finalmente ho iniziato la mia bellissima maglia, però mi sono fermata perché mi è sorto un dubbio.....quando faccio il gettato sul rovescio lo lavoro normale (così mi deve rimanere il buco) o lo lavoro ritorto? Grazie mille mille
24.02.2015 - 17:16DROPS Design answered:
Buonasera Jvonne, in questo modello i gettati vanno lavorati a rov nei ferri di ritorno del diagramma M.1 e a rov ritorto durante gli aumenti. Ci riscriva se non è chiaro. Buon lavoro!
24.02.2015 - 17:59
|
||||||||||||||||
Mist#mistcardigan |
||||||||||||||||
|
|
||||||||||||||||
Knitted DROPS jacket in stockinette st with cables and round yoke in ”Andes” or “Snow”. Size: S - XXXL.
DROPS 134-17 |
||||||||||||||||
|
GARTER ST (back and forth on needle): K all rows. DECREASE TIP 1: All dec are done from RS. Dec as follows before 4 sts in the side: Work until 2 sts remain before marker, K tog the next 2 sts. Dec as follows after 4 sts in the side: Slip 1 st as if to K, K 1, psso. DECREASE TIP 2: Dec 1 st on each side of marker as follows: Work until 2 sts remain before marker, slip 1 st as if to K, K 1, psso, (marker), K tog the next 2 sts. INCREASE TIP: All inc are done from RS. Inc 1 st by making 1 YO. On next row P YO twisted (i.e. work in back loop of YO instead of front) to avoid holes. PATTERN: See diagram M.1 (the diagram shows the pattern from RS) -------------------------------------------------------- BODY: Worked back and forth on circular needle from mid front. Cast on 78-86-94-102-114-122 sts (includes 3 band sts in each side towards mid front) on circular needle size 10 mm / US 15 with Andes. Work 1st row (= from RS) as follows: 3 band sts in garter st - See explanation above - work diagram M.1 (= 7 sts), * K 2, P 2 *, repeat from *-* until 10 sts remain on needle, work diagram M.1 and finish with 3 band sts in garter st. NOTE: Work band sts in garter st until finished measurements. Work like this for 4 rows, work next row (= RS) as follows: 3 band sts, work diagram M.1, work in stockinette st until 10 sts remain on needle, work diagram M.1, finish with 3 band sts. Continue in stockinette st with diagram M.1 and 3 band sts in each side. Insert 4 markers in the piece as follows: Work 19-21-23-25-28-30 sts, 1 marker, work 4 sts, 1 marker, work 32-36-40-44-50-54 sts, 1 marker, work 4 sts, 1 marker, work remaining sts (= 4 sts between each marker in each side). REMEMBER THE GAUGE! When piece measures 10 cm / 4" from cast on edge, dec 1 st on each side of 4 sts in each side - see decrease tip 1 above. Repeat dec when piece measures 20 cm / 8" = 70-78-86-94-106-114 sts. Continue in stockinette st with diagram M.1 and 3 band sts in each side. When piece measures 31-32-32-33-33-34 cm / 12¼"-12½"-12½"-13"-13"-13⅜", inc 1 st on each side of 4 sts in the sides - Read increase tip above = 74-82-90-98-110-118 sts. Continue to work until piece measures 42-43-44-45-46-47 cm / 16½"-17"-17¼"-17¾"-18"-18½". Work next row from WS as follows: Work 18-20-22-24-27-29 sts, bind off the next 4 sts, work 30-34-38-42-48-52 sts, bind off the next 4 sts and work the last 18-20-22-24-27-29 sts. Put piece aside = 66-74-82-90-102-110 sts remain on needle. SLEEVE: The sleeve is worked back and forth on circular needle. Cast on 22-22-22-26-26-26 sts (includes 1 edge st in each side) on circular needle size 10 mm / US 15. Work 1st row (= RS) in rib as follows: 1 edge st in garter st, * K 2, P 2 *, repeat from *-* and finish with 1 edge st in garter st. Continue like this until rib measures approx. 4 cm / 1½". Now continue in stockinette st with 1 edge st in each side - At the same time on 1st row from RS, adjust no of sts to 22-23-23-25-27-27. When piece measures 8 cm / 3⅛", inc 1 st in each side inside 1 edge st. Repeat inc every 6-6-5-5-5-4 cm / 2⅜"-2⅜"-2"-2"-2"-1½" a total of 6-6-7-7-7-8 times = 34-35-37-39-41-43 sts. When piece measures approx. 43-42-42-41-40-40 cm / 17"-16½"-16½"-16⅛"-15¾"-15¾" (NOTE! Shorter measurements in the larger sizes because of wider shoulder width) bind off 3 sts at beg of the next 2 rows = 28-29-31-33-35-37 sts. Put piece aside and knit another sleeve. ASSEMBLY: Sew the sleeves tog inside 1 edge st. YOKE: Slip sleeves on to same circular needle as body where armholes were bound off = 122-132-144-156-172-184 sts. Insert 1 marker after 19-17-16-18-18-20 sts, then insert another 7-7-7-8-8-8 markers with 12-14-16-15-17-18 sts between each = 19-17-16-18-18-20 sts remain after last marker (= 8-8-8-9-9-9 markers). Now measure the piece from here. Continue in stockinette st with diagram M.1 and 3 band sts in each side as before. When piece measures 2 cm / ¾", dec 1 st on each side of every marker (= 16-16-16-18-18-18 sts dec) - Read decrease tip 2. Repeat dec every 4½-5-5-5½-4½-4½ cm / 1¾"-2"-2"-2¼"-1¾"-1¾" a total of 4-4-4-4-5-5 times = 58-68-80-84-82-94 sts. Continue to work until piece measures 18-19-20-21-22-23 cm / 7"-7½"-8"-8¼"-8¾"-9". NOTE: Adjust so that last row is the 4th row in diagram M.1. Continue to work an elevation in the neck with short rows as follows: 1st row (= RS): 3 band sts, work 1st row in diagram M.1, work in stockinette st while AT THE SAME TIME dec 12-18-30-30-28-36 sts evenly (do not dec over diagram M.1 and band sts), work 1st row in diagram M.1 and finish with 3 band sts = 46-50-50-54-54-58 sts, turn piece. 2nd row (= WS): 3 band sts, work 2nd row in diagram M.1, work in P sts - but turn piece when 10 sts remain on needle. 3rd row: Tighten the yarn and K from RS until 10 sts remain in the other side. Turn piece and tighten yarn . 4th row: P 1 row from WS until 10 sts remain towards mid front, work 2nd row in diagram M.1 over the next 7 sts and finish with 3 band sts. Work next row (= from RS) as follows: 3 band sts, diagram M.1, * K 2, P 2 *, repeat from *-* until 10 sts remain, work diagram M.1 and finish with 3 band sts. Continue like this until rib measures 3 cm / 1⅛", then loosely bind off with K over K and P over P. ASSEMBLY: Sew the openings under the sleeves. Sew 7 buttons evenly distributed on left front band, use the holes between sts on right front band as button holes. |
||||||||||||||||
Diagram explanations |
||||||||||||||||
|
||||||||||||||||
 |
||||||||||||||||
Have you finished this pattern?Tag your pictures with #dropspattern #mistcardigan or submit them to the #dropsfan gallery. Do you need help with this pattern?You'll find 12 tutorial videos, a Comments/Questions area and more by visiting the pattern on garnstudio.com. © 1982-2026 DROPS Design A/S. We reserve all rights. This document, including all its sub-sections, has copyrights. Read more about what you can do with our patterns at the bottom of each pattern on our site. |
||||||||||||||||


With over 40 years in knitting and crochet design, DROPS Design offers one of the most extensive collections of free patterns on the internet - translated to 17 languages. As of today we count 324 catalogs and 12290 patterns - 12280 of which are translated into English (US/in).
We work hard to bring you the best knitting and crochet have to offer, inspiration and advice as well as great quality yarns at incredible prices! Would you like to use our patterns for other than personal use? You can read what you are allowed to do in the Copyright text at the bottom of all our patterns. Happy crafting!
Post a comment to pattern DROPS 134-17
We would love to hear what you have to say about this pattern!
If you want to leave a question, please make sure you select the correct category in the form below, to speed up the answering process. Required fields are marked *.