
Popular categories
Looking for a yarn?


Comments / Questions (82)
![]() Alex wrote:
Alex wrote:
Ok, hab meinen Fehler selbst gefunden. Trotzdem Danke!!!
13.03.2014 - 19:56
![]() Alex wrote:
Alex wrote:
Guten Morgen! Ich habe ein Problem in Reihe 7/8 bei der Passe (Größe S). In Reihe 8 soll ich auf 239 Stb kommen, bin aber in Reihe 7 schon bei über 250 Stb. Ich hab Reihe 6 schon nachgezählt und hab dort genau 207 Stb (wie in der Anleitung). Wo steckt denn mein Fehler? Oder muss ich in Reihe 6 auch die Lm zählen um auf 207 zu kommen? Vielen Dank im Voraus!!!
12.03.2014 - 08:05
![]() Dorthe Holm wrote:
Dorthe Holm wrote:
Jeg vil gerne vide garnforbruget, hvis den laves i hvid med blå kant?
30.01.2014 - 01:10DROPS Design answered:
Hej Dorte. Det er: F.nr 17, hvid: 400-450-500-550-600-650 gr F.nr 09, marineblå: 50-50-100-100-100-100 gr. Vi skal faa det tilföjet paa mönstret med det samme.
30.01.2014 - 10:31
![]() Anabelle wrote:
Anabelle wrote:
Bonjour, dans "dos et devants" je ne comprends pas où raccrocher les 18ml ? Par ailleurs au même endroit pour la taille S, de 287m nous arrivons à 199m, pourquoi ? Merci de votre réponse, je suis complètement bloquée.
25.12.2013 - 22:36DROPS Design answered:
Bonjour Anabelle, avant les emmanchures en taille S, on a bien 287 m. puis on forme les emmanchures en sautant les mailles du dessus des manches (on les reprendra ensuite pour faire les manches), que l'on remplace par 18 m pour la partie sous les manches et on a ainsi sur les 287 m = 40 m (devant), (on saute 62 m pour la manche), 18 ml (emmanchure) + 83 m (dos), (on saute 62 m pour la manche), 18 ml (emmanchure) + 40 m (devant) = 199m. Bon crochet!
27.12.2013 - 13:43
![]() Lucia wrote:
Lucia wrote:
PER I PRIMI AUMENTI: non riesco a capire ogni quante maglie devo fare i 32 aumenti lavorando il motivo m1 e come regolarmi per i successivi dato che c'e' un motivo da seguire anche se fatti su delle righe lavorate tutte a m. alta-grazie
17.12.2013 - 14:05
![]() Aljona wrote:
Aljona wrote:
Guten Tag.Ich hoffe, dass Sie mir weiterhelfen können. Ich habe angefangen die Jacke in der Größe M zu häkeln. Nach den 160 Lm habe ich die nächste Reihe, wie beschrieben, gehäkelt:1 Stb in die 4. Lm von der Nadel und dann abwechselnt 1Lm übersprungen und 1 Stb in jedes der nächsten 3Lm.Ich komme aber anschließend nicht auf die 119 Stb. Habe ich etwas falsch verstanden? Liebe Grüße
24.09.2013 - 00:02Aljona answered:
Ich habe meinen eigenen Fehler gefunden. Danke
24.09.2013 - 00:35
![]() Josiane wrote:
Josiane wrote:
Merci beaucoup. Ca y est j'y suis arrivée. En fait c'était tout simple mais je ne tenais pas mon gilet correctement. Encore un grand merci. Je suis déjà inscrite sur le forum. Cordialement
16.07.2013 - 22:40
![]() Josiane wrote:
Josiane wrote:
Merci pour votre réponse. J'avais bien compris qu'il fallait faire une bride dans le rang de brides mais ma question est comment faire ? Mon fil se trouve coincé derrière l'ouvrage, je n'y arrive pas. Si vous avez un lien ou une photo pour me montrer car je n'ai trouvé aucun renseignement sur le forum et Kalidou ne sait pas comment on fait Merci
16.07.2013 - 16:46DROPS Design answered:
Bonjour Josiane, prenez le gilet sur l'endroit, encolure devant vous et crochetez dans les brides du rang indiqué, toujours sur l'endroit, quand une autre bride a été faite, piquez dans la même maille, à côté, mais toujours sur l'endroit, votre fil doit rester "normalement" au-dessus de l'ouvrage, pas en dessous. N'hésitez pas à vous inscrire sur le forum DROPS si vous souhaitez une aide plus complète. Bon crochet !
16.07.2013 - 17:43
![]() Josiane wrote:
Josiane wrote:
Bonjour Je suis coincée. Comment relever (repiquer) les mailles pour faire la bordure ajourée le long de l'empiècement . Merci pour votre réponse
15.07.2013 - 13:32DROPS Design answered:
Bonjour Josiane, la bordure M.3 se crochète dans les mailles du rang 1 de M.1. Piquez le crochet dans toutes les brides de ce rang, même celles qui ont été crochetées pour l'empiècement (dans certaines brides, vous aurez ainsi 2 brides). Bon crochet !
15.07.2013 - 13:48
![]() Veerle wrote:
Veerle wrote:
Sorry, ik voel me een beetje lastig, maar...worden er misschien halve stokjes bedoeld (double crochet), in plaats van stokjes? Dan kom ik namelijk na 12 toeren wel uit op 10 cm. hoogte. Ik heb ook bij de andere proeflapjes strak gehaakt, in verschillende naalddiktes. Ook na het wassen worden dan 12 toeren echt geen 10 cm.!
28.05.2013 - 16:07DROPS Design answered:
Hoi Veerle. Het patroon is correct. Ik heb vanochtend zelf een proeflapje gehaakt en kom uit op de juiste afmetingen. Waarom het bij jouw niet lukt kan ik helaas niet zeggen.
29.05.2013 - 13:29
|
||||||||||||||||
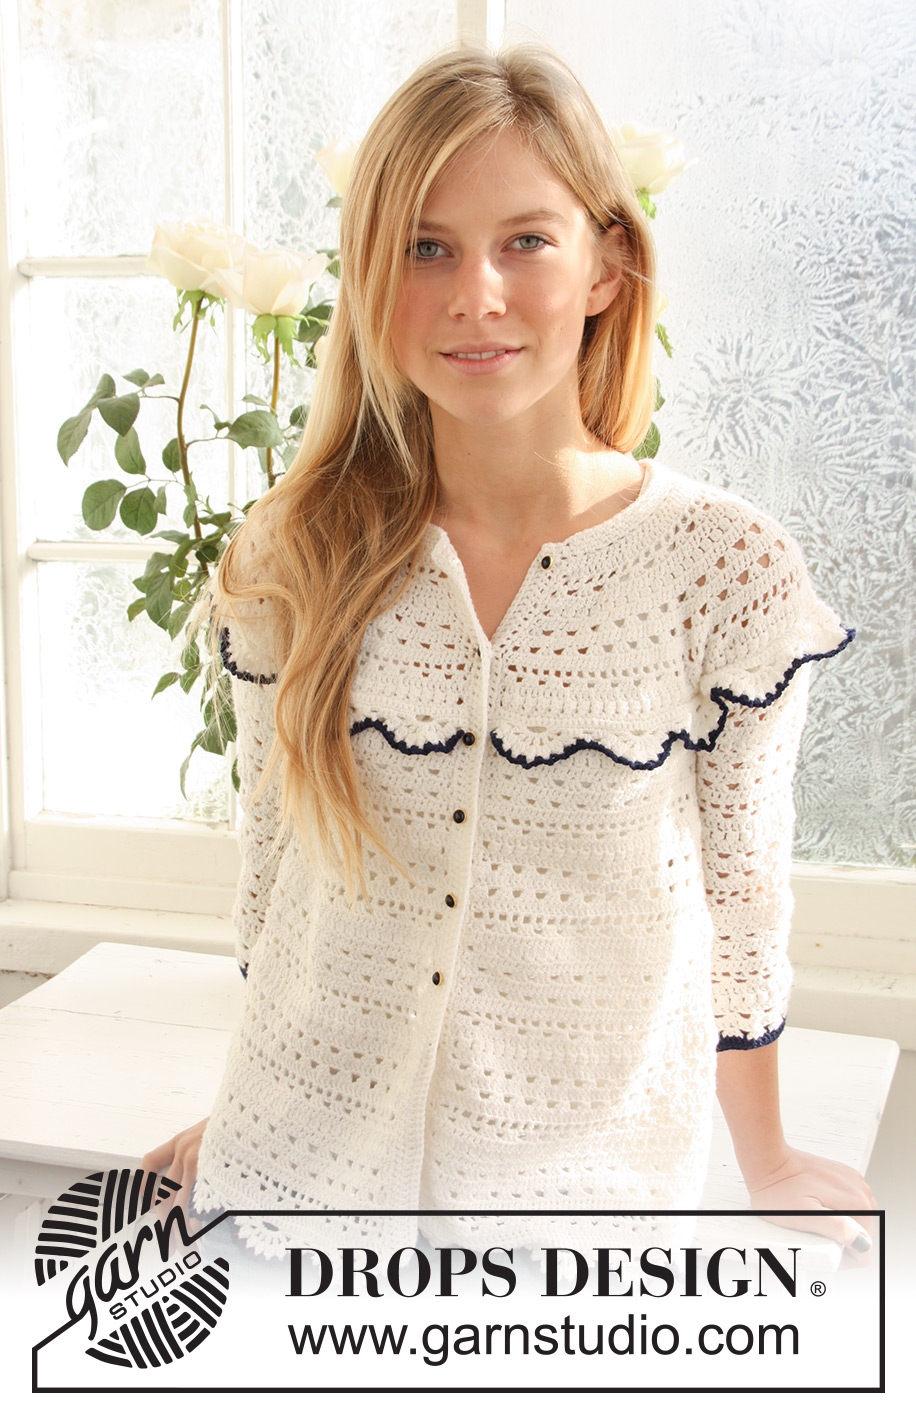
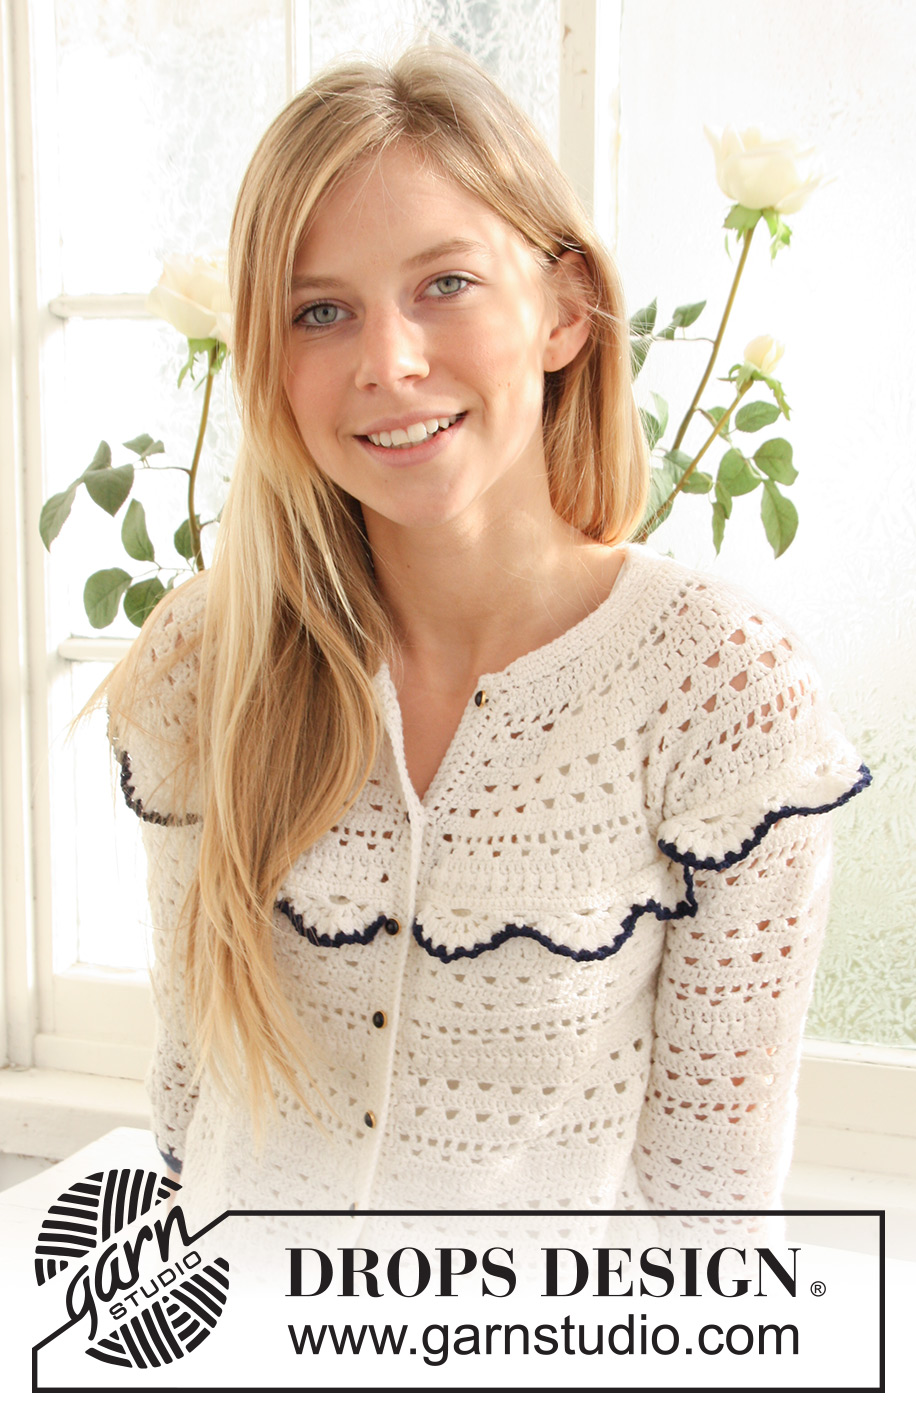
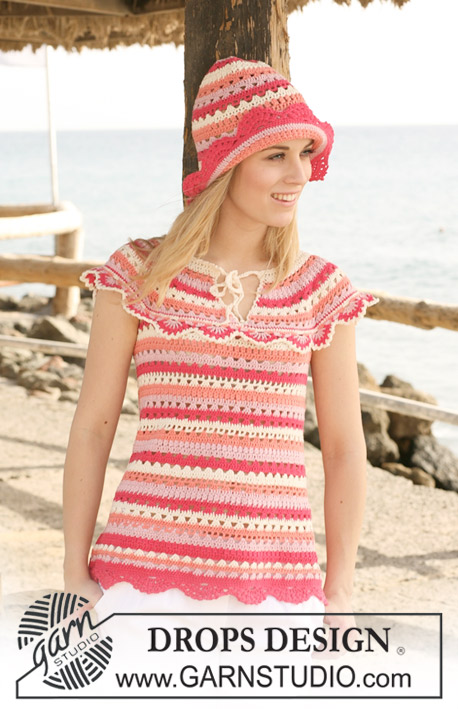
Afternoon Romance#afternoonromancecardigan |
||||||||||||||||
 |
 |
|||||||||||||||
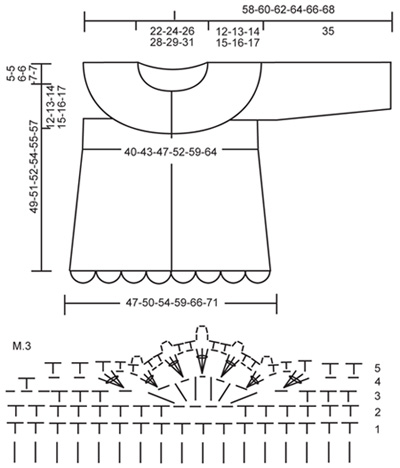
Crochet DROPS jacket with stripes and lace pattern in ”Safran”. Size XS - XXL.
DROPS 120-60 |
||||||||||||||||
|
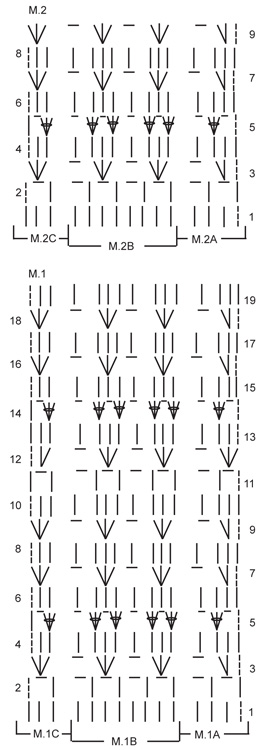
PATTERN: See diagram M.1 to M.3. STRIPES: Crochet stripes as follows: * 1 row off-white, 2 rows ice blue, 2 rows light blue/purple, 2 rows denim blue, 1 row off-white *, repeat from *-*. INCREASING TIP-1: Make all inc on rows in diagram with dc only (= row 1, 4, 6 or 8). Inc by working 2 dc in 1 dc. INCREASING TIP-2: Inc 1 sc by working 2 sc in 1 sc. DECREASING TIP: Make all dec on rows in diagram with dc only (= row 1, 4, 6 or 8). Dec 1 dc by working 1 dc but wait with the last pull-through (= 2 sts on hook). Crochet next dc but when doing the last pull-through pull thread through all sts on hook. 1 dec dc. CROCHET TIP: Replace 1 dc with 3 ch and 1 sc with 1 ch at beg of row. -------------------------------------------------------- -------------------------------------------------------- WHITE JACKET: Crochet the jacket the same way as the striped jacket but without stripes. On the sleeves crochet the 2 last rows with sc with navy blue. On lace borders crochet last row in M.3 with navy blue. STRIPED JACKET YOKE: Jacket is crochet from top down, back and forth from mid front. READ ALL OF THIS SECTION BEFORE BEG! Ch 139-150-160-171-182-192 with hook size 3 mm / C and off-white. Crochet 1 dc in 4th ch from hook and continue as follows: * skip 1 ch, crochet 1 dc in each of the next 3 ch *, repeat from *-* and finish with skip 1 ch and 1 dc in each of the last 2-1-3-2-1-3 ch = 103-111-119-127-135-143 dc. Turn piece. Work next row as follows (beg on row marked 1 in M.1): M.1A, repeat M.1B 12-13-14-15-16-17 times and finish with M.1C. AT THE SAME TIME crochet STRIPES - see above. AT THE SAME TIME on row 1 in diagram inc 32 dc evenly - see INCREASING TIP-1 = 135-143-151-159-167-175 dc. Repeat the inc on row 4 = 167-175-183-191-199-207 dc, on row 6 = 199-207-215-223-231-239 dc and on row 8 = 231-239-247-255-263-271 dc. Continue in M.1 and Stripes. AT THE SAME TIME on row 10 inc 40-48-32-32-32-32 dc evenly = 271-287-279-287-295-303 dc. SIZE XS + S: Continue in M.1 and Stripes until row 13-14 inclusive. Piece now measures approx 12-13 cm / 4¾"-5⅛". SIZE M: Continue in M.1 and Stripes. AT THE SAME TIME on row 13 inc 32 dc evenly = 311. Continue to row 16 inclusive. Piece now measures approx 14 cm / 5½". SIZE L + XL: Continue in M.1 and Stripes. AT THE SAME TIME on row 13 inc 24-32 dc evenly = 311-327 dc, and on row 15 inc 32-40 dc evenly = 343-367 dc. Continue to row 17 inclusive. Piece now measures approx 15-16 cm / 6"-6¼". Size XXL: Continue in M.1 and Stripes. AT THE SAME TIME on row 13 inc 32 dc evenly = 335 dc, and on row 15 inc 32 dc evenly = 367 dc, and on row 17 inc 40 dc evenly = 407 dc. Continue to row 19 inclusive. Piece now measures approx 17 cm / 6¾". BODY PIECE: Insert a marker, and now measure piece from here. Continue with Stripes as before and crochet next row as follows (from mid front) – see CROCHET TIP: Crochet 1 dc in each of the first 37-40-43-49-53-59 sts, skip 60-62-68-72-76-84 sts, ch 16-18-20-20-28-28, crochet 1 dc in each of the next 77-83-89-101-109-121 sts (= back piece), skip 60-62-68-72-76-84 sts, ch 16-18-20-20-28-28, crochet 1 dc in each of the last 37-40-43-49-53-59 sts. There are now a total of 183-199-215-239-271-295 sts on round. Continue in Stripes and M.2 as follows (NOTE! beg on row 2 in diagram): M.2C, M.2B on the next 176-192-208-232-264-288 sts, M.2A. Continue like this until piece measures approx 15 cm / 6" from marker (adjust so that next row in M.2 is a row with dc only). Now inc 8 dc evenly - see INCREASING TIP-1 – and repeat the inc on approx every 6 cm / 2⅜" a total of 4 times = 215-231-247-271-303-327 sts. When all inc are complete piece measures approx 33 cm / 13" from marker. Continue in M.2 and Stripes until stripe pattern is completed. Now continue in M.2 and crochet the next 3 stripes as follows: 1 row off-white, 1 row ice blue, 1 row light blue/purple. Now crochet 1 row denim blue, AT THE SAME TIME inc 4-5-6-16-1-11 dc evenly = 219-236-253-287-304-338 dc. LACE BORDER: Now crochet a border along bottom edge with denim blue as follows: Crochet M.3 on all sts. NOTE! Beg on row marked 1 in diagram, on the last repeat crochet on the remaining 15 sts to make pattern identical both sides towards mid front. See CROCHET TIP! After M.3 cut and fasten thread. LACE BORDER ON YOKE: Beg mid front with denim blue. Crochet 1 sc in each dc round the last row on yoke = 271-287-311-343-367-407 sc. Continue in M.3, beg on row marked 1 in diagram and AT THE SAME TIME on first row inc 50-51-44-46-56-50 sc evenly - see INCREASING TIP = 321-338-355-389-423-457 sc. NOTE! On the last repeat crochet on the remaining 15 sts to make pattern identical both sides towards mid front. AT THE SAME TIME crochet stripes as follows: row 1: off-white, row 2: ice blue, row 3: light blue/purple, row 4: denim blue, row 5: off-white. After M.3 cut and fasten thread. SLEEVE: Sleeve is worked back and forth under lace border on yoke. Continue with Stripes and M.2 as on body piece. NOTE! Cut the thread for each stripe, thread end to be used when sewing sleeve seam tog. First part of sleeve is sewn to the edge under sleeve on body piece – see ASSEMBLY Crochet 63-63-71-79-79-87 dc with denim blue on sleeve under lace border in the same sts in which lace border was crochet (i.e. crochet in the 60-62-68-72-76-84 dc skipped on body piece, at the same time inc 3-1-3-7-3-3 dc evenly). Insert a marker, and measure sleeve from here. Continue back and forth in Stripes as follows: M.2A, repeat M.2B on the next 56-56-64-72-72-80 sts, M.2C. AT THE SAME TIME when piece measures approx 7 cm / 2¾" from marker (adjust to a row in M.2 with dc only) dec 4 dc evenly - see DECREASING TIP = 59-59-67-75-75-83 dc. Continue as before. When sleeve measures approx 25 cm / 9¾" from marker (adjust to a row in M.2 with dc only) dec 4 dc evenly = 55-55-63-71-71-79 dc. Continue in Stripes and M.2 until there are 4 vertical repeats of M.2, sleeve now measures approx 33 cm / 13" from marker. Now crochet 1 dc in each dc with ice blue, then 1 sc in each dc with light blue/purple, and then 1 row denim blue with 1 sc in each sc. Cut and fasten thread. Crochet the other sleeve in the same way. LEFT FRONT BAND: Beg at the top of left front piece. Crochet with hook size 3 mm / C and denim blue as follows - see CROCHET TIP: Crochet 1 sc in corner and continue down along front piece as follows * ch 1, skip approx 0.5 to 1 cm/ ¼"-⅜", 1 sc * repeat from *-* and finish with 1 sc at bottom of front piece before lace border. Turn piece. Crochet 1 dc in each sc and in each ch back to neckline. Turn piece. Crochet 1 dc in each dc. Turn piece. Crochet 1 sc in each dc back to neck. Cut and fasten thread. RIGHT FRONT BAND: Crochet like left front band, but mirrored, i.e. beg at bottom edge. NECKLINE: Beg mid front, in corner on right front band. Crochet with hook size 3 mm / C and denim blue on front band and continue round neck as follows: 1 sc, * ch 1, skip approx 0.5 to 1 cm/ ¼"-⅜", 1 sc *, repeat from *-* and finish with 1 sc in corner on left front piece. Turn piece. Crochet 1 sc in each ch and 1 ch over each sc round neck. Turn piece. Crochet 1 sc in each ch and ch 1 over each sc. Turn piece. Crochet 1 sc in each ch and ch 1 over each sc round neck until 30 sts remain on right front piece (= 15 sc and 15 ch). Turn piece. Crochet 1 sc in each ch and ch 1 over each sc round the neck until 30 sts remain on left front piece. Turn piece. Crochet 1 sc in each ch and ch 1 over each sc round neck until 50 sts remain on right front piece (= 25 sc and 25 ch). Turn piece. Crochet 1 sc in each ch and ch 1 over each sc until 50 sts remain on left front piece. Cut the thread. Beg mid front on right front piece. Crochet 1 sc in each ch and ch 1 over each sc round the whole neck to mid front on left front piece. Cut and fasten thread. ASSEMBLY: Sew under arm seam tog, edge to edge, with thread ends from color changes. Sew the top 3.5-4-4.5-4.5-6-6 cm / 1¼"-1½"-1¾"-1¾"-2⅜"-2⅜" to the edge under sleeve on body piece. Sew buttons to left front band. Place the top button approx 1 cm / ⅜" from top of neckline, the bottom one approx 9 to 12 cm / 3½"-4¾" from bottom edge and the remaining 5 with approx 6.5-7-7-7-7.5-7.5 cm / 2½"-2¾"-2¾"-2¾"-2⅞"-2⅞" between each. Use second dc row on right front band as buttonholes |
||||||||||||||||
Diagram explanations |
||||||||||||||||
|
||||||||||||||||
 |
||||||||||||||||
 |
||||||||||||||||
Have you finished this pattern?Tag your pictures with #dropspattern #afternoonromancecardigan or submit them to the #dropsfan gallery. Do you need help with this pattern?You'll find 7 tutorial videos, a Comments/Questions area and more by visiting the pattern on garnstudio.com. © 1982-2026 DROPS Design A/S. We reserve all rights. This document, including all its sub-sections, has copyrights. Read more about what you can do with our patterns at the bottom of each pattern on our site. |
||||||||||||||||


With over 40 years in knitting and crochet design, DROPS Design offers one of the most extensive collections of free patterns on the internet - translated to 17 languages. As of today we count 324 catalogs and 12291 patterns - 12281 of which are translated into English (US/in).
We work hard to bring you the best knitting and crochet have to offer, inspiration and advice as well as great quality yarns at incredible prices! Would you like to use our patterns for other than personal use? You can read what you are allowed to do in the Copyright text at the bottom of all our patterns. Happy crafting!
Post a comment to pattern DROPS 120-60
We would love to hear what you have to say about this pattern!
If you want to leave a question, please make sure you select the correct category in the form below, to speed up the answering process. Required fields are marked *.