
Popular categories
Looking for a yarn?


Comments / Questions (127)
![]() Emese Benedek-Kováts wrote:
Emese Benedek-Kováts wrote:
Azt hiszem, megvan a válasz. Akkor a karöltőnél kell a 8 sor szaporítás után a köv sorban az egyszerre 8 szem, ugye? Köszönöm
14.09.2017 - 11:59DROPS Design answered:
Kedves Emese, igen, a 8 sornyi egy-egy szem szaporítása után egyszerre kell több szemet szaporítani, így alakul ki a karöltő íve.
18.09.2017 - 00:39
![]() Benedek-Kováts Emese wrote:
Benedek-Kováts Emese wrote:
Kedves Drops csapat! A mellény elejének horgolásánál nem értem a szemszám számolását. L-es méret összes szaporítás után 51et ír. De: ha a karöltőt úgy készítem, ahogy a hátán, akkor 8soron át szaporítok, de itt csak egyet kell soronként, mert egyszerre egyik oldal, viszont duplán van számolva, így jön ki az 51, de ha karöltőhöz csak a váll felől, a nyakhoz csak a közepe felé szaporítok, akkor 17+8+18=43 szem lesz. Előre is köszönöm a segítséget! Emese
12.09.2017 - 20:37DROPS Design answered:
Kedves Emese, ahogy már sikerült tisztázni, 8 sornyi egy-egy szem szaporítása után egyszerre kell több szemet szaporítani, így alakul ki a karöltő íve. Sikeres kézimunkázást!
08.10.2017 - 22:56
![]() Frouk wrote:
Frouk wrote:
Kan iemand mij zeggen hoe ze aan de voorpanden aan de 71stokjes komen? Als ik de 17 stokjes en de 21 middenvoor en de 17 aan de armsgat heb gehaakt dan kom ik op 55 stokjes???? mvg frouk
07.06.2017 - 18:51DROPS Design answered:
Hoi Frouk, Nadat je de 17 stokjes gemeerderd hebt voor het armgsgat, zet je ook nog eens een aantal steken extra op (door lossen te haken waar je op de volgende toer stokjes op haakt). Dan kom je wel op de 71 steken.
09.06.2017 - 08:37
![]() Marina wrote:
Marina wrote:
Hallo, ich habe eine Denkblokade. Und zwar. Bei dem Rückenteil muss ich an beiden Seiten 11LM zunehmen, wenden und Stb. häkeln. 1. Seite krieg ich hin, häkel in Stb zurück. Kommen die LM auf der anderen Seite nicht automatisch eine Reihe tiefer? Ich kriege das nicht hin.
01.10.2016 - 22:58DROPS Design answered:
Liebe Marina, das stimmt, dieser Unterschied wird aber bein den beiden Vorderteile ausgeglichen.
03.10.2016 - 09:22Char wrote:
Voor maat m meerder je voor de hals 18 x en voor de mouw 8 x. Is totaal 26 steken. Je komt dan op 43 steken en niet op 51 steken zoals jullie beschrijven. Je moet in het patroon van voorpand voor het meerderen van de mouw naar de beschrijving in het achterpand kijken. Voor achterpand heb je 2 mouwen en dan meerder je 16 steken. Het lijkt alsof jullie die optelling ook voor het voorpand hebben gebruikt.
10.06.2016 - 12:03DROPS Design answered:
Hoi Char. Je meerdert aan de zijkant = 8 keer = 43 st inclusief de st voor langs middenvoor. Maar je moet hier ook meerderen met 10 l aan het einde aan de zijkant, keren haak 1 stk in 4e l van de haak en 1 stk in iedere van de volgende 6 + 8 stk = 51 stk op de toer.
10.06.2016 - 14:45
![]() Ingrid wrote:
Ingrid wrote:
Snap niet hoe ik moet uitrekenen hoeveel ik moet opzetten voor maat xl.
22.02.2016 - 08:16DROPS Design answered:
Hoi Ingrid. Maat XL is de tweedelaatste maat, dus je gebruikt tweedelaatste getal in het patroon. Je begint alle maten met 23 lossen en haakt tot toer 4. Hier komen de werkwijze per maat: TOER 4: 1 stk in ieder stk als hiervoor, haak aan het einde van de toer op het rechter achterpand 30-33-35-38-40-43 l (= hals middenachter), dan 1 stk in ieder stk op het linker achterpand, keer het werk. = Je haakt 40 l voor maat XL.
22.02.2016 - 13:45
![]() Monika Springmann wrote:
Monika Springmann wrote:
Hallo ich möchte gerne die Damenweste 118-26 häkeln. Gibt ausser Ihrer Anleitung vielleicht auch eine sogenannte Häkelschrift? Das wäre nicht schlecht. Liebe Grüsse
20.02.2016 - 12:51DROPS Design answered:
Leider haben wir keine Häkelschrift zu der Weste, aber das Muster ist nicht so schwierig und Sie werden den Rhythmus schnell erkennen, wenn Sie das Muster nach der geschriebenen Anleitung häkeln.
24.02.2016 - 19:43Nancy Kiefer wrote:
Row 2 right front piece done to 2 in ĺñc 1dc to mid front to 3.5 then inc for armhole do 20 time but I only come up with 56 dc on roll not 63 for xl
09.02.2016 - 18:42DROPS Design answered:
Dear Mrs Kiefer, you in 20 sts for neckline and 26 sts for armhole as on back piece: 1 st 13 times + 15 ch on the side, 1 dc in 4th ch from hook, 1 dc in each of the next 11 ch = 13 dc. 17+20+26= 63 dc. Happy crocheting!
10.02.2016 - 10:07
![]() Claudia wrote:
Claudia wrote:
Ich bin noch Anfänger und dies ist meine erste Weste. Der folgende Punkt ist mir völlig unklar. Hintere Schulter Bei der nächsten R. am Anfang und am Schluss der R. 7-8-10-11-15-18 Lm häkeln, die Arbeit drehen und 1 Stb in die 4. Lm häkeln, danach je 1 Stb in jede der 3-4-6-7-11-14 nächsten Lm. Ich habe 8 Lm, drehe die Arbeit, häkel die Stb in die Lm und dann hängt da dieser Zipfel. Was verstehe ich falsch?
05.10.2015 - 20:24DROPS Design answered:
"Die Arbeit drehen" soll heißen, dass Sie die Arbeit wenden, Sie häkeln also einfach die Reihe, die Sie um die entsprechende Anzahl Lm ergänzt haben, wieder zurück. Dabei handelt es sich ja um die Erweiterung der Breite des Rückenteils für den Armausschnitt, also das, was sich dann an der Seite unter dem Arm befindet.
13.10.2015 - 16:06
![]() Edith Hoekstra wrote:
Edith Hoekstra wrote:
In het patroon bij het rugpand wordt gezegd dat er na 12 cm (voor maat medium) moet worden gemeerderd. Mijn vraag: Is dit 12 cm inclusief de hoogte van de schouders of exclusief, dus vanaf de halslijn? Hartelijk dank bij voorbaat voor uw reactie!
08.07.2015 - 00:34DROPS Design answered:
Hoi Edith. Het is de totale hoogte - dus vanaf je opzetnld
30.07.2015 - 13:53
|
|
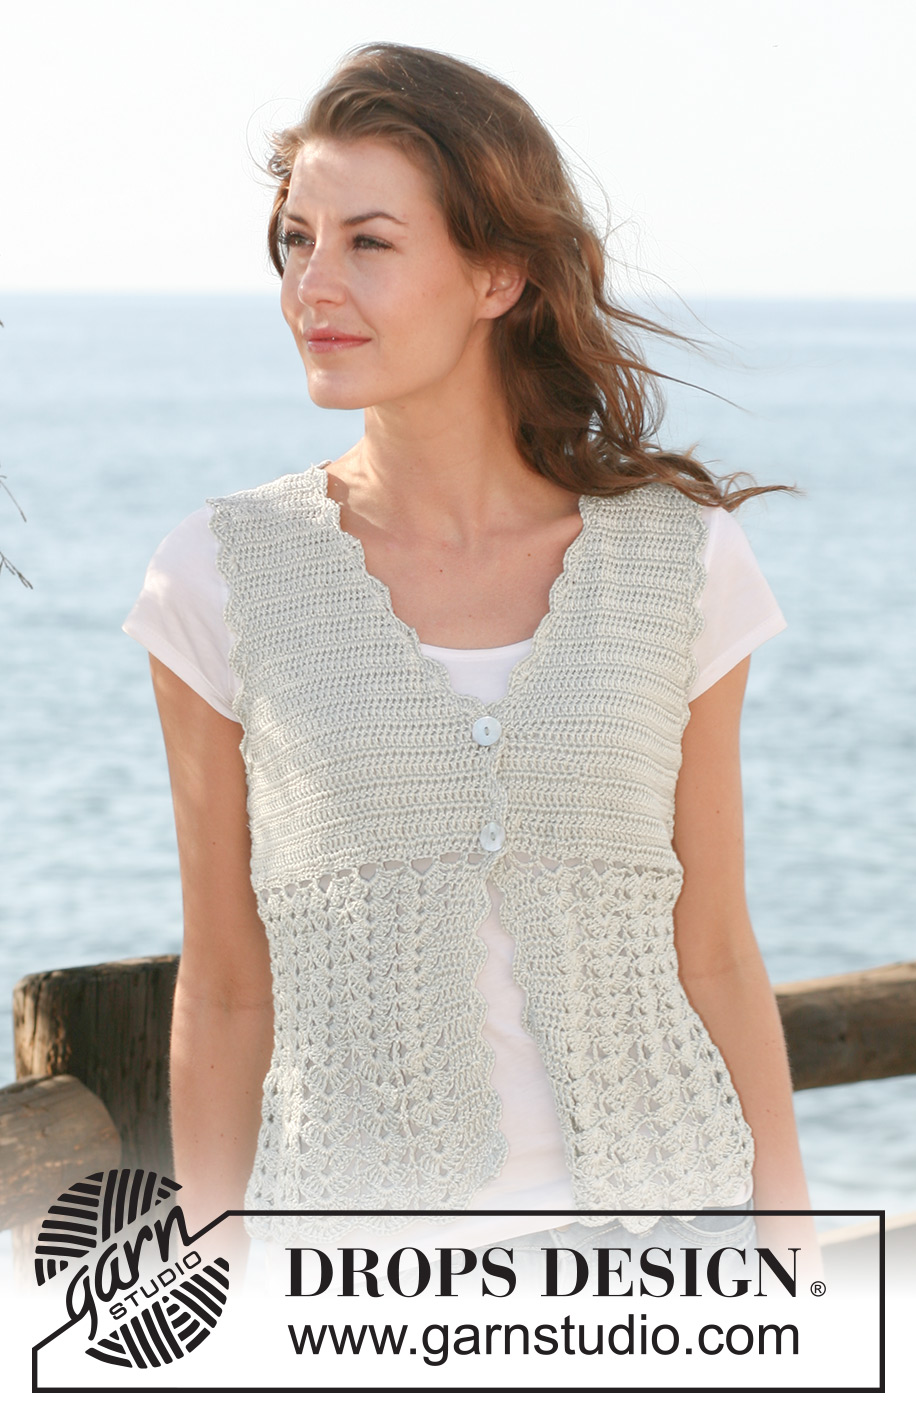
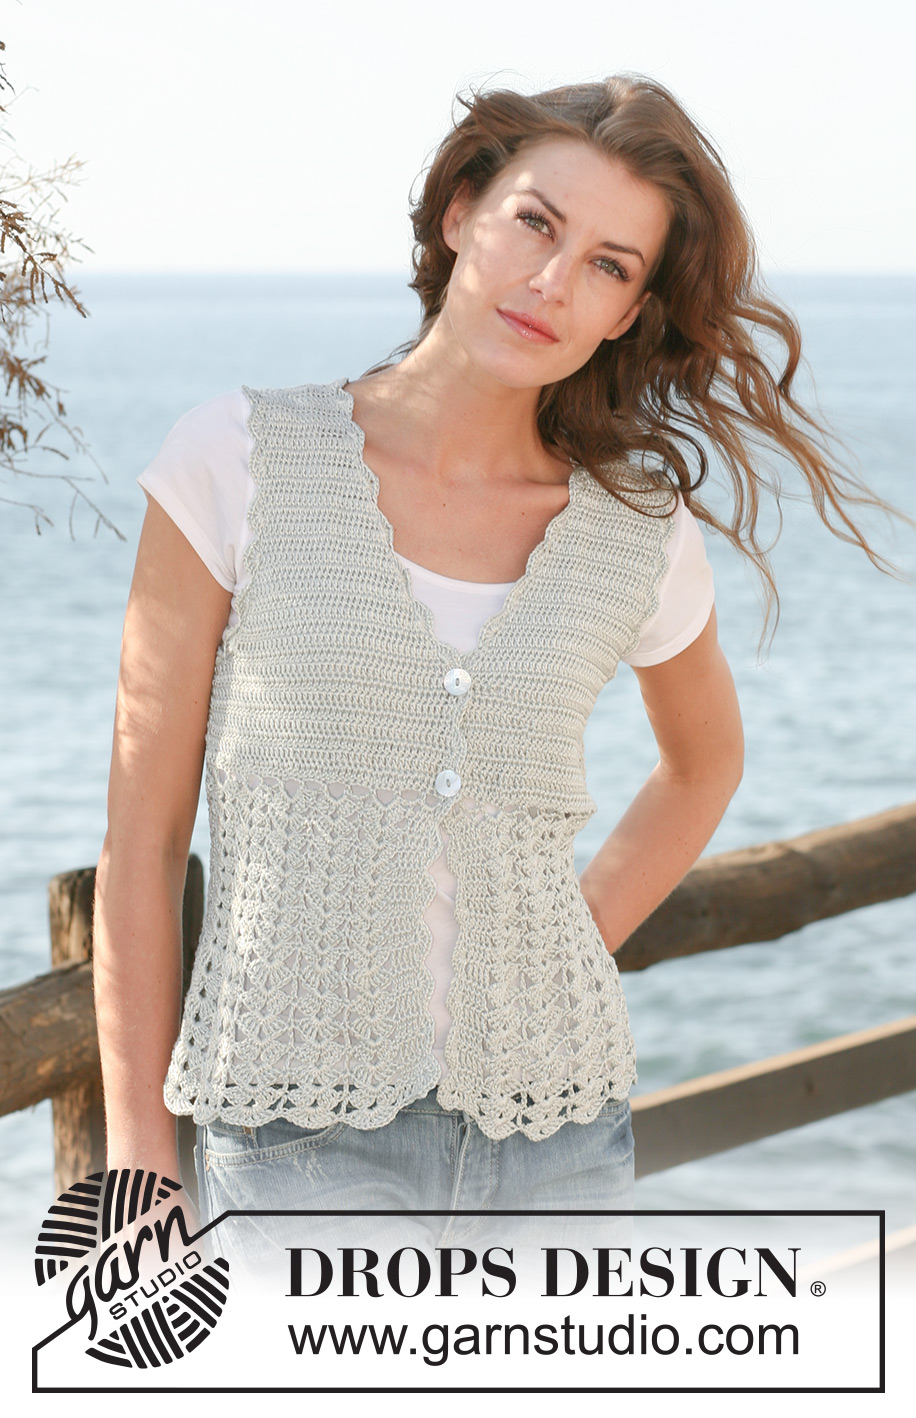
Vested lnterest#vestedlnterestvest |
|
 |
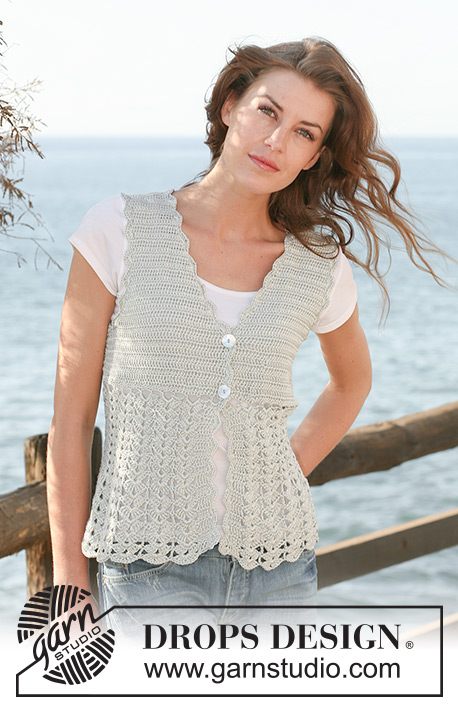 |
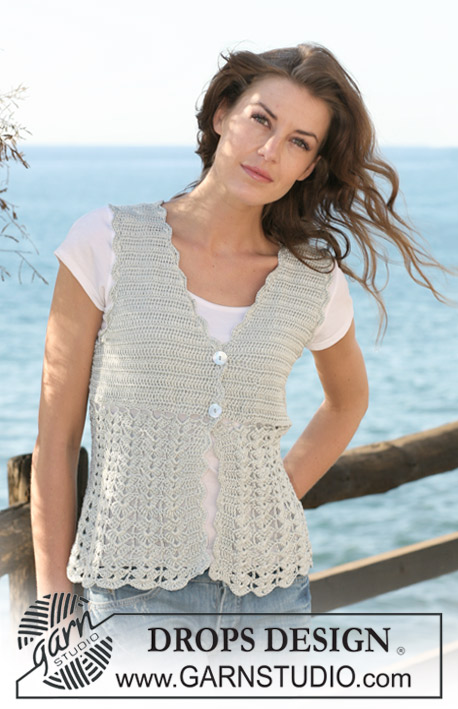
Crochet DROPS waistcoat with fan pattern in ”Cotton Viscose”. Size XS - XXL.
DROPS 118-26 |
|
|
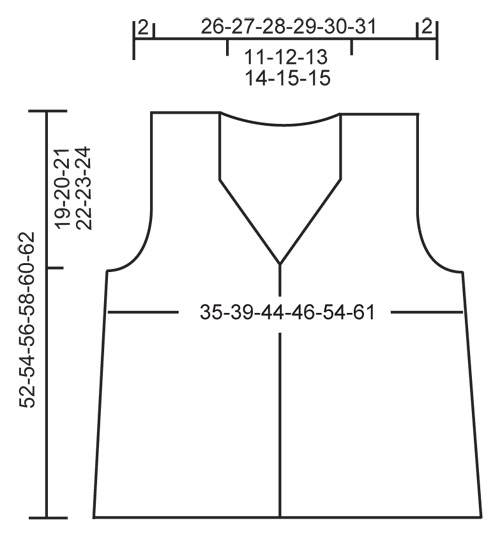
CROCHET TIP: Replace first dc on row with 3 ch, and finish row with 1 dc in 3rd ch from previous row. Replace first tr on row with 4 ch, and finish row with 1 tr in 4th ch from previous row. -------------------------------------------------------- -------------------------------------------------------- WAISTCOAT: Back piece and both front pieces crochet from shoulder and down. Then the pieces are sewn tog and the body piece of waistcoat is crochet in fan pattern from the yoke towards bottom edge. LEFT SHOULDER BACK PIECE (when placed flat): Crochet 23 LOOSE ch with hook size 3.5 mm/E/4 and Cotton Viscose. ROW 1: Crochet 1 dc in 4th ch from hook, *skip 1 ch, 1 dc in each of the next 4 ch *, repeat from *-* and finish with skip 1 ch and 1 dc in each of the last 3 ch = 17 dc. ROW 2: See CROCHET TIP! Crochet 1 dc in each dc. ROW 3: Crochet 1 dc in each dc. Put piece aside and crochet RIGHT SHOULDER on back piece in the same way, turn piece. ROW 4: 1 dc in each dc as before, at the end of row on right back piece crochet 30-33-35-38-40-43 ch (= neckline mid back), then 1 dc in each dc on left back piece, turn piece. ROW 5: 1 dc in each dc on left back piece, 1 dc in each of the first 2-1-2-1-2-1 ch, * skip 1 ch, 1 dc in each of the next 4 ch *, repeat from *-* a total of 5-6-6-7-7-8 times, skip 1 ch, 1 dc in each of the last 2-1-2-1-2-1 ch, crochet 1 dc in each dc from right back piece. There are now 58-60-62-64-66-68 dc on row. Continue with 1 dc in each dc. AT THE SAME TIME when piece measures 13-12-12-11-9-6 cm / 5⅛"-4¾"-4¾"-4⅜"-3½"-2⅜" inc for armhole each side. Inc 1 dc at the beg and at the end of every row, and repeat the inc a total of 5-7-8-10-13-17 times each side by working 2 dc in the outermost dc. On next row ch 7-8-10-11-15-18 at the end of row, turn and crochet 1 dc in 4th ch from hook and 1 dc in each of the next 3-4-6-7-11-14 ch. Repeat the other side = 78-86-94-102-118-134 dc. Continue with 1 dc in each dc until back measures 25-27-29-31-33-35 cm / 9¾"-10⅝"-11⅜"-12¼"-13"-13¾". Put piece aside. RIGHT FRONT PIECE: Crochet 23 LOOSE ch on hook size 3.5 mm/E/4 with Cotton Viscose. ROW 1: Crochet 1 dc in 4th ch from hook, *skip 1 ch, 1 dc in each of the next 4 ch *, repeat from *-* and finish with skip 1 ch and crochet 1 dc in each of the last 3 ch = 17 dc. ROW 2: See CROCHET TIP! Crochet 1 dc in each dc. Continue with 1 dc in each dc, AT THE SAME TIME when piece measures 5 cm / 2" inc for neckline towards mid front. Inc 1 dc at the end and the beg of every row towards mid front by working 2 dc in outermost dc a total of 16-17-18-19-20-21 times. AT THE SAME TIME when piece measures 13-12-12-11-9-6 cm / 5⅛"-4¾"-4¾"-4⅜"-3½"-2⅜" inc for armhole at the side as described for back piece. When all inc are complete there are 43-47-51-55-63-71 dc on row. Continue with 1 dc in each dc until piece measures 25-27-29-31-33-35 cm / 9¾"-10⅝"-11⅜"-12¼"-13"-13¾" – adjust to back piece. Put piece aside and crochet left front piece. LEFT FRONT PIECE: Like right front piece. ASSEMBLY: Sew shoulder seams edge to edge. Sew side seams edge to edge. There are now 164-180-196-212-244-276 dc along bottom edge. FAN PATTERN: Continue back and forth from mid front as follows – see CROCHET TIP! ROW 1: 1 dc in each dc = 164-180-196-212-244-276 dc, turn piece. ROW 2: 1 dc in each dc, AT THE SAME TIME inc 32 dc evenly = 196-212-228-244-276-308 dc. ROW 3: * ch 4, skip 3 sts, 1 sc in next dc *, repeat from *-* on all sts = 49-53-57-61-69-77 ch-loops, turn piece. ROW 4: 4 dc in first ch-loop, 1 dc in next ch-loop, * 4 dc + 2 ch + 4 dc in next ch-loop, 1 dc in next ch-loop *, repeat from *-* until 1 ch-loop remain, and finish with 4 dc in this ch-loop = 23-25-27-29-33-37 fans with 4 dc (= front band) each side towards mid front, turn piece. ROW 5: 1 dc in each of the first 4 dc (= front band), 1 dc in next dc, * 4 dc + 2 ch + 4 dc in the middle of next dc-group (i.e. in 2 ch in dc-group), 1 dc in next dc *, repeat from *-* until 4 dc remain, and finish with 1 dc in each dc (= front band). Repeat row 5 until piece measures approx 40-42-44-46-48-50 cm / 15¾"-16½"-17¼"-18"-19"-19¾" from shoulder. NEXT ROW: 1 tr in each of the first 4 dc, 1 tr in next dc, * 4 tr + 2 ch + 4 tr in the middle of next dc-group, 1 tr in next dc *, repeat from *-* until 4 dc remain, and finish with 1 tr in each dc. Repeat this row until piece measures approx 52-54-56-58-60-62 cm / 20½"-21¼"-22"-22¾"-23⅝"-24⅜" from shoulder. Cut and fasten thread. Sew buttons on left front band over fan pattern. Use gaps between dc on right front band as buttonholes. CROCHET BORDER: Crochet a border with hook size 3.5 mm/E/4 and Cotton Viscose round opening as follows, beg at bottom of right front piece: 1 sc in first st, * skip approx 2 cm / ¾", 3 dc + 2 ch + 3 dc in next st, skip approx 2 cm / ¾", 1 sc in next st *, repeat from *-* up along right front piece, along neckline and down along left front piece. Crochet a similar border round armholes. |
|
 |
|
Have you finished this pattern?Tag your pictures with #dropspattern #vestedlnterestvest or submit them to the #dropsfan gallery. Do you need help with this pattern?You'll find 7 tutorial videos, a Comments/Questions area and more by visiting the pattern on garnstudio.com. © 1982-2026 DROPS Design A/S. We reserve all rights. This document, including all its sub-sections, has copyrights. Read more about what you can do with our patterns at the bottom of each pattern on our site. |
|


With over 40 years in knitting and crochet design, DROPS Design offers one of the most extensive collections of free patterns on the internet - translated to 17 languages. As of today we count 325 catalogs and 12298 patterns - 12288 of which are translated into English (US/in).
We work hard to bring you the best knitting and crochet have to offer, inspiration and advice as well as great quality yarns at incredible prices! Would you like to use our patterns for other than personal use? You can read what you are allowed to do in the Copyright text at the bottom of all our patterns. Happy crafting!
Post a comment to pattern DROPS 118-26
We would love to hear what you have to say about this pattern!
If you want to leave a question, please make sure you select the correct category in the form below, to speed up the answering process. Required fields are marked *.