
Popular categories
Looking for a yarn?


Comments / Questions (45)
![]() Andrea wrote:
Andrea wrote:
I haven't made this hat, but can suggest you try this. If using a pattern that calls for a M IN the stitch, I would use a safety pin so it would mark the actual stitch as well as be easy to move up as required. Hope this helps. Happy Knitting!!!
18.01.2010 - 19:54
![]() Drops Design wrote:
Drops Design wrote:
Yes you are supposed to mark the stitch, you can either tie a little piece of scrap yarn in the stitch, use a paper clip, safety pin... If you are using stitch markers that have a ring that you put on the needle, you can decide to either put it before or after each stitch you are supposed to mark.
18.01.2010 - 19:49Marjana wrote:
"M-1 in first st on row"and "M-2 in st 11" etc. Does this mean I place the marker on the stich number 1 and 11 themselves? How? I thought markers are placed on the needle, between the stiches. And if this is correct,do I place M-1 before or after the first stich and M-2 before or after stich number 11? Pls reply urgently. Thanks and regards, Marjana
17.01.2010 - 21:41Agnieszka Knitting wrote:
Thanks a lot. That video is very good :) And the hat, I have finished looks wonderfull :)
03.12.2009 - 12:31
![]() Drops Design wrote:
Drops Design wrote:
There is a link in the pattern to a tutorial video on how to sew hat together. If it doesn't help I'm sure you will get help in the shop where you bought the yarn.
02.12.2009 - 18:04Agnieszka Knitting wrote:
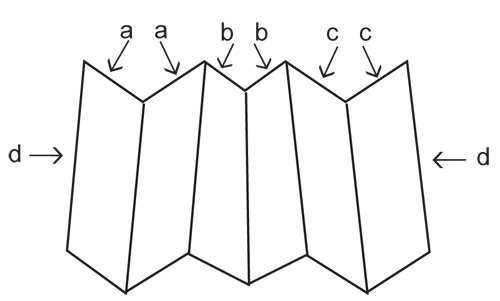
Im not sure how to bind off. During the K1, K2 tog row by psso? and should it be RS or WS? And Im not sure how to sew the hat: what does it mean i.e. 2 whole points and 2 half points? - markers or something else?? and is the all bind off row only a, b and c at the diagram? and d is the whole edge??
02.12.2009 - 17:37
![]() Drops Design wrote:
Drops Design wrote:
Du feller av SAMTIDIG som du strikker 1 re.,2 re. sammen.
19.01.2009 - 12:27
![]() Margrethe wrote:
Margrethe wrote:
Er det bare èn pinne som skal strikkes når du feller av, eller skal man strikke 1r og 2r sammen til det ikke er flere masker igjen?
18.01.2009 - 20:25
![]() Drops Design wrote:
Drops Design wrote:
I det du strikker 2 sammen feller du en maske.
03.01.2009 - 21:02
![]() Hilde Sophie wrote:
Hilde Sophie wrote:
....hvordan kan jeg felle av samtidig som jeg strikker 1r og 2 r sammen....?
03.01.2009 - 19:42
|
|||||||||||||
Pilot Cuddles#pilotcuddlesbonnet |
|||||||||||||
|
|
|||||||||||||
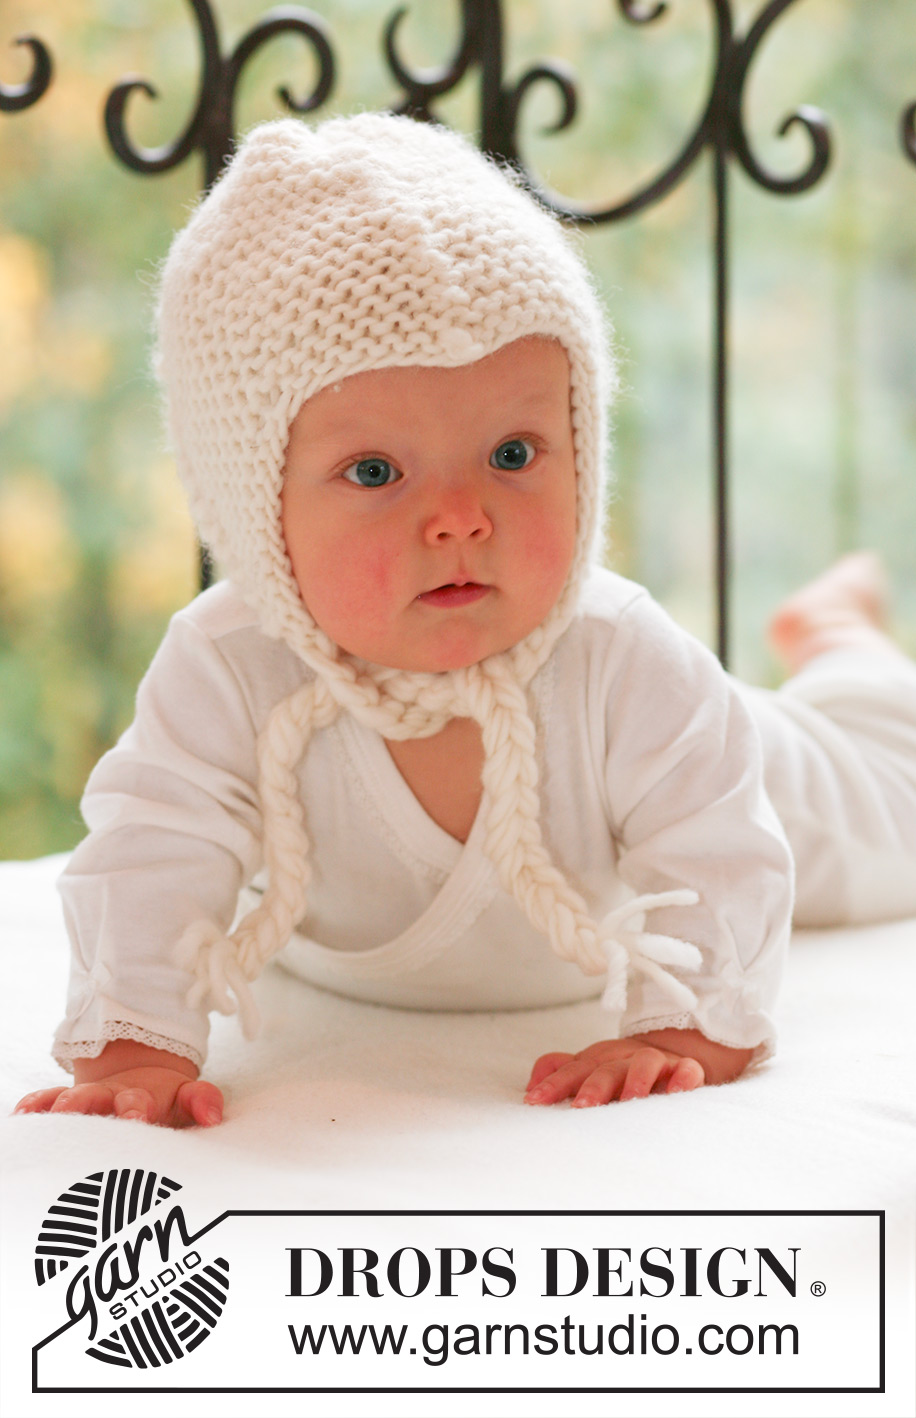
Knitted bonnet in garter st for baby and children in DROPS Snow or DROPS Wish
DROPS Baby 16-12 |
|||||||||||||
|
GARTER ST (back and forth on needle): K all rows. INCREASING TIP: Make all inc from RS. Inc 1 st before and after st with marker by making 1 YO. Work YO into back of loop on return row to avoid a hole. DECREASING TIP: Make all dec from RS. Dec 1 st on each side of st with marker as follows: Slip st before st with marker on cable needle behind piece, slip 1 st as if to K, (= st with marker), K tog next st and st on cable needle, psso (= st with marker). ------------------------------------------------------------ HAT: Worked back and forth on needle in garter st – SEE ABOVE. Cast on 57-61-65 (67-67) sts on needle size 7 mm [US 10 ½] with Snow or Wish. K 1 row from WS and turn piece. Insert 7 markers in piece from RS as follows: M-1 in first st on row M-2 in st 11-12-13(14-15) M-3 in st 21-23-25(27-29) M-4 in st 29-31-33(34-34) M-5 in st 37-39-41(41-39) M-6 in st 47-50-53(54-53) M-7 in last st on row Continue in garter st – AT THE SAME TIME inc and dec as follows – SEE INCREASING AND DECREASING TIP: Inc 1 st after M-1 on every other row, Dec 1 st on each side of M-2 on every other row, Inc 1 st before M-3 on every other row, Inc 1 st after M-3 on every 4th row, Dec 1 st on each side of M-4 on every 4th row, Inc 1 st before M-5 on every 4th row, Inc 1 st after M-5 on every other row, Dec 1 st on each side of M-6 on every other row, Inc 1 st before M-7 on every other row. NOTE: Make sure no of sts remain the same. Continue to inc and dec like this until piece measures 13-15-16 (18-19) cm [5⅛"-6"-6¼" (7"-7½")] (measured from lowest point by M-2 or M-6). Now work next row as follows: * K1, K2 tog *, repeat from *-*, AT THE SAME TIME as casting/binding off. ASSEMBLY: Back of hat = bind off row, i.e. 2 whole points and 2 half points. The middle of the 3 whole points on the opposite side of piece = cast on row, sits at middle of forehead. Sew hat tog, edge to edge along bind off row as follows: Sew first half point to one side of the first whole point. Sew the other side of first whole point to one side of second whole point. Then the other side of second whole point to the last half point. Now sew hat tog mid back – make sure to sew edge to edge to avoid a chunky seam TIE STRINGS: Crochet tie strings with 4 threads Snow or Wish and crochet hook size 10 mm [N/15]. Beg with 1 dc in the bottom of point on one side, crochet a chain string of approx 20-22-24 (26-28) cm [8"-8¾"-9½" (10¼"-11")], cut the thread and pull through the last loop. Repeat at the other side. |
|||||||||||||
Diagram explanations |
|||||||||||||
|
|||||||||||||
 |
|||||||||||||
Have you finished this pattern?Tag your pictures with #dropspattern #pilotcuddlesbonnet or submit them to the #dropsfan gallery. Do you need help with this pattern?You'll find 10 tutorial videos, a Comments/Questions area and more by visiting the pattern on garnstudio.com. © 1982-2026 DROPS Design A/S. We reserve all rights. This document, including all its sub-sections, has copyrights. Read more about what you can do with our patterns at the bottom of each pattern on our site. |
|||||||||||||


With over 40 years in knitting and crochet design, DROPS Design offers one of the most extensive collections of free patterns on the internet - translated to 17 languages. As of today we count 325 catalogs and 12298 patterns - 12288 of which are translated into English (US/in).
We work hard to bring you the best knitting and crochet have to offer, inspiration and advice as well as great quality yarns at incredible prices! Would you like to use our patterns for other than personal use? You can read what you are allowed to do in the Copyright text at the bottom of all our patterns. Happy crafting!
Post a comment to pattern DROPS Baby 16-12
We would love to hear what you have to say about this pattern!
If you want to leave a question, please make sure you select the correct category in the form below, to speed up the answering process. Required fields are marked *.