
Popular categories
Looking for a yarn?


Comments / Questions (45)
SELAM wrote:
But then it will be on the WR side?what row number is the every forth from row 1 K ALL( WS)?
10.09.2013 - 11:13DROPS Design answered:
Dear Selam, you will dec that way : *RS: inc before 3rd marker and after 3rd marker. WS: work 1 row - RS: inc before 3rd marker - WS: work 1 row * so that inc before 3rd marker is done every 2nd row = every ridge from RS, and inc after 3rd marker is worked every 4th row, ie every 2 ridge from RS. Happy knitting!
10.09.2013 - 13:25SELAM wrote:
But then it will be on the WR side?what row number is the every forth from row 1 K ALL( WS)?
10.09.2013 - 11:12
![]() Selam wrote:
Selam wrote:
I still do not understand for example M3 will the inc before and after M occure on top of each other?
10.09.2013 - 10:22DROPS Design answered:
Dear Mrs Selam, inc have to be made each side of the st with marker : you will inc 1 st before 3rd marker every other row, and you will inc 1 st after 3rd marker every 4th row. Happy knitting!
10.09.2013 - 10:52Selam wrote:
Hi, how do I do the decreases that occur every forth row if all decrease has to be done from RS? please explain. thank you in advance
10.09.2013 - 00:23DROPS Design answered:
Dear Selam, first dec will be done from RS, work then 3 rows, and on next row (RS), dec once again = your dec will be every 4th row. Happy knitting!
10.09.2013 - 09:36
![]() Farah.woods wrote:
Farah.woods wrote:
Vielen Dank für einen weiteren informativen Website . Wo sonst könnte ich diese Art von Informationen in einer solchen idealer Weise geschrieben? Ich habe ein Projekt , dass ich gerade jetzt arbeiten , und ich habe auf der Suche nach solchen Informationen gewesen. besten Wünsche
27.11.2012 - 05:05
![]() Cobie Van Der Toorn wrote:
Cobie Van Der Toorn wrote:
Wat betekent in het patroon m1, m2, m3, enz, datis mij niet duidelijk
15.11.2012 - 13:12DROPS Design answered:
M = markeerder. Je plaatst 7 in het werk in de st aangegeven in het patroon
16.11.2012 - 17:12
![]() Paula Dias wrote:
Paula Dias wrote:
Gostava da vossa ajuda para perceber o que querem dizer com marcadores, na explicação do modelo referenciado. Obrigada
16.11.2011 - 15:00
![]() Cali29 wrote:
Cali29 wrote:
Très joli modèle et très rapide à tricoter.
24.04.2010 - 23:09
![]() Ida wrote:
Ida wrote:
Riktigt snabbstickad även för mig som stickar långsamt. Blir jämn och fin. Toppen!
08.02.2010 - 19:36Marjana wrote:
Thank you Andrea, thank you Drops Design! Have a peaceful night. Marjana
18.01.2010 - 23:11
|
|||||||||||||
Pilot Cuddles#pilotcuddlesbonnet |
|||||||||||||
|
|
|||||||||||||
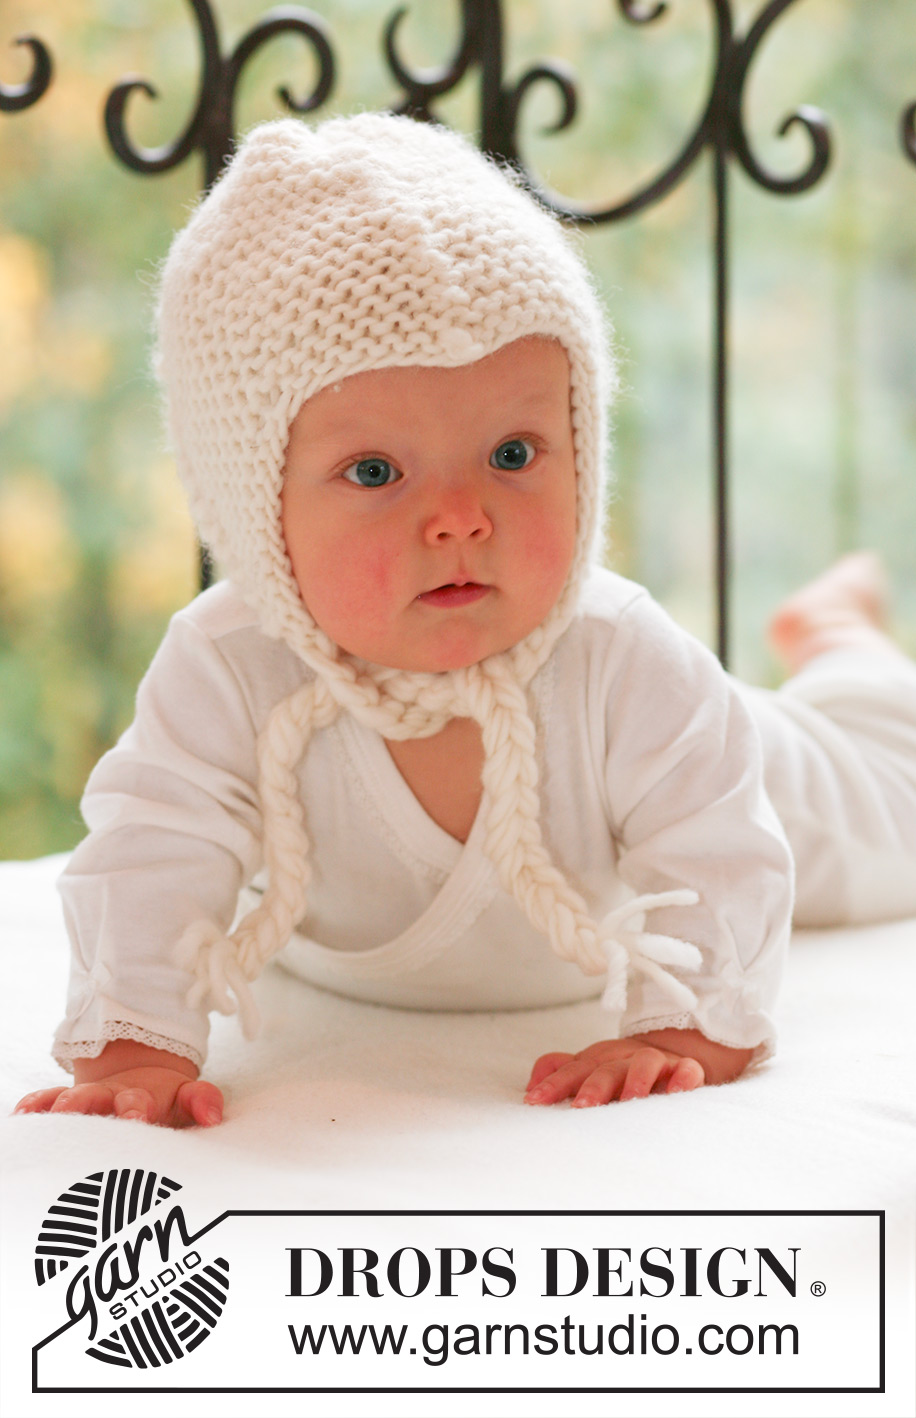
Knitted bonnet in garter st for baby and children in DROPS Snow or DROPS Wish
DROPS Baby 16-12 |
|||||||||||||
|
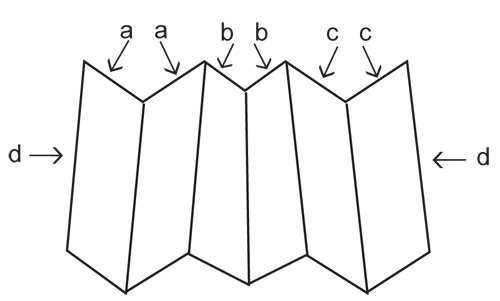
GARTER ST (back and forth on needle): K all rows. INCREASING TIP: Make all inc from RS. Inc 1 st before and after st with marker by making 1 YO. Work YO into back of loop on return row to avoid a hole. DECREASING TIP: Make all dec from RS. Dec 1 st on each side of st with marker as follows: Slip st before st with marker on cable needle behind piece, slip 1 st as if to K, (= st with marker), K tog next st and st on cable needle, psso (= st with marker). ------------------------------------------------------------ HAT: Worked back and forth on needle in garter st – SEE ABOVE. Cast on 57-61-65 (67-67) sts on needle size 7 mm [US 10 ½] with Snow or Wish. K 1 row from WS and turn piece. Insert 7 markers in piece from RS as follows: M-1 in first st on row M-2 in st 11-12-13(14-15) M-3 in st 21-23-25(27-29) M-4 in st 29-31-33(34-34) M-5 in st 37-39-41(41-39) M-6 in st 47-50-53(54-53) M-7 in last st on row Continue in garter st – AT THE SAME TIME inc and dec as follows – SEE INCREASING AND DECREASING TIP: Inc 1 st after M-1 on every other row, Dec 1 st on each side of M-2 on every other row, Inc 1 st before M-3 on every other row, Inc 1 st after M-3 on every 4th row, Dec 1 st on each side of M-4 on every 4th row, Inc 1 st before M-5 on every 4th row, Inc 1 st after M-5 on every other row, Dec 1 st on each side of M-6 on every other row, Inc 1 st before M-7 on every other row. NOTE: Make sure no of sts remain the same. Continue to inc and dec like this until piece measures 13-15-16 (18-19) cm [5⅛"-6"-6¼" (7"-7½")] (measured from lowest point by M-2 or M-6). Now work next row as follows: * K1, K2 tog *, repeat from *-*, AT THE SAME TIME as casting/binding off. ASSEMBLY: Back of hat = bind off row, i.e. 2 whole points and 2 half points. The middle of the 3 whole points on the opposite side of piece = cast on row, sits at middle of forehead. Sew hat tog, edge to edge along bind off row as follows: Sew first half point to one side of the first whole point. Sew the other side of first whole point to one side of second whole point. Then the other side of second whole point to the last half point. Now sew hat tog mid back – make sure to sew edge to edge to avoid a chunky seam TIE STRINGS: Crochet tie strings with 4 threads Snow or Wish and crochet hook size 10 mm [N/15]. Beg with 1 dc in the bottom of point on one side, crochet a chain string of approx 20-22-24 (26-28) cm [8"-8¾"-9½" (10¼"-11")], cut the thread and pull through the last loop. Repeat at the other side. |
|||||||||||||
Diagram explanations |
|||||||||||||
|
|||||||||||||
 |
|||||||||||||
Have you finished this pattern?Tag your pictures with #dropspattern #pilotcuddlesbonnet or submit them to the #dropsfan gallery. Do you need help with this pattern?You'll find 10 tutorial videos, a Comments/Questions area and more by visiting the pattern on garnstudio.com. © 1982-2026 DROPS Design A/S. We reserve all rights. This document, including all its sub-sections, has copyrights. Read more about what you can do with our patterns at the bottom of each pattern on our site. |
|||||||||||||


With over 40 years in knitting and crochet design, DROPS Design offers one of the most extensive collections of free patterns on the internet - translated to 17 languages. As of today we count 325 catalogs and 12298 patterns - 12288 of which are translated into English (US/in).
We work hard to bring you the best knitting and crochet have to offer, inspiration and advice as well as great quality yarns at incredible prices! Would you like to use our patterns for other than personal use? You can read what you are allowed to do in the Copyright text at the bottom of all our patterns. Happy crafting!
Post a comment to pattern DROPS Baby 16-12
We would love to hear what you have to say about this pattern!
If you want to leave a question, please make sure you select the correct category in the form below, to speed up the answering process. Required fields are marked *.