Comments / Questions (106)
![]() Shakedra wrote:
Shakedra wrote:
Stuck at here: Continue back and forth with A.1 and A.2 in the side and in stockinette stitch over the remaining stitches until entire A.1 and A.2 have been worked vertically = 60-66- 72 -78-86-96 stitches. REMEMBER THE KNITTING GAUGE Finish after 1 row from wrong side. Front piece up to where vent ends is now done. Cut the yarn and put piece aside. Work back piece the same way but do not cut the yarn when piece is done. What should I do next? Please explain a little plain this is confusing.
18.04.2025 - 03:51
![]() Letizia wrote:
Letizia wrote:
Buona sera, alla fine della spiegazione del davanti destro c’è scritto “intrecciare dal rovescio del lavoro a rovescio” è possibile avere un chiarimento? Cosa devo intrecciare e in che senso intrecciare? Grazie
04.01.2025 - 21:48DROPS Design answered:
Buongiorno Letiza, "intrecciare" significa chiudere le maglie, e in quel punto va fatto dal rovescio del lavoro. Buon lavoro!
06.01.2025 - 09:00
![]() Chiara Marin wrote:
Chiara Marin wrote:
Buongiorno! Vorrei sapere se le misure sul disegno della canotta sono in cm o se sono le maglie da avviare
01.08.2024 - 13:22DROPS Design answered:
Buongiorno Chiara, lo schema in fondo alla pagina riporta i cm. Buon lavoro!
01.08.2024 - 13:33
![]() Gaby Rmz wrote:
Gaby Rmz wrote:
Sobre mi pregunta anterior. Ya le entendí, muchas gracias!
01.08.2024 - 01:59
![]() Gaby Rmz wrote:
Gaby Rmz wrote:
Hola! En la primer parte del cuerpo, qué significa: tejer A1 y A2 completos verticalmente? Dice: =72 puntos (para la talla M)
31.07.2024 - 08:33
![]() Julia wrote:
Julia wrote:
Wenn es heißt rechtes Vorderteil, welches "rechts" ist damit gemeint? Wenn das Oberteil vor mir liegt ist dann die rechte Seite gemeint, oder die rechte Seite wenn ich das Oberteil an habe?
21.07.2024 - 10:45DROPS Design answered:
Liebe Julia, mit dem rechten Vorderteil ist die Seite beim Tragen des Tops gemeint, nicht, wenn es vor Ihnen liegt. Viel Spaß beim Stricken!
22.07.2024 - 23:57
![]() Sabina wrote:
Sabina wrote:
Non riesco proprio a capire come si deve fare questo top. O sono le traduzioni fatte male oppure le istruzioni sono fatte male. Peccato perché i modelli sono molto carini
20.06.2024 - 19:59DROPS Design answered:
Buonasera Sabina, può indicarci quale parte del modello non le è chiara? Buon lavoro!
20.06.2024 - 21:16
![]() Laurence wrote:
Laurence wrote:
Bonjour, Combien de rang je dois faire en jersey pour les fentes après les cotes ? Merci beaucoup d’avance Laurence
01.04.2024 - 09:25
![]() Shelly Clement wrote:
Shelly Clement wrote:
Drops Seaside Spiral pattern 211-13 I am from Canada and have been knitting for over 40 years. I am finding this pattern with all the charts very confusing. Can anyone help me as I have had it for a few years & get discouraged each time I pick it back up as they are not clear to me. Thank you Shelly
05.03.2024 - 20:40DROPS Design answered:
Dear Mrs Clement, this lesson explains how to read diagrams, this could help you. At the very top of the pattern, look at the tab "Video" to see 2 related videos to this pattern and how to work some of the diagrams. Happy knitting!
06.03.2024 - 08:10
![]() Crys wrote:
Crys wrote:
Très joli modèle et la laine est très agréable en 100% Coton. Par contre certaines explications ne sont pas faciles à déchiffrer
04.03.2024 - 14:39
Seaside Spirals#seasidespiralstop |
|||||||||||||||||||||||||||||||||||||
 |
 |
||||||||||||||||||||||||||||||||||||
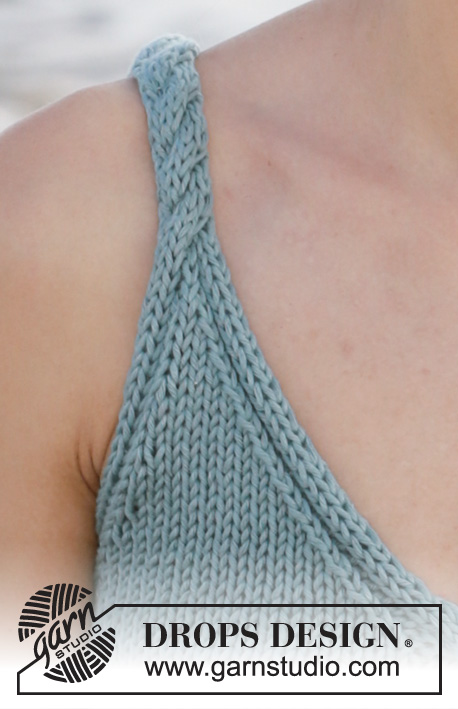
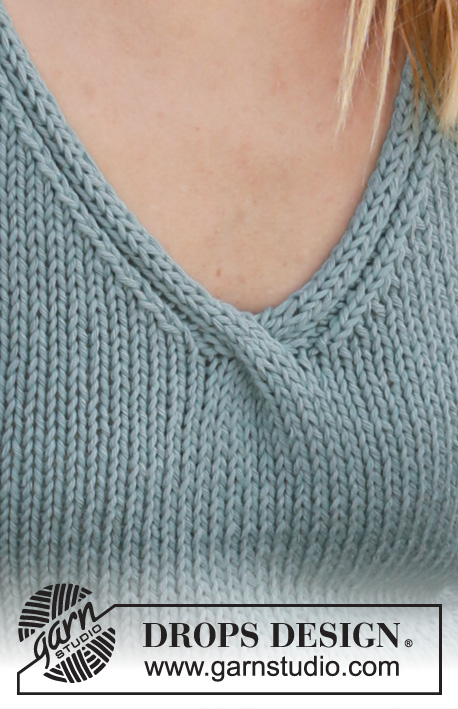
Knitted top with cables and V-neck in DROPS Paris. Size XS–XXL.
DROPS 211-13 |
|||||||||||||||||||||||||||||||||||||
|
---------------------------------------------------------- EXPLANATION FOR THE PATTERN: ---------------------------------------------------------- PATTERN: See diagrams A.1 to A.7. Diagrams show all rows seen from the right side! DECREASE TIP-1 (evenly): To calculate how to decrease evenly, use the number of stitches decreases are done over (e.g. 58 stitches) , and divide stitches by number of decreases to be done (e.g. 4) = 14.5. In this example decrease by knitting alternately every 13th and 14th stitch and every 14th and 15th stitch together. DECREASE TIP-2: Decrease as follows after A.5: Slip 1 stitch knitwise, knit 1, pass slipped stitch over. Decrease as follows before A.4: Knit 2 together. ---------------------------------------------------------- START THE PIECE HERE: ---------------------------------------------------------- TOP - SHORT OVERVIEW OF THE PIECE: First work front and back piece back and forth on circular needle separately until vent is done. Then slip the 2 parts on to same circular needle , and work in the round up to V-neck and armholes. Then divide piece for back piece and right and left front piece, and finish each part separately. BODY: Cast on 68-76-80-88-96-104 stitches on circular needle size 4.5 mm with Paris. Purl 1 row from wrong side. Then work rib as follows: Work A.1 over the first 5 stitches, rib * knit 2, purl 2 *, work from *-* until 7 stitches remain on row, knit 2, A.2 over the last 5 stitches. Continue back and forth like this until rib measures 2 cm - adjust so that next row is worked from right side. Work next row as follows: A.1 over the first 5 stitches, knit the next 58-66-70-78-86-94 stitches and decrease at the same time 4-6-4-6-6-4 stitches evenly – read DECREASE TIP-1, A.2 over the last 5 stitches = 64-70-76-82-90-100 stitches. Switch to circular needle size 5.5 mm. Continue back and forth with A.1 and A.2 in the side, and in stocking stitch over the remaining stitches until entire A.1 and A.2 have been worked vertically = 60-66-72-78-86-96 stitches. REMEMBER THE KNITTING TENSION. Finish after 1 row from wrong side. Front piece up to where vent ends is now done. Cut the yarn and put piece aside. Work back piece the same way but do not cut the yarn when piece is done. Now work the 2 parts together as from right side. Begin to work over stitches on back piece as follows: Knit 2 together (= 1 stitch decreased), knit until 2 stitches remain on back piece, slip 1 stitch knitwise, knit 1, pass slipped stitch over (= 1 stitch decreased), insert a marker thread here. Then work the same way over stitch on front piece = 116-128-140-152-168-188 stitches. There is now 1 marker thread in each side of piece. Move marker threads in each side when working, they are used later. Work in stocking stitch in the round. When piece measures 30-31-32-33-34-34 cm from cast-on edge, work next round as follows: Knit the 58-64-70-76-84-94 stitches on back piece, knit 24-27-30-33-37-42 stitches, A.3 over the middle 10 stitches on front piece, knit 24-27-30-33-37-42 stitches. Knit 1 round and A.3 over the middle 10 stitches on front piece. Now slip the 8-8-8-10-10-12 stitches on each side of marker thread in each side on separate stands of yarn (= 4 strands with 8-8-8-10-10-12 stitches on each). Slip the 42-48-54-56-64-70 stitches on back piece on a separate strand of yarn. Divide front piece in 2 so that half of the stitches (i.e. 21-24-27-28-32-35 stitches) is on a separate strand of yarn for right and left front piece. RIGHT FRONT PIECE: Cast on 5 stitches on circular needle size 5.5 mm with a new ball Paris. ROW 1 (= right side): Work A.4 over all stitches, turn. ROW 2: Work A.4 back over the first 4 stitches, knit last stitch together with 1st and 2nd stitch after marker thread in the side (i.e. of the 8-8-8-10-10-12 stitches on the strand of yarn), so that the 5 stitches in A.4 are worked together with right front piece, turn. ROW 3: Work A.4 over the 5 stitches, turn. ROW 4: Work A.4 back over the first 4 stitches, knit last stitch together with 3rd and 4th stitch after marker thread, so that the 5 stitches in A.4 are worked together with right front piece, turn. Continue back and forth like this by working last stitch in A.4 together with the next 2 stitches along armhole until all the 8-8-8-10-10-12 stitches along armhole have been worked together with A.4. Finish after a row from wrong side, and work as before over the 21-24-27-28-32-35 stitches on the strand of yarn for right front piece (i.e. work from armhole and until middle of cable = A.3) = 26-29-32-33-37-40 stitches on needle. Now work pattern, and decrease for V-neck and armhole as follows: Work A.5 over the first 5 stitches, knit until 5 stitches remain, A.4 over the last 5 stitches. Continue back and forth like this, AT THE SAME TIME on first row from right side, decrease for V-neck and armhole - read DECREASE TIP-2. Decrease for V-neck every other row 9-10-11-11-12-13 times in total, and decrease for armhole every other row 0-2-5-7-12-14 times, then every 4th row 4-4-3-2-0-0 times = 13 stitches. Now work A.6 over the last 13 stitches. When A.6 has been worked vertically, 8 stitches remain on needle. Repeat the last 4 rows in diagram (from row with arrow) until piece measures 17-18-19-20-21-23 cm from the first decrease for neck - adjust to finish after a row that is next to last row in diagram. Cast off from wrong side by purling, at the same time purl 2 and 2 stitches together. Top measures approx. 48-50-52-54-56-58 cm in total. LEFT FRONT PIECE: Cast on 5 stitches on circular needle size 5.5 mm with Paris. ROW 1 (= right side): Work A.5 over the first 4 stitches, purl last stitch together with 1st and 2nd stitch after marker thread in the side (i.e. of the 8-8-8-10-10-12 stitches on the strand of yarn), so that the 5 stitches in A.5 are worked together with left front piece, turn. ROW 2: Work A.5 over the 5 stitches, turn. ROW 3: Work A.5 back over the first 4 stitches, purl last stitch together with 3rd and 4th stitch after marker thread, so that the 5 stitches in A.5 are worked together with left front piece, turn. Continue back and forth like this by working last stitch in A.5 together with the next 2 stitches along armhole until all the 8-8-8-10-10-12 stitches along armhole have been worked together with A.5. Finish with a row from wrong side. Now work pattern, and decrease for V-neck and armhole as follows: Work A.5 over the first 5 stitches, knit until 5 stitches remain, A.4 over the last 5 stitches. Continue back and forth like this, AT THE SAME TIME on first row from right side, decrease for V-neck and armhole - remember DECREASE TIP-2. Decrease for V-neck every other row 9-10-11-11-12-13 times in total, and decrease for armhole every other row 0-2-5-7-12-14 times, then every 4th row 4-4-3-2-0-0 times = 13 stitches. Now work A.7 over the last 13 stitches. When A.7 has been worked vertically, 8 stitches remain on needle. Repeat the last 4 rows in diagram (from row with arrow) until piece measures 17-18-19-20-21-23 cm from the first decrease for neck - adjust to finish after a row that is next to last row in diagram. Cast off from wrong side by purling, at the same time purl 2 and 2 stitches together. Top measures approx. 48-50-52-54-56-58 cm in total. BACK PIECE: Edge around left armhole: Cast on 5 stitches on circular needle size 5.5 mm with a new ball Paris. ROW 1 (= right side): Work A.4 over all stitches, turn. ROW 2: Work A.4 back over the first 4 stitches, knit last stitch together with 1st and 2nd stitch after marker thread in the side (i.e. of the 8-8-8-10-10-12 stitches on the strand of yarn), so that the 5 stitches in A.4 are worked together with back piece, turn. ROW 3: Work A.4 over the 5 stitches, turn. ROW 4: Work A.4 back over the first 4 stitches, knit last stitch together with 3rd and 4th stitch after marker thread so that the 5 stitches in A.4 are worked together with back piece, turn. Continue back and forth like this by working last stitch in A.4 together with the next 2 stitches along armhole until all the 8-8-8-10-10-12 stitches along armhole have been worked together with A.4. Finish with a row from wrong side. Edge around right armhole: Cast on 5 stitches on circular needle size 5.5 mm with Paris. ROW 1 (= right side): Work A.5 over the first 4 stitches, purl last stitch together with 1st and 2nd stitch after marker thread in the side (i.e. of the 8-8-8-10-10-12 stitches on the strand of yarn), so that the 5 stitches in A.5 are worked together with back piece, turn. ROW 2: Work A.5 over the 5 stitches, turn. ROW 3: Work A.5 back over the first 4 stitches, purl last stitch together with 3rd and 4th stitch after marker thread, so that the 5 stitches in A.5 are worked together with back piece, turn. Continue back and forth like this by working last stitch in A.5 together with the next 2 stitches along armhole until all the 8-8-8-10-10-12 stitches along armhole have been worked together with A.5. Finish with a row from wrong side. Now work stitches from the strand of yarn for back piece together with the 5 stitches for edge along armholes from right side as follows: Work A.5 over the first 5 stitches, knit the 42-48-54-56-64-70 stitches from the strand of yarn for back piece, work A.4 over the last 5 stitches (= 52-58-64-66-74-80 stitches on needle), at the same time begin decrease for armhole – remember DECREASE TIP-2. Decrease for armhole every other row 1-2-5-7-12-14 times, then every 4th row 4-4-3-2-0-0 times = 42-46-48-48-50-52 stitches. Continue back and forth with knit over knit and purl over purl until piece measures 9-10-11-11-12-14 cm from decrease for armhole. Work 1 row from right side with knit over knit and purl over purl, and increase 0-0-2-2-0-2 stitches evenly (but not over the outermost 5 stitches in each side) = 42-46-50-50-50-54 stitches. Work 1 row in pattern from wrong side. Switch to circular needle size 4.5 mm. Now work rib as follows: Knit 3, purl 3. * Knit 2, purl 2 *, repeat from *-* until 8 stitches remain on needle, knit 2, purl 3, knit 3. Continue back and forth like this until rib measures 2 cm - adjust so that next row is worked from right side, work from the second last row in A.7 over the first 8 stitches before slipping them on a strand of yarn (= strap), cast off with knit over knit and purl over purl over the next 26-30-34-34-34-38 stitches, work from next to last row in A.6 over the last 8 stitches on needle (= strap). Switch to needle size 5.5 mm. Repeat pattern from the row with the arrow, back and forth over these 8 stitches until strap measures approx. 6-6-6-7-7-7 cm – adjust to finish after next to last row in diagram. Cast off from wrong side by purling, at the same time purl 2 and 2 stitches together. Slip the 8 stitches from the strand of yarn back on circular needle size 5.5 mm and work last row in A.7 (= from wrong side). Then repeat pattern from row with arrow until strap measures approx. 6-6-6-7-7-7 cm – adjust to finish after next to last row in diagram. Cast off from wrong side by purling, at the same time purl 2 and 2 stitches together. ASSEMBLY: Sew straps together with grafting/kitchener stitches. Sew together cast-on edges in the side where 5 new stitches were cast on (A.5/A.4). Sew with grafting/kitchener stitches to avoid chunky seam. Fasten off. |
|||||||||||||||||||||||||||||||||||||
Diagram explanations |
|||||||||||||||||||||||||||||||||||||
|
|||||||||||||||||||||||||||||||||||||
 |
|||||||||||||||||||||||||||||||||||||
 |
|||||||||||||||||||||||||||||||||||||
Have you finished this pattern?Tag your pictures with #dropspattern #seasidespiralstop or submit them to the #dropsfan gallery. Do you need help with this pattern?You'll find 23 tutorial videos, a Comments/Questions area and more by visiting the pattern on garnstudio.com. © 1982-2025 DROPS Design A/S. We reserve all rights. This document, including all its sub-sections, has copyrights. Read more about what you can do with our patterns at the bottom of each pattern on our site. |
|||||||||||||||||||||||||||||||||||||


Post a comment to pattern DROPS 211-13
We would love to hear what you have to say about this pattern!
If you want to leave a question, please make sure you select the correct category in the form below, to speed up the answering process. Required fields are marked *.