
Popular categories
Looking for a yarn?


Comments / Questions (218)
![]() Faranaaz wrote:
Faranaaz wrote:
Ik ben nu bij de pas. Er staat in het patroon "Meerder alleen op het voorpand en het achterpand richting elke raglan. " Maar er is toch niet meer dan 'alleen' het voor- en achterpand? Als je aan beide kanten meerderd kom ik uit op 16 steken per naald. Dat is volgens mij 2x te veel.. Waar moet ik dan meerderen voor de raglan? Alleen aan de voorkant? Dus dat is bij de 2e en 3e marker? Alvast bedankt!
17.06.2021 - 23:26DROPS Design answered:
Dag Farnaaz,
Bij de meeste raglantruien meerder je zowel op de mouwen als op het pand, maar in dit geval alleen op de panden, dus op het voor- en achterpand. Dus als je bij de markeerdraad bent meerder je alleen aan de kant van het pand en niet op de mouw. Je meerdert wel op beide panden dus op het voor- en het achterpand.
23.06.2021 - 20:26
![]() Jeanet wrote:
Jeanet wrote:
Hallo. Ik ben bezig met het lijf en moet nu gaan minderen bij een hoogte van 4 cm vanaf de scheiding . Er staat "Minder zo ongeveer ieder 8-9-6-5-4-3 cm 2 keer in totaal enz. Ik heb mt 38 en moet dus (de tweede maat) volgens het patroon ieder 9 cm minderen. Moet dit niet 7 zijn ? Groetjes
06.06.2021 - 20:25DROPS Design answered:
Dag Jeanet,
Ja, ik denk dat dit inderdaad 9 cm moet zijn, maar ik zal het even doorgeven aan de ontwerp afdeling om na te kijken.
07.06.2021 - 19:57
![]() Ann wrote:
Ann wrote:
Behöver man rundsticka i både längd 40 och 80 eller räcker det med en av längderna?
21.05.2021 - 21:39DROPS Design answered:
Hej Ann. Du behöver båda eftersom du måste ha en kort rundsticka när det inte är så många maskor vid halskanten. Mvh DROPS Design
24.05.2021 - 08:08
![]() Lori Ann wrote:
Lori Ann wrote:
For the Canyon Clay yoke, the pattern says to increase 2 stitches every other round 9-9-8-10-12-13 times in total, then increase 1 stitch every other round 2-4-6-6 times. Following the RAGLAN instructions to start the yolk it says after increasing in the first round 8 stitches AND THEREAFTER INCREASE 1 stitch towards each raglan on front and back = 4 stitches increased on round. Do you increase 2 stitches or 4 stitches? I find the pattern confusing
10.05.2021 - 01:59DROPS Design answered:
Dear Lorí Ann, first you increase 2 stitches at each raglan, but only tovard the body pieces (that is 8 increase / round) 9-9-8-10-12-13 times, then 1 stitch at each raglan, only the body pieces (that is 4 stitch increased on the round.. Happy Knitting!
10.05.2021 - 10:11
![]() Mayte wrote:
Mayte wrote:
Para el CANESU 244 puntos. Continuar con derecho sobre derecho y revés sobre revés hasta que la la prenda mida 13 cm desde el marcapuntos. En cuanto tengamos los 244 puntos (Talla M) ya no se aumenta mas a cada lado del marcapuntos??? Gracias
10.05.2021 - 01:25DROPS Design answered:
Hola Mayte. Una vez se llegue a 244 puntos, se trabaja sin aumentos hasta el largo indicado según la talla.
16.05.2021 - 17:39
![]() Marie Azé wrote:
Marie Azé wrote:
Bonsoir ; je crains que ma question soit un peu sotte mais , je me demande pour le modèle Canyon Clay , y a -t-il un moment ou on prend les aiguilles No 5 préconisées pour Paris ? Merci pour votre réponse
06.05.2021 - 18:43DROPS Design answered:
Bonjour Marie Azé, on prend l'aiguille circulaire 5 à la fin de la partie COL, juste avant le paragraphe EMPIÈCEMENT. Bon tricot!
07.05.2021 - 07:39
![]() Marie Azé wrote:
Marie Azé wrote:
Bonjour , j'ai 2 problèmes pour commencer le pull Canyon Clay : 1 - le modèle M indique 16 mailles pour les manches et 36 mailles pour le dos et le devant ce qui fait en tout 104 mailles ; or on doit monter 118 mailles : que comprendre ? 2 - on commence le rang avec 2 mailles endroit et il finit ( avec 118 mailes ) par 2 mailles endroit ! le tout suivant commence donc par 4 mailles endroit : est-ce normal ? Merci infiniment de vos réponses ;
05.05.2021 - 16:48DROPS Design answered:
Bonjour Marie Azé, en fait avez pour le demi-dos: 8 m en côtes 2/2 + 1 m end ( = 9 m), puis pour la 1ère manche: 1 m end, 36 m en côtes 1 m env/2 m end, 1 m env, 1 m end (= 39 m) entre les fils marqueurs, puis pour le devant: 1 m end, 16 m en côtes 2 m env/2 m end, 2 m env, 1 m end (= 20 m entre les fils marqueurs), pour la 2ème manche 1 m end, 36 m en côtes 1 m env/2 m end, 1 m env, 1 m end (= 39 m), et pour le 2ème demi-dos: 1 m end, 8 m en côtes 2 m env/2 m end, 2 m env (= 11 m) autrement dit: 9+39+20+39+11=118 m. Tricotez bien les mailles comme indiqué pendant 3 cm (les m end à l'end et les m env à l'env). Bon tricot!
06.05.2021 - 07:17
![]() Madou wrote:
Madou wrote:
Bonjour, Y aurait-t-il une erreur dans les diminutions du dos et devant ? "Diminuer ainsi 2 fois au total tous les 8-9-6-5-4-3 cm environ = 128-140-154-170-196-216 mailles." Je trouve juste un peu curieux que ce soit 9 cm et non 7 cm pour la taille M... Merci d'avance !
29.04.2021 - 07:31
![]() Madou wrote:
Madou wrote:
Bonjour, merci beaucoup pour toutes vos explications ! Je viens d'isoler les manches sur les arrêts de mailles et en suis à "Quand l'ouvrage mesure 4 cm depuis la séparation, diminuer 1 maille de chaque côté des fils marqueurs". Où exactement est la séparation ? Est-ce à partir de l'arrêt de mailles, donc à la limite entre les côtes des manches et le raglan ? Ou bien plus bas, à partir des mailles montées sous la manche et qui la ferment ? Je vous remercie d'avance ! Madou
28.04.2021 - 08:27DROPS Design answered:
Bonjour Madou, cette séparation est celle du tour où vous avez mis les mailles des manches en attente et monté celles des emmanchures, donc à partir du tour où l'on continue seulement le dos et le devant avec les nouvelles mailles montées. Bon tricot!
28.04.2021 - 11:17
![]() Mayte wrote:
Mayte wrote:
Trabajar 1 fila con derecho sobre derecho y revés sobre revés (trabajar las lazadas retorcidas para evitar que se formen agujeros) El patron pone fila, se trabaja de ida y vuelta o es un error y tendria que poner trabajar 1 vuelta Gracias
28.04.2021 - 00:50
|
|
Canyon Clay#canyonclaytop |
|
 |
 |
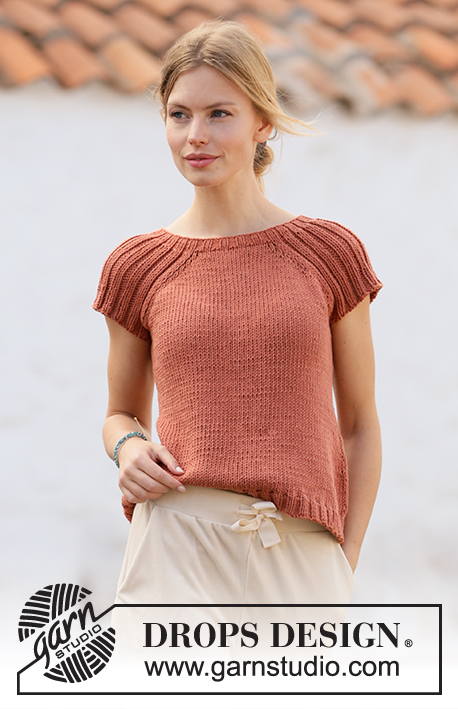
Knitted top with raglan in DROPS Paris. Piece is knitted top down with rib. Size: S - XXXL
DROPS 212-15 |
|
|
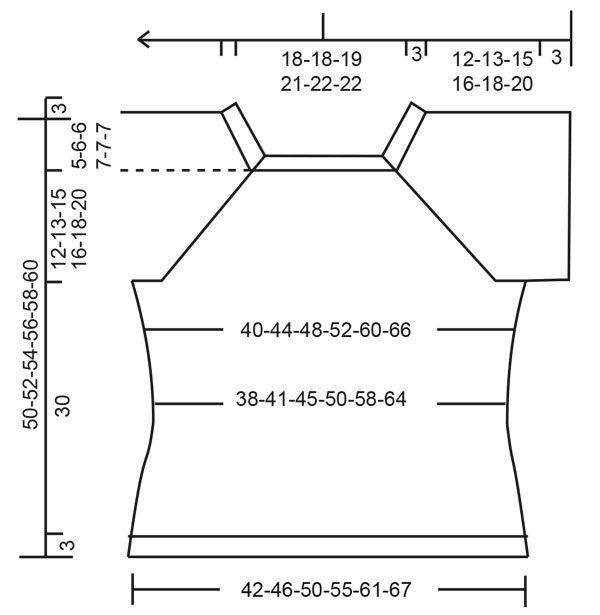
---------------------------------------------------------- EXPLANATION FOR THE PATTERN: ---------------------------------------------------------- INCREASE TIP-1 (evenly): To calculate how to increase evenly, count the stitches to be increased (e.g. 9 stitches) and divide by stitches of increases to be done (e.g. 2) = 4.5. In this example increase by making 1 yarn over after alternately every 4th and 5th stitch. On next row work yarn overs twisted to avoid holes. INCREASE TIP-2: Increase 1 stitch by making 1 yarn over. On next round purl yarn over twisted to avoid holes. Purl the new stitches. INCREASE TIP-3 (applies to sides of body): Work until 2 stitches remain before marker thread, 1 yarn over, knit 4 (marker thread is in the middle of these stitches), 1 yarn over. On next round knit yarn overs twisted to avoid holes. Then work the new stitches in stocking stitch. DECREASE TIP: Decrease 1 stitch on each side of marker thread as follows: Work until 3 stitches remain before marker thread and knit 2 together, knit 2 (marker thread is between these stitches), slip 1 stitch knitwise, knit 1, pass slipped stitch over stitch worked. RAGLAN: In the beginning increase 2 stitches towards each raglan on front and back piece (= 8 stitches increased on round), and thereafter increase 1 stitch towards each raglan on front and back piece (= 4 stitches increased on round). Increase 2 stitches before marker thread as follows: Work until 2 stitches remain before marker thread: 1 yarn over, knit 1, 1 yarn over, knit 1, marker thread is here. Increase 2 stitches after marker thread as follows: Knit 1, 1 yarn over, knit 1, 1 yarn over. Increase 1 stitch before marker thread as follows: Work until 1 stitch remains before marker thread: 1 yarn over, knit 1, marker thread is here. Increase 1 stitch after marker thread as follows: Knit 1, 1 yarn over. On next round knit yarn overs twisted to avoid holes. Then work the new stitches in stocking stitch. CAST-OFF TIP: To avoid a tight cast-off edge you may use a larger needle. If this also is too tight, make 1 yarn over after approx. every 4th stitch and cast off these as regular stitches. ---------------------------------------------------------- START THE PIECE HERE: ---------------------------------------------------------- TOP - SHORT OVERVIEW OF THE PIECE: Work neck edge and yoke in the round on circular needle from mid back, top down. Now divide yoke for body and sleeves. Work body in the round on circular needle. Work sleeves in the round on double pointed needles/short circular needle, top down. NECK EDGE: Cast on 112-118-126-138-144-144 stitches on circular needle size 3.5 mm with Paris. Knit 1 round. Work next round as follows: (Knit 2/purl 2) over the first 8-8-12-12-12-12 stitches, knit 1, insert a marker thread here (= in transition between back piece and right sleeve), knit 1, (purl 1/knit 2) over the next 33-36-36-42-45-45 stitches, purl 1, knit 1, insert a marker thread here (= in transition between right sleeve and front piece), knit 1, (purl 2/knit 2) over the next 16-16-20-20-20-20 stitches, purl 2, knit 1, insert a marker thread here (= in transition between front piece and left sleeve), knit 1, (purl 1/knit 2) over the next 33-36-36-42-45-45 stitches, purl 1, knit 1, insert a marker thread here (= in transition between left sleeve and back piece), knit 1, (purl 2/knit 2) over the next 8-8-8-8-8-8 stitches, purl 2. Continue in the round like this until rib measures 3 cm. When rib is done, work next round as follows: Knit until first marker thread and increase at the same time 2-3-3-3-3-4 stitches evenly – read INCREASE TIP-1, knit over knit and purl over purl until next marker thread and increase at the same time 1 stitch in every purl section – read INCREASE TIP-2, knit until next marker thread and increase at the same time 4-6-5-5-6-8 stitches evenly, knit over knit and purl over purl until next marker thread and increase at the same time 1 stitch in every purl section, knit the last 11-11-11-11-11-11 stitches and increase at the same time 2-3-2-2-3-4 stitches evenly = 144-156-162-178-188-192 stitches. Work 1 row with knit over knit and purl over purl (work the yarn overs twisted to avoid holes). Switch to circular needle size 5 mm. Insert 1 marker at the beginning of round (= approx. mid back), measure yoke from this marker! YOKE: Knit over knit and purl over purl. On first round start increase for RAGLAN – read explanation above. Only increase on front piece and back piece towards each raglan. Increase 2 stitches every other round 9-9-8-10-12-13 times in total, then increase 1 stitch every other round 2-4-6-6-8-8 times = 224-244-250-282-316-328 stitches. REMEMBER THE KNITTING TENSION! Continue with knit over knit and purl over purl until piece measures 12-13-15-16-18-20 cm from marker. The yoke is finished. Then work in the outermost stitch in each side of front piece and back piece in on sleeves. Work next round as follows: Work the first 30-33-37-41-47-50 stitches, slip the next 50-54-54-62-66-66 stitches on a stitch holder for sleeve and cast on 6-6-10-10-10-14 stitches on needle (= in the side under sleeve), work the next 62-68-71-79-92-98 stitches (= front piece), slip the next 50-54-54-62-66-66 stitches on a stitch holder for sleeve and cast on 6-6-10-10-10-14 stitches on needle (= in the side under sleeve), work the remaining 32-35-34-38-45-48 stitches on needle. Then finish body and sleeves separately. NOW MEASURE PIECE FROM HERE! BODY: = 136-148-162-178-204-224 stitches. Insert 1 marker thread in the in each side, in middle of the new stitches cast-on under the sleeves (= 3-3-5-5-5-7 new stitches on each side of marker thread). Move the marker threads upwards when working; they should be used for increase later in the sides. Work in stocking stitch in the round. When piece measures 4 cm from division, decrease 1 stitch on each side of marker threads - read DECREASE TIP. Decrease like this approx. every 8-7-6-5-4-3 cm 2 times in total = 128-140-154-170-196-216 stitches. When piece measures 20-18-16-14-12-10 cm from division, increase 1 stitch on each side of marker threads - read INCREASE TIP-3. Increase like this approx. every 3-4-4-5-6-6 cm 4-4-4-4-3-3 times in total = 144-156-170-186-208-228 stitches. When piece measures 30 cm from division (3 cm remain until finished measurements - work to desired length), knit 1 round while increasing 28-28-34-38-40-44 stitches = 172-184-204-224-248-272 stitches. Switch to circular needle size 3.5 mm. Work rib (knit 2/purl 2) in the round for 3 cm. Cast off with knit over knit and purl over purl - read CAST-OFF TIP. Top measures total 50-52-54-56-58-60 cm in total from shoulder and down. SLEEVE: Slip the 50-54-54-62-66-66 stitches from stitch holder in one side back on double pointed needles/circular needle size 5 mm, and pick up 1 stitch in each of the 6-6-10-10-10-14 stitches cast on under the sleeve = 56-60-64-72-76-80 stitches. Work rib (knit 2/purl 2) in the round. When sleeve measures 3 cm from division, cast off with knit over knit and purl over purl - remember CAST-OFF TIP. Work the other sleeve the same way. |
|
 |
|
Have you finished this pattern?Tag your pictures with #dropspattern #canyonclaytop or submit them to the #dropsfan gallery. Do you need help with this pattern?You'll find 25 tutorial videos, a Comments/Questions area and more by visiting the pattern on garnstudio.com. © 1982-2026 DROPS Design A/S. We reserve all rights. This document, including all its sub-sections, has copyrights. Read more about what you can do with our patterns at the bottom of each pattern on our site. |
|


With over 40 years in knitting and crochet design, DROPS Design offers one of the most extensive collections of free patterns on the internet - translated to 17 languages. As of today we count 325 catalogues and 12298 patterns translated into English (UK/cm). 12298
We work hard to bring you the best knitting and crochet have to offer, inspiration and advice as well as great quality yarns at incredible prices! Would you like to use our patterns for other than personal use? You can read what you are allowed to do in the Copyright text at the bottom of all our patterns. Happy crafting!
Post a comment to pattern DROPS 212-15
We would love to hear what you have to say about this pattern!
If you want to leave a question, please make sure you select the correct category in the form below, to speed up the answering process. Required fields are marked *.