
Looking for a yarn?


Comments / Questions (111)
![]() Sonia Graff wrote:
Sonia Graff wrote:
Dans l'explication du dos du gilet vous avez ecrit au début deux fois le meme texte : tricoter le dernier rang de A3 A2 et A1ainsi sur envers , une maille lis,21m en jersey,en diminuant 3 m à intervalle régulier au dessus des 21 mailles,voir dim.tricoter le dernier rang de A3 A2 et A1 en jersey en diminuant à interv. régulier au dessus des 21 m et terminer par 1m.lis.mousse. est -ce correct ?
10.09.2020 - 12:16DROPS Design answered:
Bonjour Mme Graff, lorsque vous tricotez le dernier rang des diagrammes sur l'envers, vous avez 21 mailles en côtes entre la maille lisière au point mousse et 1.3/A.1, ces 21 mailles vont être maintenant tricotées en jersey (= à l'envers sur l'envers) en diminuant 3 mailles à intervalles réguliers (= 21-3= on aura ainsi 18 mailles jersey de part et d'autre des diagrammes), et, au milieu dos. vous tricotez le dernier rang des diagrammes . Bon tricot!
10.09.2020 - 13:46
![]() Celeste wrote:
Celeste wrote:
Me encantan, las prendas y las instrucciones. Me gustaría que los vídeos se relacionen con la prenda. Muchas gracias.
17.08.2020 - 02:53
![]() Hannele wrote:
Hannele wrote:
Hei Miten teen huivikauluksen Winter gardinal villatakkiin ??
14.05.2020 - 11:04DROPS Design answered:
Huivikauluksen ohje löytyy etukappaleen ohjeen lopusta.
17.11.2020 - 16:46
![]() Annette wrote:
Annette wrote:
Bonsoir . Est-il possible de mettre des mailles en attente en début de rang ? Quelle est la technique ? Vous dites de tricoter les mailles avant de les mettre en attente mais si elles sont tricotées , elles ne sont plus en attente . ...... Merci pour votre réponse.
08.05.2020 - 22:55DROPS Design answered:
Bonjour Annette, tricotez ces mailles d'abord puis glissez-les en attente sur un fil ou un arrêt de mailles, et continuez à tricoter votre rang. Vous n'avez ainsi pas à couper le fil puis à le joindre après ces mailles. Bon tricot!
11.05.2020 - 08:39
![]() Carla wrote:
Carla wrote:
Hermoso!! cuando estará disponible en español?
15.04.2020 - 05:10
![]() Rousseau Frédérique wrote:
Rousseau Frédérique wrote:
Bonjour et merci pour tous ces superbes modèles que vous mettez à disposition à des accrocs du tricot comme moi. Cependant je n'aime pas les aiguilles circulaires donc auriez-vous les explications pour aiguilles droites du modèle Drops 205-24. Merci beaucoup par avance
27.02.2020 - 21:24DROPS Design answered:
Bonjour Mme Rousseau et merci. Nous ne pouvons adapter chacun de nos modèles à chaque demande, toutefois, vous trouverez ici une aide précieuse. Merci pour votre compréhension, bon tricot!
28.02.2020 - 08:04
![]() Patricia wrote:
Patricia wrote:
Bonjour En haut du devant droit avec les 28 mailles. Concernant les 4 rangs suivants , si j'ai bien compris : R1 = 24m - R2 = 24m - R3 = 28m et R4 = 28m ? et ce jusqu'à ce que le côté gauche (vue de face) fasse 10cm ? Mais alors, petits côtés gauche + droit feront 20cm. Or on rabat 15m sur dos pour l'encolure soit plus ou moins 10cm où seront cousus les 20cm cumulés. Pas possible car 10cm de trop. Merci de bien vouloir m'éclairer, je suis bloquée.
29.01.2020 - 19:38DROPS Design answered:
Bonjour Patricia, vous tricotez des rangs raccourcis sur ces 28 m (= 2 rangs sur 24 m, 2 rangs sur 28 m) en commençant sur l'endroit, c'est donc le côté bordure devant (i-cord) qui sera plus long. L'autre côté (côté épaule) doit mesurer 10 cm, et sera ensuite cousu le long de l'encolure dos. Bon tricot!
30.01.2020 - 09:18
![]() Heike wrote:
Heike wrote:
Liebes Team, ich habe die Jacke in Grau gestrickt, sie ist wunderbar, weich und griffig, warm und angenehm. Die Wollmenge ist (wie oft) sehr knapp berechnet, ich habe den Gürtel aus einer anderen Restwolle gestrickt, hat meines Erachtens dadurch gewonnen. War ein tolles Projekt und gar nicht so kompliziert. Danke
24.01.2020 - 14:27
![]() Carine wrote:
Carine wrote:
Zou het mogelijk zijn om dit met garen Drops Melody ( garen D) en moet dit dan met 2 draden te breien?
19.01.2020 - 13:23DROPS Design answered:
Dag Carine,
Ja, je kan dit ook met een garen uit garengroep D breien. In dat geval brei je met 1 draad. Maak wel even een proeflapje om en pas eventueel de naalddikte aan om op de juiste stekenverhouding te komen.
19.01.2020 - 18:06
![]() Josette JEANTIN wrote:
Josette JEANTIN wrote:
Taille M 5 pelotes Nepal pour le DOS 3,5 pelotes par DEVANT donc 7 pelotes Total utilisé 12 pelotes sur 15 indiquées Il me reste donc 3 pelotes pour tricoter les 2 MANCHES... Il doit y avoir un problème !!!!
14.01.2020 - 10:35DROPS Design answered:
Bonjour Mme Jeantin, avez-vous bien le bon échantillon et respecté la même tension tout du long soit 14 m x 16 rangs jersey = 10 x 10 cm? Si tout est juste, alors la quantité totale indiquée devrait être suffisante. Bon tricot!
14.01.2020 - 13:08
|
||||||||||||||||
Winter Cardinal Cardigan#wintercardinalcardigan |
||||||||||||||||
 |
 |
|||||||||||||||
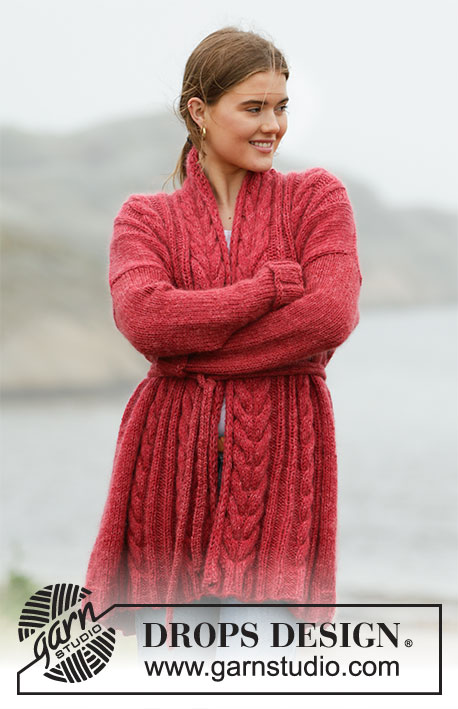
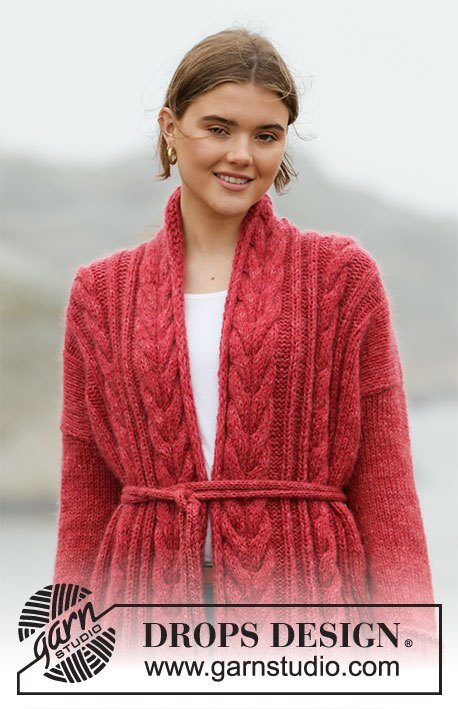
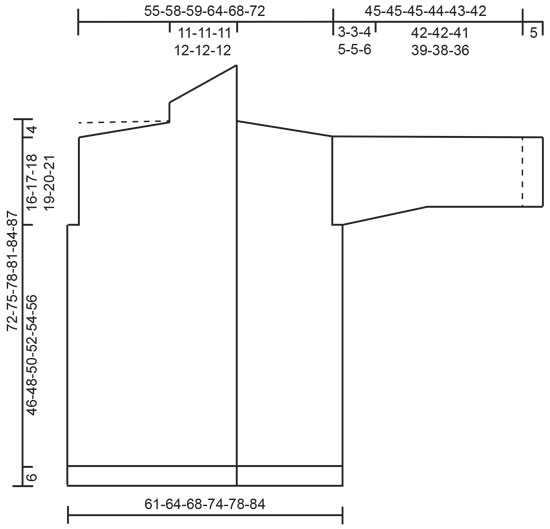
Knitted long jacket in DROPS Nepal and DROPS Kid-Silk. Piece is knitted with cables, shawl collar and belt. Size: S - XXXL
DROPS 205-24 |
||||||||||||||||
|
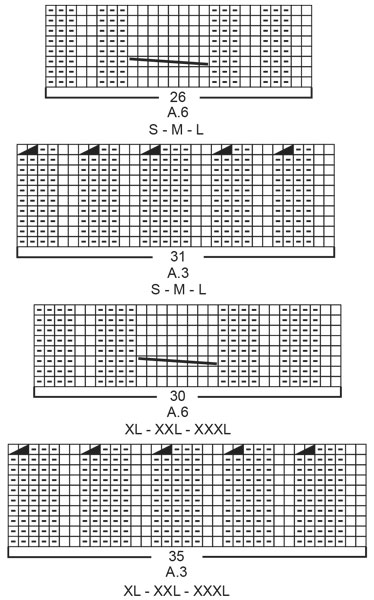
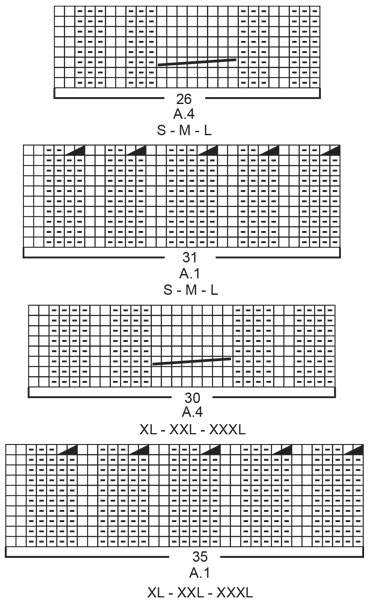
---------------------------------------------------------- EXPLANATION FOR THE PATTERN: ---------------------------------------------------------- GARTER STITCH (back and forth): Knit all rows. 1 ridge vertically = knit 2 rows. I-CORD EDGE RIGHT FRONT PIECE (applies to outermost edge along mid front): Begin from right side, * pass the first 3 stitches on needle loosely onto right needle without working the stitches (pass 1 by 1 with thread at the back of piece), tighten yarn a bit, and work pattern and stocking stitch over the other stitches as explained in pattern, turn piece, work stocking stitch and pattern as before until 3 stitches remain on row towards mid front, purl these stitches, turn piece *, work from *-* until finished measurements. NOTE! You need to work a few cm and pull the edge a bit before you see the best result. I-CORD EDGE LEFT FRONT PIECE (applies to outermost edge along mid front): Begin from right side, * work stocking stitch and pattern as before until 3 stitches on needle remain towards mid front, pass the last 3 stitches on needle loosely onto right needle without working the stitches (pass them 1 by 1 with thread at the back of piece), turn piece, tighten yarn, and purl the first 3 stitches, then work pattern and stocking stitch over the other stitches as explained in pattern, turn piece *, work from *-* until finished measurements. NOTE! You need to work a few cm and pull the edge a bit before you see the best result. PATTERN: See diagrams A.1 to A.6. Choose diagram for your size. Diagrams show all rows in pattern seen from the right side. DECREASE TIP-1 (evenly): Decrease from wrong side before cables begin. To calculate how to decrease evenly, count number of stitches to decrease over (e.g. 16 stitches) and divide by number of decreases to be done (e.g. 3) = 5.3. In this example decrease by working approx. every 4th and 5th stitch purl together. DECREASE TIP-2 (applies to mid under sleeves): Begin 3 stitches before marker thread and knit 2 together, knit 2 (marker thread is between these 2 stitches), slip 1 stitch knitwise, knit 1, pass slipped stitch over stitch worked (= 2 stitches decreased). INCREASE TIP (evenly): To calculate how to increase evenly, use the total number of stitches to increase over (e.g. 34 stitches) and divide stitches by number of increases to be done (e.g. 8) = 4.25. In this example increase by making 1 yarn over after approx. every 4th stitch. On next round work yarn overs twisted to avoid holes. TUBE KNITTING: Knit 1 row from right side, * slide all stitches to the right side of needle without turning the piece, tighten yarn and knit over all stitches *, work from *-*. ---------------------------------------------------------- START THE PIECE HERE: ---------------------------------------------------------- JACKET - SHORT OVERVIEW OF THE PIECE: Front pieces and back piece are worked back and forth on circular needle, bottom up. There are cables on both front pieces and back piece. On front piece the outermost 26-26-26-28-28-28 stitches towards mid front count as band with overlap. Sew piece together on the shoulders. Pick up stitches along the armholes and work sleeves back and forth on circular needle top down until sleeve cap is done, then work the sleeves in the round until finished measurements. Work sleeves top down to adjust sleeve length to desired measurements. Then sew sleeve and side seams and collar to neck line at the back of neck. RIGHT FRONT PIECE: Cast on 79-79-84-90-90-95 stitches (including 26-26-26-28-28-28 band stitches towards mid front and 1 edge stitch in the side) on circular needle size 5 mm with 1 strand Nepal and 1 strand Kid- Silk (= 2 strands). Purl 1 row (= wrong side). Work next row as follows from the right side (i.e. from mid front): Work I-CORD EDGE RIGHT FRONT PIECE over the first 3 stitches - read explanation above, work A.2 (= 28-28-28-30-30-30 stitches), work A.3 (= 31-31-31-35-35-35 stitches), * knit 2, purl 3 *, work from *-* over the next 15-15-20-20-20-25 stitches, knit 1 and finish with 1 edge stitch in garter stitch. Continue rib like this but work last row in A.3 and A.2 as follows from wrong side: 1 edge stitch in garter stitch, work 16-16-21-21-21-26 stitches in stocking stitch and decrease at the same time 3-1-3-4-1-2 stitches evenly over these 16-16-21-21-21-26 stitches - read DECREASE TIP 1, work last row in A.3 and A.2, and finish with i-cord edge over the last 3 stitches towards mid front. Piece measures approx. 6 cm from cast-on edge and there are 66-68-71-76-79-83 stitches on needle. Switch to circular needle size 6 mm. Now begin cables, i.e. work next row as follows from right side: Continue with i-cord edge over the first 3 stitches mid front, work A.5 (= 23-23-23-25-25-25 stitches), work A.6 (= 26-26-26-30-30-30 stitches), work 13-15-18-17-20-24 stitches in stocking stitch and finish with 1 edge stitch in garter stitch towards the side. Continue pattern like this. REMEMBER THE KNITTING TENSION! When piece measures 52-54-56-58-60-62 cm, cast off 5-5-7-8-8-9 stitches for armhole at the beginning of row from the side = 61-63-64-68-71-74 stitches. Continue pattern as before with 1 edge stitch in garter stitch towards armhole until piece measures 68-71-74-77-80-83 cm. On next row from right side, knit stitches in the outermost cable towards the side together 2 by 2 (= 4 stitches decreased) = 57-59-60-64-67-70 stitches remain on needle. Then slip stitches on stitch holder for diagonal shoulder as explained below. Begin in the side at armhole and slip stitches on a stitch holder on every row from armhole like this (to avoid cutting the yarn work stitches before slipping them on a stitch holder): Slip 10-11-11-12-13-14 stitches on stitch holder 2 times and 11-11-12-12-13-14 stitches on a stitch holder 1 time = 26-26-26-28-28-28 stitches remain on needle for collar, work the rest of row as before. Continue to work back and forth over these 26-26-26-28-28-28 stitches as follows: Row 1 (right side): Work as before over the first 23-23-23-24-24-24 stitches, turn and tighten yarn. Row 2 (= wrong side): Work as before the rest of row, turn piece and tighten yarn. Row 3 (right side): Work as before over all stitches, turn piece and tighten yarn. Row 4 (= wrong side): Work as before the rest of row, turn piece and tighten yarn. Repeat rows 1-4 until collar measures approx. 9-9-9-10-10-10 cm on the inside at the shortest. Work 1 ridge back and forth over all stitches. Loosely cast off by knitting from right side. LEFT FRONT PIECE: Cast on 79-79-84-90-90-95 stitches (including 1 edge stitch in the side and 26-26-26-28-28-28 band stitches towards mid front) on circular needle size 5 mm with 1 strand Nepal + 1 strand Kid-Silk (= 2 strands). Purl 1 row (= wrong side). Work next row as follows from the right side (i.e. from the side): Work 1 edge stitch in garter stitch, knit 1, * purl 3, knit 2 *, work from *-* over the next 15-15-20-20-20-25 stitches, work A.1 (= 31-31-31-35-35-35 stitches), work A.2 (= 28-28-28-30-30-30 stitches), and finish with I-CORD EDGE LEFT FRONT PIECE over the 3 last stitches. Continue rib like this but work last row in A.2 and A.1 as follows from wrong side: Work i-cord edge over the 3 first stitches, work last row in A.2 and A.1, work 16-16-21-21-21-26 stitches in stocking stitch and decrease at the same time 3-1-3-4-1-2 stitches evenly over these 16-16-21-21-21-26 stitches and finish with 1 edge stitch in garter stitch. Piece measures approx. 6 cm from cast-on edge and there are 66-68-71-76-79-83 stitches on needle. Switch to circular needle size 6 mm. Now begin cables, i.e. work next row as follows from right side: 1 edge stitch in garter stitch, work 13-15-18-17-20-24 stitches in stocking stitch, work A.4 (= 26-26-26-30-30-30 stitches), work A.5 (= 23-23-23-25-25-25 stitches), finish with i-cord edge over the last 3 stitches mid front as before. Continue pattern like this. When piece measures 52-54-56-58-60-62 cm, cast off 5-5-7-8-8-9 stitches for armhole at the beginning of row from the side = 61-63-64-68-71-74 stitches. Continue pattern as before with 1 edge stitch in garter stitch towards armhole until piece measures 68-71-74-77-80-83 cm. On next row from right side, knit stitches in the outermost cable towards the side together 2 by 2 (= 4 stitches decreased) = 57-59-60-64-67-70 stitches remain on needle. Then slip stitches on stitch holder for diagonal shoulder as explained below. Begin in the side at armhole and slip stitches on a stitch holder on every row from armhole like this (to avoid cutting the yarn work stitches before slipping them on a stitch holder): Slip 10-11-11-12-13-14 stitches on stitch holder 2 times and 11-11-12-12-13-14 stitches on a stitch holder 1 time = 26-26-26-28-28-28 stitches remain on needle for collar, work the rest of row as before. Continue to work back and forth over these 26-26-26-28-28-28 stitches as follows: Row 1 (= wrong side): Work as before over the first 23-23-23-24-24-24 stitches, turn and tighten yarn. Row 2 (right side): Work as before the rest of row, turn piece and tighten yarn. Row 3 (= wrong side): Work as before over all stitches, turn piece and tighten yarn. Row 4 (right side): Work as before the rest of row, turn piece and tighten yarn. Repeat rows 1-4 until collar measures approx. 9-9-9-10-10-10 cm on the inside at the shortest but finish after a row from wrong side. Work 1 ridge back and forth over all stitches. Loosely cast off by knitting from right side. BACK PIECE: Cast on 124-124-134-144-144-154 stitches (including 1 edge stitch in each side) on circular needle size 5 mm with 1 strand Nepal and 1 strand Kid- Silk (= 2 strands). Purl 1 row (= wrong side). Work next row as follows from right side: 1 edge stitch in GARTER STITCH - read explanation above, knit 1, * purl 3, knit 2 *, work from *-* over the next 15-15-20-20-20-25 stitches, work A.1 (= 31-31-31-35-35-35 stitches), work A.2 (= 28-28-28-30-30-30 stitches), work A.3 (= 31-31-31-35-35-35 stitches), * knit 2, purl 3 *, work from *-* over the next 15-15-20-20-20-25 stitches, knit 1 and finish with 1 edge stitch in garter stitch. Continue rib like this but work last row in A.3, A.2 and A.1 as follows from wrong side: 1 edge stitch in garter stitch, work 16-16-21-21-21-26 stitches in stocking stitch and decrease 3-1-3-4-1-2 stitches evenly over these 16-16-21-21-21-26 stitches - read DECREASE TIP-1, work last row in A.3, A.2 and A.1, work 16-16-21-21-21-26 stitches in stocking stitch and decrease 3-1-3-4-1-2 stitches evenly over these 16-16-21-21-21-26 stitches and finish with 1 edge stitch in garter stitch. Piece measures approx. 6 cm from cast-on edge and there are 103-107-113-121-127-135 stitches on needle. Switch to circular needle size 6 mm. Now begin cables, i.e. work next row as follows from right side: 1 edge stitch in garter stitch, 13-15-18-17-20-24 stitches in stocking stitch, work A.4 (= 26-26-26-30-30-30 stitches), work A.5 (= 23-23-23-25-25-25 stitches), work A.6 (= 26-26-26-30-30-30 stitches), work 13-15-18-17-20-24 stitches in stocking stitches and finish with 1 edge stitch in garter stitch. Continue pattern like this. When piece measures 52-54-56-58-60-62 cm, cast off 5-5-7-8-8-9 stitches at the beginning of the next 2 rows for armhole = 93-97-99-105-111-117 stitches remain. Continue with pattern as before with 1 edge stitch in garter stitch in each side until piece measures 68-71-74-77-80-83 cm. On next row from right side, knit stitches in the outermost cable in each side together 2 by 2 (= 8 stitches decreased on row) = 85-89-91-97-103-109 stitches remain on needle. Then slip stitches on a stitch holder for diagonal shoulder in each side and cast at the same time off for neck as explained below. Begin at armhole and slip stitches on a stitch holder on every row from armhole in each side like this (to avoid cutting the yarn work stitches before slipping them on a stitch holder): Slip 10-11-11-12-13-14 stitches on a stitch holder 2 times in each side and 11-11-12-12-13-14 stitches on a stitch holder 1 time in each side. AT THE SAME TIME when piece measures 69-72-75-78-81-84 cm, decrease 8 stitches over the 2 cables mid back (knit stitches in each cable together 2 by 2). On next row cast off the middle 13-13-13-15-15-15 stitches for neck and finish each shoulder separately. Continue to slip stitches on a stitch holder and cast at the same time off 1 stitch for neck on next row from neck. When all stitches have been slipped on a stitch holder for diagonal shoulder and cast off for neck, back piece measures approx. 72-75-78-81-84-87 cm from the highest point on shoulder and down. Finish the other shoulder the same way. SHOULDER: Slip the 31-33-34-36-39-42 stitches from stitch holder on one of the shoulder back on circular needle size 6 mm. Knit 1 row from wrong side over these stitches but to avoid holes in every transition where stitches were slipped on stitch holder, pick up loop between 2 stitches and slip it twisted on left needle before working it together with next stitch on left needle. Then loosely cast off all stitches by knitting from right side. Work the same way along the 3 other shoulders. ASSEMBLY: Sew shoulder seams inside cast-off edge. Sew collar tog mid back (make sure that seam is facing inwards when collar is folded down). Sew collar to neckline in the back of neck. SLEEVE: Pick up 44-48-50-54-56-58 stitches along armhole inside 1 edge stitch in garter stitch on circular needle size 6 mm with 1 strand of each quality (= 2 strands) - NOTE: Do not pick up stitches along the bottom of armhole. Work in stocking stitch back and forth for 3-3-4-5-5-6 cm (= sleeve cap and as far as the bottom of armhole). Then work sleeves in the round on double pointed needles/a short circular needle size 6 mm. Insert 1 marker thread at beginning of round (= mid under sleeve). Move the marker thread upwards when working; it should be used for decrease mid under sleeve. Work in stocking stitch in the round. When sleeve measures 2 cm from where marker thread was inserted, decrease 2 stitches mid under sleeve - read DECREASE TIP-2. Decrease like this every 3-3-2½-2-2-1½ cm 5-6-7-8-8-9 times in total = 34-36-36-38-40-40 stitches. Work until sleeve measures 42-42-41-39-38-36 cm from where marker thread was inserted (sleeve has been worked to finished length, try the jacket on and work to desired length). Switch to double pointed needles size 5 mm. Knit 1 round while increasing 8-6-6-4-8-8 stitches evenly - read INCREASE TIP = 42-42-42-42-48-48 stitches. Work rib in the round = knit 2/purl 4 for 5 cm. Knit 1 round and then loosely cast off by purling. Work the other sleeve the same way. Fold the rib at the bottom upwards on both sleeves and fasten with a couple of stitches. MORE ASSEMBLY: Sew side seams inside 1 edge stitch in garter stitch. Sew bottom of armhole. BELT: Cast on 5 stitches on double pointed needles size 6 mm with 1 strand Nepal + 1 strand Kid-Silk and work TUBE KNITTING - read explanation above, until belt measures approx. 250-300 cm (or desired length). Cast off. Place belt double when using it. |
||||||||||||||||
Diagram explanations |
||||||||||||||||
|
||||||||||||||||
 |
||||||||||||||||
 |
||||||||||||||||
 |
||||||||||||||||
 |
||||||||||||||||
Have you finished this pattern?Tag your pictures with #dropspattern #wintercardinalcardigan or submit them to the #dropsfan gallery. Do you need help with this pattern?You'll find 30 tutorial videos, a Comments/Questions area and more by visiting the pattern on garnstudio.com. © 1982-2025 DROPS Design A/S. We reserve all rights. This document, including all its sub-sections, has copyrights. Read more about what you can do with our patterns at the bottom of each pattern on our site. |
||||||||||||||||


With over 40 years in knitting and crochet design, DROPS Design offers one of the most extensive collections of free patterns on the internet - translated to 17 languages. As of today we count 320 catalogues and 12092 patterns translated into English (UK/cm). 12092
We work hard to bring you the best knitting and crochet have to offer, inspiration and advice as well as great quality yarns at incredible prices! Would you like to use our patterns for other than personal use? You can read what you are allowed to do in the Copyright text at the bottom of all our patterns. Happy crafting!
Post a comment to pattern DROPS 205-24
We would love to hear what you have to say about this pattern!
If you want to leave a question, please make sure you select the correct category in the form below, to speed up the answering process. Required fields are marked *.