
Popular categories
Looking for a yarn?


Comments / Questions (109)
![]() Judith wrote:
Judith wrote:
Ich liebe das Garn, ich liebe das Modell, ich habe Größe S gestrickt und musste das Projekt aufgeben, weil die Jacke viel zu eng wurde (Maschenprobe stimmte). Aufribbeln war möglich, machte das Garn aber nicht schöner. Ich versuche es jetzt mit Größe L.
08.06.2025 - 18:47
![]() ELSA PAVLOTZKY wrote:
ELSA PAVLOTZKY wrote:
Hay un video que explica cómo coser los hombros luego de haber cerrado los puntos según las explicaciones? Lo mismo para las costuras laterales
07.01.2025 - 10:27DROPS Design answered:
Hola Elsa, puedes usar este método de costura invisible para la labor: https://www.garnstudio.com/video.php?id=48&lang=es.
12.01.2025 - 15:20
![]() Teatske Wissema wrote:
Teatske Wissema wrote:
Het telpatroon van dit vest klopt van geen kant a2 staat dat het 30 steken zijn zijn er 26 dus nu komt het helemaal niet uit, erg jammer, dit geldt voor alle telpatronen van dit vest
29.12.2024 - 20:03
![]() Chantal Martin wrote:
Chantal Martin wrote:
Je n arrive pas a terminer le devant . je ne comprend pas comment faire le col; merci
11.10.2024 - 10:46DROPS Design answered:
Bonjour Mme Martin, tricotez les 26 ou 28 mailles en allers et retours avec des rangs raccourcis en commençant sur l'endroit (devant droit)/l'envers (devant gauche): tricotez 2 rangs sur les 23-24 premières mailles, 2 rangs sur toutes les mailles - tricotez les mailles comme avant (continuez les torsades également). Répétez ces 4 rangs jusqu'à ce que le col mesure 9 -10 cm côté épaule , tricotez 2 rangs endroit et rabattez toutes les mailles. Dans cette vidéo, nous montrons (pour un pull) comment ce type de bordure est assemblée ensuite au milieu dos/le long de l'encolure dos. Bon tricot!
11.10.2024 - 16:06
![]() Carla wrote:
Carla wrote:
Ik moet bij het voorpand steken op een hulpvraag zetten voor een diagonale schouder. Daarna moet ik naald 1, 23 steken breien en daarna weer alle steken. Ik snap dit gedeelte niet helemaal. Moet ik niet minderen op het patroon loopt het voorpand schreef af.
12.09.2024 - 17:44DROPS Design answered:
Dag Carla,
Nadat je steken op een hulpdraad hebt gezet (in 3 stappen, zodat de schouder schuin afloopt) heb je nog de steken over op de naald voor de hals. Daarna brei je de hals ook met verkorte toeren, zodat hij aan de binnenkant (waar de hals later aan het achterpand vast genaaid wordt) korter is, waardoor de hals mooier valt. Voor het andere voorpand brei je ook nog een stukje verder in de hoogte, alleen over de halssteken.
12.09.2024 - 20:42
![]() Neringa wrote:
Neringa wrote:
Hi! I would like to thank you so much for such nice cardigan pattern. Some questions & answers to them were very helpful. I did it in one month and I am very happy finally to own the cardigan I like. Just the one remark - I needed much more yarns than it is indicated (I knitted quite loosely).
11.07.2024 - 15:14
![]() Biggi wrote:
Biggi wrote:
Hallo, mein Problem ist, was muss ich an den Halsausschnitt des Rückenteils nähen und was nähe ich als Kragen zusammen? Wie puzzle ich das zusammen? Vielleicht gibts eine Zeichnung?ich bin zu doof🙈sorry
17.05.2024 - 22:00DROPS Design answered:
Liebe Biggi, in diesem Video zeigen wir, wie man so einen Kragen näht, dh zuerst die abgekettenen Maschen von beiden Vorderteilen/Blenden zusammennähen, dann die Blende am Halsausschnitt annähen. Viel Spaß beim Stricken!
21.05.2024 - 12:07
![]() Biggi wrote:
Biggi wrote:
Hallo, ich begreife leider nicht ganz, wie der Kragen angenäht werden soll. LG Biggi
09.05.2024 - 18:39DROPS Design answered:
Liebe Biggi, in diesem Video zeigen wir (für ein anderes Modell/Muster), wie man zuerst die Maschen der Blende zusammennäht, dann wie die Blende angenäht wird. Viel Spaß beim Stricken!
10.05.2024 - 08:47
![]() Biggi wrote:
Biggi wrote:
Danke für die schnelle Antwort, ich habs jetzt begriffen.
16.02.2024 - 20:02
![]() Biggi wrote:
Biggi wrote:
Hallo, ich habe eine Frage zur Abnahme am äußeren Zopf, (der am I Cord oder der an der Seite? Wenn ich die 4 Maschen abgenommen habe, arbeite ich dann glatt rechts weiter oder arbeite ich den Zopf mit 2/2 weiter?
14.02.2024 - 20:00DROPS Design answered:
Liebe Biggi, dieser Zopf ist der diejenige, der an der Seite sind, damit die Schulter die richtige Breite hat, muss man Maschen in diesem Zopf abnehmen. Diese Maschen werden dann auf dem Faden für den Schulter stillgelegt. Viel Spaß beim stricken!
15.02.2024 - 07:32
|
||||||||||||||||
Winter Cardinal Cardigan#wintercardinalcardigan |
||||||||||||||||
 |
 |
|||||||||||||||
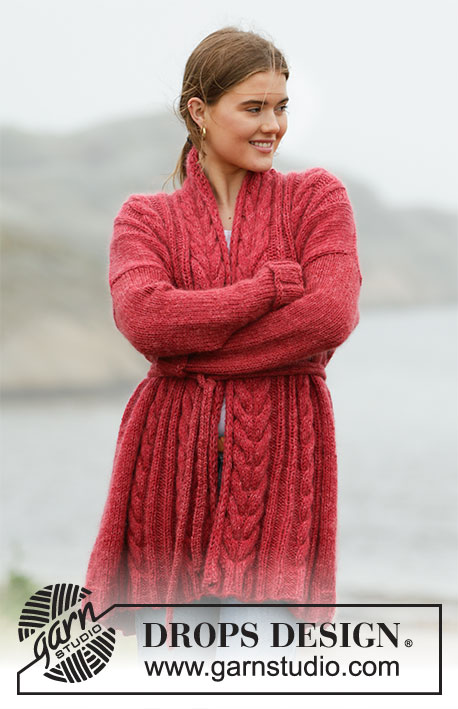
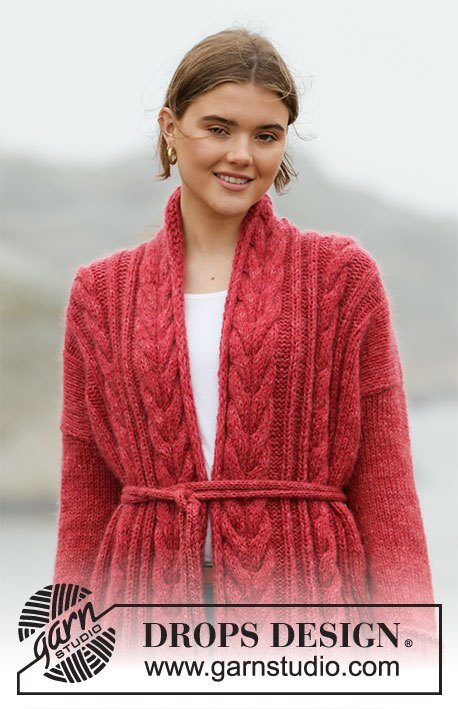
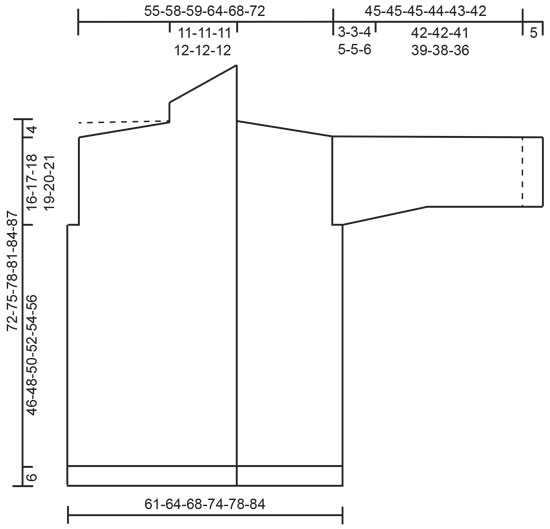
Knitted long jacket in DROPS Nepal and DROPS Kid-Silk. Piece is knitted with cables, shawl collar and belt. Size: S - XXXL
DROPS 205-24 |
||||||||||||||||
|
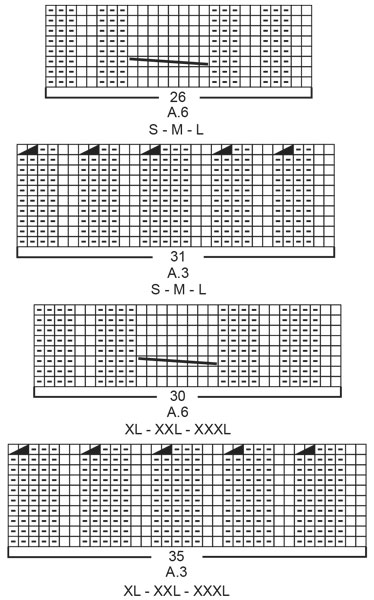
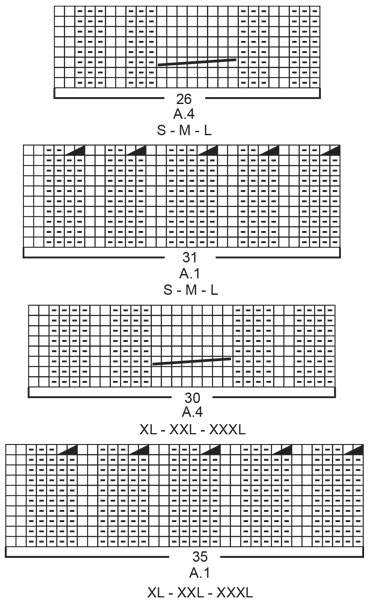
---------------------------------------------------------- EXPLANATION FOR THE PATTERN: ---------------------------------------------------------- GARTER STITCH (back and forth): Knit all rows. 1 ridge vertically = knit 2 rows. I-CORD EDGE RIGHT FRONT PIECE (applies to outermost edge along mid front): Begin from right side, * pass the first 3 stitches on needle loosely onto right needle without working the stitches (pass 1 by 1 with thread at the back of piece), tighten yarn a bit, and work pattern and stocking stitch over the other stitches as explained in pattern, turn piece, work stocking stitch and pattern as before until 3 stitches remain on row towards mid front, purl these stitches, turn piece *, work from *-* until finished measurements. NOTE! You need to work a few cm and pull the edge a bit before you see the best result. I-CORD EDGE LEFT FRONT PIECE (applies to outermost edge along mid front): Begin from right side, * work stocking stitch and pattern as before until 3 stitches on needle remain towards mid front, pass the last 3 stitches on needle loosely onto right needle without working the stitches (pass them 1 by 1 with thread at the back of piece), turn piece, tighten yarn, and purl the first 3 stitches, then work pattern and stocking stitch over the other stitches as explained in pattern, turn piece *, work from *-* until finished measurements. NOTE! You need to work a few cm and pull the edge a bit before you see the best result. PATTERN: See diagrams A.1 to A.6. Choose diagram for your size. Diagrams show all rows in pattern seen from the right side. DECREASE TIP-1 (evenly): Decrease from wrong side before cables begin. To calculate how to decrease evenly, count number of stitches to decrease over (e.g. 16 stitches) and divide by number of decreases to be done (e.g. 3) = 5.3. In this example decrease by working approx. every 4th and 5th stitch purl together. DECREASE TIP-2 (applies to mid under sleeves): Begin 3 stitches before marker thread and knit 2 together, knit 2 (marker thread is between these 2 stitches), slip 1 stitch knitwise, knit 1, pass slipped stitch over stitch worked (= 2 stitches decreased). INCREASE TIP (evenly): To calculate how to increase evenly, use the total number of stitches to increase over (e.g. 34 stitches) and divide stitches by number of increases to be done (e.g. 8) = 4.25. In this example increase by making 1 yarn over after approx. every 4th stitch. On next round work yarn overs twisted to avoid holes. TUBE KNITTING: Knit 1 row from right side, * slide all stitches to the right side of needle without turning the piece, tighten yarn and knit over all stitches *, work from *-*. ---------------------------------------------------------- START THE PIECE HERE: ---------------------------------------------------------- JACKET - SHORT OVERVIEW OF THE PIECE: Front pieces and back piece are worked back and forth on circular needle, bottom up. There are cables on both front pieces and back piece. On front piece the outermost 26-26-26-28-28-28 stitches towards mid front count as band with overlap. Sew piece together on the shoulders. Pick up stitches along the armholes and work sleeves back and forth on circular needle top down until sleeve cap is done, then work the sleeves in the round until finished measurements. Work sleeves top down to adjust sleeve length to desired measurements. Then sew sleeve and side seams and collar to neck line at the back of neck. RIGHT FRONT PIECE: Cast on 79-79-84-90-90-95 stitches (including 26-26-26-28-28-28 band stitches towards mid front and 1 edge stitch in the side) on circular needle size 5 mm with 1 strand Nepal and 1 strand Kid- Silk (= 2 strands). Purl 1 row (= wrong side). Work next row as follows from the right side (i.e. from mid front): Work I-CORD EDGE RIGHT FRONT PIECE over the first 3 stitches - read explanation above, work A.2 (= 28-28-28-30-30-30 stitches), work A.3 (= 31-31-31-35-35-35 stitches), * knit 2, purl 3 *, work from *-* over the next 15-15-20-20-20-25 stitches, knit 1 and finish with 1 edge stitch in garter stitch. Continue rib like this but work last row in A.3 and A.2 as follows from wrong side: 1 edge stitch in garter stitch, work 16-16-21-21-21-26 stitches in stocking stitch and decrease at the same time 3-1-3-4-1-2 stitches evenly over these 16-16-21-21-21-26 stitches - read DECREASE TIP 1, work last row in A.3 and A.2, and finish with i-cord edge over the last 3 stitches towards mid front. Piece measures approx. 6 cm from cast-on edge and there are 66-68-71-76-79-83 stitches on needle. Switch to circular needle size 6 mm. Now begin cables, i.e. work next row as follows from right side: Continue with i-cord edge over the first 3 stitches mid front, work A.5 (= 23-23-23-25-25-25 stitches), work A.6 (= 26-26-26-30-30-30 stitches), work 13-15-18-17-20-24 stitches in stocking stitch and finish with 1 edge stitch in garter stitch towards the side. Continue pattern like this. REMEMBER THE KNITTING TENSION! When piece measures 52-54-56-58-60-62 cm, cast off 5-5-7-8-8-9 stitches for armhole at the beginning of row from the side = 61-63-64-68-71-74 stitches. Continue pattern as before with 1 edge stitch in garter stitch towards armhole until piece measures 68-71-74-77-80-83 cm. On next row from right side, knit stitches in the outermost cable towards the side together 2 by 2 (= 4 stitches decreased) = 57-59-60-64-67-70 stitches remain on needle. Then slip stitches on stitch holder for diagonal shoulder as explained below. Begin in the side at armhole and slip stitches on a stitch holder on every row from armhole like this (to avoid cutting the yarn work stitches before slipping them on a stitch holder): Slip 10-11-11-12-13-14 stitches on stitch holder 2 times and 11-11-12-12-13-14 stitches on a stitch holder 1 time = 26-26-26-28-28-28 stitches remain on needle for collar, work the rest of row as before. Continue to work back and forth over these 26-26-26-28-28-28 stitches as follows: Row 1 (right side): Work as before over the first 23-23-23-24-24-24 stitches, turn and tighten yarn. Row 2 (= wrong side): Work as before the rest of row, turn piece and tighten yarn. Row 3 (right side): Work as before over all stitches, turn piece and tighten yarn. Row 4 (= wrong side): Work as before the rest of row, turn piece and tighten yarn. Repeat rows 1-4 until collar measures approx. 9-9-9-10-10-10 cm on the inside at the shortest. Work 1 ridge back and forth over all stitches. Loosely cast off by knitting from right side. LEFT FRONT PIECE: Cast on 79-79-84-90-90-95 stitches (including 1 edge stitch in the side and 26-26-26-28-28-28 band stitches towards mid front) on circular needle size 5 mm with 1 strand Nepal + 1 strand Kid-Silk (= 2 strands). Purl 1 row (= wrong side). Work next row as follows from the right side (i.e. from the side): Work 1 edge stitch in garter stitch, knit 1, * purl 3, knit 2 *, work from *-* over the next 15-15-20-20-20-25 stitches, work A.1 (= 31-31-31-35-35-35 stitches), work A.2 (= 28-28-28-30-30-30 stitches), and finish with I-CORD EDGE LEFT FRONT PIECE over the 3 last stitches. Continue rib like this but work last row in A.2 and A.1 as follows from wrong side: Work i-cord edge over the 3 first stitches, work last row in A.2 and A.1, work 16-16-21-21-21-26 stitches in stocking stitch and decrease at the same time 3-1-3-4-1-2 stitches evenly over these 16-16-21-21-21-26 stitches and finish with 1 edge stitch in garter stitch. Piece measures approx. 6 cm from cast-on edge and there are 66-68-71-76-79-83 stitches on needle. Switch to circular needle size 6 mm. Now begin cables, i.e. work next row as follows from right side: 1 edge stitch in garter stitch, work 13-15-18-17-20-24 stitches in stocking stitch, work A.4 (= 26-26-26-30-30-30 stitches), work A.5 (= 23-23-23-25-25-25 stitches), finish with i-cord edge over the last 3 stitches mid front as before. Continue pattern like this. When piece measures 52-54-56-58-60-62 cm, cast off 5-5-7-8-8-9 stitches for armhole at the beginning of row from the side = 61-63-64-68-71-74 stitches. Continue pattern as before with 1 edge stitch in garter stitch towards armhole until piece measures 68-71-74-77-80-83 cm. On next row from right side, knit stitches in the outermost cable towards the side together 2 by 2 (= 4 stitches decreased) = 57-59-60-64-67-70 stitches remain on needle. Then slip stitches on stitch holder for diagonal shoulder as explained below. Begin in the side at armhole and slip stitches on a stitch holder on every row from armhole like this (to avoid cutting the yarn work stitches before slipping them on a stitch holder): Slip 10-11-11-12-13-14 stitches on stitch holder 2 times and 11-11-12-12-13-14 stitches on a stitch holder 1 time = 26-26-26-28-28-28 stitches remain on needle for collar, work the rest of row as before. Continue to work back and forth over these 26-26-26-28-28-28 stitches as follows: Row 1 (= wrong side): Work as before over the first 23-23-23-24-24-24 stitches, turn and tighten yarn. Row 2 (right side): Work as before the rest of row, turn piece and tighten yarn. Row 3 (= wrong side): Work as before over all stitches, turn piece and tighten yarn. Row 4 (right side): Work as before the rest of row, turn piece and tighten yarn. Repeat rows 1-4 until collar measures approx. 9-9-9-10-10-10 cm on the inside at the shortest but finish after a row from wrong side. Work 1 ridge back and forth over all stitches. Loosely cast off by knitting from right side. BACK PIECE: Cast on 124-124-134-144-144-154 stitches (including 1 edge stitch in each side) on circular needle size 5 mm with 1 strand Nepal and 1 strand Kid- Silk (= 2 strands). Purl 1 row (= wrong side). Work next row as follows from right side: 1 edge stitch in GARTER STITCH - read explanation above, knit 1, * purl 3, knit 2 *, work from *-* over the next 15-15-20-20-20-25 stitches, work A.1 (= 31-31-31-35-35-35 stitches), work A.2 (= 28-28-28-30-30-30 stitches), work A.3 (= 31-31-31-35-35-35 stitches), * knit 2, purl 3 *, work from *-* over the next 15-15-20-20-20-25 stitches, knit 1 and finish with 1 edge stitch in garter stitch. Continue rib like this but work last row in A.3, A.2 and A.1 as follows from wrong side: 1 edge stitch in garter stitch, work 16-16-21-21-21-26 stitches in stocking stitch and decrease 3-1-3-4-1-2 stitches evenly over these 16-16-21-21-21-26 stitches - read DECREASE TIP-1, work last row in A.3, A.2 and A.1, work 16-16-21-21-21-26 stitches in stocking stitch and decrease 3-1-3-4-1-2 stitches evenly over these 16-16-21-21-21-26 stitches and finish with 1 edge stitch in garter stitch. Piece measures approx. 6 cm from cast-on edge and there are 103-107-113-121-127-135 stitches on needle. Switch to circular needle size 6 mm. Now begin cables, i.e. work next row as follows from right side: 1 edge stitch in garter stitch, 13-15-18-17-20-24 stitches in stocking stitch, work A.4 (= 26-26-26-30-30-30 stitches), work A.5 (= 23-23-23-25-25-25 stitches), work A.6 (= 26-26-26-30-30-30 stitches), work 13-15-18-17-20-24 stitches in stocking stitches and finish with 1 edge stitch in garter stitch. Continue pattern like this. When piece measures 52-54-56-58-60-62 cm, cast off 5-5-7-8-8-9 stitches at the beginning of the next 2 rows for armhole = 93-97-99-105-111-117 stitches remain. Continue with pattern as before with 1 edge stitch in garter stitch in each side until piece measures 68-71-74-77-80-83 cm. On next row from right side, knit stitches in the outermost cable in each side together 2 by 2 (= 8 stitches decreased on row) = 85-89-91-97-103-109 stitches remain on needle. Then slip stitches on a stitch holder for diagonal shoulder in each side and cast at the same time off for neck as explained below. Begin at armhole and slip stitches on a stitch holder on every row from armhole in each side like this (to avoid cutting the yarn work stitches before slipping them on a stitch holder): Slip 10-11-11-12-13-14 stitches on a stitch holder 2 times in each side and 11-11-12-12-13-14 stitches on a stitch holder 1 time in each side. AT THE SAME TIME when piece measures 69-72-75-78-81-84 cm, decrease 8 stitches over the 2 cables mid back (knit stitches in each cable together 2 by 2). On next row cast off the middle 13-13-13-15-15-15 stitches for neck and finish each shoulder separately. Continue to slip stitches on a stitch holder and cast at the same time off 1 stitch for neck on next row from neck. When all stitches have been slipped on a stitch holder for diagonal shoulder and cast off for neck, back piece measures approx. 72-75-78-81-84-87 cm from the highest point on shoulder and down. Finish the other shoulder the same way. SHOULDER: Slip the 31-33-34-36-39-42 stitches from stitch holder on one of the shoulder back on circular needle size 6 mm. Knit 1 row from wrong side over these stitches but to avoid holes in every transition where stitches were slipped on stitch holder, pick up loop between 2 stitches and slip it twisted on left needle before working it together with next stitch on left needle. Then loosely cast off all stitches by knitting from right side. Work the same way along the 3 other shoulders. ASSEMBLY: Sew shoulder seams inside cast-off edge. Sew collar tog mid back (make sure that seam is facing inwards when collar is folded down). Sew collar to neckline in the back of neck. SLEEVE: Pick up 44-48-50-54-56-58 stitches along armhole inside 1 edge stitch in garter stitch on circular needle size 6 mm with 1 strand of each quality (= 2 strands) - NOTE: Do not pick up stitches along the bottom of armhole. Work in stocking stitch back and forth for 3-3-4-5-5-6 cm (= sleeve cap and as far as the bottom of armhole). Then work sleeves in the round on double pointed needles/a short circular needle size 6 mm. Insert 1 marker thread at beginning of round (= mid under sleeve). Move the marker thread upwards when working; it should be used for decrease mid under sleeve. Work in stocking stitch in the round. When sleeve measures 2 cm from where marker thread was inserted, decrease 2 stitches mid under sleeve - read DECREASE TIP-2. Decrease like this every 3-3-2½-2-2-1½ cm 5-6-7-8-8-9 times in total = 34-36-36-38-40-40 stitches. Work until sleeve measures 42-42-41-39-38-36 cm from where marker thread was inserted (sleeve has been worked to finished length, try the jacket on and work to desired length). Switch to double pointed needles size 5 mm. Knit 1 round while increasing 8-6-6-4-8-8 stitches evenly - read INCREASE TIP = 42-42-42-42-48-48 stitches. Work rib in the round = knit 2/purl 4 for 5 cm. Knit 1 round and then loosely cast off by purling. Work the other sleeve the same way. Fold the rib at the bottom upwards on both sleeves and fasten with a couple of stitches. MORE ASSEMBLY: Sew side seams inside 1 edge stitch in garter stitch. Sew bottom of armhole. BELT: Cast on 5 stitches on double pointed needles size 6 mm with 1 strand Nepal + 1 strand Kid-Silk and work TUBE KNITTING - read explanation above, until belt measures approx. 250-300 cm (or desired length). Cast off. Place belt double when using it. |
||||||||||||||||
Diagram explanations |
||||||||||||||||
|
||||||||||||||||
|
||||||||||||||||

|
||||||||||||||||
|
||||||||||||||||
|
||||||||||||||||
Have you finished this pattern?Tag your pictures with #dropspattern #wintercardinalcardigan or submit them to the #dropsfan gallery. Do you need help with this pattern?You'll find 30 tutorial videos, a Comments/Questions area and more by visiting the pattern on garnstudio.com. © 1982-2025 DROPS Design A/S. We reserve all rights. This document, including all its sub-sections, has copyrights. Read more about what you can do with our patterns at the bottom of each pattern on our site. |
||||||||||||||||


With over 40 years in knitting and crochet design, DROPS Design offers one of the most extensive collections of free patterns on the internet - translated to 17 languages. As of today we count 314 catalogues and 11822 patterns translated into English (UK/cm).
We work hard to bring you the best knitting and crochet have to offer, inspiration and advice as well as great quality yarns at incredible prices! Would you like to use our patterns for other than personal use? You can read what you are allowed to do in the Copyright text at the bottom of all our patterns. Happy crafting!
Post a comment to pattern DROPS 205-24
We would love to hear what you have to say about this pattern!
If you want to leave a question, please make sure you select the correct category in the form below, to speed up the answering process. Required fields are marked *.