
Popular categories
Looking for a yarn?


Comments / Questions (56)
![]() Loly wrote:
Loly wrote:
Hola no sé qué hago mal pero la orilla del cuello y cenefa queda como un embudo y no queda la orilla del cuello asentada o sea no queda sobre el cuello gracias
17.11.2023 - 01:01DROPS Design answered:
Hola Loly, puede ser que, cuando pasas del elástico del cuello al punto jersey del canesú, trabajes demasiado prieto el punto jersey, lo que hace que se eleve el cuello, haciendo esa forma de embudo o cono. Puedes intentar usar una aguja ligeramente más grande para obtener la tensión correcta. También puede ser que el elástico quede muy flojo (recuerda que debe quedar más prieto que el resto de la labor en punto jersey) o que el borde de montaje quede demasiado prieto. En principio, al trabajar la prenda de arriba abajo, el cuello debería asentarse mejor.
26.11.2023 - 19:12
![]() Silke Bilet wrote:
Silke Bilet wrote:
DROPS Children 32-10 DROPS Design: Modell me-040-bn Hallo,ich bin dabei, das obige Modell zu stricken- Passe ist fertig, jetzt soll für den Rumpf bei 13cm excl. Halsausschnitt die arbeit geteilt werden... ich habe aber bereits jetzt 15,5cm Länge...hätte ich während der Passe schon teilen müssen??? Danke für eine Antwort LG Silke Bilet
11.11.2023 - 15:31DROPS Design answered:
Liebe Frau Bilet, es hängt sicher an Ihrer Reihenanzahl für 10 cm, nach A.1 soll die Arbeit bzw A.1 ca 13 cm messen. Wenn A.1 bei Ihnen länger ist, dann sollen Sie die Arbeit früher = nach 13 cm verteilen und dann A.1 beim Rumpf und Ärmel separat zur Ende stricken. Viel Spaß beim stricken!
13.11.2023 - 07:42
![]() Isabelle wrote:
Isabelle wrote:
Bonjour, je fais référence à la question de Catherine du 18/1/2023, et à la réponse qui l accompagne. Dans les explications pour la réhausse, il est dit de refaire 2 fois de plus les rangs raccourcis en enlevant 8 mailles de chaque côté. Ors, dans votre réponse vous parlez de 4 mailles....pouvez-vous préciser s il vous plaît ?Merci à vous
19.10.2023 - 13:36DROPS Design answered:
Bonjour Isabelle, les explications sont justes, vous devez tricoter 8 mailles à chacun des rangs raccourcis de la réhausse, il doit s'agir d'une faute de frappe dans la réponse précédente. Bon tricot!
19.10.2023 - 15:54
![]() Isabelle wrote:
Isabelle wrote:
Bonjour je ne comprends pas comment augmenter le tricot car sur le schéma A 1 au rang 4 lorsqu'on commence le motif il faut augmenter au début et à la fin du motif d'une maille : ce qui veut dire qu'il faut faire 2 jetés consécutifs? Merci à toute votre équipe !
31.08.2023 - 11:59DROPS Design answered:
Bonjour Isabelle, on tricote le 1er rang de A.1 ainsi: sur 6 mailles en taille 12/18 mois et 2 ans: (1 jeté, 5 m end, 1 jeté, 1 m end) - sur 7 mailles dans les autres tailles: (7 m end, 1 jeté) - répétez de (à) tout le tour, vous aurez ainsi 1 m entre les jeté en 12/18 mois et 2 ans et 7 m entre chaque jeté dans les autres tailles. Bon tricot!
01.09.2023 - 08:31
![]() Catherine wrote:
Catherine wrote:
Bonsoir, je ne comprends pas les explications concernant la réhausse encolure dos dans la rubrique techniques employées.J'ai l'impression qu'il y a une erreur car on dit de placer le marqueur au milieu DEVANT puis à la fin des explications de tricoter jusqu'au milieu DOS .Mais dans ce cas ma réhausse se trouve devant l'ouvrage ? Merci pour votre réponse, bien cordialement
16.01.2023 - 18:44DROPS Design answered:
Bonjour Catherine, pour la réhausse, on place un marqueur au milieu du devant, car on va se servir de ce marqueur pour tricoter les rangs raccourcis, autrement dit, en commençant au milieu dos, vous tricotez jusqu'à ce qu'il reste 8 à 12 m avant le marqueur du milieu devant, tournez et tricotez à l'envers sur l'envers jusqu'à ce qu'il reste 8 à 12 m avant le marqueur du milieu devant, continuez ainsi en tricotant 4 m en moins tous les rangs (on doit tricoter 4 séries de rangs raccourcis soit 8 rangs au total). Bon tricot!
17.01.2023 - 10:00
![]() Jill wrote:
Jill wrote:
I am making the jumper in size 2. For the sleeve it says increase after 1cm, then increase after 2cm six times. This totals 13 cm. However the next instruction says when the sleeve measures 12cm - but I am already at 13cm. Help please.
28.11.2022 - 20:36DROPS Design answered:
Dear Jill, start first increase after 1 cm, then work 2nd decrease after 3 cm (= 2 cm later), 3rd decrease after 5 cm (2 cm later), 4th decrease after 7 cm (2 cm later), 5th decrease after 9 cm (2 cm later) and 6th decrease after 11 cm (2 cm later), there is still 1 cm before ribbing edge. Happy knitting!
29.11.2022 - 10:00
![]() Elena wrote:
Elena wrote:
Ho eseguito questo simpatico maglioncino con facilità perché la spiegazione è ben fatta. Complimenti.
25.10.2022 - 20:04
![]() Stephanie Gaskell wrote:
Stephanie Gaskell wrote:
I have 66 stitches to commence A1 pattern for 12-18 mth size. Then pattern has 16 stitches which h does not divide into 66. Can you advise me on how to proceed.
19.08.2022 - 04:11DROPS Design answered:
Hi Stephanie, You choose the diagram for your size, which in your case is the bottom A.1 for size 12-18 months. This starts with 6 stitches in each repeat (plus 2 yarn overs so the next row has 8 stitches in each repeat) and 11 repeats of A.1 on the round. Happy knitting!
19.08.2022 - 06:51
![]() Toni wrote:
Toni wrote:
Hello, I am knitting the 5/6 and come around a problem, I got to 155 stitch and been told to increase 19 stitches to get 164? but it works out 174 stitches. do I increase 19 stitches or 9 stitches? Thank you
21.07.2022 - 20:04DROPS Design answered:
Hi Toni, for size 5/6 - when the piece measure 19 cm from where body and sleeves were divided, increase 9 stitches evenly on the next round = 164 stitches. So you should increase 9 stitches: 155+9=164. Happy knitting!
22.07.2022 - 21:38
![]() Elisabet wrote:
Elisabet wrote:
Hej Vad är finessen med att öka 9 maskor sista varvet före resåren? Jag förstår att man måste nå delbarhet med 4, men varför så många maskor (4cm!)
20.02.2022 - 09:39DROPS Design answered:
Hei Elisabet På 80 tallet skulle gjerne vrangborden være mye smalere enn selve genseren, men nå ønsker man seg en penere overgang mellom bol og vrangbord og bortsdett fra å bytte pinne str. øker man også med noen masker. mvh DROPS Design
21.02.2022 - 13:11
|
|||||||||||||
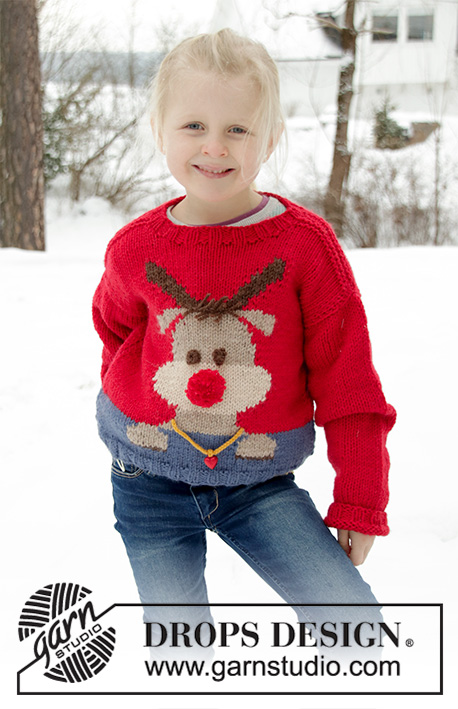
Little Red Nose#littlerednosesweater |
|||||||||||||
 |
 |
||||||||||||
Knitted Christmas jumper for babies and children with round yoke in DROPS Merino Extra Fine. The piece is worked top down with Nordic pattern. Sizes 12 months – 12 years.
DROPS Children 32-10 |
|||||||||||||
|
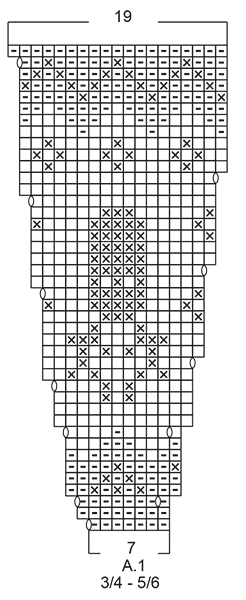
EXPLANATIONS FOR THE PATTERN: ------------------------------------------------------- PATTERN: See diagram A.1. Choose diagram for your size. The whole pattern is worked in stocking stitch. DECREASE/INCREASE TIP: To work out when to decrease/increase on the round, count the total number of stitches on the needle (e.g. 72 stitches) and divide by the number of decreases/increases to be made (e.g. 6) = 12. In this example, decrease by working together each 11th and 12th stitch, or increase after each 12th stitch by making 1 yarn over (the yarn overs are worked twisted on the next row to avoid holes). INCREASE TIP (for sides of body): Increase 1 stitch on each side of marker thread as follows: Start 2 stitches before marker thread, make 1 yarn over, work 4 stitches (marker thread sits in the middle of these 4 stitches), make 1 yarn over (= 2 stitches increased). On the next round work the yarn overs twisted to avoid holes. DECREASE TIP (for mid under sleeves): Decrease 1 stitch on each side of the marker thread as follows: Start 3 stitches before the marker thread, knit 2 together, knit 2 (marker thread sits between these 2 stitches), slip 1 stitch as if to knit, knit 1 and pass the slipped stitch over the knitted stitch (= 2 stitches decreased). ELEVATION (back of neck): Skip this section if you do not want an elevation. SIZE 12/18 MONTHS (2-5/6-7/8) YEARS: place 1 marker between 2 stitches mid-front (after 33 (36-42-42) stitches). SIZE (3/4-9/10-11/12) YEARS: place 1 marker in the stitch mid-front (in stitch 39-46-46) Knit until there are 8 (8-8-10-10-12-12) stitches left before the marker, turn, tighten strand and purl until there are 8 (8-8-10-10-12-12) stitches left on the other side, turn, tighten strand and knit until there are 16 (16-16-18-18-20-20) stitches left, turn, tighten strand and purl until there are 16 (16-16-18-18-20-20) stitches left on other side. Continue by working 8 stitches less each time you turn, 2 more times in each side, turn, tighten strand and knit to mid-back. ------------------------------------------------------- START THE PIECE HERE : ------------------------------------------------------- JUMPER - SHORT OVERVIEW OF THE PIECE: The piece is worked in the round, top down. A yoke is worked first, then divided for body and sleeves. The round starts approx. mid back. Body is worked in the round with circular needle. Sleeves are worked in the round with double pointed needles. NECK: Cast on 72 (76-80-84-88-96-100) stitches with red and double pointed needles/short circular needle size 3 mm (in the 2 smallest sizes you need to cast on and work with double pointed needles until you have enough stitches to use a circular needle; the other sizes can be cast on and worked with circular needle). Knit 1 round. Then work rib (= knit 2 / purl 2). Continue this rib for 3 cm. YOKE: Change to double pointed needles/short circular needle size 4 mm. Knit 1 round and decrease 6 (4-3-0-4-5-9) stitches evenly on round – read DECREASE/INCREASE TIP = 66 (72-77-84-84-91-91) stitches. You can now work an elevation in back of neck so that the yoke is slightly higher at the back. This elevation can be left out; the neck will then be the same front and back – work ELEVATION – read description above or continue working. Work pattern A.1 - NOTE: Choose diagram for your size (= 11 (12-11-12-12-13-13) repeats of 6 (6-7-7-7-7-7) stitches). Continue this pattern and increase as shown in diagram. REMEMBER THE KNITTING TENSION! When A.1 has been completed there are 176 (192-209-228-240-260-260) stitches on the needle. Continue with stocking stitch and red. On the next round increase 7 (7-10-7-3-0-11) stitches evenly on round = 183 (199-219-235-243-260-271) stitches. When the piece measures 13 (14-15-16-17-18-19) cm mid front (measured without neck), divide the piece as follows: Work 25 (27-30-32-34-36-38) stitches, place the next 42 (46-50-54-54-58-60) stitches on 1 thread for sleeve (without working them), cast on 8 stitches on the needle, work 49 (53-59-63-67-72-75) stitches, place the next 42 (46-50-54-54-58-60) stitches on 1 thread for sleeve (without working them), cast on 8 stitches on the needle and work the remaining 25 (27-30-32-34-36-38) stitches as before = 115 (123-135-143-151-160-167) stitches. BODY: Insert 1 marker thread in the middle of the 8 stitches cast on under each of the sleeves (= 57 (61-67-71-75-80-83) stitches between marker threads on the front piece). THE PIECE IS NOW MEASURED FROM HERE! When the piece measures 3 cm from where body and sleeves were divided, increase on each side of both marker threads – read INCREASE TIP. Repeat this increase when the piece measures 6 and 9 cm from where body and sleeves were divided = 127 (135-147-155-163-172-179) stitches. When the piece measures 11 (13-16-19-22-25-28) cm from where body and sleeves were divided, increase 9 (9-9-9-9-8-9) stitches evenly on the next round = 136 (144-156-164-172-180-188) stitches. Change to needles size 3 mm and work rib (= knit 2 / purl 2) for 4 cm. Then cast off with knit over knit and purl over purl. The whole jumper measures approx. 34 (37-41-45-49-53-57) cm, measured from shoulder. SLEEVE: Place the stitches from the one thread on double pointed needles size 4 mm and knit up 1 stitch in each of the 8 stitches cast on under the sleeve = 50 (54-58-62-62-66-68) stitches. Insert 1 marker thread in the middle of these 8 stitches (= mid under sleeve). THE PIECE IS NOW MEASURED FROM HERE! Work stocking stitch in the round with red. When the sleeve measures 1 cm from where body and sleeve were divided, decrease 2 stitches mid under sleeve – read DECREASE TIP. Decrease like this every 1½ (2-2-2½-3-3½-3½) cm a total of 6 (6-8-8-8-8-9) times = 38 (42-42-46-46-50-50) stitches. When the sleeve measures 10 (12-17-20-24-27-31) cm from where body and sleeve were divided, decrease 2 stitches evenly on round = 36 (40-40-44-44-48-48) stitches. Change to double pointed needles size 3 mm and work rib in the round (= knit 2 / purl 2) for 8 cm or to desired length. On the next round increase all purl 2 to purl 3 = 45 (50-50-55-55-60-60) stitches. Then cast off with knit over knit and purl over purl.. The sleeve measures a total of approx. 18 (20-25-28-32-35-39) cm from where body and sleeve were divided. Work the other sleeve in the same way. NOSES: Crochet with red and hook size 3 mm as follows: Work 4 chain stitches and 1 treble crochet in the 4th chain stitch from the hook, cut and fasten the strand. Work 1 nose for each reindeer (= 11 (12-11-12-12-13-13) noses). Tie the noses to each reindeer and fasten the strands. |
|||||||||||||
Diagram explanations |
|||||||||||||
|
|||||||||||||

|
|||||||||||||
|
|||||||||||||

|
|||||||||||||

|
|||||||||||||
Have you finished this pattern?Tag your pictures with #dropspattern #littlerednosesweater or submit them to the #dropsfan gallery. Do you need help with this pattern?You'll find 30 tutorial videos, a Comments/Questions area and more by visiting the pattern on garnstudio.com. © 1982-2025 DROPS Design A/S. We reserve all rights. This document, including all its sub-sections, has copyrights. Read more about what you can do with our patterns at the bottom of each pattern on our site. |
|||||||||||||


With over 40 years in knitting and crochet design, DROPS Design offers one of the most extensive collections of free patterns on the internet - translated to 17 languages. As of today we count 314 catalogues and 11820 patterns translated into English (UK/cm). 11820
We work hard to bring you the best knitting and crochet have to offer, inspiration and advice as well as great quality yarns at incredible prices! Would you like to use our patterns for other than personal use? You can read what you are allowed to do in the Copyright text at the bottom of all our patterns. Happy crafting!
Post a comment to pattern DROPS Children 32-10
We would love to hear what you have to say about this pattern!
If you want to leave a question, please make sure you select the correct category in the form below, to speed up the answering process. Required fields are marked *.