
Popular categories
Looking for a yarn?


Comments / Questions (71)
![]() Janina wrote:
Janina wrote:
Witam, mam serdeczną prośbę o odpowiedź na moje pytanie dot. schematu A1. Jak przerobić pierwsze oczko, które jest narzutem w rzędzie 34, wg schematu pierwsze oczko należy przerobić 2 razy na prawo czy narzut mam przerobić 2 razy czy może chodzi o kolejne oczko ( za narzutem )?. Nie mam doświadczenia w czytaniu schematów, w pomocy nie udało mi się odnaleźć podobnego schematu a bardzo pragnę zrobić ten śliczny beret. Z góry dziękuję za pomoc i pozdrawiam Janina
23.03.2019 - 01:28DROPS Design answered:
Witaj Janino. W rzędzie 35, w pierwsze oczko rzędu 34, czyli narzut, przerabiasz 2 oczka prawe, wkłuwając drut raz z przodu, a raz z tyłu oczka. Jak to zrobić znajdziesz TUTAJ. Powodzenia!
25.03.2019 - 07:41
![]() Elisabetta Guglielmi wrote:
Elisabetta Guglielmi wrote:
Buonasera, sto seguendo il diagramma A1 Al giro 17/19/21 ci sono tre simboli e tre nello altro verso tipo uncini, che non sono nel diagramma.... può aiutarmi? Grazie Elisabetta
24.02.2019 - 18:38DROPS Design answered:
Buongiorno Elisabetta. Se abbiamo capito correttamente, dopo la stella, lavora 1 m gettata, che al ferro successivo lavorerà ritorta (quinto simbolo descritto nella legenda), poi passa una maglia a dir, 1 m dir e accavalla la m passata (nono simbolo); prima della stella lavora: 2 m insieme a dir (ottavo simbolo) e 1 m gettata da lavorare ritorta al ferro successivo. Buon lavoro!
24.02.2019 - 19:08
![]() Elisabetta Guglielmi wrote:
Elisabetta Guglielmi wrote:
Buonasera, mia figlia adora questo completino, ma non essendo esperta con i ferri a doppia punta, trovo molta difficolta'....è possibile farlo con i ferri circolari? Se no, avete un modello simile da consigliarmi ma pu semplice? Grazie Elisabetta
21.02.2019 - 18:23DROPS Design answered:
Buonasera Elisabetta. Può lavorare con i ferri circolari al posto dei ferri a doppia punta. Buon lavoro!
21.02.2019 - 23:54
![]() Hania Benzine wrote:
Hania Benzine wrote:
Bonjour, Tout d'abord un grand merci pour tous ses merveilleux modèles que vous nous proposez, c'est vraiment une passion pour moi tricoter, et j'adore votre site, les modèles sont magnifiques, ceci dit je suis une grande passionnée de tricot, jusqu’à maintenant 'ai fait des bonnets, des cache cou et des écharpes, j'aimerais beaucoup commencer a faire des mitaines, serait-il possible de faire une vidéo complète de ce modèle, merci encore de votre patience. Hania
18.01.2019 - 05:18DROPS Design answered:
Bonjour Mme Benzine, nous ne pouvons réaliser une vidéo pour chacun de nos modèles mais les diagrammes se lisent simplement en commençant en bas à droite et tous les tours de droite à gauche. Vous retrouverez la légende de chaque symbole au-dessus des diagrammes. Vous trouverez une vidéo pour le pouce si besoin. Bon tricot!
18.01.2019 - 09:19
![]() Katherine wrote:
Katherine wrote:
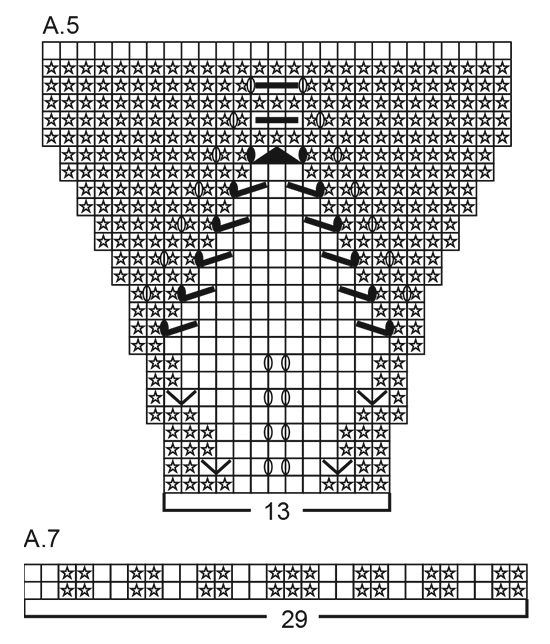
Thanks for your confirming/clarifying regarding Chart A.5, and for planning to update the chart. The Neckwarmer is turning out beautifully; your sharing this beautiful design is wonderful.
18.12.2018 - 12:48
![]() Katherine wrote:
Katherine wrote:
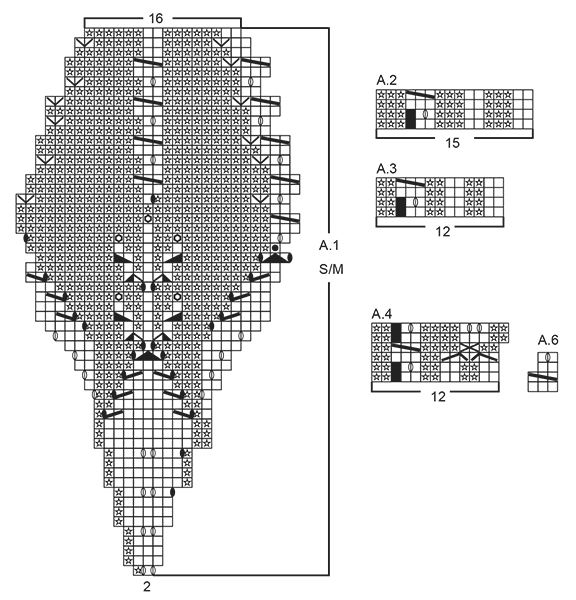
Thank you very much for answering my question. I now realize I had merged the solid oval and decrease lines together as I looked, thinking they were new and different symbols! Am now moving along again on the pattern! Chart A.5, Row I5, a purl star symbol appears to be missing on the left side of the diagram, following 7 knit stitches rather than 8 knit stitches as shown, to keep the leaf shaping symmetrical? So there would be 7 purls on each side of 7 knit stitches?
17.12.2018 - 13:06DROPS Design answered:
Dear Katherine, you are right, there should be P7 on each side of the K7 - and after checking once again, P1 is also missing on each side of the K sts after next two dec row, a new diagram will be added. Thank you. Happy knitting!
18.12.2018 - 08:01
![]() Katherine wrote:
Katherine wrote:
Thank you for this lovely set of patterns. I am making the cowl, and wondering about two symbols on chart A.5, which I don\'t believe are shown on the pattern symbol page (?). Starting at row 10 of chart A.5, three sts from each repeat end, are the symbols meant to stand for k2tog and ssk to decr two sts to one? Do you have a web page that shows all your symbol meanings? Again, many thanks, and happy winter holidays to one and all.
15.12.2018 - 01:43DROPS Design answered:
Dear Katherine, on row 10 in A.5 you will decrease and increase on same row: start with YO (= 5th symbol under diagram key), then dec 1 st (= 9th symbol), K sts and dec 1 st (8th symbol), and make YO (=5th symbol). = the number of sts is the same, on next round work the YO twisted they shouldn't make holes. Happy knitting!
17.12.2018 - 09:19
![]() Murielle wrote:
Murielle wrote:
Bonjour, je ne comprends pas le point A2 avec le diagramme pas de maille, sauter la case , cela veut dire exactement car si je fait ça mon diagramme ne fait plus 15 mailles mais 16. pourriez vous m'expliquer ? Merci
26.11.2018 - 19:45DROPS Design answered:
Bonjour Murielle, A.2 se tricote sur 15 m ( 2 m end, 4 m env, 2 m end, 3 m env, 2 m end, 3 m env), mais au 2èem rang, on fait un jeté pour former la petite torsade (voir aussi cette vidéo)= on a 16 m. Au dernier rang, on va diminuer 1 m pour la torsade = 15 m de nouveau. Bon tricot!
27.11.2018 - 08:03Walshy wrote:
Just finished this. Love it! Thanks for the pattern.
26.10.2018 - 20:30
![]() Esmee wrote:
Esmee wrote:
Goedenavond Garnstudio, Ik zou graag de Polswarmer maken maar ik snap niet helemaal hoe ik moet beginnen. ik wil een maat S/M maken dus dan moet ik 50 steken opzetten, is dat op een naald of over 3 a 4 losse naalden zonder knop? Moet ik met losse naalden breien en dan met 2a3a4 naalden? En als ze in het begin van het patroon hebben over brei de volgende nld als volgd bedoelden ze dan 1 naald of de hele set dus van de marker tot de marker? Met vriendelijk groeten, Esmee
03.12.2017 - 18:15DROPS Design answered:
Hallo Esmee, Om in de rondte te breien met naalden zonder knop, zet je eerst het aantal steken op en dan verdeel je de steken in de rondte over 3 naalden. Je begint met breien met de vierde naald. Met de volgende naald wordt de hele naald of de hele toer bedoeld, dus over alle opgezette steken.
04.12.2017 - 11:08
|
|||||||||||||||||||||||||||||||||||||||||||||||||||||||||||||
Hello Sunshine#hellosunshineset |
|||||||||||||||||||||||||||||||||||||||||||||||||||||||||||||
 |
 |
||||||||||||||||||||||||||||||||||||||||||||||||||||||||||||
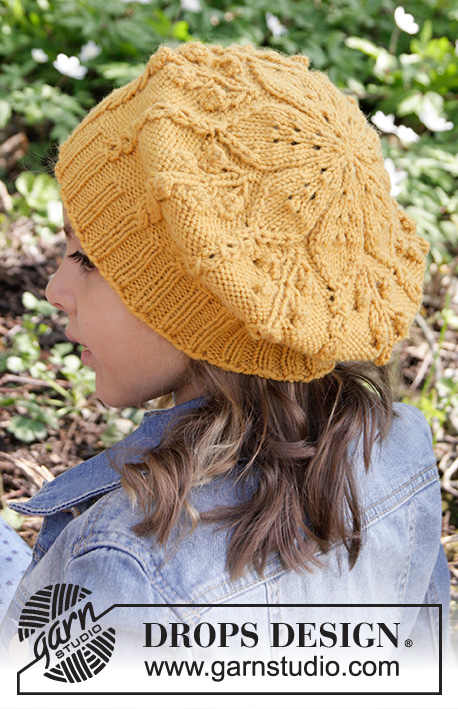
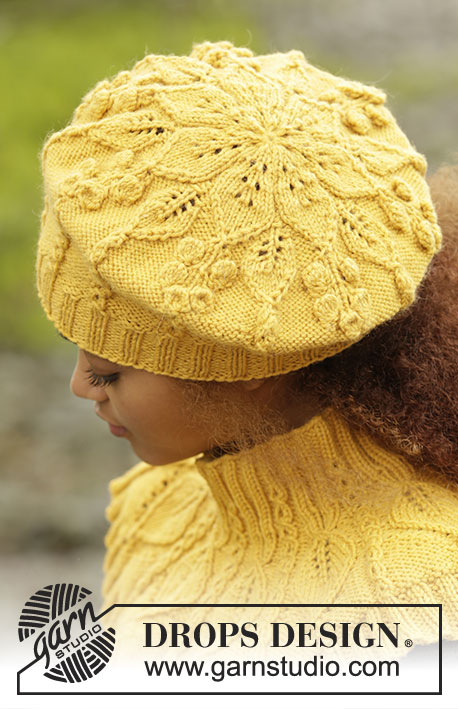
Set consists of: Knitted DROPS beret and neck warmer with leaf pattern worked top down in ”Lima” and DROPS wrist warmers with leaf pattern in “Lima”.
DROPS 173-43 |
|||||||||||||||||||||||||||||||||||||||||||||||||||||||||||||
|
BERET: PATTERN: See diagram A.1 (choose diagram for correct size). MAGIC CIRCLE: To avoid hole in the middle beg with this technique: Hold yarn end in the left hand and make a loop around left index finger (from left to right). Hold the loop with left thumb and index finger. Insert needle through loop, get yarn from ball (i.e. place yarn 1 time over needle from you), pull yarn back through loop, 1 YO (now place yarn from the back and towards you) and pull YO through sts on needle, * insert needle through loop, 1 YO (place yarn from the back and towards you), pull YO through loop, 1 YO (from the back and towards you) and pull YO through outermost st on right needle (i.e. the last st made) *, repeat from *-* until there are 14 sts on needle. Distribute sts on 4 double pointed needles size 3.5 mm as explained in pattern. Then work as explained in pattern – AT THE SAME TIME pull yarn end so that loop is tighten tog and the hole disappears. CAST-OFF TIP: Make 1 YO after approx. every 4th st while casting off (cast off YO as a st) to make the cast-off edge more elastic. ---------------------------------------------------------- BERET: Work in the round on double pointed needles top down, switch to circular needle when needed. Beg with MAGIC CIRCLE - see explanation above and cast on 14 sts with Lima as explained above – NOTE: If you do not want to start with a magic circle cast on 14 sts on double pointed needles size 3.5 mm with Lima (when beret is done baste a yarn up and down through sts around hole at the top and tighten tog). Distribute sts on 4 double pointed needles size 3.5 mm with 4 sts on each of the first 3 needles and 2 sts on last needle. Then work pattern according to diagram A.1 (choose diagram for correct size = 7 repetitions of 2 sts). REMEMBER THE KNITTING TENSION When A.1 has been worked, there are 112 sts on needle in both sizes and piece measures approx. 19-21 cm from the top down. Switch to circular needle size 3 mm and work rib in the round (= K 2/P 2) – adjust to work 2 K over every pattern border and P 2 + K 2 + P 2 between every pattern border. When rib measures 3-4 cm (or desired measurements), cast off with K over K and P over P - READ CAST-OFF TIP. ---------------------------------------------------------- NECK WARMER: PATTERN: See diagrams A.2 to A.7. INCREASE TIP: Inc 1 st in transition between P and K by making 1 YO. On next round P YO twisted to avoid holes. ---------------------------------------------------------- NECK WARMER: Worked in the round on circular needle, top down. Cast on 120-135 sts on circular needle size 3.5 mm with Lima. K 1 round. Then work rib in the round = K 2/P 3. When rib measures 3-4 cm, switch to circular needle size 4 mm. Then work pattern in the round according to diagram A.2 (= 8-9 repetitions of 15 sts) until A.2 has been worked 2 times in total vertically – AT THE SAME TIME on last round dec all 3 P to 2 P (dec 1 st by P 2 tog = 24-27 sts dec) = 96-108 sts on needle. Now work 1 repetition vertically according to diagram A.3 the same way. After A.3 piece measures approx. 7-8 cm. Then work pattern according to diagram A.4 (= 8-9 repetitions of 12 sts). When A.4 has been worked 1 time vertically, there are 128-144 sts on needle (incl YOs in pattern) - NOTE: Finish last round when 2 sts remain on round, insert 1 marker (round beg here now). Work next round as follows: * Work A.5 (= 13 sts), A.6 (= 3 sts) *, repeat from *-* 8-9 times in total. Continue pattern like this and inc as shown in diagram. REMEMBER THE KNITTING TENSION! When A.5 has been worked, there are 232-261 sts on needle. Switch to circular needle size 3.5 mm and work rib in the round according to diagram A.7 (= 8-9 repetitions of 29 sts). AT THE SAME TIME after 2 round rib inc every other 2 P to 3 P - READ INCREASE TIP = 256-288 sts. After the next 2 round inc the remaining 2 P to 3 P = 280-315 sts. When rib measures 3-4 cm, loosely cast off with K over K and P over P. Neck warmer measures approx. 21-23 cm from top and down. ---------------------------------------------------------- WRIST WARMER: PATTERN: See diagrams A.8 and A.9. ---------------------------------------------------------- RIGHT WRIST WARMER: Worked in the round on double pointed needles. Cast on 50-55 sts on double pointed needles size 3 mm with Lima. K 1 round. Work next round as follows: * K 2, P 3 *, repeat from *-* 4-5 times in total, K 2, P 1, work pattern according to diagram A.8 (= 6 sts), P 1, repeat from *-* 4-4 times in total. Continue rib and A.8 like this until piece measures 3 cm. Now dec 3 P to 2 P the entire round = 40-44 sts. Switch to double pointed needles size 3.5 mm, work next round as follows: Work 18-22 sts in stocking st, continue A.8 and finish with 16-20 sts in stocking st. REMEMBER THE KNITTING TENSION When piece measures 8-9 cm (ending after a row like row marked with arrow in diagram), work pattern according to diagram A.9 over A.8 (work the other sts in stocking st). Continue pattern like this and inc and dec as shown in diagram. When A.9 has been worked, there are 48-52 sts on needle and piece measures approx. 15-16 cm. Work 1 round in stocking st and slip AT THE SAME TIME the middle 10 sts in A.9 on a stitch holder for thumb, in addition cast on 2 new sts on needle behind the thumb = 40-44 sts on needle. Continue in the round in stocking st until piece measures 19-20 cm (approx. 3 cm remain until finished measurements – try the wrist warmer on and work to desired measurements). Switch to double pointed needles size 3 mm and K 1 round while at the same time inc 4 sts evenly = 44-48 sts. Then work rib in the round = K 2/P 2 for 3 cm. LOOSELY cast off sts with K over K and P over P. Entire wrist warmer measures approx. 22-23 cm. THUMB: Slip the 10 sts from stitch holder back on double pointed needles size 3.5 mm and pick up 6 new sts behind the thumb = 16 sts. Work 2 rounds in stocking st (make sure to avoid a tight thumb). Then work rib in the round = K 2/P 2 for 3-3½ cm (or desired measurements). Cast off sts with K over K and P over P. LEFT WRIST WARMER: Work as right wrist warmer but reversed, i.e. work first round with rib as follows: * P 3, K 2 *, repeat from *-* 4-4 times in total, P 1, A.8 (= 6 sts), P 1, K 2, repeat from *-* 4-5 times in total. After rib work 16-16 sts in stocking st, A.8 and 18-22 sts in stocking st. |
|||||||||||||||||||||||||||||||||||||||||||||||||||||||||||||
Diagram explanations |
|||||||||||||||||||||||||||||||||||||||||||||||||||||||||||||
|
|||||||||||||||||||||||||||||||||||||||||||||||||||||||||||||
|
|||||||||||||||||||||||||||||||||||||||||||||||||||||||||||||

|
|||||||||||||||||||||||||||||||||||||||||||||||||||||||||||||
|
|||||||||||||||||||||||||||||||||||||||||||||||||||||||||||||
Have you finished this pattern?Tag your pictures with #dropspattern #hellosunshineset or submit them to the #dropsfan gallery. Do you need help with this pattern?You'll find 31 tutorial videos, a Comments/Questions area and more by visiting the pattern on garnstudio.com. © 1982-2025 DROPS Design A/S. We reserve all rights. This document, including all its sub-sections, has copyrights. Read more about what you can do with our patterns at the bottom of each pattern on our site. |
|||||||||||||||||||||||||||||||||||||||||||||||||||||||||||||


With over 40 years in knitting and crochet design, DROPS Design offers one of the most extensive collections of free patterns on the internet - translated to 17 languages. As of today we count 314 catalogues and 11820 patterns translated into English (UK/cm). 11820
We work hard to bring you the best knitting and crochet have to offer, inspiration and advice as well as great quality yarns at incredible prices! Would you like to use our patterns for other than personal use? You can read what you are allowed to do in the Copyright text at the bottom of all our patterns. Happy crafting!
Post a comment to pattern DROPS 173-43
We would love to hear what you have to say about this pattern!
If you want to leave a question, please make sure you select the correct category in the form below, to speed up the answering process. Required fields are marked *.