
Popular categories
Looking for a yarn?


Comments / Questions (84)
![]() Nicole Farley wrote:
Nicole Farley wrote:
Je ne comprends pas les symboles de la grille. Je ne comprends pas e que représente un triangle dans une grille
26.03.2021 - 19:18DROPS Design answered:
Bonjour Nicole, le triangle signifie: glisser 1 m à l'end, 2 m ens à l'end, passer la m glissée par-dessus la m tricotée. Regardez le video ICI. Bon tricot!
28.03.2021 - 22:46
![]() Ignacio wrote:
Ignacio wrote:
Hey! i like the way its explained the pattern but i find that it ist clear enough where to put the markers and the increases, im trying to knit the L one, how many stiches are between each marker since there is a different amount if is the armpart and the bodypart?
30.11.2020 - 18:32DROPS Design answered:
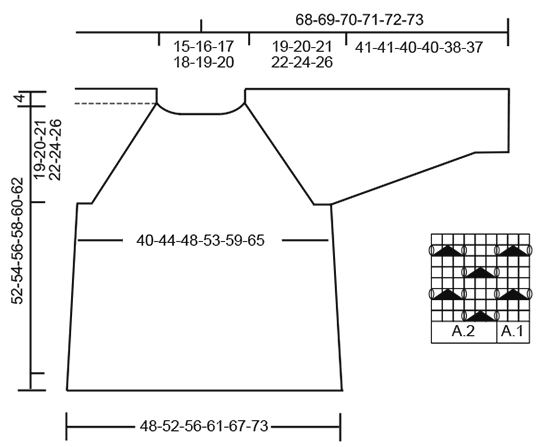
Dear Ignacio, work 1st increase round adding markers as follows in L: K 21, work 2 sts in next st, YO, K1, marker, K1, YO, work 2 sts in next st, A.1 (= 3 sts), A.2 over the next 12 sts, work 2 sts in next st, YO, K1, marker, K1, YO, 2 sts in next st, K42, work 2 sts in next st, YO, K1, marker, K1, YO, work 2 sts in next st, A.1, A.2 over the next 12 sts, 2 sts in next st, YO, K1, marker, K1, YO, 2 sts in next st, K 21 = 146 sts (8 sts inc by working 2 sts in the same st + 8 YO). Happy knitting!
01.12.2020 - 09:06
![]() Eva Kremer wrote:
Eva Kremer wrote:
Bonjour, à quel endroit est mesurée la largeur de juste (44cm dans mon cas en taille M)? En effet lorsque j'arrive au bout du raglan, je ne suis qu'à 15cm de hauteur après le rang de montage et 44cm de largeur devant. Il faut donc que j'allonge de 5 cm sans pour autant élargir avant de séparer manches et dos/devant. Comment procéder?
18.11.2020 - 11:10DROPS Design answered:
Bonjour Mme Kremer, les 44 cm de la taille M se calculent après la division de l'ouvrage, autrement dit, si votre tension est juste, vous aurez 204 m en taille M et donc 88 cm soit 44 cm posé à plat. Retrouvez ici plus d'infos sur l'échantillon. Bon tricot!
19.11.2020 - 09:33
![]() Sandra wrote:
Sandra wrote:
Buonasera, vorrei un chiarimento sugli aumenti per il raglan (16 aumenti). Per aumentare 4 maglie sul dietro e 4 maglie per le maniche prima del segnapunti devo iniziare 3 maglie prima e quindi fare 2 aumenti 1 gettato 1 maglia diritta e quindi il segnapunti e dopo il segnapunti 1 maglia diritta 1 gettato e 2 aumenti? Grazie
28.08.2020 - 15:36DROPS Design answered:
Buongiorno Sandra. Inizia 2 maglie prima del segnapunti, lavora 2 volte la prima di queste maglie , 1 gettato, 1 maglia diritta, segnapunti, 1 maglia diritta , 1 gettato e poi lavora 2 volte la maglia successiva. Buon lavoro!
28.08.2020 - 21:02
![]() Angélique wrote:
Angélique wrote:
Bonjour, j'ai juste une petite question concernant les manches...je tricote avec une aiguille circulaire de 40cm et c'est l'horreur car elles semblent trop longues...je suis obligée de "tirer" sur mes mailles pour tricoter. d'autant que je viens d'en commencer une et qu'il va falloir que je diminue de 20m auriez-vous une astuce? merci d'avance
04.03.2020 - 18:37DROPS Design answered:
Bonjour Angélique, vous pouvez utiliser une aiguille circulaire de 80 cm et la technique dite du magic loop (cf vidéo ici) ou bien utiliser des aiguilles doubles pointes. Bon tricot!
05.03.2020 - 10:04
![]() Trine wrote:
Trine wrote:
How much ease should I expect when choosing size?
05.02.2020 - 20:47DROPS Design answered:
Dear Trine, measure a garment you have and like the shape and compare the measurments (in cm) in chart to find out the matching size. read more about schematic drawing there. Happy knitting!
06.02.2020 - 09:55
![]() Michèle wrote:
Michèle wrote:
Bonjour! Lorsque je fais ma première augmentation tout se déroule bien cependant j'ai besoin de vérifier si je poursuis correctement.... le tour suivant je tricote tout en jersey et ensuite je redébute les augmentations comme indiqué au raglan.... par contre le motif A1 et A2 je le lis toujours de la droite puisque je tricote en rond mais puisque j'ai plus de mailles est-ce que je tricote le diagramme de la façon suivante: A1 puis A2 sur 12 mailles et je recommence A1 ?
01.02.2020 - 19:51DROPS Design answered:
Bonjour Michèle, les mailles des manches se tricotent ainsi: d'abord A.1, puis on répète A.2. Les augmentations vont se tricoter en suivant les diagrammes, mais tricotez-les en jersey en attendant d'avoir suffisamment de mailles pour faire un motif ajouré entier. Vous devez ainsi répéter les points ajourés en quinconce comme on le montre dans le diagramme. Bon tricot!
03.02.2020 - 09:50
![]() Michèle wrote:
Michèle wrote:
Bonjour, lorsque l'on travaille les manches, on va suivre le diagramme tel qu'indiqué dans le patron mais lorsque l'on arrive à la deuxième manche est-ce que je dois inversée le diagramme si je veux obtenir le motif comme la première? Moi en tricotant le diagramme tel quel, je place le tricot et mes deux devants de manches sont différents.....
26.01.2020 - 16:50DROPS Design answered:
Bonjour Michèle, vos deux manches doivent être identiques car vous les tricotez de la même façon; A.1, puis A.2, et vous allez augmenter au même rythme sur les manches. À moins que je comprenne mal votre question?
27.01.2020 - 09:27
![]() Samanta wrote:
Samanta wrote:
Disturbo ancora perché nn riesco a trovarmi con il secondo giro di aumenti del raglan. Infatti, mi trovo ad avere 27 punti tra i due segnapunti delle maniche. Seguendo la terza riga del motivo, dovrei terminare con un gettato preceduto dall’accavallamento, in realtà mi trovo ad avere tre maglie semplici. Cosa sto sbagliando? Grazie ancora della cortesia
16.01.2020 - 09:27DROPS Design answered:
Buongiorno Samanta. Man mano che aumenta, continua a lavorare i diagrammi in modo che siano incolonnati come indicato nei diagrammi. Lavora a maglia rasata le maglie che non riescono ad essere lavorate seguendo i diagrammi. Buon lavoro!
16.01.2020 - 19:36
![]() Samanta wrote:
Samanta wrote:
Grazie mille della risposta. Avrei un’ulteriore dubbio. Ho fatto il primo aumento raglan... ora faccio un giro tutto a diritto? Cioè, diritto su davanti e dietro della maglia e secondo ferro del motivo? I gettati dovrei lavorarli, giusto?
15.01.2020 - 21:10DROPS Design answered:
Buongiorno Samanta. È corretto come ha indicato: lavora a diritto le maglie del davanti e del dietro; lavora la seconda riga del diagramma sulle maglie delle maniche e lavora le maglie gettate a diritto così da formare i buchi (può aiutarla verificare con la fotografia). Buon lavoro!
15.01.2020 - 22:55
|
||||||||||
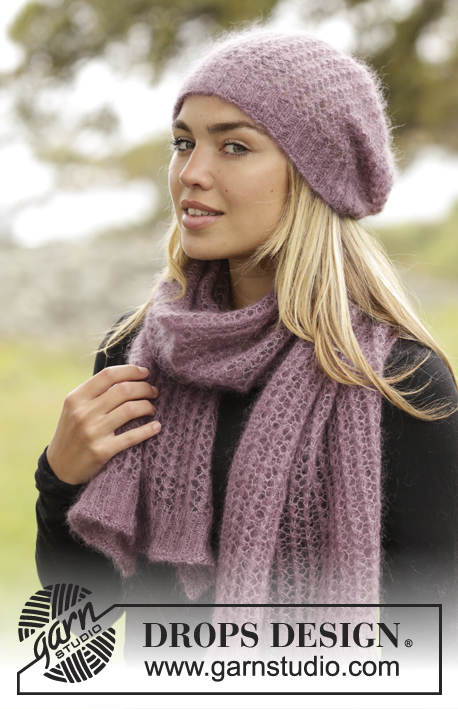
Touch of Heather#touchofheathersweater |
||||||||||
|
|
||||||||||
Knitted DROPS jumper with raglan and lace pattern, worked top down in ”Kid-Silk”. Size: S - XXXL.
DROPS 172-32 |
||||||||||
|
GARTER ST (worked in the round): 1 ridge = 2 rounds. * K 1 round and P 1 round *, repeat from *-*. PATTERN: See diagrams A.1 and A.2. RAGLAN: Inc every other round as follows: Inc 4 sts on back piece, 4 sts on front piece and 4 sts on each sleeve (= 16 sts inc in total). Inc as follows before marker (beg 2 sts before marker): Work 2 sts in 1 st, 1 YO, K 1, marker. K YOs on next round to make a hole. Inc as follows after marker: Marker, K 1, 1 YO and work 2 sts in next st. K YOs on next round to make a hole. Inc 16 sts like this 1-1-2-2-1-1 more times (= 2-2-3-3-2-2 times in total, first inc is explained in text). Then inc every other round as follows: Inc 2 sts on back piece, 2 sts on front piece and 2 sts on each sleeve (= 8 sts inc in total). Inc as follows before marker (beg 1 sts before marker): 1 YO, K 1, marker. Inc as follows after marker: Marker, K 1, 1 YO. K YOs on next round to make a hole. Inc 8 sts this way 20-22-22-24-28-30 times in total. INCREASE TIP (applies to inc in the sides of body): Beg 1 sts before marker, 1 YO, K 2 (marker is in the middle of these 2 sts), 1 YO (= 2 sts inc). On next round K YOs twisted to avoid holes. ---------------------------------------------------------- JUMPER: Worked in the round on circular needle from mid back, top down. Cast on 108-112-120-124-128-132 sts on a short circular needle size 3.5 mm with 2 strands Kid-Silk. K 1 round, then work rib = K 2/P 2 for 3 cm. Work 2 ridges, on first row in last ridge inc 2-10-10-22-38-54 sts evenly = 110-122-130-146-166-186 sts. Remove one strand, then work with 1 strand Kid-Silk. Work as follows from mid back and inc for RAGLAN – see explanation above: 16-19-21-25-30-35 sts in stocking st, work 2 sts in next st, 1 YO, 2 sts in stocking st (insert a marker between these sts), 1 YO, work 2 sts in next st, A.1 (= 3 sts), A.2 over the next 12 sts, 2 sts in next st, 1 YO, 2 sts in stocking st (insert a marker between these sts), 1 YO, 2 sts in next st, 32-38-42-50-60-70 sts in stocking st, 2 sts in next st, 1 YO, 2 sts in stocking st (insert a marker between these sts), 1 YO, work 2 sts in next st, A.1, A.2 over the next 12 sts, 2 sts in next st, 1 YO, 2 sts in stocking st (insert a marker between these sts), 1 YO, 2 sts in next st, 16-19-21-25-30-35 sts in stocking st (= 126-138-146-162-182-202 sts). First inc is now done. Continue this pattern, and inc for raglan as explained above. Work the new sts on sleeves in A.1 and A.2. REMEMBER THE KNITTING TENSION When all inc for raglan are done, there are 302-330-354-386-422-458 sts on round. Piece measures 23-24-25-26-28-30 cm from shoulder (19-20-21-22-24-26 cm from cast-on edge). Work next round as follows: Work 42-47-51-57-64-71 sts (= half back piece), slip the next 67-71-75-79-83-87 sts on a stitch holder (= sleeve), cast on 8 sts under sleeve, work the next 84-94-102-114-128-142 sts (= front piece), slip the next 67-71-75-79-83-87 sts on a stitch holder (= sleeve), cast on 8 new sts under sleeve, work the last 42-47-51-57-64-71 sts (= half back piece). BODY: There are now 184-204-220-244-272-300 sts on body. Continue in stocking st. Insert a marker in each side, in the middle of the 8 new sts that were cast on. NOW MEASURE PIECE FROM HERE. When piece measures 4 cm, inc 1 st on each side of each marker (= 4 sts inc) - READ INCREASE TIP, inc every 3 cm 9 times in total = 220-240-256-280-308-336 sts. When piece measures 36-37-38-39-39-39 cm, work 2 ridges over all sts. Cast off, piece measures approx. 56-58-60-62-64-66 cm from cast-on edge. SLEEVE: Worked in the round. Slip sts from sleeve back on a short circular needle/double pointed needles size 3.5 mm, pick up 1 st in each of the 8 sts under sleeve = 75-79-83-87-91-95 sts. Insert 1 marker mid under sleeve = beg of round. NOW MEASURE PIECE FROM HERE! Continue with A.1 and A.2, work the sts in each side that do not fit the pattern in stocking st. When piece measures 4 cm, dec 1 st on each side of marker. Dec every 3-2½-2-2-2-2 cm 10-11-12-12-13-14 times in total = 55-57-59-63-65-67 sts. When piece measures 40-40-39-39-37-36 cm, work 2 ridges in GARTER ST - see explanation above! Then cast off. NOTE: Because of lace pattern the sleeve will stretch lengthwise. Try the jumper and work sleeve to desired length. Work the other sleeve the same way. |
||||||||||
Diagram explanations |
||||||||||
|
||||||||||
|
||||||||||
Have you finished this pattern?Tag your pictures with #dropspattern #touchofheathersweater or submit them to the #dropsfan gallery. Do you need help with this pattern?You'll find 29 tutorial videos, a Comments/Questions area and more by visiting the pattern on garnstudio.com. © 1982-2025 DROPS Design A/S. We reserve all rights. This document, including all its sub-sections, has copyrights. Read more about what you can do with our patterns at the bottom of each pattern on our site. |
||||||||||


With over 40 years in knitting and crochet design, DROPS Design offers one of the most extensive collections of free patterns on the internet - translated to 17 languages. As of today we count 314 catalogues and 11820 patterns translated into English (UK/cm). 11820
We work hard to bring you the best knitting and crochet have to offer, inspiration and advice as well as great quality yarns at incredible prices! Would you like to use our patterns for other than personal use? You can read what you are allowed to do in the Copyright text at the bottom of all our patterns. Happy crafting!
Post a comment to pattern DROPS 172-32
We would love to hear what you have to say about this pattern!
If you want to leave a question, please make sure you select the correct category in the form below, to speed up the answering process. Required fields are marked *.