DROPS Kid-Silk
DROPS Kid-Silk
75% Mohair, 25% Silk
from 6.75 $ /25g
Get the yarn to make this pattern from 33.75$.

The yarn cost is calculated from the pattern’s smallest size and the yarn’s cheapest product type. Looking for an even better price? You might find it on the DROPS Deals!

DROPS SS24

Touch of Heather

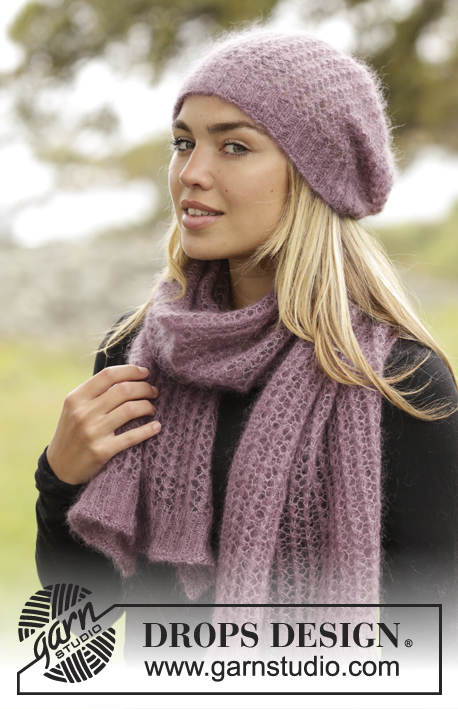
Knitted DROPS jumper with raglan and lace pattern, worked top down in ”Kid-Silk”. Size: S - XXXL.

DROPS 172-32
DROPS design: Pattern no ks-114
Yarn group A
----------------------------------------------------------
Size: S - M - L - XL - XXL - XXXL
Materials:
DROPS KID-SILK from Garnstudio
125-125-150-150-175-175 g color no 05, old pink

DROPS DOUBLE POINTED NEEDLES AND CIRCULAR NEEDLE (40 and 80 cm / 16'' and 32'') SIZE 3.5 mm/US 4 - or size needed to get 23 sts x 30 rows in stockinette st = 4'' x 4'' (10 x 10 cm).

-------------------------------------------------------

Alternative Yarn – See how to change yarns here
Yarn Groups A to F – Use the same pattern and change the yarn here
Yarn usage using an alternative yarn – Use our yarn converter here

-------------------------------------------------------

DROPS Kid-Silk
DROPS Kid-Silk
75% Mohair, 25% Silk
from 6.75 $ /25g
Get the yarn to make this pattern from 33.75$.

The yarn cost is calculated from the pattern’s smallest size and the yarn’s cheapest product type. Looking for an even better price? You might find it on the DROPS Deals!

Pattern instructions

NOTE: This pattern is written in American English. All measurements in charts are in cm. For conversion from inches to cm - click here. There are different terms for crocheting in American and British English. If this pattern includes crochet, click for "crochet terms" here. For this pattern in British English, please click here.
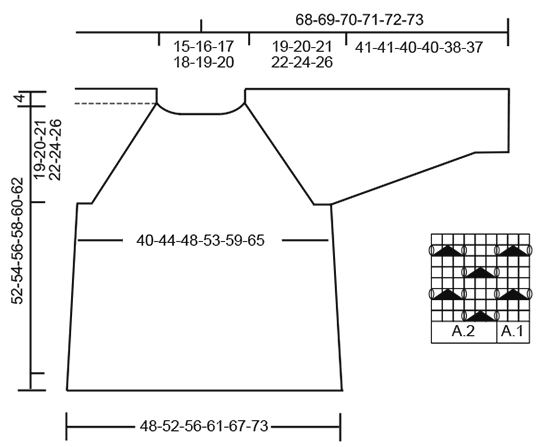
GARTER ST (worked in the round):
1 ridge = 2 rounds. * K 1 round and P 1 round *, repeat from *-*.

PATTERN:
See diagrams A.1 and A.2.

RAGLAN:
Inc every other round as follows: Inc 4 sts on back piece, 4 sts on front piece and 4 sts on each sleeve (= 16 sts inc in total).

Inc as follows before marker (beg 2 sts before marker):
Work 2 sts in 1 st, 1 YO, K 1, marker. K YOs on next round to make a hole.

Inc as follows after marker:
Marker, K 1, 1 YO and work 2 sts in next st. K YOs on next round to make a hole.
Inc 16 sts like this 1-1-2-2-1-1 more times (= 2-2-3-3-2-2 times in total, first inc is explained in text).

Then inc every other round as follows: Inc 2 sts on back piece, 2 sts on front piece and 2 sts on each sleeve (= 8 sts inc in total).
Inc as follows before marker (beg 1 sts before marker):
1 YO, K 1, marker.

Inc as follows after marker:
Marker, K 1, 1 YO.
K YOs on next round to make a hole. Inc 8 sts this way 20-22-22-24-28-30 times in total.

INCREASE TIP (applies to inc in the sides of body):
Beg 1 sts before marker, 1 YO, K 2 (marker is in the middle of these 2 sts), 1 YO (= 2 sts inc). On next round K YOs twisted to avoid holes.
----------------------------------------------------------

JUMPER:
Worked in the round on circular needle from mid back, top down. Cast on 108-112-120-124-128-132 sts on a short circular needle size 3.5 mm / US 4 with 2 strands Kid-Silk. K 1 round, then work rib = K 2/P 2 for 3 cm / 1''. Work 2 ridges, on first row in last ridge inc 2-10-10-22-38-54 sts evenly = 110-122-130-146-166-186 sts. Remove one strand, then work with 1 strand Kid-Silk. Work as follows from mid back and inc for RAGLAN – see explanation above: 16-19-21-25-30-35 sts in stockinette st, work 2 sts in next st, 1 YO, 2 sts in stockinette st (insert a marker between these sts), 1 YO, work 2 sts in next st, A.1 (= 3 sts), A.2 over the next 12 sts, 2 sts in next st, 1 YO, 2 sts in stockinette st (insert a marker between these sts), 1 YO, 2 sts in next st, 32-38-42-50-60-70 sts in stockinette st, 2 sts in next st, 1 YO, 2 sts in stockinette st (insert a marker between these sts), 1 YO, work 2 sts in next st, A.1, A.2 over the next 12 sts, 2 sts in next st, 1 YO, 2 sts in stockinette st (insert a marker between these sts), 1 YO, 2 sts in next st, 16-19-21-25-30-35 sts in stockinette st (= 126-138-146-162-182-202 sts). First inc is now done. Continue this pattern, and inc for raglan as explained above. Work the new sts on sleeves in A.1 and A.2. REMEMBER THE KNITTING GAUGE When all inc for raglan are done, there are 302-330-354-386-422-458 sts on round. Piece measures 23-24-25-26-28-30 cm / 9"-9½"-9 3/4"-10 1/4"-11"-11 3/4'' from shoulder (19-20-21-22-24-26 cm / 7½"-8"-8 1/4"-8 3/4"-9½"-10 1/4'' from cast-on edge). Work next round as follows: Work 42-47-51-57-64-71 sts (= half back piece), slip the next 67-71-75-79-83-87 sts on a stitch holder (= sleeve), cast on 8 sts under sleeve, work the next 84-94-102-114-128-142 sts (= front piece), slip the next 67-71-75-79-83-87 sts on a stitch holder (= sleeve), cast on 8 new sts under sleeve, work the last 42-47-51-57-64-71 sts (= half back piece).

BODY:
There are now 184-204-220-244-272-300 sts on body. Continue in stockinette st. Insert a marker in each side, in the middle of the 8 new sts that were cast on. NOW MEASURE PIECE FROM HERE. When piece measures 4 cm / 1½'', inc 1 st on each side of each marker (= 4 sts inc) - READ INCREASE TIP, inc every 3 cm / 1'' 9 times in total = 220-240-256-280-308-336 sts. When piece measures 36-37-38-39-39-39 cm / 14 1/4"-14½"-15"-15 1/4"-15 1/4"-15 1/4", work 2 ridges over all sts. Bind off, piece measures approx. 56-58-60-62-64-66 cm / 22''-22¾''-23 5/8''-24 3/8''-25¼''-26'' from cast-on edge.

SLEEVE:
Worked in the round. Slip sts from sleeve back on a short circular needle/double pointed needles size 3.5 mm / US 4, pick up 1 st in each of the 8 sts under sleeve = 75-79-83-87-91-95 sts. Insert 1 marker mid under sleeve = beg of round. NOW MEASURE PIECE FROM HERE! Continue with A.1 and A.2, work the sts in each side that do not fit the pattern in stockinette st. When piece measures 4 cm / 1½'', dec 1 st on each side of marker. Dec every 3-2½-2-2-2-2 cm / 1 1/8"-7/8"-3/4"-3/4"-3/4"-3/4" 10-11-12-12-13-14 times in total = 55-57-59-63-65-67 sts. When piece measures 40-40-39-39-37-36 cm / 15 3/4"-15 3/4"-15 1/4"-15 1/4"-14½"-14 1/4'', work 2 ridges in GARTER ST - see explanation above! Then bind off. NOTE: Because of lace pattern the sleeve will stretch lengthwise. Try the jumper and work sleeve to desired length. Work the other sleeve the same way.

Diagram

All measurements in charts are in cm.

symbols = K
symbols = 1 YO between 2 sts
symbols = slip 1 st as if to K, K 2 tog, psso
diagram

Each of our patterns has specific tutorial videos to help you.

Do you have a question? See a list of frequently asked questions (FAQ)

Knitting tension is what determines the final measurements of your work, and is usually measured per 10 x 10 cm. It is provided like so: number of stitches in width x number of rows in height - eg: 19 stitches x 26 rows = 10 x 10 cm.

The knitting tension is very individual; some people knit/crochet loosely while others work tightly. You adjust the knitting tension with the needle size, which is why the suggested needle size only serve as a guide! You need to adjust this (up or down) to ensure that YOUR knitting tension matches the knitting tension provided in the pattern. If you work with a different knitting tension than provided you will have a different yarn consumption, and your work will have different measurements than what the pattern suggests.

The knitting tension also determines which yarns can replace each other. As long as you achieve the same knitting tension you can replace one yarn with another.

See DROPS lesson: How to measure your tension/gauge

See DROPS video: How to make a gauge tension swatch

The required amount of yarn is provided in grams, eg: 450 g. To calculate how many balls you’ll need you first need to know how many grams are in 1 ball (25g, 50g or 100g). This information is available if you click on the individual yarn quality on our pages. Divide the amount required with the amount of each ball. For example, if each ball is 50g (the most common amount), the calculation will be as follows: 450 / 50 = 9 balls.

The important thing when changing from one yarn to another is that the knitting/crochet tension remains the same. This is so that the measurements of the finished piece will be the same as on the sketch provided. It is easier to achieve the same knitting tension using yarns from the same yarn group. It is also possible to work with multiple strands of a thinner yarn to achieve the knitting tension of a thicker one. Please try our yarn converter. We recommend you to always work a test swatch.

Please NOTE: when changing yarn the garment might have a different look and feel to the garment in the photo, due to individual properties and qualities of each yarn.

See DROPS lesson: Can I use a different yarn than the one mentioned in the pattern?

All our yarns are categorised into yarn groups (from A to F) according to thickness and knitting tension – group A contains the thinnest yarns and group F the thickest. This makes it easier for you to find alternative yarns to our patterns, should you wish to switch yarn. All yarns within the same group have a similar knitting tension and can easily replace each other. However, different yarn qualities have different structures and properties which will give the finished work a unique look and feel.

Click here for an overview of the yarns in each yarn group

At the top of all our patterns you’ll find a link to our yarn converter, which is a helpful tool should you wish to use a different yarn than suggested. By filling in the yarn quality you wish to replace, the amount (in your size) and number of strands, the converter will present good alternative yarns with the same knitting tension. Additionally it will tell you how much you’ll require in the new qualities and whether you’ll need to work with multiple strands. Most skeins are 50g (some are 25g or 100g).

If the pattern is worked with multiple colours, every colour will have to be converted separately. Similarly, if the pattern is worked with several strands of different yarns (for example 1 strand Alpaca and 1 strand Kid-Silk) you will have to find alternatives for each, individually.

Click here to see our yarn converter

Since different yarns have different qualities and textures we have chosen to keep the original yarn in our patterns. However, you can easily find options among our available qualities by using our yarn converter, or simply pick a yarn from the same yarn group.

It is possible that some retailers still have discontinued yarns in stock, or that someone has a few skeins at home that they would like to find patterns for.

The yarn converter will provide both alternative yarn as well as required amount in the new quality.

If you think it's hard to decide what size to make, it can be a good idea to measure a garment you own already and like the size of. Then you can pick the size by comparing those measures with the ones available in the pattern's size chart.

You'll find the size chart at the bottom of the pattern.

See DROPS lesson: How to read size chart

The needle size provided in the pattern serves only as a guide, the important thing is to follow the knitting tension. And since knitting tension is very individual, you will have to adjust the needle size to ensure that YOUR tension is the same as in the pattern – maybe you’ll have to adjust 1, or even 2 needle sizes, up or down to achieve the correct tension. For this, we recommend that you work test swatches.

Should you work with a different knitting tension than the one provided, the measurements of the finished garment might deviate from the measurement sketch.

See DROPS lesson: How to measure your tension/gauge

See DROPS video: How to make a gauge tension swatch

Working a garment top-down provides more flexibility and room for personal adjustment. For example it is easier to try the garment on while working, as well as making adjustments to length of yoke and shoulder caps.

The instructions are carefully explaining every step, in the correct order. Diagrams are adjusted to the knitting direction and are worked as usual.

The diagram depicts all rows/rounds, and every stitch seen from the right side. It is read from bottom to top, from right to left. 1 square = 1 stitch.

When working back and forth, every other row is worked from the right side and every other row is worked from the wrong side. When working from the wrong side, the diagram will have to be worked reversed: from left to right, knit stitches are purled, purl stitches are knit etc.

When working in the round every round is worked from the right side and the diagram are worked from right to left on all rounds.

See DROPS lesson: How to read knitting diagrams

The diagram depicts all rows/rounds, and every stitch seen from the right side. It is worked from bottom to top, from right to left.

When working back and forth every other row is worked from the right side: from right to left and every other row is worked from the wrong side: from left to right.

When working in the round, every row in the diagram are worked from the right side, from right to left.

When working a circular diagram you start in the middle and work your way outwards, counter clockwise, row by row.

The rows usually start with a given number of chain stitches (equivalent to the height of the following stitch), this will either be depicted in the diagram or explained in the pattern.

See DROPS lesson: How to read crochet diagrams

Instructions for working several diagrams after each other on the same row/round, will often be written like so: “work A.1, A.2, A.3 a total of 0-0-2-3-4 times". This means you work A.1 once, then A.2 is worked once, and A.3 is repeated (in width) the number of times provided for your size – in this case like so: S = 0 times, M = 0 times, L=2 times, XL= 3 times and XXL = 4 times.

The diagrams are worked as usual: begin with the first row in A.1, then work the first row in A.2 etc.

See DROPS lesson: How to read knitting diagrams

See DROPS lesson: How to read crochet diagrams

The total width of the garment (from wrist-to-wrist) will be larger in the larger sizes, despite the actual sleeves being shorter. The larger sizes have longer sleeve caps and wider shoulders, so there will be a good fit in all sizes.

The measurement sketch/schematic drawing provides information regarding the full length of the garment. If it’s a jumper or a jacket the length is measured from the highest point on the shoulder (usually closest to the neckline), and straight down to the bottom of the garment. It is NOT measured from the tip of shoulder. Similarly, the length of yoke is measured from the highest point on the shoulder and down to where yoke is split into body and sleeves.

See DROPS lesson: How to read a schematic drawing

Diagrams are often repeated on the round or in height. 1 repeat is the diagram the way it appears in the pattern. If it says to work 5 repeats of A.1 in the round, then you work A.1 a total of 5 times after/next to each other in the round. If it says to work 2 repeats of A.1 vertically/in height you work the entire diagram once, then begin again at the start and work the entire diagram one more time.

Chain stitches are slightly narrower than other stitches and to avoid working the cast-on edge too tight, we simply chain more stitches to begin with. The stitch count will be adjusted on the following row to fit the pattern and measurement sketch.

The rib edge is more elastic and will contract slightly compared to, for example, stocking stitch. By increasing before the rib edge, you avoid a visible difference in width between the rib edge and the rest of the body.

It’s very easy to cast off too tightly, and by making yarn overs while casting off (and simultaneously casting these off) you avoid a too tight cast off edge.

See DROPS video: How to bind off with yarn overs (yo)

To achieve an even increase (or decrease) you can increase on, for example: every 3rd and 4th row alternately, like so: work 2 rows and increase on the 3rd row, work 3 rows and increase on the 4th. Repeat this until the increase is complete.

See DROPS lesson: Increase or decrease 1 st on every 3rd and 4th row alternately

Should you prefer to work in the round instead of back and forth, you may of course adjust the pattern. You’ll need to add steeks mid-front (usually 5 stitches), and follow the instructions. When you would normally turn and work from the wrong side, simply work across the steek and continue in the round. At the end you’ll cut the piece open, pick up stitches to work bands, and cover the cut edges.

See DROPS video: How to knit steeks and cut open

Should you prefer to work back and forth instead of in the round, you may of course adjust the pattern so you work the pieces separately and then assemble them at the end. Divide the stitches for the body in 2, add 1 edge stitch in each side (for sewing) and work the front and back pieces separately.

See DROPS lesson: Can I adapt a pattern for circular needles into straight needles?

Pattern repeats can vary slightly in the different sizes, in order to get the correct proportions. If you’re not working the exact same size as the garment in the photo, yours might deviate slightly. This has been carefully developed and adjusted so that the complete impression of the garment is the same in all sizes.

Make sure to follow instructions and diagrams for your size!

If you have found a pattern you like which is available in women’s size it’s not very difficult to convert it to men’s size. The biggest difference will be the length of sleeves and body. Start working on the women size that you think would fit across the chest. The additional length will be worked right before you cast off for the armhole/sleeve cap. If the pattern is worked top-down you can add the length right after the armhole or before the first decrease on sleeve.

Regarding additional yarn amount, this will depend on how much length you add, but it is better with a skein too many than too few.

All yarns will have excess fibres (from production) that might come off as lint or shedding. Brushed yarns (ie hairier yarns) have more of these loose, excess fibres, causing more shedding.

Shedding also depends on what is worn under or over the garment, and whether this pulls at the yarn fibres. It’s therefore not possible to guarantee that there will be no shedding

Below are some tips on how to get the best result when working with hairier yarns:

1. When the garment is finished (before you wash it) shake it vigorously so the looser hairs come off. NOTE: do NOT use a lint roller, brush or any method that pulls at the yarn.

2. Place the garment in a plastic bag and put it in your freezer - the temperature will cause the fibres to become less attached to each other, and excess fibres will come off easier.

3. Leave in the freezer for a few hours before taking it out and shaking it again.

4. Wash the garment according to the instructions on the yarn label.

Pilling is a natural process that happens to even the most exclusive of fibers. It's a natural sign of wear and tear that is hard to avoid, and that is most visible in high friction areas of your garment like a sweater's arms and cuffs.

You can make your garment look as new by removing the pilling, using a fabric comb or a pill/lint remover.

Still can't find the answer you need? Then scroll down and leave your question so one of our experts can try to help you. This will be done normally within 5 to 10 working days.
In the meantime, you can read the questions and answers that others have left to this pattern or join the DROPS Workshop on Facebook to get help from fellow knitters/crocheters!

You might also like...

Touch of Heather

AnnaLisa, Italy

Touch of Heather

Sofylo, France

Post a comment to pattern DROPS 172-32

We would love to hear what you have to say about this pattern!

If you want to leave a question, please make sure you select the correct category in the form below, to speed up the answering process. Required fields are marked *.

Comments / Questions (84)

country flag Tove Henningsen wrote:

Er det rigtig forstået, at det kun er halskanten, der strikkes med dobbelt tråd. Resten af trøjen strikkes med enkelt tråd?

22.02.2023 - 22:11

DROPS Design answered:

Hej Tove, ja det stemmer :)

24.02.2023 - 15:24

country flag Lena Råberg wrote:

Jag undrar om jag alltid ska sticka A2 över 12 maskor som det står i beskrivningen av första varvet? Alltså A1 =3maskor och A2=12 maskor? Vänliga hälsningar Lena

22.08.2022 - 10:57

DROPS Design answered:

Hej Lena. Du kommer få fler maskor som ska stickas in i mönstret allt eftersom du ökar maskor till raglan. De nya m på ärmarna stickas fortlöpande in i A.1 och A.2. Mvh DROPS Design

24.08.2022 - 13:52

country flag Elisabeth Christiansen wrote:

Hvordan kan raglanstykket bli langt nok? Det skal være totalt 25 økninger i min størrelse. Det blir 50 pinner. 30 pinner skal være 10 cm. 50 pinner blir da 16,67 cm, men iflg. oppskriften skal da stykket måle 21 cm. Hvordan løse dette?

06.07.2022 - 12:22

DROPS Design answered:

Hej Elisabeth, raglanlinjen vil blive længere end når du måler 50 pinde lige ned i strikkeretningen. Tager du ud ifølge opskriften og holder du strikkefastheden får du målene som står i opskriften :)

06.07.2022 - 13:27

country flag Helena wrote:

Hello, I have finished increasing for raglan in size M, and mysteriously missing 12 stitches on each of the sleeves. Cannot possibly figure out how, it looks evenly increased everywhere... Would you have any ideas?

12.11.2021 - 14:00

DROPS Design answered:

Dear Helena, make sure you increase the correct number of times for raglan, ie you were supposed to increase 16 sts a total of 2 times + 8 sts a total of 22 times - this means: 122 sts + 16x2 + 8x22 = 330 sts in total. Hope this will help. Happy knitting!

12.11.2021 - 14:23

country flag Marie wrote:

Bonjour, je me retrouve face à un problème sur votre site. Je ne réussis pas à voir toutes les données pour faire plusieurs modèles. Pour celui ci, je ne vois pas le diagramme montrant les mesures du patron.ces données sont manquantes. J\'ai ce même problème pour beaucoup de modèles.. est-ce que vous avez un problème avec votre site? Parce que c\'est la première fois que je vie cette situation.Merci beaucoup

06.10.2021 - 04:39

DROPS Design answered:

Bonjour Marie, nous avons eu effectivement quelques soucis d'affichage, mais tout est rentré dans l'ordre maintenant, merci pour votre patience. Bon tricot!

06.10.2021 - 07:41

country flag Lyn wrote:

I am unfamiliar with knitting diagrams. I am making Drops Pattern ‘A Touch of Heather’ #172/32. Do you have written instructions for the lace pattern please?

13.08.2021 - 11:39

DROPS Design answered:

Dear Lynn, unfortunately we do not have written out instructions for the lace pattern, not only because our patternsare available in several languages, but also, because we believe, that with diagram you not only see the very next step (as with written out instructions) but also the bigger picture, as how stitches and rows relate to each other " en large". However, we do have a lesson about how to READ DIAGRAMS HERE. Happy Stitching!

15.08.2021 - 23:23

country flag Manon wrote:

Bonjour, comment fonctionne le point de fantaisie A1 et A2. Est-ce toujours 1 fois A1 sur 3 mailles et 2 fois A2 sur 12 mailles? Est-ce qu'après les mailles requises pour faire les augmentations au début de la manche, je dois attendre qu'il y ait 15 mailles de disponible pour faire A1 et 2 fois A2? Et est-ce la même chose, soit attendre qu'il y ait 15 mailles de disponibles avant les mailles servant à faire les augmentations à la fin de la manche pour faire A1 et 2xA2? Merci!

31.07.2021 - 00:29

DROPS Design answered:

Bonjour Manon, lorsque vous allez augmenter les mailles des manches, vous allez intégrer les augmentations au point fantaisie lorsque vous aurez suffisamment de mailles (= il faut 3 mailles pour faire le point ajouré); autrement dit, vous devez alterner toujours 3 m jersey et 3 m point ajouré puis 3 m point ajouré et 3 m jersey. Bon tricot!

02.08.2021 - 07:04

country flag Claudine KROPFELD wrote:

Lorsque je fais le compte des mailles pour la taille S avant les augmentations raglan selon les explications je compte 104 mailles 16 pour 1/2 dos , 12 pour la manche, 32 pour le devant, 12 pour l'autre manche, 16 pour l'autre demi dos et 16 pour les raglans (4X4) alors que nous devons commencer avec 110 mailles (108 + 2 aug). je n'ai peut-être pas tout compris. Pourriez-vous m'éclairer. Merci

01.06.2021 - 10:25

DROPS Design answered:

Bonjour Mme Kropfeld, vous avez également 2 m jersey pour le raglan entre chaque pièce et les augmentations (= quand on tricote la même maille 2 fois) : 17 m pour le 1/2 dos, 2 m raglan, 17 m au total pour la manche (1 augm, 3 m de A.1, 12 m de A.2, 1 augm), 2 m pour le raglan, 34 m pour le devant (1 augm, 32 m, 1 augm), 2m pour le raglan, 17 m pour la manche, 2 m pour le raglan, 17 m pour le dos = 17+2+17+2+34+2+17+2+17=110 m. Bon tricot!

01.06.2021 - 16:32

country flag Manon wrote:

Bonjour, sous la section PULL à la 5ieme ligne, on mentionne de retirer un fil. Quelles parties de ce chandail se tricote à 2 fils et quelles parties à un fil? Merci

23.05.2021 - 16:40

DROPS Design answered:

Bonjour Manon, à la 2ème ligne ce même paragraphe, on indique que l'on doit monter les mailles avec 2 fils (cf vidéo), vous tricotez ensuite 2 côtes mousse (avec 2 fils) et continuez ensuite avec 1 seul fil Kid-Silk. Bon tricot!

25.05.2021 - 07:56

country flag Manon St-Jean wrote:

Bonjour, le modèle 172-32 montre que la poitrine est 80 cm pour un small, 88 cm pour un médium et 96 cm pour un large. Ma mesure est 92 cm. Je ne porte jamais du large. Est-ce que je choisis médium et je l’agrandis seulement au niveau de la poitrine? Par contre le modèle 194-29 montre 88 cm pour un S, 96 cm pour un M et 104 cm pour un L. Comment est-ce que les mesures pour la même taille peuvent être aussi différentes d’un modèle à l’autre? Merci

23.05.2021 - 04:16

DROPS Design answered:

Bonjour Mme St Jean, chaque modèle est différent, mesurez un pull similaire que vous avez et dont vous aimez la taille pour les comparer aux mesures du modèle que vous souhaitez et ainsi choisir la taille adaptée. Retrouvez plus d'infos sur les tailles ici - et rappelez-vous de bien tricoter votre échantillon pour obtenir les bonnes mesures (voir ici). Bon tricot!

25.05.2021 - 07:53