
Looking for a yarn?


Comments / Questions (30)
![]() Therese wrote:
Therese wrote:
Ik kom niet verder dan de 1e 12nld van mijn 1e werk.Er staat dat je een patroon moet breien.Welke is dit en dat zijn maar in de 50 st.en ik heb er 76 opstaan.Wat moet ik met de rest doen.Zelfs mijn zus en moeder komen hier niet aan uit
21.03.2019 - 14:21DROPS Design answered:
Dag Therese
De telpatronen (A.1, A.2 etc) kun je onderaan de beschrijving van het patroon vinden. Kies het juiste telpatroon voor jouw maat. In de beschrijving staat uitgelegd welke patronen je moet breien en in welke volgorde en evt nog kantsteken e.d. je moet breien. Op die manier kom je wel op het aantal opgezette steken uit. In de FAQ kun je hierover ook informatie vinden.
21.03.2019 - 16:33
![]() Heloise wrote:
Heloise wrote:
Pourquoi faire simple si on peut compliquer ?
28.12.2018 - 08:55
![]() H. Pols wrote:
H. Pols wrote:
Bij het linker voorpand na de boordnaalden staat o.a.dat A6a gebreid moet worden, maar volgens mij moet dat A6b zijn.
29.01.2018 - 17:17
![]() Karin Elend wrote:
Karin Elend wrote:
Ich möchte mir die Jacke gern in Größe 54/56 stricken. Wie errechne ich mir die richtige Größe, Maschenzahl und Maße?
16.11.2017 - 10:30DROPS Design answered:
Liebe Frau Elend, am Enden der Seite finden Sie eine Maßskizze mit aller Maßen für jede Größe. Vergleichen Sie sie mit der einer ähnlichen Jacke die Sie gerne haben um die richtige Größe zu finden. Mehr lesen Sie hier. Viel Spaß beim stricken!
16.11.2017 - 11:46
![]() Violeta wrote:
Violeta wrote:
Preciosa labor, pero tengo una duda. En la explicación del delantero derecho dice que hay que continuar la labor hasta que mida 70 cm, y ajustar a 7 repeticiones de a2.b (talla L), pero a mí me salen 8 repeticiones para que mida 70 cm. No sé si estoy haciendo algo mal o no he entendido las explicaciones. Me da miedo de que quede demasiado largo. Muchas gracias
11.07.2017 - 11:53DROPS Design answered:
Hola Violeta. El número de repeticiones son aproximadas (depende de la tensión del tejido). Tienes que guiarte por las medidas en cm.
14.07.2017 - 13:59
![]() Tine wrote:
Tine wrote:
Hei! Jeg fikk strikket én omgang før jeg ikke skjønte resten. Hva mener dere med "Gjenta de 2 første p i diag til det er strikket ...p, strikk de 2 resterende p i diagrammet." Skal man strikke A.1a og A.2a i x antall omganger, så A.3a og A.4a? Det virket ikke logisk for meg :)
04.02.2017 - 16:51DROPS Design answered:
Hei Tine. Du gentager p 1 og 2 af alle 4 diagrammer til du har strikket i alt 12 eller 8 p (det er kun ret og vrang). Derefter strikker du de 2 sidste p i diagrammet - hvor der tages ind (i A.4 tages der ikke ind). Saa du har strikket i alt 14 eller 10 p naar du er faerdig med ribben.
06.02.2017 - 13:37Donna Hein wrote:
What is the P over diagram?
30.11.2016 - 11:58DROPS Design answered:
Dear Mrs Hein, when working from RS, P all sts with a - (= reversed stocking st), when working from WS, P all sts with a white square (= stocking st seen from RS). Happy knitting!
30.11.2016 - 12:05
![]() Donna wrote:
Donna wrote:
Back Piece: where do you start to measure for 8 1/2". Is it over the middle 30 sts. Or from the front shoulder marker.
23.11.2016 - 15:30DROPS Design answered:
Dear Donna, measure from shoulder marker so that new sts for armholes will be cast on on same height on back and on front piece (fold piece double at markers if necessary). Happy knitting!
23.11.2016 - 15:43
![]() Trudy Vink wrote:
Trudy Vink wrote:
Mogelijk ligt het aan mij maar ik vindt de overgang van de schouderpartij links en rechter voorpand naar de rug onduidelijk , de hals snap ik wel, maar niet de doorloop van het patroon dat over de schouder heen loopt, is daar eventueel een uitleg over, alvast bedankt.
11.11.2016 - 22:38DROPS Design answered:
Hoi Trudy. Je hebt van beneden naar boven gebreid en hebt nu een rechter en een linker voorpand. Je breit het achterpand van boven naar beneden van de schouders van de voorpanden. Je keert het werk van het linker voorpand en breit de goede kant zoals beschreven, dan zet je 20 nieuwe st op voor de hals (middenachter), en breit de x aantal st van de rechterschouder. Je breit nu door volgens het patroon zoals eerst (van de schouder) met 20 st in tricotst langs de hals en meerdert 4 st gelijkmatig. Brei door zoals beschreven.
14.11.2016 - 15:22
![]() Ansje wrote:
Ansje wrote:
In de voorbies moeten gaatjes worden gebreid. In het stekenoverzicht is daar ook een teken voor maar in het patroon vind ik die niet terug . Waar in het patroon moet ik dan die gaatjes breien?
18.10.2016 - 10:05DROPS Design answered:
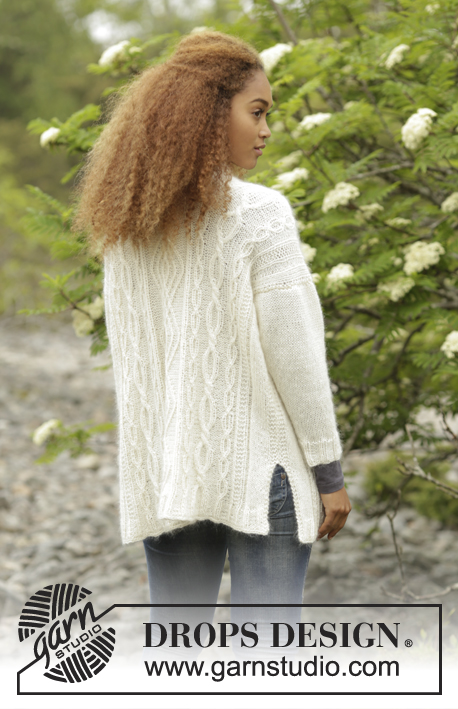
Hoi Ansje. Die staan in telpatroon A.1a
18.10.2016 - 12:17
|
||||||||||||||||||||||||||||||||||||||||
Irish Winter Cardigan#irishwintercardigan |
||||||||||||||||||||||||||||||||||||||||
 |
 |
|||||||||||||||||||||||||||||||||||||||
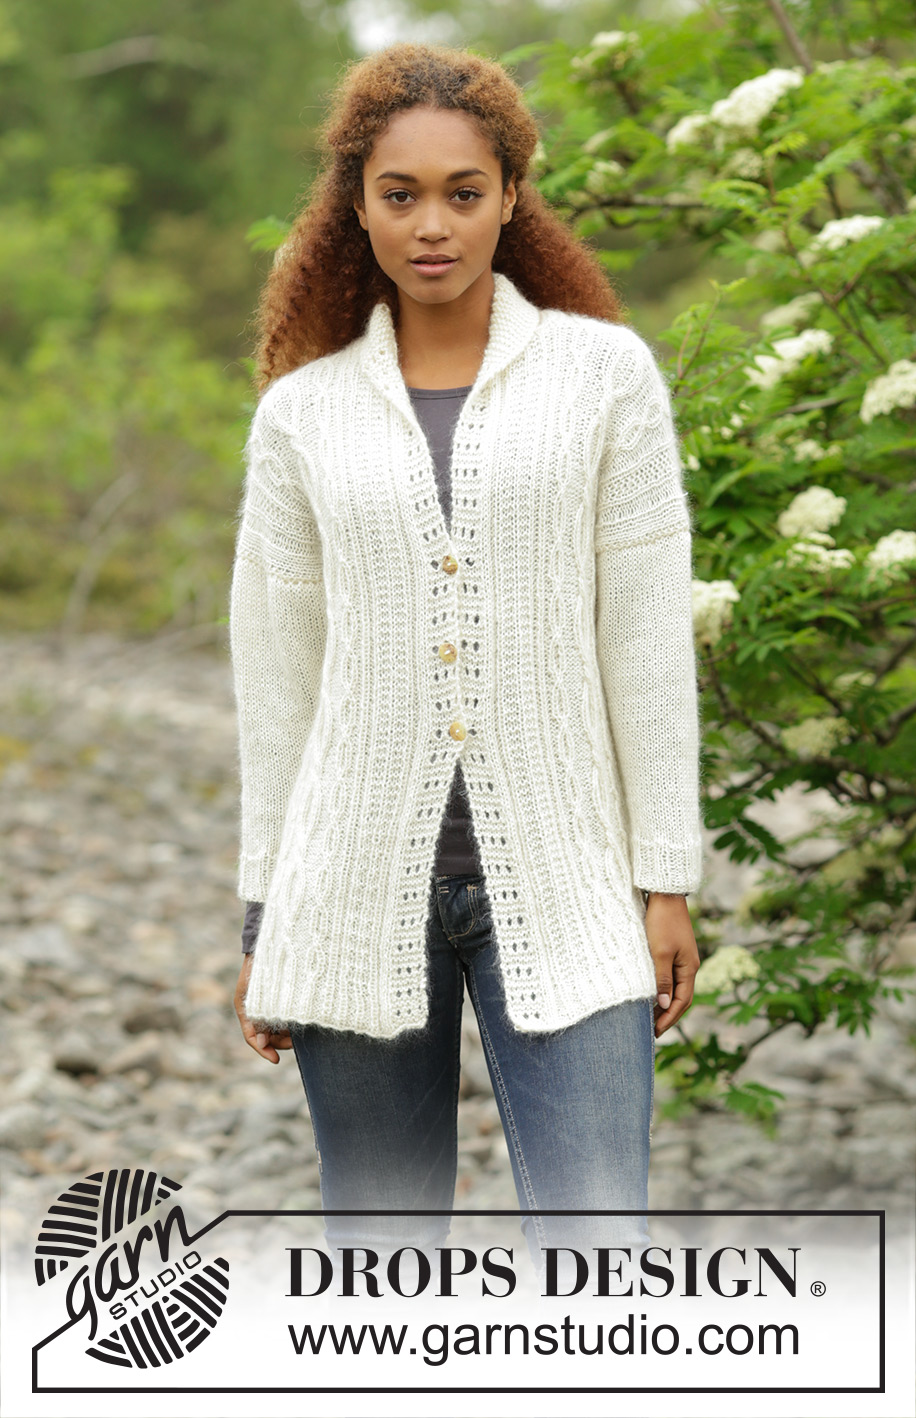
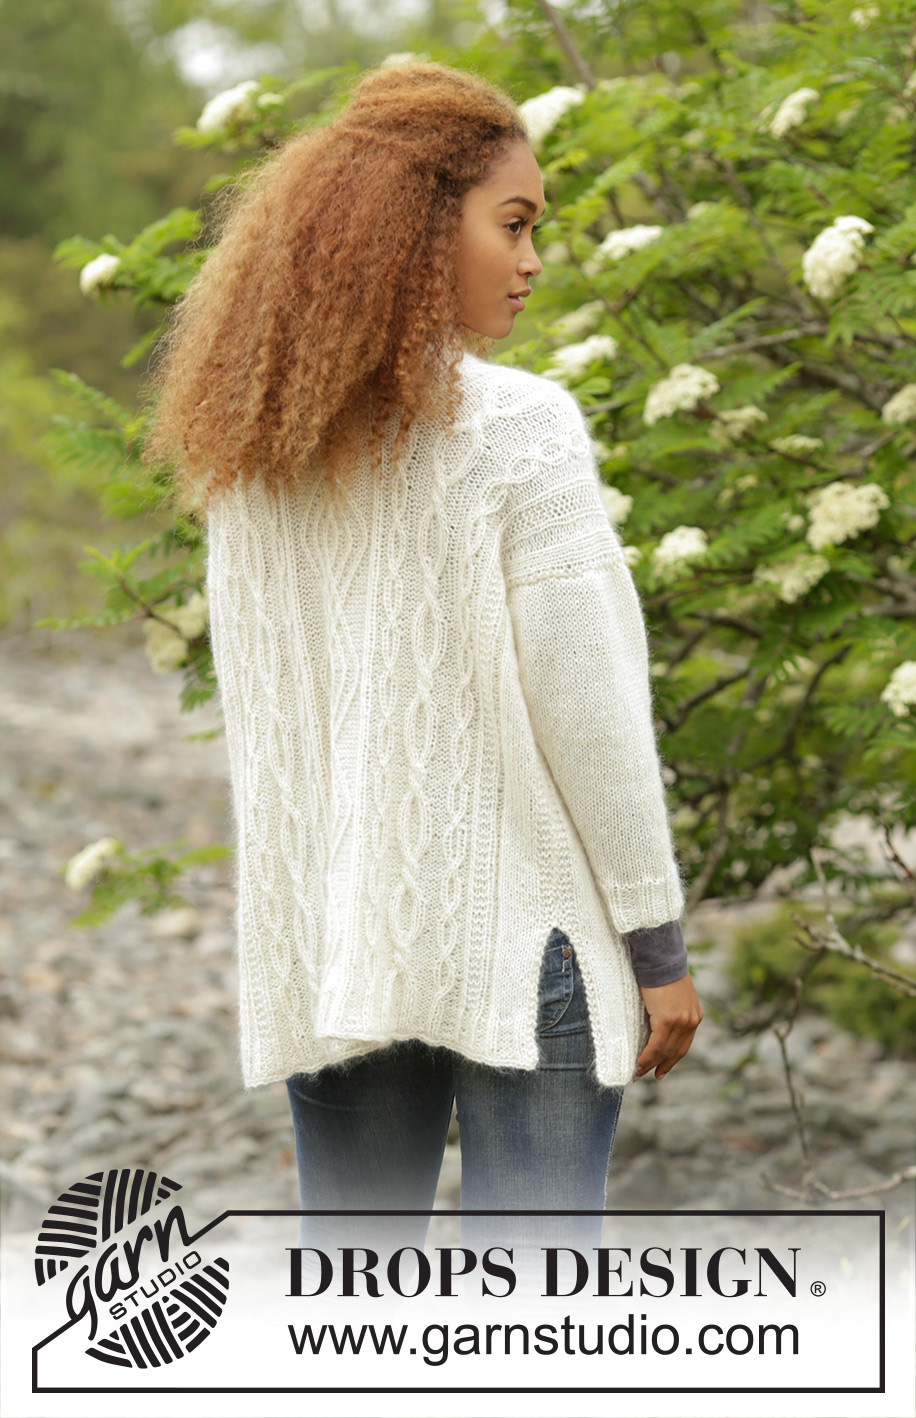
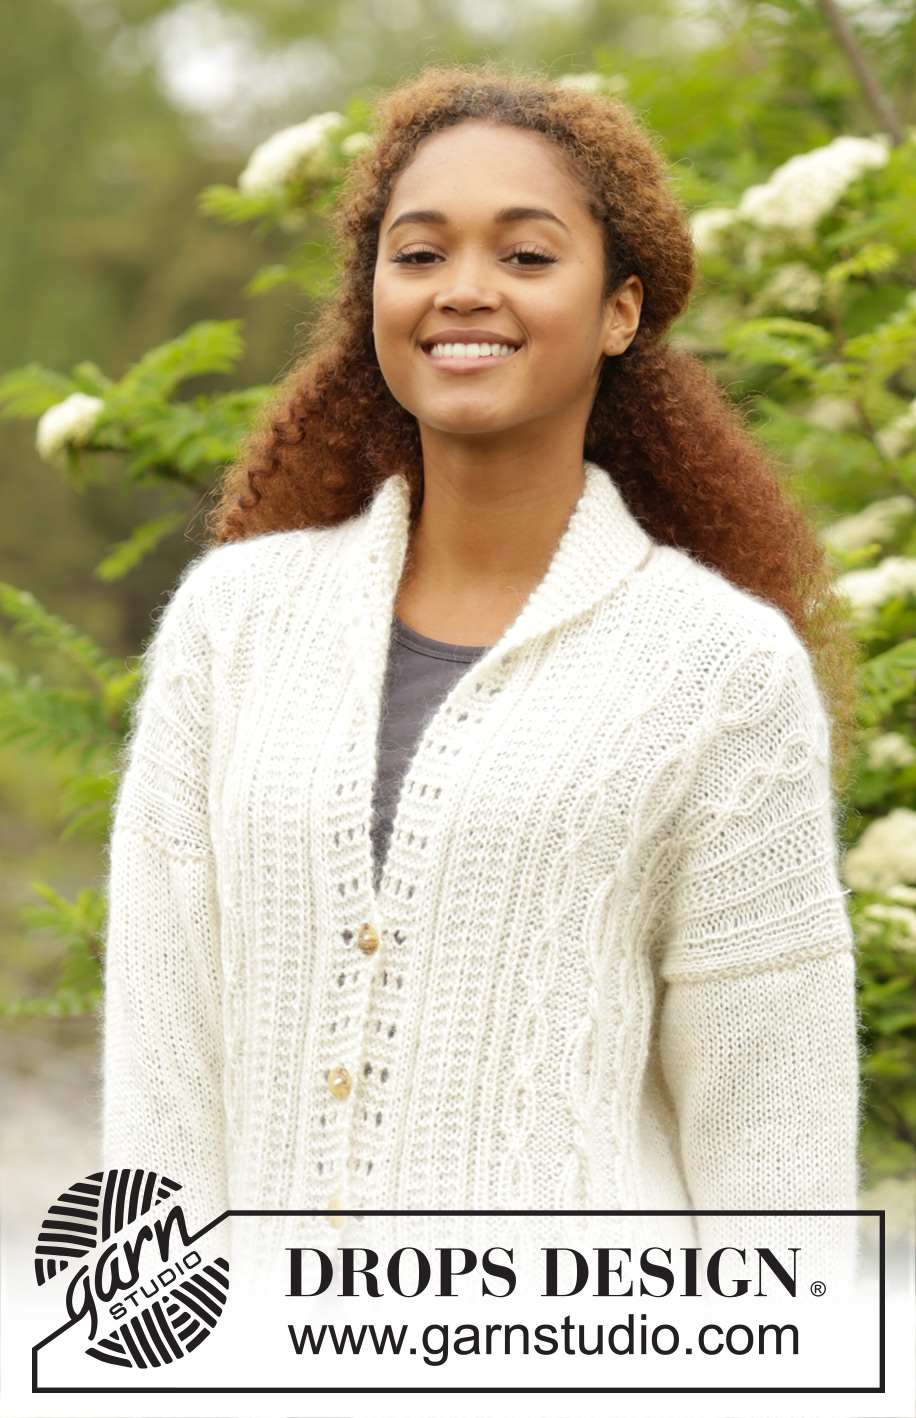
Knitted DROPS jacket with cables and shawl collar in "Alpaca" and "Kid-Silk". Size S-XXXL.
DROPS 171-9 |
||||||||||||||||||||||||||||||||||||||||
|
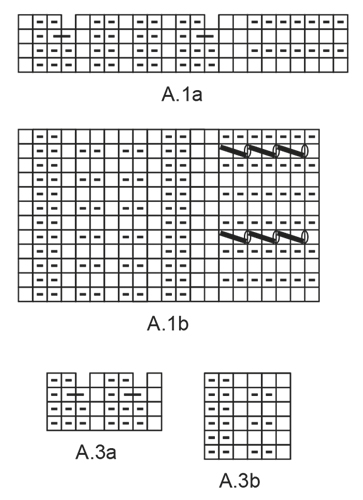
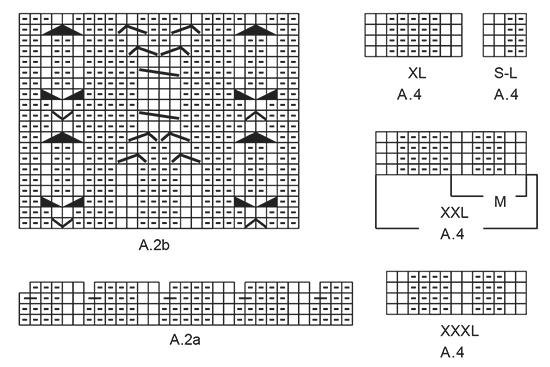
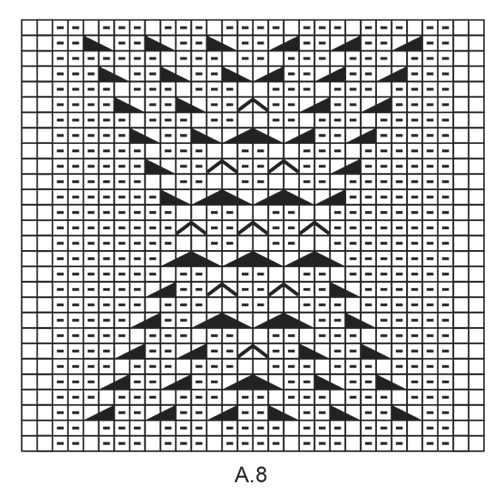
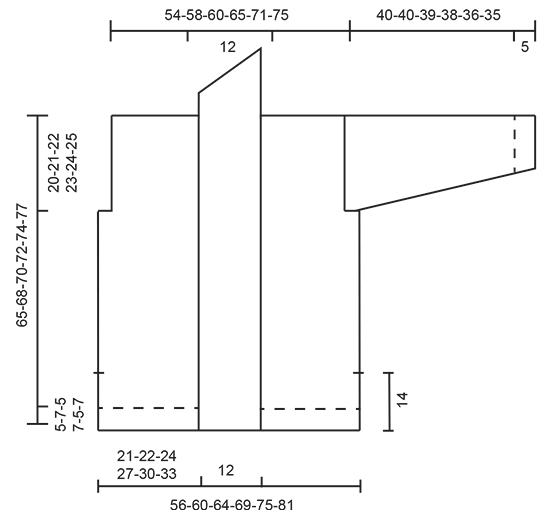
GARTER ST (back and forth): K all rows. 1 ridge = 2 rows K. PATTERN: See diagrams A.1 to A.8 – see diagram for correct size. The diagrams show all rows in pattern seen from RS. INCREASE TIP-1 (body): All inc are done from RS. Inc 1 st by making a YO. On next row K YOs twisted to avoid holes. INCREASE TIP-2 (sleeve): All inc are done from RS. Inc 1 st by making a YO. On next row P YOs twisted to avoid holes. BUTTONS: Measure from cast-on edge mid front and sew buttons on to left band as follows: SIZE S: 30, 38 and 46 cm SIZE M: 33, 41 and 49 cm SIZE L: 35, 43 and 51 cm SIZE XL: 37, 45 and 53 cm SIZE XXL: 39, 47 and 55 cm SIZE XXXL: 42, 50 and 58 cm CAST-OFF TIP: To avoid a tight cast-off edge you may use a needle ½ size larger. ---------------------------------------------------------- JACKET: Beg by working right front piece, then work left front piece before slipping the 2 parts tog and continue down the back piece. RIGHT FRONT PIECE AND SHOULDER: Cast on 68-71-76-81-86-93 sts on with 1 strand Alpaca + 1 strand Kid-Silk (= 2 strands) on circular needle size 4.5 mm. Work pattern as follows from RS: Work A.1a (= 23 sts), A.2a (= 31 sts), A.3a (= 8 sts) 1-1-2-2-2-3 times, work A.4 (= 4-7-4-9-14-13 sts), 2 edge sts in GARTER ST - see explanation above. Repeat the first 2 rows in diagram until 12-8-12-8-12-8 rows have been worked, work the 2 remaining rows in diagram = 59-62-65-70-75-80 sts. Switch to circular needle size 5 mm. Now work pattern as follows: Work A.1b (= 21 sts), A.2b (= 26 sts), A.3b (= 6 m) 1-1-2-2-2-3 times, work 4-7-4-9-14-13 sts in stocking st, 2 edge sts in garter st. When piece measures 14 cm, cast on 1 new st at the end of next row from RS (marks vent) = 60-63-66-71-76-81 sts. Work the new st in garter st. REMEMBER THE KNITTING TENSION When piece measures 45-47-48-49-50-52 cm, cast off 2-2-3-4-4-5 sts for armhole at beg of next row from WS = 58-61-63-67-72-76 sts. Continue pattern as before with 1 edge st in garter st in the side until piece measures 65-68-70-72-74-77 cm - adjust so that 6½-7-7-7½-7½-8 repetitions have been worked of A.2b vertically. I.e. in size S, XL, XXL work 6-7-7 repetitions vertically + the first 10 rows in diagram A.2b. Insert a marker here. NOW MEASURE THE PIECE FROM HERE. Now continue over the shoulder as follows from RS: K the first 19 sts on row before slipping them on a stitch holder for shawl collar, continue pattern over the remaining 39-42-44-48-53-57 sts for shoulder. When piece measures 2 cm, cast on 1 new st at the end of next row from WS = 40-43-45-49-54-58 sts. Slip sts on a stitch holder and work left front piece and shoulder. LEFT FRONT PIECE AND SHOULDER: Cast on 68-71-76-81-86-93 sts on with 1 strand Alpaca + 1 strand Kid-Silk (= 2 strands) on circular needle size 4.5 mm. Now work pattern as follows from RS: Work 2 edge sts in garter st, A.5 (= 4-7-4-9-14-13 sts), A.6a (= 8 sts) 1-1-2-2-2-3 times in width, A.2a (= 31 sts), A.7a (= 23 sts). Repeat the first 2 rows in diagram until 12-8-12-8-12-8 rows have been worked, work the 2 remaining rows in diagram = 59-62-65-70-75-80 sts. Switch to circular needle size 5 mm. Now work pattern as follows: Work 2 edge sts in garter st, work 4-7-4-9-14-13 sts in stocking st, A.6a (= 6 sts) 1-1-2-2-2-3 times in width, A.2b (= 26 sts), A.7b (= 21 sts). When piece measures 14 cm, cast on 1 new st at the end of next row from WS (marks vent) = 60-63-66-71-76-81 sts. Work the new st in garter st. When piece measures 45-47-48-49-50-52 cm, cast off 2-2-3-4-4-5 sts for armhole at beg of next row from RS = 58-61-63-67-72-76 sts. Continue pattern as before with 1 edge st in garter st in the side until piece measures 65-68-70-72-74-77 cm - adjust so that 6½-7-7-7½-7½-8 repetitions have been worked of A.2b vertically. I.e. in size S, XL, XXL work 6-7-7 repetitions vertically + the first 10 rows in diagram A.2b. Insert a marker here. NOW MEASURE THE PIECE FROM HERE. Now continue over the shoulder as follows from RS: Work pattern over the first 39-42-44-48-53-57 sts as before, K over the remaining 19 sts on row, turn and K over the first 19 sts before slipping them on a stitch holder for shawl collar = 39-42-44-48-53-57 sts for shoulder. When piece measures 2 cm, cast on 1 new st at the end of next row from RS = 40-43-45-49-54-58 sts. Turn and work back. BACK PIECE: Now continue with pattern from RS as follows: Work the first 40-43-45-49-54-58 sts as before, then cast on 20 new sts for neck, work the 40-43-45-49-54-58 sts from right shoulder on to the same needle = 100-106-110-118-128-136 sts. Turn and work pattern but K over the middle 20 sts (from WS) and inc 4 sts evenly over these sts (inc with K 2 sts in 1 st) = 104-110-114-122-132-140 sts. On next row from RS work A.8 over the middle 30 sts. When piece measures 20-21-22-23-24-25 cm, cast on 2-2-3-4-4-5 new sts at the end of the next 2 rows = 108-114-120-130-140-150 sts. Now work pattern as follows: 3 sts in garter st, stocking st over the next 4-7-4-9-14-13 sts, pattern as before over the next 94-94-106-106-106-118 sts, work 4-7-4-9-14-13 sts in stocking st, 3 sts in garter st. When piece measures 51-54-56-58-60-63 cm, dec 1 st at beg of the next 2 rows (= marks vent) = 106-112-118-128-138-148 sts. When 6½-7-7-7½-7½-8 repetitions of A.2b have been worked vertically (= 13-14-14-15-15-16 repetitions in total) switch to circular needle size 4,5 and work as follows: Work 2 edge sts in garter st, A.5 over the next 4-7-4-9-14-13 sts, K over K and P over P over the next 94-94-106-106-106-118 sts, AT THE SAME TIME inc 1 P st in every section with P over diagram, A.3b, A.2b and A.6b + 1 st over the 2 sts in garter st in diagram A.3b and A.6b (= 14-14-18-18-18-22 sts) – READ INCREASE TIP-1, work A.4 over the next 4-7-4-9-14-13 sts, 2 edge st in garter st = 120-126-136-146-156-170 sts. Continue back and forth with rib like this until 12-8-12-8-12-8 rows rib have been worked. Cast off with K over K and P over P - READ CAST-OFF TIP. SHAWL COLLAR: Right shawl collar: Slip sts from stitch holder back on circular needle size 5 mm = 19 sts. Beg from WS and work as follows: K 1 row over all sts, * turn and K 10, turn and work back, K 2 rows over all sts *, repeat from *-* until collar measures 9 cm on the shortest. Cast off. Left shawl collar: Slip sts from stitch holder back on circular needle size 5 mm = 19 sts. Beg from RS and work as follows: * K 1 row, turn and K 10, turn and work 10 sts, turn and K over all sts *, repeat from *-* until collar measures 9 cm on the shortest. Cast off. SLEEVE: The sleeve is worked back and forth on circular needle. Cast on 44-44-49-49-54-54 sts (incl 1 edge st in garter st in each side) with 1 strand Alpaca + 1 strand Kid-Silk (= 2 strands) on circular needle size 4.5 mm . P 1 row from WS. Then work rib as follows: 1 edge st in garter st, (K 2, P 3) until 3 sts remain, K 2, 1 edge st in garter st. When rib measures 5 cm, dec 6-4-7-7-10-8 sts evenly = 38-40-42-42-44-46 sts. Switch to circular needle size 5 mm. Now work in stocking st with 1 edge sts in garter st in each side. When piece measures 8 cm in all sizes, inc 1 st inside 1 edge st in garter st in each side - READ INCREASE TIP-2. Inc like this every 4th row 15-14-13-10-6-4 times and on every other row 1-3-4-9-14-17 times = 70-74-76-80-84-88 sts. When piece measures 40-40-39-38-36-35 cm (shorter measurements in the larger sizes because of wider shoulders), cast off all sts. Knit another sleeve the same way. ASSEMBLY: Sew sleeves to body inside 1 edge st in garter st. Sew underarm and side seams in one inside 1 edge st in garter st down to vent (vent = 14 cm). Repeat in the other side. Sew the 2 cast-off edges on collar mid back. Sew collar to neck edge at the back. Sew BUTTONS – see explanation above, on left band. Button through holes in band. |
||||||||||||||||||||||||||||||||||||||||
Diagram explanations |
||||||||||||||||||||||||||||||||||||||||
|
||||||||||||||||||||||||||||||||||||||||
 |
||||||||||||||||||||||||||||||||||||||||
 |
||||||||||||||||||||||||||||||||||||||||
 |
||||||||||||||||||||||||||||||||||||||||
 |
||||||||||||||||||||||||||||||||||||||||
 |
||||||||||||||||||||||||||||||||||||||||
Have you finished this pattern?Tag your pictures with #dropspattern #irishwintercardigan or submit them to the #dropsfan gallery. Do you need help with this pattern?You'll find 26 tutorial videos, a Comments/Questions area and more by visiting the pattern on garnstudio.com. © 1982-2025 DROPS Design A/S. We reserve all rights. This document, including all its sub-sections, has copyrights. Read more about what you can do with our patterns at the bottom of each pattern on our site. |
||||||||||||||||||||||||||||||||||||||||


With over 40 years in knitting and crochet design, DROPS Design offers one of the most extensive collections of free patterns on the internet - translated to 17 languages. As of today we count 320 catalogues and 12092 patterns translated into English (UK/cm). 12092
We work hard to bring you the best knitting and crochet have to offer, inspiration and advice as well as great quality yarns at incredible prices! Would you like to use our patterns for other than personal use? You can read what you are allowed to do in the Copyright text at the bottom of all our patterns. Happy crafting!
Post a comment to pattern DROPS 171-9
We would love to hear what you have to say about this pattern!
If you want to leave a question, please make sure you select the correct category in the form below, to speed up the answering process. Required fields are marked *.