Comments / Questions (43)
![]() Vibeke wrote:
Vibeke wrote:
Hej Kan man strikke denne model uden mønster på ryggen? Hvis det er, har det så betydning for maskeantallet? Mvh Vibeke
14.11.2024 - 20:05DROPS Design answered:
Hej Vibeke, ja det kan du med samme antal masker :)
19.11.2024 - 10:56
![]() Birgitta Waldt wrote:
Birgitta Waldt wrote:
Hej förtydligande av min förra fråga. På bilden är längden från mönster A4 till axeln mycket längre än det blir på min stickning. Skiljer ca 10 cm. Det verkar saknas en del på mönstret. Mitt maskantal stämmer mot mönstret.
06.02.2024 - 14:13DROPS Design answered:
Hei Birgitta. Se vårt forrige svar. mvh DROPS Design
15.02.2024 - 11:29
![]() Birgitta Waldt wrote:
Birgitta Waldt wrote:
Hej Jag håller på att sticka denna ponchon. Men när jag tittar på bilden är längden från mönster A4 mycket längre på bilden än på det jag fått. Verkar som om en del saknas i beskrivningen. Antal maskor stämmer.
05.02.2024 - 18:28DROPS Design answered:
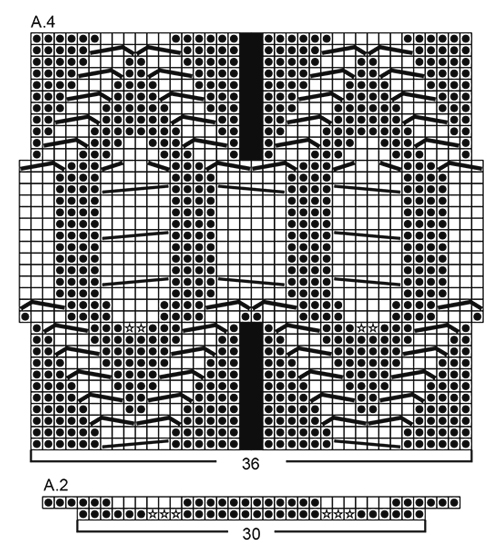
Hei Birgitta. Skal ikke mangle noe i oppskriften, men husk at ponchoen strikkes sidelengs. Så når du ser på diagrammet (A.4) stående, så blir det i virkeligheten liggende på selve plagget. mvh DROPS Design
15.02.2024 - 09:42
![]() Brigitte Grizonnet-Riviere wrote:
Brigitte Grizonnet-Riviere wrote:
Bonjour,c est encore moi donc le diagramme A4 n'a pas toujours la même largeur? ou bien empiète t-il sur les diagrammes qui le bordent? encore merci et bonne journée.Brigitte
02.11.2023 - 11:24DROPS Design answered:
Bonjour Brigitte, le diagramme A.4 va avoir la même largeur tout du long, si on augmente des mailles, c'est pour conserver la même largeur pour les torsades au milieu des 2 motifs; quand ces torsades sont terminées, on va diminuer les mailles augmentées. La largeur sera ainsi la même (il faut plus de mailles pour tricoter des torsades que du jersey/jersey envers, raison pour laquelle on doit augmenter, sinon l'ouvrage deviendrait plus étroit à ce niveau (et on manquerait de mailles pour les torsades). Bon tricot!
02.11.2023 - 17:51
![]() Brigitte Grizonnet-Riviere wrote:
Brigitte Grizonnet-Riviere wrote:
Bonjour, Au 12eme rang du schéma A4 faut- il augmenter de 4 mailles au total, puis diminuer de 4 mailles au 26 eme rang? merci Brigitte
31.10.2023 - 17:45DROPS Design answered:
Bonjour Mme Grizonnet-Riviere, tout à fait, il vous suffit d'augmenter au niveau des étoiles (cf diagramme et légende) puis vous diminuerez (Cf 5ème et 6ème symboles figurant également dans le diagramme. Bon tricot!
01.11.2023 - 14:55
![]() Brigitte Grizonnet-Riviere wrote:
Brigitte Grizonnet-Riviere wrote:
Bonjour,je ne comprends pas le diagramme A 4.Vous dites dans un précédent commentaire que les cases noires correspondent à des mailles que l on a précédemment diminuées.je ne comprends pas à quel moment nous avons diminué ces 2 mailles.\D\'autre part,sur le tricot, A4 contient combien de mailles(36ou38ou40)?.merci;Brigitte
31.10.2023 - 17:39
![]() Annabelle Garcia wrote:
Annabelle Garcia wrote:
Bonjour, je dois commencer le col et je ne comprends pas le répartition ni le nombre d'augmentations comme expliqué:Quand les côtes mesurent 10 cm, augmenter 1 m dans 1 section 2 m end sur 2 = 108-108-117-126 m. Quand les côtes mesurent 18 cm, augmenter 1 m end dans les sections 2 m end restantes = 120-120-130-140 m. Merci pour votre aide
10.10.2023 - 14:33DROPS Design answered:
Bonjour Mme Garcia, vous devez augmenter le nombre de mailles envers des côtes 2/2, autrement dit, après la 1ère augmentation, vous aurez *2 m end, 2 m env, 3 m end, 2 m env* tout le tour; puis vous augmenterez dans les sections 2 m end restantes pour continuer en côtes 3 m end, 2 m env. Vu sur l'endroit quand le col sera replié, vos côtes se présenteront en 2 m end/3 m env. Bon tricot!
10.10.2023 - 16:26
![]() Angela Beer wrote:
Angela Beer wrote:
Thank you so much for your reply. I feel so sorry for posting a negative review on this pattern when had read it properly in the first instance and looked at the directional arrow instead of leaping ahead, I would have realised it was sideways on!!!! I have now started the garment and hope that because I am knitting it for my daughter it'll turn out well. I love everything about Drops yarns and have used them extensively. The colour palette is amazing. Thank you.
23.10.2022 - 16:06
![]() Angela Beer wrote:
Angela Beer wrote:
I cannot comprehend this pattern. Is it because the instructions do not go from right to left across the garment, but rather sideways, then the neck, and then the remainder of the front of the garment. Similarly the back would be knitted the same way. It is important because I have got the yarn, a lot of it, and it was going to be a present for my daughter.
19.10.2022 - 15:38DROPS Design answered:
Dear Mrs Beer, correct, the front piece is worked sideways from the right side towards the left (when poncho is worn), then back piece is worked sideways from the left side towards the right side (when poncho is worn); you then sew pieces together on shoulder and work neck in the round around neckline. Hope it will help. Happy knitting!
19.10.2022 - 16:23
![]() Angela Beer wrote:
Angela Beer wrote:
I have just posted a query and have been answered in not a very appropriate fashion. My comments contain forbidden words. I am sorry I do not see why I have said anything offending.
19.10.2022 - 15:33
Alanna#alannaponcho |
||||||||||||||||||||||||||||||||||
|
|
||||||||||||||||||||||||||||||||||
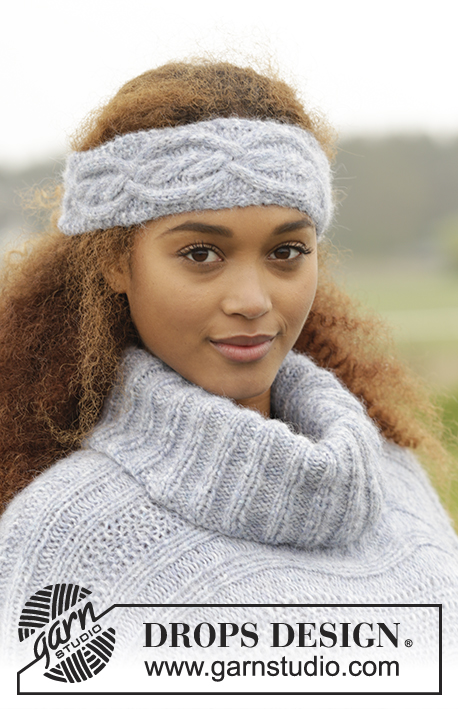
Knitted DROPS poncho with cables, turtle neck and tassels in “Air”. Size: S - XXXL.
DROPS 171-49 |
||||||||||||||||||||||||||||||||||
|
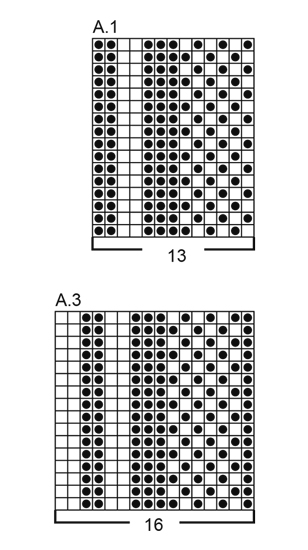
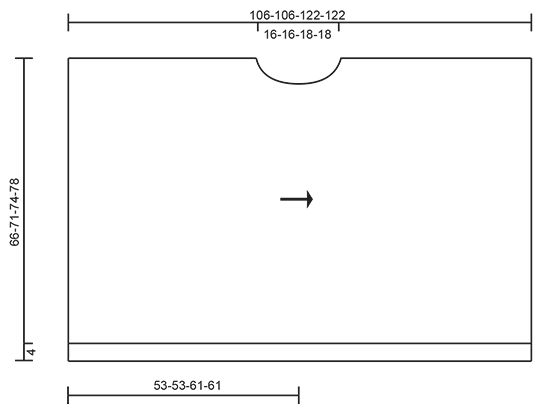
GARTER ST (back and forth): K all rows. 1 ridge = 2 rows K. PATTERN: See diagrams A.1 to A.4. The diagrams show all rows in pattern seen from RS. ---------------------------------------------------------- PONCHO: Piece is worked sideways and front and back on circular needle in 2 parts. FRONT PIECE: Cast on 112-120-126-132 sts on circular needle size 4.5 mm with Air. Work 6 ridges in GARTER ST - see explanation above. Switch to circular needle size 5 mm and work next row from RS as follows: 6 edge st in garter st, 45-53-59-65 sts in stocking st, A.1 (= 13 sts), A.2 (= 30 sts), A.3 (= 16 sts) and 2 edge sts in garter st. Work back from WS the same way = 118-126-132-138 sts. Work next row as follows from RS: 6 edge sts in garter st, 45-53-59-65 sts in stocking st, continue A.1 over the next 13 sts, work A.4 over the next 36 sts, continue A.3 over the next 16 sts and finish with 2 edge sts in garter st. Continue pattern like this. REMEMBER THE KNITTING TENSION When piece measures approx. 45-45-52-52 cm, insert 1 marker at the end of row from RS, i.e. if the knitting tension is kept vertically, there should now remain 8 cm in size S/M + L/XL before finishing with one whole repetition of A.4 vertically and 9 cm in size XXL + XXXL before finishing with half a repetition of A.4 vertically – i.e. 8-8-9-9 cm remain before piece measures 53-53-61-61 cm (= mid front). Now cast off for neck at beg of every row from WS as follows: Cast off 3 sts 1 time, 2 sts 2 times and 1 st 3 times = 108-116-122-128 sts. Continue pattern as before with 1 edge st in garter st towards the neck until piece measures 8-8-9-9 cm from marker and insert 1 new marker (= mid front). Work until piece measures 2-2-3-3 cm from marker mid front. Now cast on sts for neck at the end of every row from RS as follows: Cast on 1 st 3 times, 2 sts 2 times and 3 sts 1 time = 118-126-132-138 sts on needle (piece measures now approx. 16-16-18-18 cm from first marker (= neck). Continue pattern over all sts as before until piece measures approx. 102-102-118-118 cm – finish after one whole repetition of A.4 vertically (= 6-6-7-7 repetitions in total with A.4 vertically). Work 1 row from RS as before but work the 6 sts in each cable K tog two by two = 112-120-126-132 sts remain on needle. Switch to circular needle size 4.5 mm, work 6 ridges and cast off with K from RS (make sure to avoid a tight cast-off edge). BACK PIECE: Cast on and work as front piece. When casting off for neck, this is done the same way but cast off like this: Cast off 1 sts 1 time and 2 sts 1 time = 115-123-129-135 sts on needle. When 6-6-7-7 cm have been worked from marker mid back, cast on new sts for neck the same way as on front piece but cast on as follows: Cast on 2 sts 1 time and 1 sts 1 time = 118-126-132-138 sts on needle. Then continue the same way as on front piece. ASSEMBLY: Sew the 2 parts tog on the shoulder - sew edge to edge in outer loops of edge sts so that the seam is flat. Sew if needed a little stitch in each side approx. 30-35 cm from shoulder and down. TURTLE NECK: Pick up from RS approx. 68 to 78 sts around the neck on a short circular needle size 4.5 mm. K 1 round while inc evenly to 96-96-104-112 sts (divisible by 4). Work rib in the round (= K 2/P 2). When rib measures 10 cm, inc every other 2 K sts to 3 K sts = 108-108-117-126 sts. When rib measures 18 cm, inc the remaining 2 K sts to 3 K sts = 120-120-130-140 sts. Continue in the round with K 3/P 2 until neck measures approx. 20-22-22-24 cm and loosely cast off with K over K and P over P. Fold the neck down. TASSEL: Use a cardboard piece or similar measuring approx. 15 cm. Twine the yarn 25 times around this (or do desired thickness). Use another strand to fasten tightly around the strands in one end. Use another strand and thread through loop now made at the top of tassel and use strand to fasten the tassel to the poncho. Cut the strands in the other end of tassel. Fasten one tassel in each corner on poncho (= 4 tassels). |
||||||||||||||||||||||||||||||||||
Diagram explanations |
||||||||||||||||||||||||||||||||||
|
||||||||||||||||||||||||||||||||||

|
||||||||||||||||||||||||||||||||||

|
||||||||||||||||||||||||||||||||||

|
||||||||||||||||||||||||||||||||||
Have you finished this pattern?Tag your pictures with #dropspattern #alannaponcho or submit them to the #dropsfan gallery. Do you need help with this pattern?You'll find 24 tutorial videos, a Comments/Questions area and more by visiting the pattern on garnstudio.com. © 1982-2025 DROPS Design A/S. We reserve all rights. This document, including all its sub-sections, has copyrights. Read more about what you can do with our patterns at the bottom of each pattern on our site. |
||||||||||||||||||||||||||||||||||


Post a comment to pattern DROPS 171-49
We would love to hear what you have to say about this pattern!
If you want to leave a question, please make sure you select the correct category in the form below, to speed up the answering process. Required fields are marked *.