Comments / Questions (290)
![]() Stefania wrote:
Stefania wrote:
Buongiorno, io sono arrivata all'unione dav./diet./maniche e mi ritrovo 250 maglie su ferri circolari ma non riesco ad andare avanti perchè non ho capito la spiegazione sprone ,reglan, diagramma A1. Quindi per non impazzire è possibile eliminare il diagramma ? Grazie
30.08.2018 - 16:15DROPS Design answered:
Buongiorno Stefania. Il diagramma serve anche come riferimento per le diminuzioni per il raglan. Può esserle di aiuto inserire dei segnapunti per capire meglio dove si trova il diagramma. P.es, per la taglia S, lavora 28 m, mette un segnapunti, lavora A1 (7m), mette un segnapunti e così via. Buon lavoro!
30.08.2018 - 19:19
![]() Jennifer wrote:
Jennifer wrote:
Hi, if I want to do the dubble A version rather than signle C (for the yarn) how should I calculate how much yarn I need?
28.08.2018 - 12:50DROPS Design answered:
Hi Jennifer. You can either use our yarn calculator (located right below the materials section on every pattern) or you can have a look at how to calculate it yourself here. Happy knitting.
28.08.2018 - 14:22
![]() Christé wrote:
Christé wrote:
Bonjour. Pour commencer l’encoluRe. Dès que je rabats mes mailles pour l’encolUre , est ce qtje tourne tout de suite l’ouvRage ou je termine le tour commancer? Merci
27.08.2018 - 21:51DROPS Design answered:
Bonjour Christé, après avoir rabattu les mailles de l'encolure, terminez le rang jusqu'à l'autre côté de l'encolure et tournez, continuez ensuite ainsi en allers et retours en commençant et en terminant par le côté encolure. Bon tricot!
04.09.2018 - 13:29Mardi Nowak wrote:
Hello! Am I correct in reading that after the run section, you decrease many stitches before going on with the main body stocking stitch? It just seems like a lot of stitches to decrease!
30.06.2018 - 02:21DROPS Design answered:
Dear Mardi, yes you are correct after the rib section, thenumber of stitches should be decreased when starting teh stockinett sevtion. This is done, so the ribbing would not pull the edge in, but rather let it stay flat. I hoe this helps. Happy Knitting!
01.07.2018 - 03:18
![]() Cathy Augros wrote:
Cathy Augros wrote:
Bonjour pouvez vous m aider pour l empiecement je ne comprends pas vos explication faut il commencer le raglan tout de suite après avoir glisser les manches Merci
01.05.2018 - 17:59DROPS Design answered:
Cf réponse ci-dessous.
02.05.2018 - 10:28
![]() Cathy Augros wrote:
Cathy Augros wrote:
Bonjour pouvez vous m aider pour l empiecement je ne comprends pas vos explication faut il commencer le raglan tout de suite après avoir glisser les manches Merci
01.05.2018 - 17:58DROPS Design answered:
Bonjour Mme Augros, après avoir glissé les mailles des manches sur l'aiguille circulaire, tricotez le 1er tour comme indiqué, et, en même temps, dès le 1er tour, diminuez pour le raglan d'abord 8 m tous les 2 tours/rangs puis 16 m tous les tours/rangs (cf taille pour le nombre de fois à diminuer les 8 et 16 m). Bon tricot!
02.05.2018 - 10:27
![]() Tina wrote:
Tina wrote:
😱..perdono.. Son sempre io!!! Provando a calcolare la lunghezza della manica, togliendo quindi una spalla e lo scollo, è possibile che più la taglia è grande, più la manica sia corta?? 1 cm in meno per ogni taglia in più?!? È possibile che sia sbagliato oppure ho sbagliato io?? Grazie ancora, ancora e ancora... Vi adoro!!! 💖
13.03.2018 - 09:05DROPS Design answered:
Buongiorno Tina. Le misure sono corrette. Spesso le maniche sono più corte nelle taglie più grandi perchè le spalle sono più larghe e lo sprone più profondo. Può comunque adattare facilmente la lunghezza della manica a quella necessaria al suo caso. Buon lavoro!
13.03.2018 - 14:12
![]() Tina wrote:
Tina wrote:
Ancora io, scusate, un'altra domanda: per fare una diminuzione in modo uniforme, devo dividere il n° tot. delle maglie per il n° di quelle da diminuire? Grazie tante di nuovo!!! Siete SEMPRE i MIGLIORI al MONDO!!!!!
13.03.2018 - 08:15DROPS Design answered:
Buongiorno Tina. Sì è corretto. Buon lavoro!
13.03.2018 - 08:37
![]() Tina wrote:
Tina wrote:
Salve.. Scusate la mia domanda, ma io vorrei sapere come comportarmi riguardo la taglia, per un uomo con la "pancia". Avendo come misure in vita 48 cm e più su (sulla pancia) 60 cm 😱, come dovrei fare con le taglie? Grazie infinite!!!
13.03.2018 - 08:03DROPS Design answered:
Buongiorno Tina. Le possiamo consigliare di misurare un capo analogo di suo marito che vesta correttamente e confrontare le misure con quelle indicate nello schema delle misure. Sceglierà la taglia che più si avvicina. Buon lavoro!
13.03.2018 - 08:37
![]() Elizabeth Maland wrote:
Elizabeth Maland wrote:
Me again. I decided to proceed before hearing from you and now I have read your response and am more confused. You mention I should you "knit 3 P and 1 K in the middle stitches" What? I have been K2 and P2 for the ribbing. Then I increased in the P portion so that would be K2 and P3, would it not?
05.03.2018 - 21:40DROPS Design answered:
Dear Mrs Maland, you increase 1 st in eeach of the 14 middle P sections (seen from RS) so that you will have P3 a total of 14 times on these 14 P sections, K sts from RS will not change = you will start row with K2,P2 as before, then work a total of 14 times P4, K2 (seen from RS), and finish row with K2/P2 as before. You keep all K2 from RS and the 14 middle P2 are increased to P3. Happy knitting!
06.03.2018 - 09:07
Aberdeen |
|||||||
 |
 |
||||||
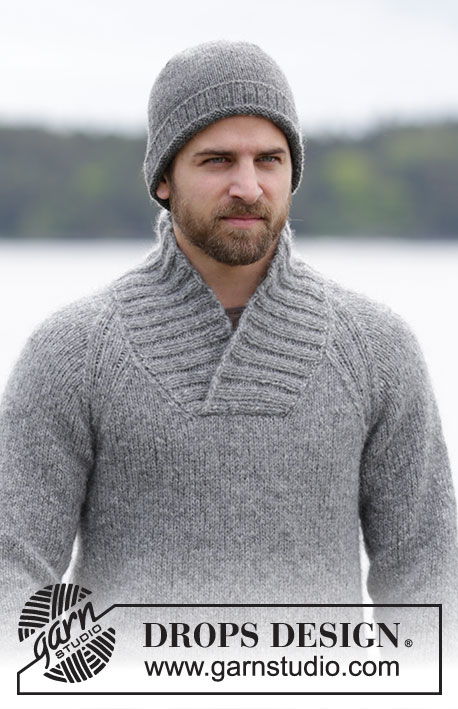
Men's knitted jumper in DROPS Air, with raglan and shawl collar. Size: S - XXXL.
DROPS Extra 0-1159 |
|||||||
|
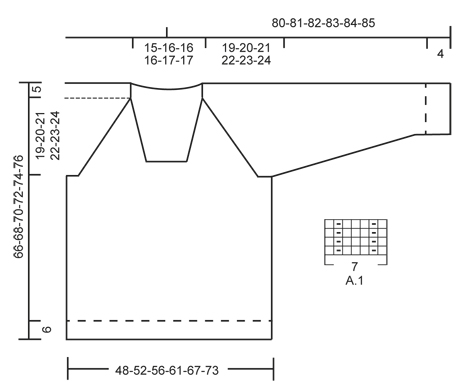
GARTER ST (back and forth): K all rows. 1 ridge = 2 rows K. PATTERN: See diagram A.1. The diagram shows all rows/rounds in pattern seen from RS. RAGLAN: All dec are done from RS! Dec 1 st on each side of every A.1 (= 8 sts dec on row/round): Dec as follows before A.1: Work until 2 sts before A.1, K 2 tog = 1 st dec. Dec as follows after A.1: Slip 1 st as if to K, K 1, psso = 1 st dec. Dec 2 sts on each side of every A.1 as follows (= 16 sts dec on row): Dec as follows before A.1: Work until 3 sts remain before A.1, slip 1 st as if to K, K 2 tog, psso = 2 sts dec. Dec as follows after A.1: Slip 1 st as if to K, K 2 tog, psso = 2 sts dec. INCREASE TIP: Inc 1 st by making 1 YO, on next round K YO twisted (i.e. work in back loop of st instead front) to avoid holes. DECREASE TIP: Dec inside 1 edge st in garter st. All dec are done from RS! Dec as follows before 1 edge st: K 2 tog. Dec after 1 edge st as follows: Slip 1 st as if to K, K 1, psso. ---------------------------------------------------------- JUMPER: Jumper is worked in the round on circular needle up to neck. When casting off for neck, continue back and forth. Rounds start mid back. BODY: Cast on 176-188-204-224-244-268 sts on circular needle size 5 mm with Air. Work rib = K 2/P 2 in the round for 6 cm. Then continue in stocking st until finished measurements. On next round switch to circular needle size 6 mm and dec 32-32-36-40-44-48 sts evenly = 144-156-168-184-200-220 sts. REMEMBER THE KNITTING TENSION! When piece measures 42-43-44-45-46-47 cm, cast off for armholes in each side as follows: Work 31-34-37-41-45-50 sts in stocking st (= half back piece), cast off 10 sts under sleeve, work 62-68-74-82-90-100 sts in stocking st (= front piece), cast off 10 sts and work the remaining 31-34-37-41-45-50 sts in stocking st (= half back piece). Put piece aside and knit the sleeves. SLEEVES: Worked in the round on double pointed needles/circular needle. Cast on 40-40-44-44-44-48 sts on double pointed needles size 5 mm. Work rib = K 2/P 2 for 4 cm. Then continue in stocking st until finished measurements. On next round switch to double pointed/circular needle size 6 mm and dec 5-3-5-3-3-7 sts evenly = 35-37-39-41-41-41 sts. When sleeve measures 8 cm in all sizes, insert a marker at beg of round (= mid under sleeve). On next round inc 1 st in each side of marker - Read INCREASE TIP! Repeat inc every 6-6-6-6-5-5 round 8-7-3-3-14-7 more times, then every 5-5-5-5-4-4 round a total of 6-7-12-12-2-11 times = 65-67-71-73-75-79 sts. Work the new stitches in stocking stitch. When piece measures 54-53-53-53-53-53, cast off 10 sts mid under sleeve (= 5 sts on each side of marker) = 55-57-61-63-65-69 sts remain on sleeve. YOKE: Slip sleeves on to same circular needle as body where armholes were cast off = 234-250-270-290-310-338 sts. Now continue with stocking st and pattern in every transition between front and back piece and sleeves from beg of round: Continue in stocking st over the first 28-31-34-38-42-47 sts, A.1 (= 7 sts), stocking st over the next 47-49-53-55-57-61 sts, A.1, 56-62-68-76-84-94 sts in stocking sts, A.1, 47-49-53-55-57-61 sts in stocking sts, A.1, 28-31-34-38-42-47 sts in stocking sts. Continue like this, AT THE SAME TIME dec for RAGLAN - see explanation above, and dec for neck as follows: READ ALL OF THE FOLLOWING SECTION BEFORE CONTINUING! RAGLAN: NOTE: Continue in the round until cast off for neck. Then work the rest of yoke back and forth. Repeat dec for raglan every other round/every row from RS 15-16-16-17-18-18 more times (= 8 sts per dec), then dec 2 sts on each side of every raglan(= 16 sts per dec). Repeat dec 1-1-2-2-2-3 more times. NECK DEC: When piece measures 44-45-46-47-48-49 cm, cast off the middle 14-16-16-16-18-20 sts on front piece for neck. Then work piece back and forth and work edge st towards the neck in GARTER ST - see explanation above. Then dec 1 st inside 1 edge st in garter st on each side of neck - Read DECREASE TIP! Repeat dec every other row until finished measurements. NOTE: Neck dec overlaps dec for raglan on front piece. I.e. when there is not enough sts to dec for raglan on front piece, continue dec for neck over A.1. When raglan and neck dec are done, there are approx. 44-48-50-56-62-68 sts on needle. Piece measures approx. 66-68-70-72-74-76 cm from bottom edge to shoulder. Now work an elevation in the neck: Beg from RS and work as before until 7 sts, turn, tighten yarn, work back until 7 sts remain, turn, tighten yarn, work until 10 sts remain, turn, tighten yarn, work until 10 sts remain, turn, tighten yarn, work until 13 sts remain, turn, tighten yarn, work until 13 sts remain, turn, tighten yarn, work until 16 sts remain, turn, tighten yarn, work until 16 sts remain. Cast off. SHAWL COLLAR: Start mid front on the right side of sts dec for neck. Pick up on circular needle size 5 mm with Air: 43-45-46-48-50-52 sts up to shoulder, then pick up 26-27-27-27-29-29 sts in the back of neck, and finally 43-45-46-48-50-52 sts down along left side of neck dec = 112-117-119-123-129-133 sts. (Do not pick up sts at the front of neck where sts were cast off.) K 1 row from WS while AT THE SAME TIME inc 4-7-5-5-7-7 sts evenly = 116-124-124-128-136-140 sts. Then work rib as follows (from RS): 1 edge st in garter st, * K 2, P 2 *, repeat from *-* until 3 sts remain, finish with K 2 and 1 edge st in garter st. Continue rib like this until collar measures approx. 6 cm. Now inc 1 st in each of the middle 14 P-sections, seen from RS (= back of neck) = 130-138-138-142-150-154 sts. Continue to work until collar measures 10-11-11-11-12-13 cm, cast off with K over K and P over P. ASSEMBLY: Place the collar double (left side over right side) at the bottom of neck opening and sew it to the neck line at the front through both layers. Sew the openings under the sleeves. |
|||||||
Diagram explanations |
|||||||
|
|||||||
 |
|||||||
Have you finished this pattern?Tag your pictures with #dropspattern or submit them to the #dropsfan gallery. Do you need help with this pattern?You'll find 26 tutorial videos, a Comments/Questions area and more by visiting the pattern on garnstudio.com. © 1982-2025 DROPS Design A/S. We reserve all rights. This document, including all its sub-sections, has copyrights. Read more about what you can do with our patterns at the bottom of each pattern on our site. |
|||||||


Post a comment to pattern DROPS Extra 0-1159
We would love to hear what you have to say about this pattern!
If you want to leave a question, please make sure you select the correct category in the form below, to speed up the answering process. Required fields are marked *.