
Looking for a yarn?


Comments / Questions (143)
![]() Maryse wrote:
Maryse wrote:
A quoi correspondent les mesures sur le schéma qui ne me semblent pas correspondre aux mesures dans les explications? Merci
28.07.2014 - 16:00DROPS Design answered:
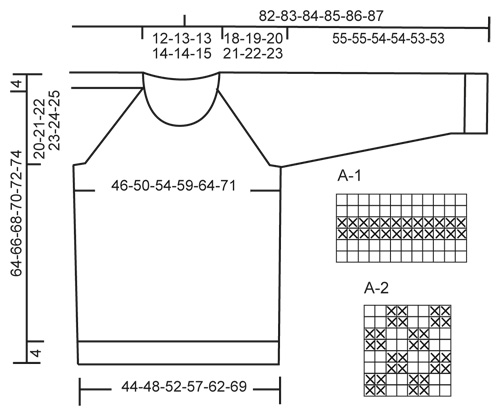
Bonjour Maryse, les mesures du schéma sont prises ouvrage à plat, d'un côté à l'autre du pull. Ainsi, en taille S, on a 196 quand toutes les augmentations sont faites, soit 46 cm respectivement pour le dos et le devant en largeur. Bon tricot!
29.07.2014 - 09:24
![]() Elina wrote:
Elina wrote:
Hei! En löydä sivuiltanne kokotaulukkoja. Mistä tiedän kannattaako minun valita M- vai L-koko tästä ohjeesta? Kiitos paljon etukäteen vastauksestanne.
01.07.2014 - 18:05DROPS Design answered:
Hei! Puseron mitat löytyvät ohjetekstin alapuolella olevasta mittapiirroksesta.
04.07.2014 - 16:48
![]() Jenny wrote:
Jenny wrote:
Står inför att börja med Raglan delen på denna tröja. Det jag inte förstår är att under beskrivningen hur man gör så ser det inte ut att vara på samma sätt som i den instruktionsvideo som finns? Kan man göra så som i videon?
04.03.2014 - 08:41DROPS Design answered:
Hej Jenny, videon visar bara generellt hur man sätter delar ihop och sedan stickar raglan med minskningar. Det är för att ge en förståelse generellt om hur detta ska göras. Det är sedan viktigt att följa det som står i beskrivningen om du vill att tröjan ska bli som på bilden.
04.03.2014 - 19:17
![]() Lea wrote:
Lea wrote:
Hallo, wie ist das Dann beim Abschnitt der Passe gemeint: "7-7-6-6-4-2 x in jeder 4. Rd, DANN 12-14-17-19-25-29 x in jeder 2. Rd abnehmen & 24-24-25-25-25-22 x in jeder 2. Rd, DANN 3-5-6-9-12-21 x in jeder Rd". Ich bin verwirrt, denn ich verstehe nicht, ob ich das gleichzeitig machen muss, oder erst eine zeitlang nur in jeder 4. oder 2. Runde abnehmen soll und danach in jeder 2. und jeder Runde. Ich bitte um Hilfe, denn ich habe es ja schon fast geschafft!
23.02.2014 - 21:21DROPS Design answered:
Liebe Lea, Sie machen das nacheinander. Also erst nur in jeder 4. Rd abnehmen, dann, wenn die entsprechende Anzahl Abnahmen erfolgt ist, machen Sie die nächsten Abnahmen in jeder 2. Rd und wenn die alle abgeschlossen sind, zuletzt in jeder Rd abnehmen. Dann noch gutes Gelingen!
23.02.2014 - 21:41
![]() Lene wrote:
Lene wrote:
Er det rigtigt at sætte mærketråde 1. og 3. på "forstykket", 2. og 4. på "rygstykket" -Der står "Raglan fra Vrangen" hvor er vrangen? jeg stikker på rundpind. På forhånd tak:-)
12.02.2014 - 18:52DROPS Design answered:
Hej Lene. Maerketraad 1 og 2 er mellem aerme/forstykke og 3 og 4 mellem aerme/rygstykke. Naar du har lukket af for halsen paa forstykket skal du strikke frem og tilbage og stadigvaek tage ind for raglan, her skal du saa bruge "raglan fra vrangen".
13.02.2014 - 14:31
![]() Lene wrote:
Lene wrote:
Er det rigtigt at sætte 1. og 3.mærketråd på "forsiden" af blusen? I opskriften står Raglan "fra Vrangen" hvor er det? på forhånd tak for hjælpen
08.02.2014 - 18:24DROPS Design answered:
1. og 2.merke sitter på hver side av forstk, 3. og 4.merke sitter på hver side av bakst, dvs i hver övergang mellan bol og ermer. Först felles det kun fra retten då du strikker runt, men efter halsfellingen så strikkes det frem og tilbake og då må det felles også fra vrangen, så det er förklart hur man gör det :)
11.02.2014 - 00:17
![]() Ines wrote:
Ines wrote:
Ok. Gracias solo quería que me lo confirmaran. Voy a realizar el diseño con karisma y nunca he tejido con manga raglán con el sistema downtop
28.09.2013 - 20:33
![]() Ines wrote:
Ines wrote:
Podría decirme cuantos puntos se disminuirán en el raglán y si solo se hacen las disminuciones en el lado derecho. No lo especifican las instrucciones y no coincide el video tutoríal ( raglán en vueltas alternas) con las instrucciones. Cuantos puntos aproximadamente quedan el final de la labor? Gracias
21.09.2013 - 20:43DROPS Design answered:
Hola Ines! En el apartado de PECHERA a partir de "Dism de manera distinta en el cuerpo y en las mangas...." va explicando como trabajamos las dism para el RAGLÁN. Se hacen en vtas alternas o cada 4ª vta - ver el patrón. Las dism son en ambos lados LD y LR. y tanto en el lado derecho como en el izquierdo (ver explicación del RAGLÁN)
23.09.2013 - 11:30
![]() Ines wrote:
Ines wrote:
Podría decirme cuantos puntos se disminuirán en el raglán y si solo se hacen las disminuciones en el lado derecho. No lo especifican las instrucciones y no coincide el video tutoríal ( raglán en vueltas alternas) con las instrucciones. Cuantos puntos aproximadamente quedan el final de la labor? Gracias
21.09.2013 - 20:42DROPS Design answered:
Hola Ines! En el apartado de PECHERA a partir de "Dism de manera distinta en el cuerpo y en las mangas...." va explicando como trabajamos las dism para el RAGLÁN. Se hacen en vtas alternas o cada 4ª vta - ver el patrón. Las dism son en ambos lados LD y LR. y tanto en el lado derecho como en el izquierdo (ver explicación del RAGLÁN)
23.09.2013 - 11:33
![]() Pia wrote:
Pia wrote:
Jeg har strikket ferdig denne genseren, og det viser seg at jeg har bomma kraftig på strikkefastheten.. Er jeg dum hvis jeg legger den litt i tørketrommelen?
21.04.2013 - 20:50DROPS Design answered:
Hej Pia. Det var da aergeligt. Men jeg ville fraraade at putte den i tørketrommelen, du kan risikere den krymper mere end du vil og saa er den helt ödelagt. Den bedste lösning er nok (desvaerre) at starte forfra...
22.04.2013 - 21:57
|
|||||||
Celtic Ballad#celticballadsweater |
|||||||
 |
 |
||||||
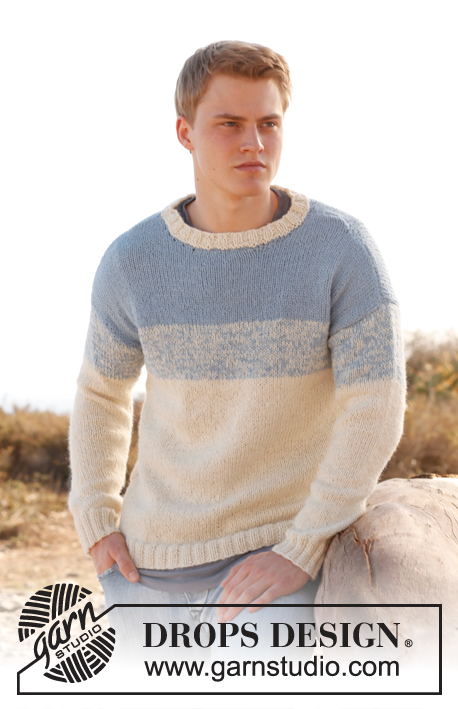
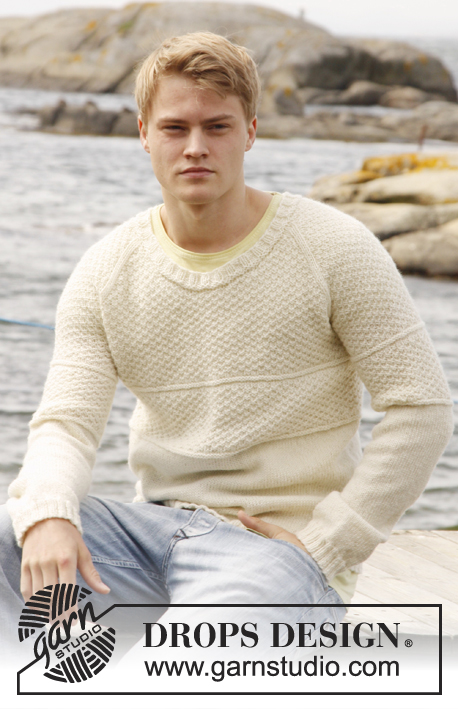
Men's knitted jumper in DROPS Lima or DROPS Merino Extra Fine with raglan and double moss st. Size: S - XXXL.
DROPS Extra 0-851 |
|||||||
|
PATTERN: See diagrams A.1 and A.2. Diagrams show pattern from RS. RAGLAN: From RS: Beg 3 sts before marker: P 2 tog, K 2 (marker is between these 2 sts), P 2 twisted tog. From WS: Beg 3 sts before marker: K 2 twisted tog, P 2 (marker is between these 2 sts), K 2 tog. KNITTING TIP: If knitting tension is incorrect in height and the knitting is too tight, the raglan dec will be too short and the armholes too small. This can be adjusted by working 1 extra row without dec evenly spaced between dec. -------------------------------------------------------- BODY: Worked in the round on circular needle from bottom up. Cast on 232-252-272-296-320-360 sts on circular needle size 3.5 mm with Lima. Work rib = K 2/P 2 for 4 cm. Switch to circular needle size 4 mm and K next round – AT THE SAME TIME dec 48-52-56-60-64-72 sts evenly = 184-200-216-236-256-288 sts. Continue in stocking st. REMEMBER THE KNITTING TENSION! Insert a marker in each side = 92-100-108-118-128-144 sts between markers. When piece measures 6 cm, inc 1 st on each side of both markers (= 4 inc). Repeat inc when piece measures 15-16-17-18-19-20 cm and 24-25-26-27-28-29 cm = 196-212-228-248-268-300 sts. When piece measures 26-27-28-29-30-31 cm, work according to A.1, when A.1 has been worked one time vertically, work according to A.2. Work A.2 for 10 cm, then work A.1 one time. Continue with A.2. When piece measures 44-45-46-47-48-49 cm, cast off 4 sts on each side of every marker = 90-98-106-116-126-142 sts on front and back piece. Put piece aside and knit the sleeves. SLEEVE: Worked in the round on double pointed needles. Cast on 68-68-72-72-76-76 sts on double pointed needles size 3.5 mm with Lima. Work rib = K 2/P 2 for 4 cm. Switch to double pointed needles size 4 mm and K next round – AT THE SAME TIME dec 14-12-14-12-14-12 sts evenly = 54-56-58-60-62-64 sts. Insert a marker at beg of round = mid under sleeve. When piece measures 8 cm, inc 1 st on each side of marker. Repeat inc every 11-8-7-6-4-3½ cm 4-5-6-7-10-11 more times = 64-68-72-76-84-88 sts. AT THE SAME TIME when piece measures 37-37-36-36-35-35 cm, work according to A.1, when A.1 has been worked one time vertically, work according to A.2. Work A.2 for 10 cm, then work A.1 one time. Continue with A-2 - work the inc sts in pattern. When piece measures 55-55-54-54-53-53 cm (shorter measurements in the larger sizes because of broader shoulder width), adjust so that you are on same round in A.2 as on body, bind off 4 sts on each side of marker = 56-60-64-68-76-80 sts. Put piece aside and knit another sleeve. YOKE: READ ALL OF THE FOLLOWING SECTION BEFORE CONTINUING: Slip sleeves on to same circular needle as body where armholes were cast off = 292-316-340-368-404-444 sts. Continue with A.2, AT THE SAME TIME when piece measures 46-47-48-49-50-51 cm, beg dec for RAGLAN - see explanation above and READ KNITTING TIP. Insert a marker in all transitions between sleeves and body (= 4 markers). 1st marker = in transition between left sleeve and front piece. Dec differently on body and on sleeves. Dec as follows after 2nd and 4th marker and before 3rd and 1st marker (= dec on sleeves) Dec every 4 rows: 7-7-6-6-4-2 times and then every other row: 12-14-17-19-25-29 times. Dec as follows after 1st and 3rd marker and before 2nd and 4th marker (= dec on front and back piece). Dec every other row: 24-24-25-25-25-22 times and then every row: 3-5-6-9-12-21 times. NECK: AT THE SAME TIME when piece measures 59-61-63-65-67-69 cm, cast off the middle 10-14-18-22-26-30 sts on front piece and then work back and forth on needle. Continue with pattern and Raglan - AT THE SAME TIME cast off for neck in each side every other row as follows: 2 sts 2 times and 1 st 4 times. After all dec for raglan and cast offs for neck, 82-86-90-94-98-102 sts remain on needle. K 1 row while at the same time dec 12-14-16-18-20-22 sts evenly = 70-72-74-76-78-80 sts. NECK EDGE: Worked in the round. Knit up 54-56-58-60-62-64 sts around the neck on needle size 3.5 mm = 124-128-132-136-140-144 sts on needle. K 2 rounds and P 2 rounds, then work rib K 2/P 2. Continue like this and loosely cast off with K over K and P over P when rib measures 3.5 cm (in total incl the first 4 rounds). ASSEMBLY: Sew the openings under the sleeves tog. |
|||||||
Diagram explanations |
|||||||
|
|||||||
 |
|||||||
Have you finished this pattern?Tag your pictures with #dropspattern #celticballadsweater or submit them to the #dropsfan gallery. Do you need help with this pattern?You'll find 30 tutorial videos, a Comments/Questions area and more by visiting the pattern on garnstudio.com. © 1982-2025 DROPS Design A/S. We reserve all rights. This document, including all its sub-sections, has copyrights. Read more about what you can do with our patterns at the bottom of each pattern on our site. |
|||||||


With over 40 years in knitting and crochet design, DROPS Design offers one of the most extensive collections of free patterns on the internet - translated to 17 languages. As of today we count 320 catalogues and 12095 patterns translated into English (UK/cm). 12095
We work hard to bring you the best knitting and crochet have to offer, inspiration and advice as well as great quality yarns at incredible prices! Would you like to use our patterns for other than personal use? You can read what you are allowed to do in the Copyright text at the bottom of all our patterns. Happy crafting!
Post a comment to pattern DROPS Extra 0-851
We would love to hear what you have to say about this pattern!
If you want to leave a question, please make sure you select the correct category in the form below, to speed up the answering process. Required fields are marked *.