Comments / Questions (262)
![]() Lisa Gustafsson wrote:
Lisa Gustafsson wrote:
"AT THE SAME TIME when piece measures 6 cm, inc 1 st inside 1 edge st in each side - Read INCREASE TIP above. NOTE: Work the inc sts in A.4." Could you clarify? Does it mean k1 yo A4? Should the increase be incorporated in A4?
02.09.2021 - 02:55DROPS Design answered:
Dear Mrs Gustafsson, increase 1 stitch inside 1 edge stitch on each side - see INCREASE TIP - then incorporate the new stitches in A.4 (= if the next stitch should be purl, knit the new stitch, if the previous stitch should be purl, knit the new stitch, if the next stitch should be knit, purl the new stitch, if the previous stitch should be knit, purl the new stitch). Happy knitting!
02.09.2021 - 08:42
![]() Lisa Gustafsson wrote:
Lisa Gustafsson wrote:
What does "band sts" mean?
31.08.2021 - 00:21DROPS Design answered:
Dear Lisa, those are the stitches that will for the buttonband/collar. Happy Stitching!
31.08.2021 - 00:28
![]() Rozalia LaJune wrote:
Rozalia LaJune wrote:
To Patricia, The A4 pattern is VERY small, compared to the number of rows/stitches in A1/A3. If I remember correctly, only 4 or 8 squares in that pattern. I too, easily overlooked it. It is basically a moss stitch.
04.06.2021 - 09:39
![]() Rozalia LaJune wrote:
Rozalia LaJune wrote:
Re: Buttons. Would you advise to have an undertape where the buttons will be sewn to make the edge stronger and prevent the buttons from dangling? To keep the knitted garment in a good form for many years, how else could the edge be fortified? Thank you.
04.06.2021 - 09:36DROPS Design answered:
Dear Rozalie, if you feel that the knitted fabric is too loose to have a button securely sewn on, you can always use a small, plain button on the wrong side as a backing, to hold it stabil. Happy Knitting!
04.06.2021 - 09:59
![]() Rozalia LaJune wrote:
Rozalia LaJune wrote:
Thank you, I think I finally got it! Sometimes it takes re-reading the notes you provided to my Qs. What is crystal clear to an advanced knitter is "clear like mud" to an intermediate beginner. I am, indeed, a happy knitter now because I can continue with the cardigan. I hope to finish it before Christmas.
04.06.2021 - 09:33
![]() Rozalia LaJune wrote:
Rozalia LaJune wrote:
Thank you for your reply. However, I still don't understand where to work the short rows? Is it in the garter stitch part (26 sts) or in the cable part of the pattern? Is it row 2, 4, 6, 8 etc. or row 2, 24, then 2 again and 24again of the A1/A3 and 3, 6, 9 or 3, 25, 3, 25 (which would be 1st row) A1/A2 patterns?
03.06.2021 - 23:20DROPS Design answered:
Dear Mrs LaJune, when you have to work Row2/3 (see previous answer) of the diagram, work the short rows as follwows: from RS (right front)/WS (left front), work the first 26 sts in garter stitch, turn (short row) and work these 26 sts back. Now continue as before. Repeat next time you will work row 2/3 of the diagram. Does this help?
04.06.2021 - 07:09
![]() Rozalia LaJune wrote:
Rozalia LaJune wrote:
The short rows (on Right and Left front). It says for Left short row, "Work 1 short row on row 2 of every pattern repetition vertically" - would it be every 24 rows in A1 (pat I chose). 2 pat rep, in48rows would be 2 short rows on the L front?- "until finished measurements as follows: "- I don't see any measurements. It continues - "On 2nd row in pattern (=WS), work 26 (...) band sts, turn and K back. Then work over all sts on row as before. " Thank you for your help.
02.06.2021 - 23:31DROPS Design answered:
Dear Mrs LaJune, you will work short rows every time you will work the row 3 (right front piece) / row 2 (left front piece) of the diagrams A.1/A.3 (right front piece) / diagrams A.1/A.2 (left front piece). Happy knitting!
03.06.2021 - 08:29
![]() Patricia wrote:
Patricia wrote:
Hello, the diagram for A4 is missing in the pattern. Could you please send it to me so I can start knitting? Thank you!
26.04.2021 - 00:34DROPS Design answered:
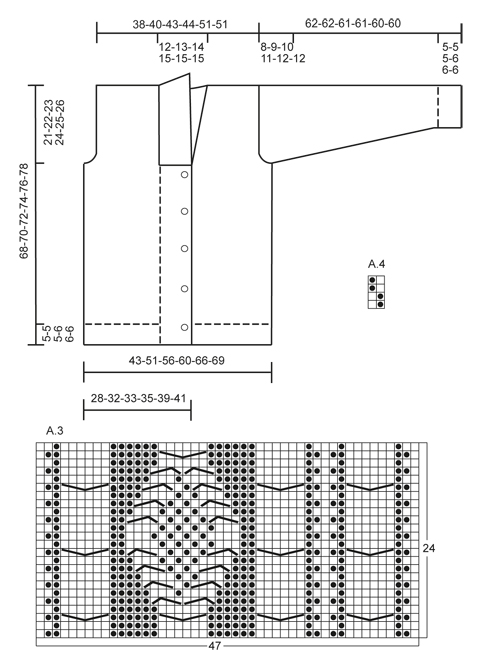
Hi Patricia, The pattern A.4 is to the right of the measurements sketch. Happy knitting!
26.04.2021 - 08:12
![]() Rob Monnee wrote:
Rob Monnee wrote:
Goedemiddag,ik heb een vraag : Is het Rambling Man Vest Lima Modelnr. LI-014 ook los te koop.Ik vind dat vest zo mooi. Ik heb maat XL. Alvast vriendelijk bedankt voor uw antwoord. Vriendelijke groeten van Rob Monnee
21.03.2021 - 14:21DROPS Design answered:
Dag Rob,
Via onze website worden de patronen gratis aangeboden. Bij het patroon staat onder de lijst met materialen een knop waarmee je het patroon kunt afdrukken. Het is niet mogelijk om kleding te bestellen.
11.04.2021 - 14:03
![]() Britt wrote:
Britt wrote:
1. Sp. På ermet står det: srart økning når arb måler 6 cm. Er det med vrangborden? 2. Når arb måler 48cm str xxl skal jeg starte felling. 3m 2 ganger osv. Hvor mange m skal det være igjen etter felling av 1m 4 ganger? 3. Så skal jeg felle 2m i hver side til det måler 59 cm? Da er det ikke nok masker igjen til at mønsteret i midten er intakt. Jeg skjønner ikke oppskriften på erme. Håper på raskt svar.
03.03.2021 - 12:06DROPS Design answered:
Hei Britt. 1). Nei. 2). 76 masker. 3). Du må nok felle av litt av sidene i A.1 for at du skal få strikket alle fellingene. mvh DROPS design
10.03.2021 - 13:33
Rambling Man#ramblingmancardigan |
||||||||||||||||
 |
 |
|||||||||||||||
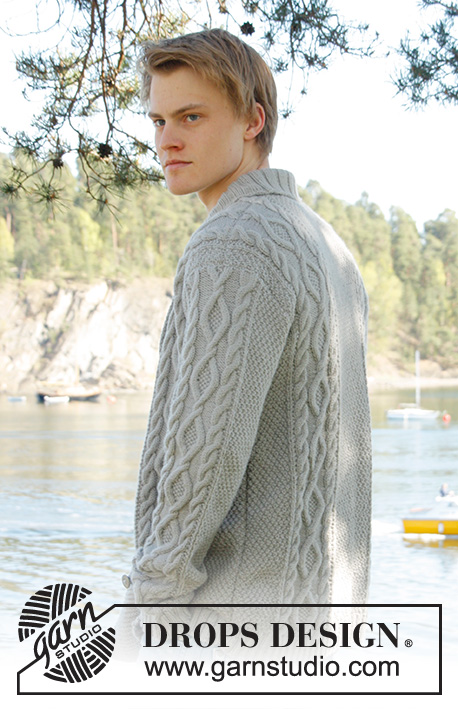
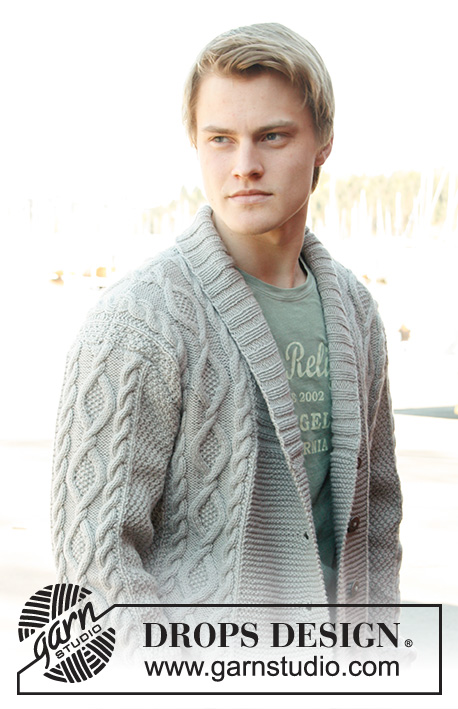
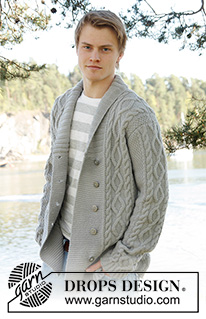
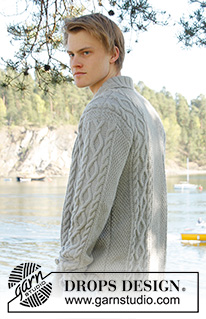
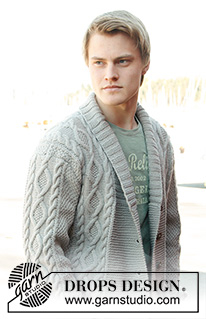
Men's knitted jacket in DROPS Lima, with cable pattern and shawl collar. Size: S - XXXL.
DROPS Extra 0-850 |
||||||||||||||||
|
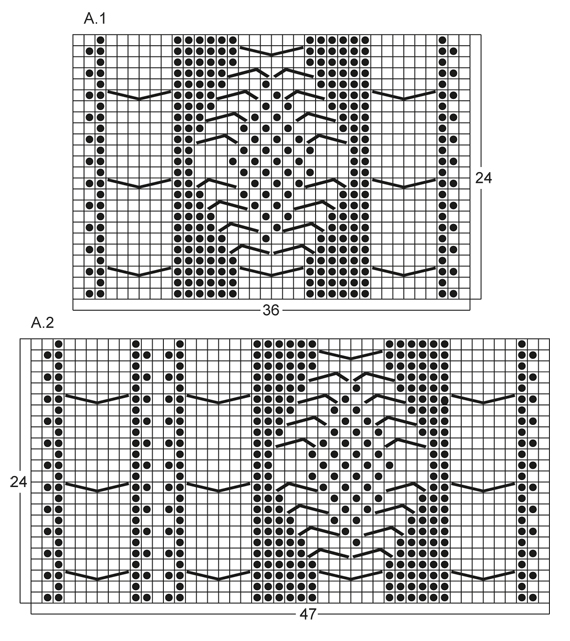
KNITTING TIPS: This design is written with button holes on right front edge, if you wish standard button holes for men, you can make the button holes on left front edge. GARTER ST (back and forth on needle): K all rows. NOTE: All edge sts are worked in garter st. PATTERN: See diagram A.1 to A.4, diagrams show all rows in 1 pattern repetition from RS. SHORT ROWS: RIGHT FRONT PIECE: Work 1 short row on row 3 of every pattern repetition vertically until finished measurements as follows: On 3rd row in pattern (= RS), work 26-26-26-26-30-30 band sts, turn and K back. Then work over all sts on row as before. LEFT FRONT PIECE: Work 1 short row on row 2 of every pattern repetition vertically until finished measurements as follows: On 2nd row in pattern (= WS), work 26-26-26-26-30-30 band sts, turn and K back. Then work over all sts on row as before. BUTTON HOLES: Cast off for 5 button holes from RS on right band. 1 BUTTON HOLE = cast off 7th and 8th st from mid front and cast on 2 new sts on next row over these sts. Cast off for button holes when piece measures: SIZE S: 14, 22, 30, 38 and 46 cm SIZE M: 15, 23, 31, 39 and 47 cm SIZE L: 16, 24, 32, 40 and 48 cm SIZE XL: 17, 25, 33, 41 and 49 cm SIZE XXL: 18, 26, 34, 42 and 50 cm SIZE XXXL: 19, 27, 35, 43 and 51 cm INCREASE TIP: Inc 1 st by making 1 YO, on next row work YO twisted (i.e. work in back loop of st instead front) to avoid holes. ---------------------------------------------------------- BACK PIECE: Worked back and forth on needle. Cast on 136-156-168-180-196-204 sts (incl 1 edge st in each side) on circular needle size 3.5 mm with Lima. Work rib as follows (1st row = RS): 1 edge st in GARTER ST - see explanation above, * K 2, P 2 *, repeat from *-*, finish with K 2 and 1 edge st in garter st. Continue to work like this until rib measures 5-5-5-6-6-6 cm. On last row from WS, P while AT THE SAME TIME dec 20-22-24-26-26-26 sts evenly = 116-134-144-154-170-178 sts. Then switch to needle size 4 mm and work next row from RS as follows: 1 edge st in garter st, 8-16-20-24-20-24 sts in A.4, work A.1 one time in size S - XL, work A.2 one time in size XXL and XXXL, 26-28-30-32-34-34 sts in A.4, then work A.1 one time in size S - XL, work A.3 one time in size XXL and XXXL, finish with 8-16-20-24-20-24 sts in A.4 and 1 edge st in garter st. REMEMBER THE KNITTING TENSION! Continue to work like this until piece measures 47-48-49-50-51-52 cm. Then cast off for armholes at the beg of every row in each side as follows: Cast off 3 sts 0-1-1-2-2-2 times, 2 sts 1-1-1-2-2-2 times, 1 st 4-7-9-8-4-8 times = 104-110-116-118-142-142 sts. Continue with pattern as before until piece measures 66-68-70-72-74-76 cm. Now cast off the middle 20-22-24-26-28-28 sts for neck and finish each part separately. Cast off 2 sts on next row from neck = 40-42-44-44-55-55 sts remain on shoulder. Continue with pattern as before. When piece measures 68-70-72-74-76-78 cm, loosely cast off sts with K over K and P over P. RIGHT FRONT PIECE: Worked back and forth on needle. Cast on 83-91-95-99-111-115 sts (incl 1 edge st in the side) on circular needle size 3.5 mm with Lima. Work rib as follows (1st row = RS): 26-26-26-26-30-30 sts in garter st (= band sts), * K 2, P 2 *, repeat from *-*, finish with 1 edge st in garter st. Continue with rib and band sts in garter st until rib measures 5-5-5-6-6-6 cm. On last row from WS, P over all sts in rib while AT THE SAME TIME dec 12-12-12-12-13-13 sts evenly (do not dec over band sts) = 71-79-83-87-98-102 sts. Then switch to needle size 4 mm and work next row from RS as follows: 26-26-26-26-30-30 band sts, work A.1 one time in size S - XL, work A.3 one time in size XXL and XXXL, 8-16-20-24-20-24 sts in A.4 and 1 edge in garter st. On next row from RS (= 3rd row in pattern) work SHORT ROWS - read explanation above. Continue with pattern and band sts at the front - while AT THE SAME TIME work 1 short row on 3rd row in every pattern repetition vertically until finished measurement. When piece measures 14-15-16-17-18-19 cm, cast off for BUTTON HOLES on right band - see explanation above! Continue to work until piece measures 47-48-49-50-51-52 cm. Then cast off at beg of next row from RS as follows: Cast off the first 25-25-25-25-29-29 sts, insert a marker (this marks where to beg the knit up for collar), work the rest of row. Then cast off for armhole on every row from WS as follows: 3 sts 0-1-1-2-2-2 times, 2 sts 1-1-1-2-2-2 times, 1 st 4-7-9-8-4-8 times = 40-42-44-44-55-55 sts remain on shoulder. Continue with pattern as before. When piece measures 68-70-72-74-76-78 cm, loosely cast off sts with K over K and P over P. LEFT FRONT PIECE: Cast on and work rib as on right front piece but reversed (i.e. * P 2, K 2 *, repeat from *-*) with 26-26-26-26-30-30 band sts in garter st. Continue to work until rib measures 5-5-5-6-6-6 cm. On last row from WS, P over all sts in rib while AT THE SAME TIME dec 12-12-12-12-13-13 sts evenly (do not dec over band sts) = 71-79-83-87-98-102 sts. Then switch to needle size 4 mm and work next row from RS as follows: 1 edge st in garter st, 8-16-20-24-20-24 sts in A.4, work A.1 one time in size S - XL, work A.2 one time in size XXL and XXXL, 26-26-26-26-30-30 band sts in garter st. On next row from WS (= 2nd row in pattern) work SHORT ROWS - read explanation above. Continue to work the same way as on right front piece but without button holes. SLEEVE: Worked back and forth on needle. Cast on 74-78-82-86-90-90 sts (incl 1 edge st in each side) on circular needle size 3.5 mm with Lima. Work rib as follows (1st row = RS): 1 edge st in garter st, * K 2, P 2 *, repeat from *-* and finish with 1 edge st in garter st. Continue to work like this until rib measures 5-5-5-6-6-6 cm. On last row from WS, P while AT THE SAME TIME dec 12-14-16-18-18-18 sts evenly = 62-64-66-68-72-72 sts. Then switch to needle size 4 mm and work next row from RS as follows: 1 edge st in garter st, 12-13-14-15-17-17 sts in A.4, work A.1 one time, 12-13-14-15-17-17 sts in A.4, finish with 1 edge st in garter st. AT THE SAME TIME when piece measures 6 cm, inc 1 st inside 1 edge st in each side - Read INCREASE TIP above. NOTE: Work the inc sts in A.4. Repeat inc every 3½-3-2½-2½-2½-2½ cm a total of 14-15-16-17-16-17 times = 90-94-98-102-104-106 sts. Continue until piece measures 54-53-51-50-48-48 cm (shorter measurements in the larger sizes because of longer sleeve cap and broader shoulder width), cast off at beg of every row in each side: 3 sts 1-1-1-2-2-2 times, 2 sts 1-1-2-2-2-2 times and 1 st 2-2-3-3-4-4 times. Then cast off 2 sts in each side until piece measures 61-61-60-60-59-59 cm, then cast off 3 sts 2 times in each side. When piece measures approx. 62-62-61-61-60-60 cm, loosely cast off sts with K over K and P over P. ASSEMBLY: Sew shoulder seams and sew in sleeves inside 1 edge st. Sew sleeve and side seams in one inside 1 edge st. Sew buttons on to left front piece, approx. 2½ cm from last K st in pattern. SHAWL COLLAR: Knit up sts from RS inside 1 edge st on circular needle size 3.5 mm. Start mid front at marker on right front piece as follows: Knit up approx. 60-70 sts up to shoulder, then 30-40 sts along the neck and 60-70 sts down along left front piece until marker = 150-180 sts. K 1 row from WS while AT THE SAME TIME adjusting no of sts to 144-148-156-164-172-180. Then work rib on next row from RS as follows: 1 sts in garter st, * K 2, P 2 *, repeat from *-* and finish with K 2 and 1 st in garter st. Continue like this until collar measures approx. 5-5-5-6-6-6 cm. Now inc 1 st in each of the middle 14-14-14-16-16-16 P-sections seen from RS (= back of neck) = 158-162-170-180-188-196 sts. Continue until collar measures approx. 12-12-12-12-14-14 cm, then loosely cast off with K over K and P over P. Fasten collar with stitches at the bottom in each side towards band from WS (so that the seam is not visible from RS) – sew edge to edge to avoid a chunky seam. |
||||||||||||||||
Diagram explanations |
||||||||||||||||
|
||||||||||||||||
 |
||||||||||||||||
 |
||||||||||||||||
Have you finished this pattern?Tag your pictures with #dropspattern #ramblingmancardigan or submit them to the #dropsfan gallery. Do you need help with this pattern?You'll find 23 tutorial videos, a Comments/Questions area and more by visiting the pattern on garnstudio.com. © 1982-2025 DROPS Design A/S. We reserve all rights. This document, including all its sub-sections, has copyrights. Read more about what you can do with our patterns at the bottom of each pattern on our site. |
||||||||||||||||






Post a comment to pattern DROPS Extra 0-850
We would love to hear what you have to say about this pattern!
If you want to leave a question, please make sure you select the correct category in the form below, to speed up the answering process. Required fields are marked *.