
Looking for a yarn?


Comments / Questions (122)
![]() Lise wrote:
Lise wrote:
Stort problem: min strikkefasthed passer ellers - men her er noget galt. Mønsterdelen på for og bagstykke angiver i til 25 cm, men på min bliver den 32 cm, hvilket giver en ret dyb udskæring foran - og en meget mærkelig dyb udskæring bag på. Hvad gør jeg galt? Hvis jeg stoppe midt i mønsteret, vil det ser mærkeligt ud tror jeg - og jeg vil ikke nå den grå farve. Samtidig bliver ærmegabet 27 og ikke 22 ( str. L) . Årgh... jeg troede jeg skulle sy sammen nu :-(
10.12.2015 - 09:05DROPS Design answered:
Hej Lise, M.1, M.2 og M.3 går over totalt 68 pinde. 68/28 (28p måler 10cm) = 24 cm. Det betyder at hvis du har 28p på 10 cm så stemmer målene også som der står i opskriften. Kan du ikke hoppe over det sidste mønster på skulderen og så bare lukke af ifølge opskriften? Hvis ikke så er du desværre nødt til at strikke bærestykket med mindre pinde (lav en strikkeprøve først, den skal også stemme i højden). God fornøjelse!
10.12.2015 - 15:26
![]() Gitte wrote:
Gitte wrote:
Strikker i str xxl. Har problemer med at få mønster m1 til at gå op i masker. Mønstret er på 6 masker. Opskriften siger 262 masker.
04.12.2015 - 08:01DROPS Design answered:
Hej Gitte, Jo men du starter ved pilen, strikker de sidste 5m i diagrammet (fra højre mod venstre), så M.1x42=252m, og sidste de første 5 m i diag = i alt 262 m. God fornøjelse!
04.12.2015 - 08:09
![]() Stella wrote:
Stella wrote:
Buonasera, vorrei realizzare questo maglione ma, confrontandolo con uno già esistente che prenderei come campione, le maniche anche nelle taglie più grandi sono troppo corte, dato che il ragazzo che lo deve portare è molto alto. Io avrei bisogno che la manica a partire dalla cucitura della spalla fosse circa 10 cm più lunga: come posso risolvere il problema? Posso distanziare di più gli aumenti sino all'arrotondamento della spalla? Grazie mille
29.10.2015 - 00:17DROPS Design answered:
Buongiorno Stella. Sì, può distanziare di più gli aumenti oppure aumentare come indicato e portare la manica alla lunghezza desiderata fino allo scalfo. Buon lavoro!
29.10.2015 - 13:38
![]() Michi wrote:
Michi wrote:
Ok! Ora mi è più chiaro! Quindi il motivo va realizzato sempre sul dritto del lavoro? O il motivo di una stessa riga va ripetuto sia sul dritto che sul rovescio? Grazie mille!
08.09.2015 - 13:10DROPS Design answered:
Buongiorno Michi. Nel diagramma, ogni riga rappresenta un ferro. Quindi, quando lavora avanti e indietro, sul diritto lavorerà una riga del diagramma leggendola da destra verso sinistra, al ferro successivo, sul rovescio, lavorerà la riga successiva del diagramma leggendola da sinistra verso destra. Ci riscriva se ancora in difficoltà. Buon lavoro!
08.09.2015 - 14:21
![]() Michi wrote:
Michi wrote:
Ciao! Sto realizzando il mio primo maglione con i ferri circolari: Sono arrivata a 48 cm di lavorazione del davanti/dietro e ora dovrei iniziare a lavorare separatamente le due parti, ma non mi è molto chiaro come: continuo il lavoro sui ferri circolari, ma come faccio? Utilizzo sempre lo stesso gomitolo sia per il davanti che per il dietro? In questo modo, però, non mi rimane sempre il filo sospeso nel punto in cui dovrò poi montare le maniche?
08.09.2015 - 12:13DROPS Design answered:
Buongiorno Michi. Deve proseguire lavorando prima solo sulle m del davanti e poi solo sulle m del dietro. Usa i ferri circolari come fossero ferri dritti, lavorando avanti e indietro e non in tondo. Buon lavoro!
08.09.2015 - 12:57
![]() Mona wrote:
Mona wrote:
Hallo, mir ist nicht ganz klar wie die Ärmel am Ende gestrickt werden. "Gleichzeitig nach 61...cm die Arbeit von der Markierung her hin und zurück stricken und auf beiden Seiten je 1 neue Masche anschlagen (=Randm.)". Heißt das, dass am Schluss nicht mehr in Runden gestrickt wird oder was bedeutet "hin und zurück stricken"?
04.09.2015 - 23:21DROPS Design answered:
Genau, das soll bedeuten, dass Sie nicht mehr in Runden, sondern in Hin- und Rück-R weiterstricken, also jeweils wenden. So erhalten Sie einen Schlitz. Das ist nötig, damit sich die Passform unter dem Arm ergibt und Sie den Ärmel in den Armausschnitt einnähen können.
08.09.2015 - 14:19
![]() Rech wrote:
Rech wrote:
Bonjour, Après la manche, j'arrive au devant et dos. Est-ce que mon calcul est bon pour centrer le motif M1 ? Sur 182 m, la 91ème maille tricotée = 2ème de M1 je commence par les 4 dernières mailles ? + 14 fois le diagramme (84m) + 6 centrées + 84 + 4 premières mailles ? Si je rabats ensuite 3 mailles de chaque côté je vais obtenir 170 mailles à répartir en 2*85 mailles. Est-ce que je suis ensuite les conseils que vous m'aviez donnés avec les calculs de la manche ? Merci beaucoup
21.05.2015 - 17:11DROPS Design answered:
Bonjour Mme Rech, sur 91 m (dos & devant), la 46ème m (= m centrale) doit être la 2ème m de M1, soit: *depuis le marqueur côté: 2 dernières m de M1, 7 fois M.1, 1 fois M.1 (la 2ème m = m centrale avec le marqueur), 6 fois M.1, 5 premières m de M.1* - pour les emmanchures rabattez ensuite 3 m de chaque côté du marqueur soit 6 m au total de chaque côté et continuez le motif comme avant avec les mailles en moins (=rabattues) sur les côtés. Bon tricot!
22.05.2015 - 09:32
![]() Marco wrote:
Marco wrote:
Eerder schreef ik: In het patroon staat: Brei tegelijkertijd vanaf een hoogte van 54 cm het werk verder heen en weer op de nld vanaf midden onder de mouw. Moet je dan niet eerst een paar steken afkanten? Hoe bedoelt U heen en weer op de naald? Bedankt voor uw antwoord, echter de vraag gaat over de mouw zelf. Het voor -en achterpand heb ik reeds klaar.
10.04.2015 - 17:14DROPS Design answered:
Hoi Marco. Je breit eerst de mouw in de rondte. Bij 54 cm brei je heen en weer vanaf het begin van de nld (middenonder de mouw), dus als j de nld hebt gebreid, keer je het werk en breit av terug tot aan het begin van de nld, keer, brei r enzovoort. Je gaat dus niet meer verder in de rondte. De mouwkop is recht voor deze model, je hoeft hier geen st af te kanten.
13.04.2015 - 14:42
![]() Marco wrote:
Marco wrote:
Hallo, erg leuk patroon. Ik ben momenteel met de mouwen bezig. Ik begrijp alleen niet goed hoe ik verder moet, na telpatroon M1? Ik brei het in het rond op de rondbreinaald. In het patroon staat: Brei tegelijkertijd vanaf een hoogte van 54 cm het werk verder heen en weer op de nld vanaf midden onder de mouw. Moet je dan niet eerst een paar steken afkanten? Hoe bedoelt U heen en weer op de naald? (eerste keer dat ik een trui brei). ;) groeten.
10.04.2015 - 13:50DROPS Design answered:
Hoi Marco, je begint al met afkanten voor de armsgaten als M.1 nog niet klaar is, dat staat hier: Kant TEGELIJKERTIJD bij een hoogte van 46-47-48-49-50-51 cm, 6-10-14-20-30-36 st af voor de armsgaten aan iedere kant... Als je dit gedaan hebt, heb je dus twee sets steken op de naald (voor- en achterpand) met openingen ertussen - het begin van de armsgaten. Als je het werk verdeeld hebt in twee panden, brei je die heen en weer. Hierna staat hoe en ook hoe je verder moet breien na M.1, bijvoorbeeld voor het voorpand: VOORPAND: = 85-89-93-97-101-105 st. Brei telpatroon M.1, brei dan telpatroon M.2 en brei tot slot M.3, ga hierna verder... Succes!
10.04.2015 - 16:04
![]() Rech wrote:
Rech wrote:
Bonjour. A 53 cm de haut, j'ai fait toutes mes augmentations, j'ai donc 85 m. Si je fais coïncider le début du tour avec la flèche, le début du tour est aussi pour moi la flèche du diagramme. Dois-je faire 1 m de couleur 5 m de blanc et de nouveau 1m couleur 5m blancs ? Si je fais cela, il me reste une maille. Je ne comprends pas votre phrase "comptez pour savoir à quel niveau commencer le diagramme. Désolée, pouvez-vous essayer de m'expliquer autrement svp ? Merci de votre patience !
24.03.2015 - 14:30DROPS Design answered:
Bonjour Mme Rech, avec 28 rangs pour 10 cm, les augmentations ne devraient pas être terminées à 53 cm. Il faut centrer le motif M1 de sorte que la 2ème m du diagramme soit celle au milieu de la manche et revenir en arrière ensuite en comptant les mailles pour savoir à quel niveau commencer. Sur 85 m, la 43ème tricotée = 2ème de M1, commencez par le tour par les 2 dernières m + 6 x le diag + le motif centré (de la 42e à la 47e m), puis 6 x le diag + les 5 premières m du diag). Bon tricot!
24.03.2015 - 15:30
|
||||||||||
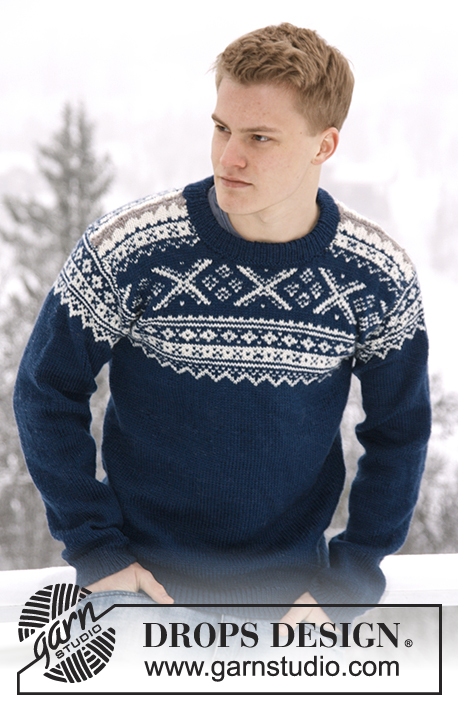
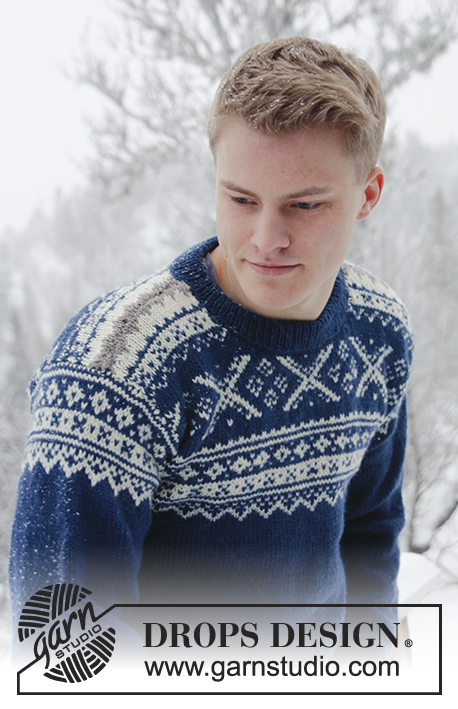
Nordic Midnight#nordicmidnightsweater |
||||||||||
 |
 |
|||||||||
Knitted jumper for men with Norwegian pattern, in DROPS Karisma. Size: S - XXXL.
DROPS Extra 0-809 |
||||||||||
|
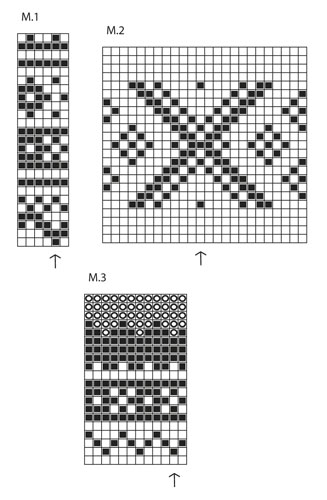
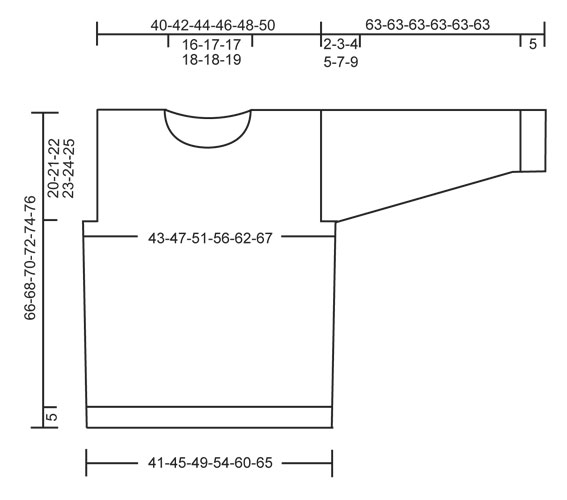
PATTERN: See diagrams M.1 to M.3 – diagrams are worked in stocking st and show 1 repetition of pattern. -------------------------------------------------------- BODY: Worked in the round on circular needle. Cast on 210-228-246-270-306-330 sts on circular needle size 3 mm with dark grey blue Karisma. Work rib = K 1/P 1 for 5 cm. Switch to circular needle size 4 mm and K 1 round while AT THE SAME TIME dec 36-38-40-44-52-56 sts evenly = 174-190-206-226-254-274 sts. Insert a marker at beg of round and a marker after 87-95-103-113-127-137 sts (these marks the sides). Continue in stocking st. REMEMBER THE KNITTING TENSION! When piece measures 15 cm, inc 1 st on each side of both markers. Repeat inc when piece measures 30 cm = 182-198-214-234-262-282 sts. When piece measures 41-43-45-46-48-50 cm, insert 2 markers in the piece; 1 in the middle st at the front and 1 in the middle st at the back. Then work diagram M.1 – st marked with arrow in diagram should be sts with marker mid front/back - count out towards the side. Count out again when at the marker in the side so that pattern is the same on the front and on the back. AT THE SAME TIME when piece measures 46-47-48-49-50-51 cm, cast off 6-10-14-20-30-36 sts for armholes in each side (i.e. 3-5-7-10-15-18 sts on each side of both markers in the sides). Finish front and back piece separately, back and forth on needle. FRONT PIECE: = 85-89-93-97-101-105 sts. Finish diagram M.1, then work diagram M.2 and finally M.3 before continuing with light beige brown until finished measurements (st with arrow in diagram should be st with marker mid front/back – count out towards the side). When piece measures 58-60-62-64-66-68 cm, slip the middle 15-17-17-19-19-21 sts on a stitch holder for neck and finish each shoulder separately. AT THE SAME TIME cast off at beg of every row from neck: 2 sts 3 times and 1 st 3 times = 26-27-29-30-32-33 sts remain on shoulder. Cast off when piece measures 66-68-70-72-74-76 cm. BACK PIECE: = 85-89-93-97-101-105 sts. Work as on front piece but do not cast off for neck until piece measures 64-66-68-70-72-74 cm. Now cast off the middle 29-31-31-33-33-35 sts for neck and finish each shoulder separately - AT THE SAME TIME cast off 2 sts on next row from neck = 26-27-29-30-32-33 sts remain on each shoulder. Cast off when piece measures approx. 66-68-70-72-74-76 cm – cast off on same row in pattern as on front piece. SLEEVE: Worked in the round on double pointed needles, switch to circular needle when needed. Cast on 62-64-66-66-68-68 sts on double pointed needles size 3 mm with dark grey blue. Work rib = K 1/P 1 for 5 cm. Switch to double pointed needles size 4 mm and K 1 round while AT THE SAME TIME dec 11 sts evenly = 51-53-55-55-57-57 sts. Insert a marker at beg of round (= mid under sleeve) and continue in stocking st. When piece measures 6 cm, inc 1 st on each side of marker. Repeat inc a total of 17-18-19-21-22-24 times in Size S: On every 9th round, Size M: Alternately on every 8th and 9th round, Size L: Every 8th round, Size XL: On every 7th round, Size XXL: Alternately on every 6th and 7th round and Size XXXL: Alternately on every 5th and 6th round = 85-89-93-97-101-105 sts. AT THE SAME TIME when piece measures 53 cm in all sizes, work diagram M.1 (st with arrow in diagram = mid on top of sleeve – count out towards the side). After diagram M.1, continue with dark grey blue until finished measurements. AT THE SAME TIME when piece measures 61-60-59-58-56-54 cm (shorter measurements in the larger sizes because of longer sleeve cap and broader shoulder width), finish the piece back and forth on needle from mid under sleeve. Cast on 1 new st in each side (= edge st for assembly) and work until sleeve measures 63 cm in all sizes, cast off. ASSEMBLY: Sew shoulder seams and sew in sleeves (section worked back and forth at the top of sleeve should fit the cast off for armhole). NECK: Knit up from RS approx. 82 to 98 sts around the neck (incl sts on stitch holder at the front) on a short circular needle size 3 mm with dark grey blue. P 1 round, then K 1 round while AT THE SAME TIME inc evenly to 102-108-110-116-118-122 sts. Then work rib = K 1/P 1 for approx. 7 cm, cast off with K over K and P over P. Fold the rib double towards WS and fasten it to the back of neck edge with neat little loose stitches. |
||||||||||
Diagram explanations |
||||||||||
|
||||||||||
 |
||||||||||
 |
||||||||||
Have you finished this pattern?Tag your pictures with #dropspattern #nordicmidnightsweater or submit them to the #dropsfan gallery. Do you need help with this pattern?You'll find 26 tutorial videos, a Comments/Questions area and more by visiting the pattern on garnstudio.com. © 1982-2025 DROPS Design A/S. We reserve all rights. This document, including all its sub-sections, has copyrights. Read more about what you can do with our patterns at the bottom of each pattern on our site. |
||||||||||


With over 40 years in knitting and crochet design, DROPS Design offers one of the most extensive collections of free patterns on the internet - translated to 17 languages. As of today we count 320 catalogues and 12094 patterns translated into English (UK/cm). 12094
We work hard to bring you the best knitting and crochet have to offer, inspiration and advice as well as great quality yarns at incredible prices! Would you like to use our patterns for other than personal use? You can read what you are allowed to do in the Copyright text at the bottom of all our patterns. Happy crafting!
Post a comment to pattern DROPS Extra 0-809
We would love to hear what you have to say about this pattern!
If you want to leave a question, please make sure you select the correct category in the form below, to speed up the answering process. Required fields are marked *.