
Looking for a yarn?


Comments / Questions (108)
![]() Mosselmans Julia wrote:
Mosselmans Julia wrote:
Kan ik niet gewoon met breina alden inplaats met ronde heh ik wat moeilijk ermee
21.12.2013 - 13:17DROPS Design answered:
Hoi Mosselmans. Ja, dat kan. Deel de panden dan in voor- en achterpand en zet 1 st op aan beide zijkanten als kantst (voor de naad). Brei ook de mouwen heen en weer (vergeet hier ook niet de kantst)
22.12.2013 - 14:27
![]() Pamela Morales wrote:
Pamela Morales wrote:
Hola, tengo una duda. Estoy haciendo este pulóver y en las indicaciones para hacer el PUNTO ARROZ pone: PUNTO ARROZ DOBLE: 1ª vuelta: * 1d, 1r *, repetir de *a*. 2ª vuelta: ... Sin embargo cuando consulto el vídeos tutoriales del PUNTO ARROZ DOBLE, pone que la 1ª fila son 2 puntos revés y 2 puntos derecho (no 1 como en el patrón) ¿Cuál es el correcto? Agradecería su respuesta. Gracias
27.11.2013 - 02:47DROPS Design answered:
Hola Pamela. Siempre hay que trabajar según las explicaciones de cada patrón. En este caso el PT ARROZ DOBLE se repite cada 4 filas y se trabaja 1 d., 1 r.
28.11.2013 - 16:50
![]() Antonia wrote:
Antonia wrote:
Ich habe an einem Männerpullover mit der Größe L (Deutschland) die Maße verglichen und komme nun bei Größe XXXL raus? Kann das sein?
20.11.2013 - 10:54DROPS Design answered:
Liebe Antonie, dies ist gut möglich - dieses Modell ist nicht sehr weit geschnitten. Je nach Schnitt kann dies sehr variieren. Wenn Sie das Modell gerne leger hätten, stören Sie sich nicht an der Grössenbenennung und stricken Sie es so!
21.11.2013 - 08:06
![]() Ellen wrote:
Ellen wrote:
Skjønner ikke fellingene på bakstykket til ermhullet? Hvordan skal det gjøres. Ser rart ut med de tallene.
15.11.2013 - 18:11DROPS Design answered:
= 84-92-100-112-124-136 m (1.p = retten). Det fortsettes med striper og dobbel perlestrikk - SAMTIDIG som det felles til ermhull i hver side på hver 2.p slik: Fell av 3 m 1 gang, 2 m 0-1-2-4-6-8 ganger og 1 m 1-2-3-4-5-6 ganger = 76-78-80-82-84-86 m. Minsta storleken 84 - 3+3m - 1+1 = 76 m
20.11.2013 - 09:16
![]() Eline wrote:
Eline wrote:
Trui is klaar, mijn zoon van 15 is helemaal blij met zijn warme trui! Duidelijk patroon!
20.10.2013 - 15:56
![]() Brenda B. wrote:
Brenda B. wrote:
I am trying to decide what size to make for my husband so that it fits like the model in the picture. Maybe you could help me out. His chest measures 39", he's 5'6" tall. He is a small, but muscular man. I know his waist measures 30". Here in Canada he wears size small most often. What do you think?
18.09.2013 - 23:31DROPS Design answered:
Dear Brenda, look at the measurement chart at the very bottom of the page, and compare these measurements (in cm) with a jumper your husband loves and wears. This will then help you to choose the right size. Happy knitting!
19.09.2013 - 09:20
![]() Peter wrote:
Peter wrote:
Axelpartiet och kragen drar väl mycket av den mörkare färgen?
29.05.2013 - 16:48
![]() Marianne Bæk wrote:
Marianne Bæk wrote:
Rigtigt som Astrid siger, der er byttet om på forbruget af de 2 farver...
28.05.2013 - 22:41
![]() Marianne Gine Bæk wrote:
Marianne Gine Bæk wrote:
Hej. er der andre som har haft problemer med garnmængden til denne trøje. Jeg er gået i gang med trøjen, men først efterflgn. observeret denne kommentar...
11.05.2013 - 22:01
![]() Connie wrote:
Connie wrote:
Hej Astrid, vil det sige at du har brugt mere af det lyse end det mørkegrå garn?
26.04.2013 - 15:58
|
|
Limestone#limestonesweater |
|
 |
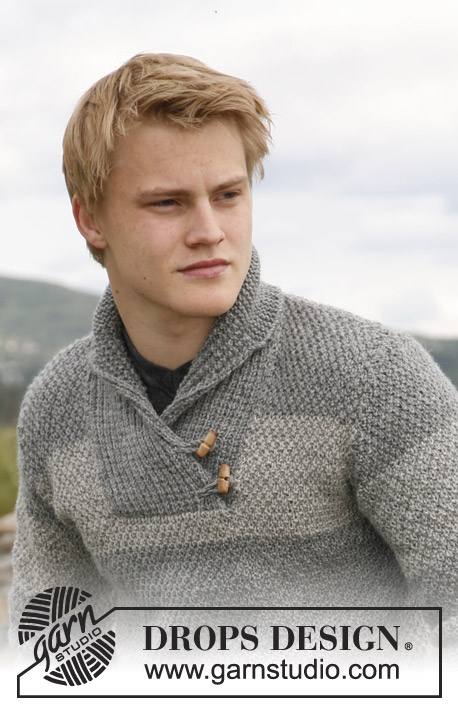 |
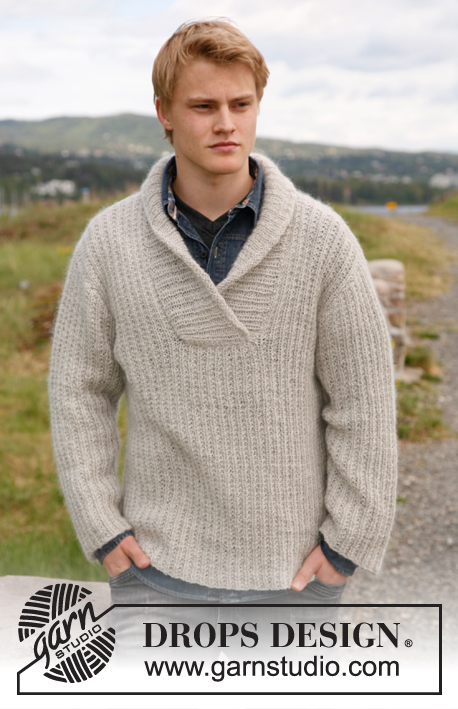
Men's knitted jumper with shawl collar, stripes and moss stitch in DROPS Karisma or DROPS Merino Extra Fine. Size S-XXXL.
DROPS 135-1 |
|
|
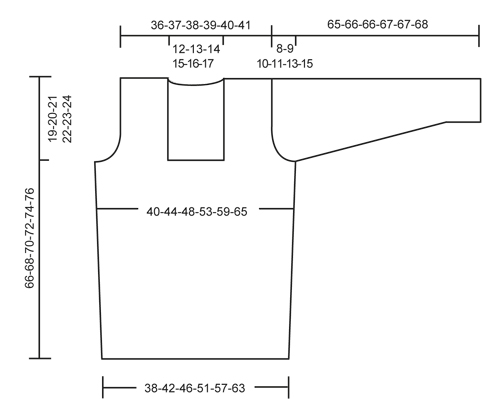
DOUBLE MOSS ST: 1st round: * K 1, P 1 *, repeat from *-*. 2nd round: K over K and P over P. 3rd round: * P 1, K 1 *, repeat from *-*. 4th round: P over P and K over K. Repeat rounds 1-4. STRIPES: Work medium grey and light grey alternately every 11-11-11½-12-12-12½ cm. NOTE: Measure first stripe from cast on edge. Work medium grey in the last stripe on the body and sleeve until finished measurements. INCREASE TIP: Inc 1 st by making 1 YO, on next round work YO twisted (i.e. work in back loop of st instead front) to avoid holes. PATTERN 1: Row 1 (= from RS): K all sts. Row 2 (= from WS): * K 1, P 1 *, repeat from *-*. Repeat 1st and 2nd row. GARTER ST (back and forth on needle): K all rows. -------------------------------------------------------- BODY: Worked in the round on circular needle. Cast on 213-234-255-288-318-351 sts on circular needle size 3.5 mm with light grey. Work rib as follows: * K 1, P 2 *, repeat from *-*. When piece measures 4 cm, K 1 round while AT THE SAME TIME dec 53-58-63-72-78-87 sts evenly (dec by K tog approx. every 3rd and 4th st) = 160-176-192-216-240-264 sts. Then switch to circular needle size 4 mm and continue in the round with DOUBLE MOSS ST and STRIPES - See explanation above. REMEMBER THE KNITTING TENSION! When piece measures 15-15-16-16-17-17 cm, insert 2 markers in the piece; 1 at beg of round and 1 after 80-88-96-108-120-132 sts (marks the sides). On next round, inc 1 st on each side of every marker - Read INCREASE TIP above = 4 new sts on round. NOTE: Work the new sts in double moss st. Repeat inc one more time when piece measures 30-30-32-32-34-34 cm = 168-184-200-224-248-272 sts. When piece measures 47-48-49-50-51-52 cm, divide the piece at the markers and finish each part separately. BACK PIECE: = 84-92-100-112-124-136 sts (1st row = RS). Continue with stripes and double moss st - while AT THE SAME TIME casting off for armholes in each side on every other row as follows: Cast off 3 sts 1 time, 2 sts 0-1-2-4-6-8 times and 1 st 1-2-3-4-5-6 times = 76-78-80-82-84-86 sts. When piece measures 64-66-68-70-72-74 cm, cast off the middle 24-26-28-30-32-34 sts for neck and finish each shoulder separately. Then dec 1 st on next row from neck (dec by working the outermost 2 sts towards the neck tog) = 25 sts remain on shoulder in all sizes. Loosely cast off all sts when piece measures 66-68-70-72-74-76 cm. FRONT PIECE: = 84-92-100-112-124-136 sts. Continue with stripes and double moss st. Start cast offs for armholes as on back piece on 1st row (= RS) - AT THE SAME TIME slip the middle 26-28-30-32-34-36 sts on a stitch holder for neck at the front, now finish each part separately. Cast off for armholes in each side as on back piece. When all cast offs are done, 25 sts remain on each shoulder. Continue in double moss st and with stripes. When piece measures 66-68-70-72-74-76 cm, loosely cast off all sts. SLEEVE: Worked in the round on double pointed needles. Cast on 63-66-69-72-75-78 sts on double pointed needles size 3.5 mm with light grey. Work rib as follows: * K 1, P 2 *, repeat from *-*. When piece measures 4 cm, K 1 round while AT THE SAME TIME dec 15-16-17-18-19-20 sts evenly (dec by K tog approx. every 3rd and 4th st) = 48-50-52-54-56-58 sts. Switch to double pointed needles size 4 mm and insert a marker at beg of round. Continue in the round with DOUBLE MOSS ST and STRIPES. When piece measures 8-8-7-7-7-6 cm, inc 1 st on each side of marker = 2 new sts. Repeat inc every 5-4½-3½-3-2½-2½ cm a total of 10-11-13-15-17-18 times = 68-72-78-84-90-94 sts. When piece measures 57-57-56-56-54-53 cm (shorter measurements in the larger sizes because of longer sleeve cap and broader shoulder width) cast off 3 sts on each side of marker (= 6 sts mid under sleeve). Then work back and forth on circular needle. Continue to cast off for sleeve cap in each side on every other row as follows: Cast off 2 sts 2-2-3-3-5-5 times, and then 1 st 3-4-4-5-5-6 times. Then cast off 2 sts in each side until piece measures 64-65-65-66-66-67 cm, then cast off 3 sts 1 time in each side. Loosely cast off all sts. Piece measures approx. 65-66-66-67-67-68 cm. ASSEMBLY: Sew the shoulder seams tog. Sew in the sleeves. RIGHT COLLAR: Worked back and forth on circular needle size 4 mm with medium grey as follows: Knit up sts from stitch holder mid front (leave the stitch holder) = 26-28-30-32-34-36 sts, P 1 row from WS. Then work PATTERN 1 from RS - See explanation above. When collar measures 19-20-21-22-23-24 cm (last row = 2nd row in PATTERN 1 = WS), insert a marker at the end of row seen from RS. Continue in GARTER ST - See explanation above - until finished measurements - At the same time work short rows as follows: * Work 2 rows over all sts, work 2 rows over the outermost 20 sts towards mid front *, repeat from *-* until piece measures 8-9-9-10-10-11 cm from marker (in the shorter side). Cast off. LEFT COLLAR: Knit up the sts from stitch holder from RS behind right collar = left collar is underneath right collar. Work the same way as on right collar but reversed (work short rows over the outermost 20 sts towards mid front). ASSEMBLY: Sew right collar to right front piece and left collar to left front piece in outermost sts. Sew collar tog mid back and sew the neck on back piece. STRAP: Make 1 strap as follows: Twine 2 threads of 40 cm medium grey and fold them double. Make another strap the same way. Fasten the straps approx. 4 and 11 cm up from bottom edge on right collar (approx. 1 cm from edge mid front). Pull the threads through the collar and fasten the ends on the back. Sew button on left collar approx. 2 and 4 cm in from seam for left front piece. |
|
 |
|
Have you finished this pattern?Tag your pictures with #dropspattern #limestonesweater or submit them to the #dropsfan gallery. Do you need help with this pattern?You'll find 17 tutorial videos, a Comments/Questions area and more by visiting the pattern on garnstudio.com. © 1982-2025 DROPS Design A/S. We reserve all rights. This document, including all its sub-sections, has copyrights. Read more about what you can do with our patterns at the bottom of each pattern on our site. |
|


With over 40 years in knitting and crochet design, DROPS Design offers one of the most extensive collections of free patterns on the internet - translated to 17 languages. As of today we count 320 catalogues and 12091 patterns translated into English (UK/cm). 12091
We work hard to bring you the best knitting and crochet have to offer, inspiration and advice as well as great quality yarns at incredible prices! Would you like to use our patterns for other than personal use? You can read what you are allowed to do in the Copyright text at the bottom of all our patterns. Happy crafting!
Post a comment to pattern DROPS 135-1
We would love to hear what you have to say about this pattern!
If you want to leave a question, please make sure you select the correct category in the form below, to speed up the answering process. Required fields are marked *.