
Looking for a yarn?


Comments / Questions (108)
![]() Stephanie wrote:
Stephanie wrote:
What is the ease of the measurements? Is it positive or negative?
26.06.2020 - 22:08DROPS Design answered:
Dear Stephanie, measure a similar garment you/he likes and compare the measurements to those in the chart to find out the best matching size - read more about sizing here. Happy knitting!
29.06.2020 - 07:30
![]() Toty wrote:
Toty wrote:
Cuando hago los dos aumentos a cada lado de los MP, al hacer el punto retorcido en ambas hebras igual me queda el espacio. No se cómo hacer ese par de aumentos sin que me quede ese espacio.
24.05.2020 - 02:56
![]() Kristina wrote:
Kristina wrote:
Denne oppskriften oppgir ikke riktig garnmengde. Jeg har vært sparsom med den lysegrå fargen og strikket stripene litt kortere enn anvist, likevel har jeg ikke nok til å gjøre ferdig den siste armen. Strikkefastheten stemmer så dette er en feil i mønsteret og utrolig kjedelig å oppdage mot slutten av prosjektet. Det er ikke lett å få tak i drops garn i butikk så da må jeg vel bestille et enkelt nøste og 3 ganger nøstes verdi i porto en gang til...
15.12.2019 - 12:48
![]() Rosa wrote:
Rosa wrote:
Buenas noches, me he quedado bloqueada en la parte de las sisas, no entiendo como y cuantos se menguan , me gustarían me aclarasen la explicación , gracias
06.11.2019 - 21:49DROPS Design answered:
Hola Rosa. Para las sisas cerrar 3 puntos a cada lado de la espalda , después cerrar cada 2ª fila 2 puntos 0-1-2-4-6-8 veces ( el número de veces depende de la talla trabajada , es decir para la talla S no se cierran 2 puntos, para la talla M cerrar 2 puntos 1 vez, para la talla L - 2 veces etc.) . Después cerramos 1 pt 1-2-3-4-5-6 veces de la misma manera.
10.11.2019 - 17:29
![]() Isaline wrote:
Isaline wrote:
Bonjour, je ne comprends pas bien les mesures du diagramme. J'ai mesuré un bras de la personne pour qui je veux faire ce modèle, qui est un homme assez costaud et de taille moyenne. De l'épaule au poignet, son bras mesure 54 cm. Hors sur le diagramme, dans les mesures épaule-poignet, ça commence à 65 cm... Il y a quelque chose de pas logique il me semble... Merci !
15.08.2019 - 03:17DROPS Design answered:
Bonjour Isaline, pour trouver la taille idéale, mesurez un pull similaire qui lui va et qu'il aime, vous pourrez ensuite ajuster si besoin les différentes longueurs. Votre magasin DROPS pourra volontiers vous assister, même par mail ou téléphone. Bon tricot!
15.08.2019 - 10:24
![]() Kathy wrote:
Kathy wrote:
Hola, necesito ayuda con el aumento que hay que hacer en el cuerpo. Entiendo que el la primera fila hago un aumento al principio y después de marcar ciertos números, pero en la segunda fila no entiendo bien a donde debo de hacer el aumento. Y luego dice terminar los aumentos dividir la pieza en los MP para continuar por separado.Gracias por su ayuda.
01.07.2019 - 16:12DROPS Design answered:
Hola Kathy. Son los aumentos en los lados. Primero marcamos los lados con los marcapuntos (según la talla). Aumentamos (trabajando una lazada) a cada lado del marcapuntos. En total, se aumentan 4 puntos en la vuelta. los marcapuntos suben con la labor y los siguientes aumentos se trabajan de la misma manera (= 1 lazada a cada lado del marcapuntos) = 4 puntos aumentados en la vuelta en total.
10.07.2019 - 23:45
![]() Jan Stanford wrote:
Jan Stanford wrote:
Do you have any videos on how to do the following: Strap Twine 2 threads of 40 cm medium grey and fold them double. Make another strap the same way. Fasten the straps approx. 4 and 11 cm up from bottom edge on right collar (approx. 1 cm from edge mid front). Pull the threads through the collar and fasten the ends on the back. Sew button on left collar approx. 2 and 4 cm in from seam for left front piece.
17.06.2019 - 21:58DROPS Design answered:
Dear Mrs Stanford, this video shows how to make a twisted string for the buttonloops, make 2 similar strings and fold them double (to make a loop where you can button the button) and sew the end of strings on the edge of the right collar inserting the ends of buttonloops from RS towards WS, tie the ends tog from WS. Sew buttons facing the buttonloops on the left collar. Happy assembly!
18.06.2019 - 08:36
![]() Jan Stanford wrote:
Jan Stanford wrote:
Please advise if you have any videos to demonstrate how to do a Kitchener stitch for a garter stitch - to close the back of the collar on this sweater - and do you think this would be a recommended way to close the back of the collar on this project - thank you Jan
10.06.2019 - 15:59DROPS Design answered:
Dear Mrs Stanford, this video shows how to graft sts together - just make sure that the last row worked on both collar is a WS row, so that you can just follow the video, working from RS. Happy knitting!
11.06.2019 - 11:53
![]() Jan Stanford wrote:
Jan Stanford wrote:
Please advise if it would work to close the back of the collar by using a Kitchener stitch on the live stitches rather than casting off and joining that edge - thought Kitchener might be a preferable closure - what are your thoughts ??
08.06.2019 - 13:38DROPS Design answered:
Dear Mrs Stanford, you can join the both collars with a kitchener for a less visible seam. Happy knitting!
11.06.2019 - 10:04
![]() Jan Stanford wrote:
Jan Stanford wrote:
It appears the length of the neck - per your schematic diagram is the same as the length of Pattern 1 length instructions for Rt collar / Lt collar - ie 23 cm is 9" - so if my opening is 9.25 inches in length - shouldn't I do Pattern 1 for 9.25" prior to starting the garter stitch / short row part of the collar - if you check out the different sizes on the schematic diagram and the instructions for Pattern 1 - they seem to match
06.06.2019 - 16:59DROPS Design answered:
Dear Mrs Stanford; I'll checked out and you are right, if your neckline is 9,25" work in pattern until collar measures 9,25" (= along whole neckline), then start garter stitch and short rows. Happy knitting!
07.06.2019 - 08:56
|
|
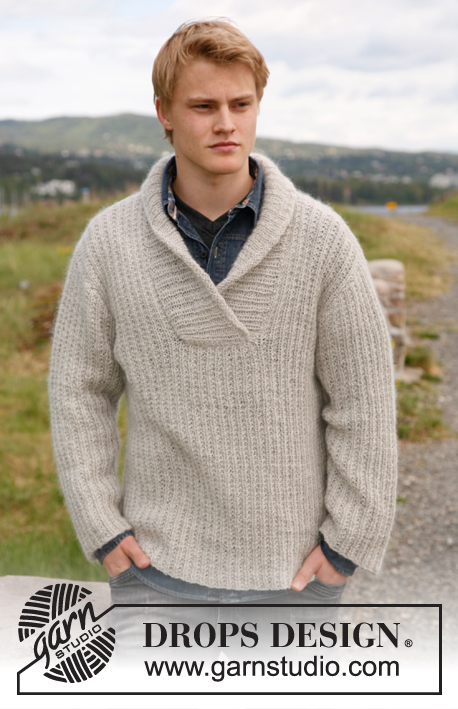
Limestone#limestonesweater |
|
 |
 |
Men's knitted jumper with shawl collar, stripes and moss stitch in DROPS Karisma or DROPS Merino Extra Fine. Size S-XXXL.
DROPS 135-1 |
|
|
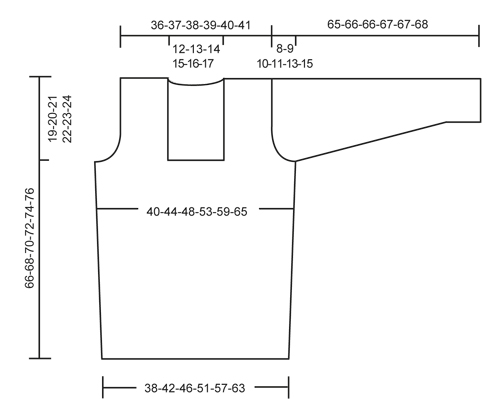
DOUBLE MOSS ST: 1st round: * K 1, P 1 *, repeat from *-*. 2nd round: K over K and P over P. 3rd round: * P 1, K 1 *, repeat from *-*. 4th round: P over P and K over K. Repeat rounds 1-4. STRIPES: Work medium grey and light grey alternately every 11-11-11½-12-12-12½ cm. NOTE: Measure first stripe from cast on edge. Work medium grey in the last stripe on the body and sleeve until finished measurements. INCREASE TIP: Inc 1 st by making 1 YO, on next round work YO twisted (i.e. work in back loop of st instead front) to avoid holes. PATTERN 1: Row 1 (= from RS): K all sts. Row 2 (= from WS): * K 1, P 1 *, repeat from *-*. Repeat 1st and 2nd row. GARTER ST (back and forth on needle): K all rows. -------------------------------------------------------- BODY: Worked in the round on circular needle. Cast on 213-234-255-288-318-351 sts on circular needle size 3.5 mm with light grey. Work rib as follows: * K 1, P 2 *, repeat from *-*. When piece measures 4 cm, K 1 round while AT THE SAME TIME dec 53-58-63-72-78-87 sts evenly (dec by K tog approx. every 3rd and 4th st) = 160-176-192-216-240-264 sts. Then switch to circular needle size 4 mm and continue in the round with DOUBLE MOSS ST and STRIPES - See explanation above. REMEMBER THE KNITTING TENSION! When piece measures 15-15-16-16-17-17 cm, insert 2 markers in the piece; 1 at beg of round and 1 after 80-88-96-108-120-132 sts (marks the sides). On next round, inc 1 st on each side of every marker - Read INCREASE TIP above = 4 new sts on round. NOTE: Work the new sts in double moss st. Repeat inc one more time when piece measures 30-30-32-32-34-34 cm = 168-184-200-224-248-272 sts. When piece measures 47-48-49-50-51-52 cm, divide the piece at the markers and finish each part separately. BACK PIECE: = 84-92-100-112-124-136 sts (1st row = RS). Continue with stripes and double moss st - while AT THE SAME TIME casting off for armholes in each side on every other row as follows: Cast off 3 sts 1 time, 2 sts 0-1-2-4-6-8 times and 1 st 1-2-3-4-5-6 times = 76-78-80-82-84-86 sts. When piece measures 64-66-68-70-72-74 cm, cast off the middle 24-26-28-30-32-34 sts for neck and finish each shoulder separately. Then dec 1 st on next row from neck (dec by working the outermost 2 sts towards the neck tog) = 25 sts remain on shoulder in all sizes. Loosely cast off all sts when piece measures 66-68-70-72-74-76 cm. FRONT PIECE: = 84-92-100-112-124-136 sts. Continue with stripes and double moss st. Start cast offs for armholes as on back piece on 1st row (= RS) - AT THE SAME TIME slip the middle 26-28-30-32-34-36 sts on a stitch holder for neck at the front, now finish each part separately. Cast off for armholes in each side as on back piece. When all cast offs are done, 25 sts remain on each shoulder. Continue in double moss st and with stripes. When piece measures 66-68-70-72-74-76 cm, loosely cast off all sts. SLEEVE: Worked in the round on double pointed needles. Cast on 63-66-69-72-75-78 sts on double pointed needles size 3.5 mm with light grey. Work rib as follows: * K 1, P 2 *, repeat from *-*. When piece measures 4 cm, K 1 round while AT THE SAME TIME dec 15-16-17-18-19-20 sts evenly (dec by K tog approx. every 3rd and 4th st) = 48-50-52-54-56-58 sts. Switch to double pointed needles size 4 mm and insert a marker at beg of round. Continue in the round with DOUBLE MOSS ST and STRIPES. When piece measures 8-8-7-7-7-6 cm, inc 1 st on each side of marker = 2 new sts. Repeat inc every 5-4½-3½-3-2½-2½ cm a total of 10-11-13-15-17-18 times = 68-72-78-84-90-94 sts. When piece measures 57-57-56-56-54-53 cm (shorter measurements in the larger sizes because of longer sleeve cap and broader shoulder width) cast off 3 sts on each side of marker (= 6 sts mid under sleeve). Then work back and forth on circular needle. Continue to cast off for sleeve cap in each side on every other row as follows: Cast off 2 sts 2-2-3-3-5-5 times, and then 1 st 3-4-4-5-5-6 times. Then cast off 2 sts in each side until piece measures 64-65-65-66-66-67 cm, then cast off 3 sts 1 time in each side. Loosely cast off all sts. Piece measures approx. 65-66-66-67-67-68 cm. ASSEMBLY: Sew the shoulder seams tog. Sew in the sleeves. RIGHT COLLAR: Worked back and forth on circular needle size 4 mm with medium grey as follows: Knit up sts from stitch holder mid front (leave the stitch holder) = 26-28-30-32-34-36 sts, P 1 row from WS. Then work PATTERN 1 from RS - See explanation above. When collar measures 19-20-21-22-23-24 cm (last row = 2nd row in PATTERN 1 = WS), insert a marker at the end of row seen from RS. Continue in GARTER ST - See explanation above - until finished measurements - At the same time work short rows as follows: * Work 2 rows over all sts, work 2 rows over the outermost 20 sts towards mid front *, repeat from *-* until piece measures 8-9-9-10-10-11 cm from marker (in the shorter side). Cast off. LEFT COLLAR: Knit up the sts from stitch holder from RS behind right collar = left collar is underneath right collar. Work the same way as on right collar but reversed (work short rows over the outermost 20 sts towards mid front). ASSEMBLY: Sew right collar to right front piece and left collar to left front piece in outermost sts. Sew collar tog mid back and sew the neck on back piece. STRAP: Make 1 strap as follows: Twine 2 threads of 40 cm medium grey and fold them double. Make another strap the same way. Fasten the straps approx. 4 and 11 cm up from bottom edge on right collar (approx. 1 cm from edge mid front). Pull the threads through the collar and fasten the ends on the back. Sew button on left collar approx. 2 and 4 cm in from seam for left front piece. |
|
 |
|
Have you finished this pattern?Tag your pictures with #dropspattern #limestonesweater or submit them to the #dropsfan gallery. Do you need help with this pattern?You'll find 17 tutorial videos, a Comments/Questions area and more by visiting the pattern on garnstudio.com. © 1982-2025 DROPS Design A/S. We reserve all rights. This document, including all its sub-sections, has copyrights. Read more about what you can do with our patterns at the bottom of each pattern on our site. |
|


With over 40 years in knitting and crochet design, DROPS Design offers one of the most extensive collections of free patterns on the internet - translated to 17 languages. As of today we count 320 catalogues and 12091 patterns translated into English (UK/cm). 12091
We work hard to bring you the best knitting and crochet have to offer, inspiration and advice as well as great quality yarns at incredible prices! Would you like to use our patterns for other than personal use? You can read what you are allowed to do in the Copyright text at the bottom of all our patterns. Happy crafting!
Post a comment to pattern DROPS 135-1
We would love to hear what you have to say about this pattern!
If you want to leave a question, please make sure you select the correct category in the form below, to speed up the answering process. Required fields are marked *.