
Looking for a yarn?


Comments / Questions (129)
![]() Miris wrote:
Miris wrote:
Bonjour, si je tricote sur l'endroit la boutonnière en suivant l'explication, je réalise la boutonnière en fin de rang endroit. Ce qui correspond au devant gauche et non au devant droit. Pouvez-vous svp, m'éclairer ? Merci
10.11.2024 - 20:36DROPS Design answered:
Bonjour Miris, quand on tricote de haut en bas, on commence sur l'endroit par le devant gauche et on termine par le devant droit, ainsi, les boutonnières vont bien se trouver sur le devant droit = en fin de rang sur l'endroit. Bon tricot!
11.11.2024 - 09:46
![]() Monika Rasmussen Osazuwa wrote:
Monika Rasmussen Osazuwa wrote:
Jeg strikker str. 2 år, og får ikke mønsteret til å stemme på første omgang etter halsen, det er 111 masker minus 2 ganger 6 (stolpemasker), altså 99 masker. Jeg får det ikke til å stemme med mønsteret. Hvor mange masker skal det være i de forskjellige delene.
13.10.2024 - 10:49DROPS Design answered:
Hej Monika, du har 111 masker. 6 kantm, A.1=7, A.2=6, A.3=5, 1, 12glat(+4), 1, A.4=6, A.2=6x4=24, A.3=5, 1, 12glat(+4), 1, A.4=6, A.2=6, A.5=6, 6 kantm = 111m + 4+4+ udtagningerne i A.3 og A.4 :)
16.10.2024 - 14:25
![]() Guillard wrote:
Guillard wrote:
Bonjour, j 'ai beau lire et relire les explications, je ne retombe pas sur mes pas dès la fin du premier rang après le col. J'ai défait environ 6 fois ce premier rang. Avez-vous des conseils à m'apporter ? Merfci
17.09.2024 - 09:40DROPS Design answered:
Bonjour Mme Guillard, n'hésitez pas à nous indiquer quelle taille vous tricotez, nous pourrons ainsi vous détailler le 1er rang; notez que les jetés (augmentations = ovales noirs) ne sont pas compris dans le nombre de mailles à tricoter, autrement dit, on tricote A.3 sur 5 mailles (et on a 6 mailles à la fin du 1er rang) et A.4 sur 6 mailles (et on a 7 mailles après le 1er rang). Bon tricot!
17.09.2024 - 16:06
![]() Emmeline Travers-Colliard wrote:
Emmeline Travers-Colliard wrote:
Bonjour, n'y a-t-il pas une erreur dans la taille 12/18 mois ? Je trouve étrange que la manche (hors bordure côtes) ne mesure que 16 cm alors que c'est 15 en 9 mois et 22 en 24 mois, cela rend le poignet plus haut que le bas du cardigan. Je m'attendrais à 18 cm de manche avant de passer en côtes (voire 19), et non 16.
07.09.2024 - 21:23DROPS Design answered:
Bonjour Mme Travers-Colliard, vérifiez les mesures sur un vêtement que le bébé porte et ajustez à la longueur nécessaire si besoin; la manche va mesurer 13+16+3 = 32 cm de longueur totale après le col (y compris le raglan). Le gilet mesure environ 33 cm de longueur totale dans la même teille (2 cm d'épaules + 13 cm de raglan + 15 cm après la division + 3 cm de côtes). Bon tricot!
09.09.2024 - 10:15
![]() Emma wrote:
Emma wrote:
Hi, I'm trying to do size 2 years. I've finished the pattern 3 times in height and now need to continue raglan without increases on front and back. I'm stuck with what I do over the 5 stitches from A3 and the responses to previous comments seem to change. Do I do A2 across the 5 stitches plus 1 marker stitch while doing raglan (then how does the raglan work on row 5 when you have to use a sleeve stitch) or do I continue with what I can from A3 and ignore the decrease on row 5?
22.08.2024 - 14:04DROPS Design answered:
Dear Emma, after you have worked the diagrams 3 times in height you have worked A.2 a total of 4 times in width (first repeat + 3 new repeats, one for each repeat in height), then you work one more time A.2 over the sts of A.3 + 1 st stocking stitch you get now 5 repeats of A.2. Happy knitting!
23.08.2024 - 07:46
![]() Manuela wrote:
Manuela wrote:
Da må jeg tilbake til mitt første spørsmål. Av en eller annen grunn er jeg ferdig med raglan på ermene før jeg har strikket A3 og A4 tre ganger i høyden. Jeg ender opp med 6 stolpemasker på hver side, de to forstykkene har 36 masker hver, ermene måler 46 masker hver (inkludert maskene med merke i), og bakstykket har 77 masker… det verste er at mønsteret ser helt perfekt ut!
13.08.2024 - 22:17DROPS Design answered:
Hej Manuela, strikker du i DROPS Flora? Har du 32 pinde på 10 cm i højden. Når du bliver færdig med raglan tidligere end hvad som står i opskriften, så kan det være fordi du strikker med tykkere garn eller med tykkere pinde.... kan det stemme?
21.08.2024 - 09:11
![]() Manuela wrote:
Manuela wrote:
Jeg lurer på om jeg har forstått hva jeg har gjort feil; det står i oppskriften «når A1 til A5 er strikket en gang i høyden strikkes neste pinne fra retten slik…» skal denne «høyden» telles med i de 3 gangene A3 og A4 skal repeteres? I såfall har jeg nok strikket en gang for mye i høyden…
12.08.2024 - 23:09DROPS Design answered:
Hei Manuela, Ja, du skal kun strikke A.1 til A.5 1 gang i høyden (8 pinner i alle rapportene) før du følger disse instruksene. God fornøyelse!
13.08.2024 - 06:36
![]() Manuela wrote:
Manuela wrote:
Jeg strikker str 6/9 mnd og har strikket A.3 og A.4 3 ganger i høyden. Det står i oppskriften at jeg skal fortsette med raglan uten økninger på forstykke og bakstykke. Men raglan på ermene (14 ganger) er ferdig FØR jeg har strikket 3 ganger i høyden; på femte pinne i siste omgang. Hva gjør jeg feil? Hvis jeg teller antall masker med alle økningene er jeg langt over 229 masker... Takk for hjelpen!
11.08.2024 - 17:39DROPS Design answered:
Hej Manuela, strikker du i DROPS Flora? Har du 32 pinde på 10 cm i højden. Når du bliver færdig med raglan tidligere end hvad som står i opskriften, så kan det være fordi du strikker med tykkere garn eller med tykkere pinde.... kan det stemme?
21.08.2024 - 09:05
![]() Christine wrote:
Christine wrote:
Size 6-9 m. After all increases in the pattern. I have a problem as to the stitch count, right front piece as worn. I have 6+A1(7), A2 x2 (12);. I should do A 2 twice more (12 ) A2 4x , but A3 has 11 sts in the last row, therefore I am missing 1 stitch for that, unless I include in that count the stitch that has the marker. Additionally, when do I stop counting the stitch with the marker separately? Does it become part of the sleeve or the pattern?
30.07.2024 - 21:51DROPS Design answered:
Hi Christine, On the right front piece, you work 6 band stitches, A.1 and A.3 (A.2 is not worked in your size). Then the marker is inserted in the next stitch (which is part of the sleeve). When the diagrams are finished in height, you have 6 band stitches, 7 stitches in A.1 and 11 stitches in A.3 on the right front piece. You then work the band stitches, A.1, A.2 x 1 (not 2) and A.3 on the right front piece, starting again from the first row in each diagram. Hope this helps and happy knitting!
31.07.2024 - 06:39
![]() Maria wrote:
Maria wrote:
Hello, I'm wanting to make this for my daughter to fit her between 3-6 months. But there doesn't seem to be a size for this age. Is there something I'm missing?
28.07.2024 - 13:30DROPS Design answered:
Hi Maria, to choose the correct size, please see the lesson HERE. Happy knitting!
28.07.2024 - 16:01
|
||||||||||||||||||||||
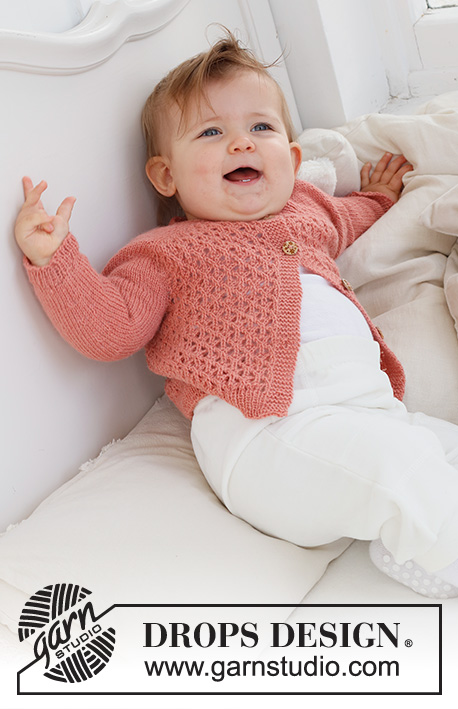
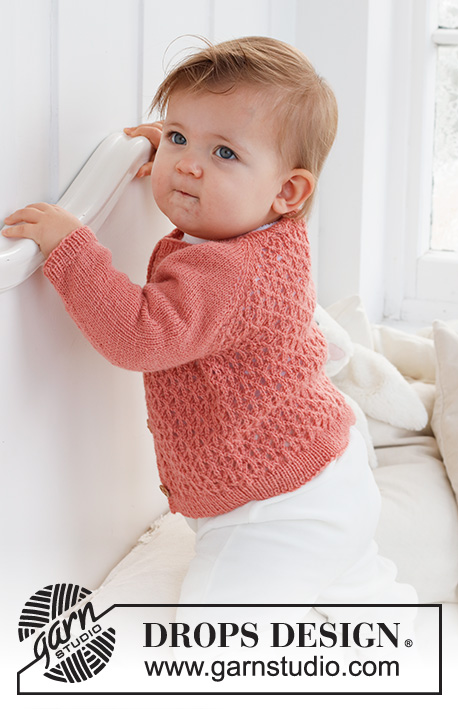
Cotswolds Cardigan#cotswoldscardigan |
||||||||||||||||||||||
 |
 |
|||||||||||||||||||||
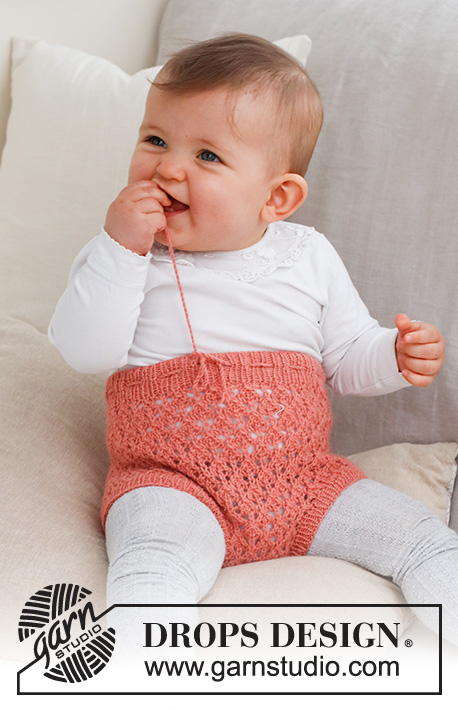
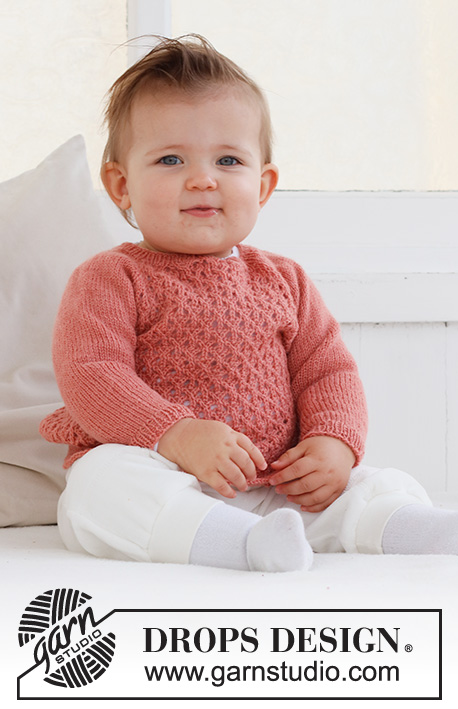
Knitted jacket for baby in DROPS Flora. The piece is worked top down, with raglan and lace pattern. Sizes 0 – 2 years.
DROPS Baby 43-2 |
||||||||||||||||||||||
|
------------------------------------------------------- EXPLANATIONS FOR THE PATTERN: ------------------------------------------------------- RIDGE/GARTER STITCH (worked back and forth): Knit all rows. 1 ridge = knit 2 rows. PATTERN: See diagrams A.1 to A.5. The diagrams show all rows in the pattern from the right side. BUTTONHOLES: Work buttonholes on the right band (when the garment is worn). Work from the right side when there are 4 stitches left on the row as follows: Make 1 yarn over, knit 2 together and knit 2. On the next row (wrong side), knit the yarn over to leave a hole. The first buttonhole is worked right after the neck. Then work the other 4 buttonholes with approx. 4½-4½ 5-5½-6 cm between each one. RAGLAN: All increases are worked from the right side! On the front and back pieces the increases are included in the diagram. Increase as follows on the sleeves: Increase 1 stitch after markers 1 and 3. Knit the marker-stitch, make 1 yarn over. Increase 1 stitch before markers 2 and 4. Work as far as the marker-stitch and make 1 yarn over, knit the marker-stitch. On the next row purl the yarn overs twisted to avoid holes! Repeat this increase every row from the right side a total of 10-12-14-16-17 times. DECREASE TIP (for sleeves): Decrease 1 stitch on either side of the marker as follows: Work until there are 3 stitches left before the marker, knit 2 together, knit 2 (marker sits between these 2 stitches), slip 1 stitch as if to knit, knit 1 and pass the slipped stitch over the knitted stitch. ------------------------------------------------------- START THE PIECE HERE: ------------------------------------------------------- JACKET – SHORT OVERVIEW OF THE PIECE. The neck and yoke are worked back and forth with circular needle, top down. The yoke is divided for body and sleeves and the body continued back and forth with circular needle. The sleeves are worked in the round with double pointed needles. NECK: Cast on 93-93-93-111-111 stitches with circular needle size 2.5 mm and DROPS Flora. Purl 1 row from the wrong side with 6 band stitches in GARTER STITCH – read description above, on each side. Then work rib as follows: 6 band stitches in garter stitch, * knit 1, purl 1 *, work from *-* until there are 7 stitches left, knit 1 and 6 band stitches in garter stitch. Work this rib for 2 cm. Change to circular needle size 3 mm. YOKE: Work the BUTTONHOLE on the right band – read description above! On the first row from the right side insert 4 markers and work as follows: Front piece: 6 band stitches in garter stitch, work A.1, then A.2 0-0-0-1-1 time, A.3. Sleeve: Insert marker 1 in the next stitch, work 12 stitches in stocking stitch and increase 4 stitches evenly over these stitches, insert marker 2 in the next stitch. Back piece: Work A.4, A.2 3-3-3-4-4 times, then A.3. Sleeve: Insert marker 3 in the next stitch, work 12 stitches in stocking stitch and increase 4 stitches evenly over these stitches, insert marker 4 in the next stitch. Front piece: Work A.4, A.2 0-0-0-1-1 time, A.5 and 6 band stitches in garter stitch. Continue this pattern on the next row from right side start to increase for sleeve – read description above. REMEMBER THE KNITTING TENSION! When A.1 to A.5 are completed, work the next row from the right side as follows: 6 band stitches in garter stitch, work A.1, A.2 1-1-1-2-2 times, A.3, work stocking stitch and increase as before over the sleeve as far as marker 2, work A.4, A.2 5-5-5-6-6 times, A.3, work stocking stitch and increase as before over the sleeve as far as marker 4, work A.4, A.2 1-1-1-2-2 times, A.5 and 6 band stitches in garter stitch. Repeat this pattern in height. Each time A.3 and A.4 are repeated in height, there is room for 1 more repeat of A.2 on the front pieces and 2 more repeats on the back piece. When A.3 and A.4 have been worked 2-2-3-3-3 times in height, the increases are finished on the front and back pieces; continue increasing only on the sleeves as explained above. Continue the pattern on the front and back pieces, but without further increases. When all the increases are finished there are 189-197-229-255-259 stitches. Now work pattern as follows: 6 band stitches in garter stitch, A.1 over 7 stitches, A.2 3-3-4-5-5 times, work 37-41-45-49-51 stitches in stocking stitch, A.2 9-9-11-12-12 times, work 37-41-45-49-51 stitches in stocking stitch, A.2 3-3-4-5-5 times, A.5 and 6 band stitches in garter stitch. Continue this pattern. When you work round 5 in A.2 on the back piece, knit the first stitch in the first repeat, the last stitch in the last repeat is worked over the first stitch on the sleeve. When the piece measures 12-13-14-15-16 cm from the cast-on edge, divide for the body and sleeves as follows: 6 band stitches in garter stitch, work 25-25-31-37-37 stitches as before, place the next 37-41-45-49-51 stitches on a thread for the sleeve, cast on 6 stitches under the sleeve, work 54-54-66-72-72 stitches, place the next 37-41-45-49-51 stitches on a thread for the sleeve, cast on 6 stitches under the sleeve, work 24-24-30-36-36 stitches as before and 6 band stitches in garter stitch. BODY: = 127-127-151-169-169 stitches. Continue back and forth as follows: 6 band stitches in garter stitch, work A.1, A.2 until there are 12 stitches left, work A.5 and 6 band stitches in garter stitch. When the piece measures 9-12-13-15-17 cm from the division, increase 20-20-22-26-26 stitches evenly spaced on the next row from the right side (do not increase over the bands) = 147-147-173-195-195 stitches. Change to circular needle size 2.5 mm and work rib from the wrong side as follows: 6 band stitches in garter stitch, * purl 1, knit 1 *, work from *-* until there are 7 stitches left, purl 1 and 6 band stitches in garter stitch. Continue this rib for 3 cm. Cast off. The jacket measures approx. 24-28-30-33-36 cm from the shoulder down. SLEEVES: Place the 37-41-45-49-51 stitches from the thread on the one side of the piece on double pointed needles size 3 mm and knit up 1 stitch in each of the 6 stitches cast on under the sleeve = 43-47-51-55-57 stitches. Insert a marker thread in the middle of the new stitches under the sleeve. Start at the marker and work stocking stitch in the round for 1 cm. Now decrease 2 stitches under the sleeve – read DECREASE TIP. Decrease like this every 2½-2-2-2-2½ cm a total of 3-5-6-7-8 times = 37-37-39-41-41 stitches. When the sleeve measures 10-12-15-16-22 cm from the division increase 5 stitches evenly spaced = 42-42-44-46-46 stitches. Change to double pointed needles size 2.5 mm and work rib (knit 1, purl 1) for 3 cm. Cast off with knit over knit and purl over purl. The sleeve measures approx. 13-15-18-19-25 cm from the division. Work the other sleeve in the same way. ASSEMBLY: Sew the buttons onto the left band. |
||||||||||||||||||||||
Diagram explanations |
||||||||||||||||||||||
|
||||||||||||||||||||||
 |
||||||||||||||||||||||
Have you finished this pattern?Tag your pictures with #dropspattern #cotswoldscardigan or submit them to the #dropsfan gallery. Do you need help with this pattern?You'll find 30 tutorial videos, a Comments/Questions area and more by visiting the pattern on garnstudio.com. © 1982-2025 DROPS Design A/S. We reserve all rights. This document, including all its sub-sections, has copyrights. Read more about what you can do with our patterns at the bottom of each pattern on our site. |
||||||||||||||||||||||


With over 40 years in knitting and crochet design, DROPS Design offers one of the most extensive collections of free patterns on the internet - translated to 17 languages. As of today we count 320 catalogues and 12093 patterns translated into English (UK/cm). 12093
We work hard to bring you the best knitting and crochet have to offer, inspiration and advice as well as great quality yarns at incredible prices! Would you like to use our patterns for other than personal use? You can read what you are allowed to do in the Copyright text at the bottom of all our patterns. Happy crafting!
Post a comment to pattern DROPS Baby 43-2
We would love to hear what you have to say about this pattern!
If you want to leave a question, please make sure you select the correct category in the form below, to speed up the answering process. Required fields are marked *.