
Looking for a yarn?


Comments / Questions (129)
![]() Katarzyna Majdan wrote:
Katarzyna Majdan wrote:
Wykonuje rozmiar 6/9 m Pozdrawiam
08.05.2023 - 15:00DROPS Design answered:
Witaj Kasiu, dalej przerabiasz tył i przody ściegiem ażurowym, ale nie dodajesz już oczek na reglany tyłu/przodów. W tym momencie powinnaś mieć 40 oczek na rękawach. Zostają Ci jeszcze 2 rzędy na prawej stronie robótki z dodawaniem oczek, ale tylko na rękawy (reglany rękawów). Pozdrawiamy!
08.05.2023 - 16:12
![]() Katarzyna Majdan wrote:
Katarzyna Majdan wrote:
Witam serdecznie obecnie jestem w części Karczek :Gdy schematy A.3 i A.4 zostaną przerobione 2-2-3-3-3 razy na wysokość, dodawanie oczek na przodach i tyle jest zakończone; dalej dodawać oczka tylko na rękawach. Dalej przerabiać przody i tył ściegiem ażurowym, ale bez dodawania oczek. I utknęłam nie do końca rozumiem jak powinnam przerabiać i chciała bym wiedzieć ile jest w obecny momencie oczek na rękawach
07.05.2023 - 12:55DROPS Design answered:
Witaj Kasiu, napisz który rozmiar wykonujesz.
08.05.2023 - 10:58
![]() Annette Enk wrote:
Annette Enk wrote:
Liegt mein Fehler vielleicht in Reihe 3? Muss nur eine Zunahme, die ja in der Rückreihe verschränkt abgestrickt wird, weggelassen werden?
30.03.2023 - 17:05DROPS Design answered:
Liebe Frau Enk, es sind beim Rumpfteil keine Zunahmen mehr gestrickt, so stricken Sie glattrechts alle Extra Maschen im Diagram, die nicht zum Lochmuster gehören, beachten Sie nur, daß im A.3/A.4 genauso viele Umschläge und Abnahmen sind, so nehmen Sie nicht mehr zu. Viel Spaß beim stricken!
11.04.2023 - 09:49
![]() Annette Enk wrote:
Annette Enk wrote:
Ich muss noch 3 Raglanzunahmen an den Ärmeln machen. Bei Rumpf- u. Vorderteilen habe ich die Zumahmen wie beschrieben weggelassen und bin jetzt in Reihe 5 beim Vorderteil. Wie endet die Reihe? Ich muss ja immer soviele Abnahmen wie Zunahmen arbeiten, damit die Maschenzahl gleich bleibt. Geht bei mir nicht auf. Wo ist mein Fehler?
30.03.2023 - 16:58DROPS Design answered:
Liebe Frau Enk, über Vorderteile strickt man jetzt nur A.2 + A.1 nach den Blenden-Maschen (linkes Vorderteil) und A.5 vor den Blenden-Maschen (rechtes Vorderteil). Viel Spaß beim stricken!
11.04.2023 - 09:47
![]() Tonya wrote:
Tonya wrote:
I am enjoying the challenging pattern. Working a 6/9 month size. I have finished the increases on the yoke and I am working the pattern. I am working round 5, but I don’t understand, “when you work round 5 in A.2 on the back piece (and here’s what I don’t understand->) knit the first stitch in the first repeat…. “
29.03.2023 - 21:22DROPS Design answered:
Dear Tonya, it means that, when working round 5 of A.2 for the first time in that round, in the first repeat you start working: knit1, yarn over, knit 1, yarn over and then the decrease. Afterwards, the last stitch of the last repeat of A.2 is worked over the first stitch of the sleeve (A.5). Remember that the last stitch of each repeat of A.2 is the first stitch of the first repeat, except for the last repeat. Happy knitting!
02.04.2023 - 16:40
![]() Gunhild Tove Leite wrote:
Gunhild Tove Leite wrote:
Jeg skal strikke str.2år,men forstår ikke oppskrifta,når d står eksp.i første fortykket strikk 6 stolpemaske så A1,A2 osv,Men når jeg er på forstykke 2 står d A4,A2,kan dere forklare meg litt,er såå rotete mønster,hvorfor ikke skrive mønster omgang f omgang og ha det samla og med raglansammen med mønster Håper dere kan hjelpe mer skulle så gjerne fått laga denne jakke
08.03.2023 - 10:46DROPS Design answered:
Du har 111 masker. På første pinne fra retten settes det 4 merker, økes og strikkes mønster slik: Forstykke: Strikk 6 stolpemasker i rille, A.1=7m, A.2=6m strikkes 1 gang, A.3=5m. sett 1.merke i neste maske, strikk 12 masker glattstrikk og øk 4 masker jevnt fordelt, sett 2.merke i neste maske (= erme). A.4=6m, A.2=6m strikkes 4 ganger, A.3=5m. sett 3.merke i neste maske, 12 masker glattstrikk og øk 4 masker jevnt fordelt, sett 4.merke i neste maske (erme). A.4=6m, A.2=6 strikkes 1 gang, A.5=6m og avslutt med 6 stolpemasker i rille. 6+7+6+5+1+12+1+6+24+5+1+12+1+6+6+6+6=111 masker :)
09.03.2023 - 09:11
![]() Gunhild Leite wrote:
Gunhild Leite wrote:
Kan dere forklare meg hvordan jeg leser mønster til denne jakke,står veldig dårlig forklart i hele oppskrift
07.03.2023 - 23:21DROPS Design answered:
Hej Gunhild, du starter ved START ARBEJDET HER - Læser den lille forklaring og legger op det antal masker som modsvarer din størrelse. Nu er det bare at følge opskriften :)
08.03.2023 - 09:47
![]() Isabelle wrote:
Isabelle wrote:
Je ne suis pas une novice. Pourtant, je renonce, modèle très mal expliqué.
28.01.2023 - 17:46DROPS Design answered:
Bonjour Isabelle, si vous avez un souci de compréhension sur ce modèle, n'hésitez pas à poser votre question ici, en nous indiquant quelle partie vous pose souci; nous pourrons alors vous aider. Bon tricot!
30.01.2023 - 09:55
![]() Brigitte wrote:
Brigitte wrote:
Bonjour, Je tricote le modèle pour 2 ans . J'ai 111 mailles au départ . Au début de l'empiècement, le nombre de mailles ne correspond pas au diagramme (je ne compte pas les augmentations) : 6 mailles bordure, 18 mailles devant , 12 mailles manche, 35 mailles dos, 12 mailles manche, 18 mailles devant et 6 mailles bordure. 6+18+12+35+12+18+6:107 et non 111! Il manque 4mailles. Où est la faute? Merci de m'aider!
27.01.2023 - 22:39DROPS Design answered:
Bonjour Brigitte, chacun des 4 marqueurs doit être placé dans une maille, autrement dit, les 4 mailles qui vous manquent sont les 4 mailles avec un marqueur au début et à la fin de chacune des 2 manches. Bon tricot!
30.01.2023 - 08:32
![]() Eva wrote:
Eva wrote:
Ik ben in het begin van het patroon waar je gaat meerderen, er wordt gezegd dat je moet meerderen over de mouw met 4 steken en daarna dat je dit patroon moet herhalen. Jammer genoeg heb ik dat gedaan en dan heb je teveel steken ben ik achter gekomen. Ik moet nu uithalen en opnieuw beginnen. Is die meerdering van 4 steken gelijkmatig over de mouw eenmalig?
22.01.2023 - 07:29DROPS Design answered:
Dag Eva,
Je voegt op een gegeven moment een markeerdraad in en dan brei je 12 steken waarbij je 4 steken verdeeld meerdert over deze 12 steken. Dan voeg je weer een markeerdraad in. Tussen die markeerdraden krijg je dan dus 16 steken in totaal.
22.01.2023 - 17:30
|
||||||||||||||||||||||
Cotswolds Cardigan#cotswoldscardigan |
||||||||||||||||||||||
 |
 |
|||||||||||||||||||||
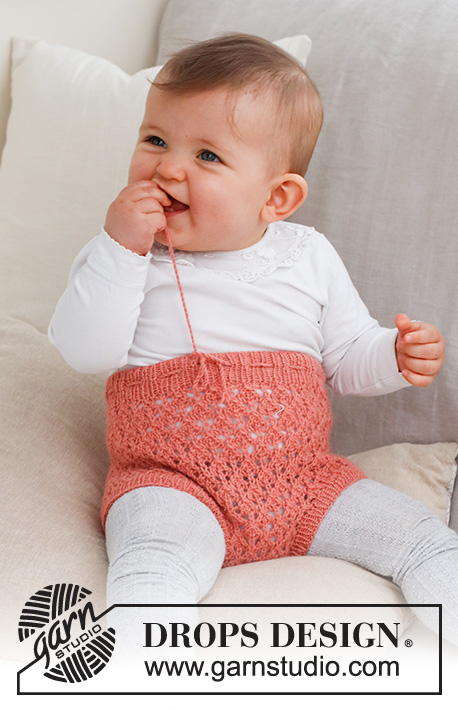
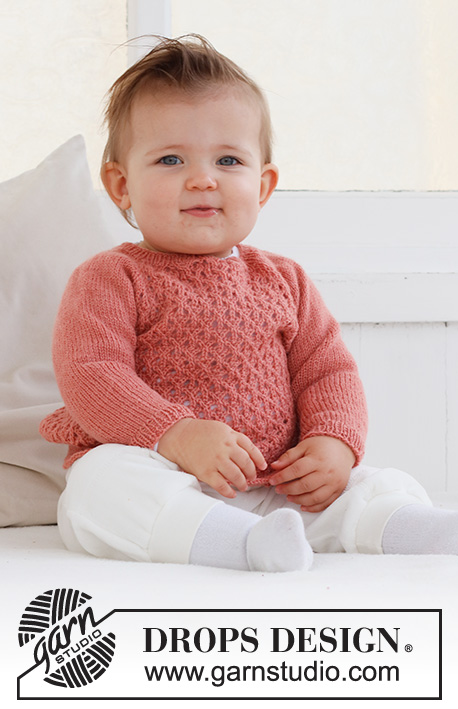
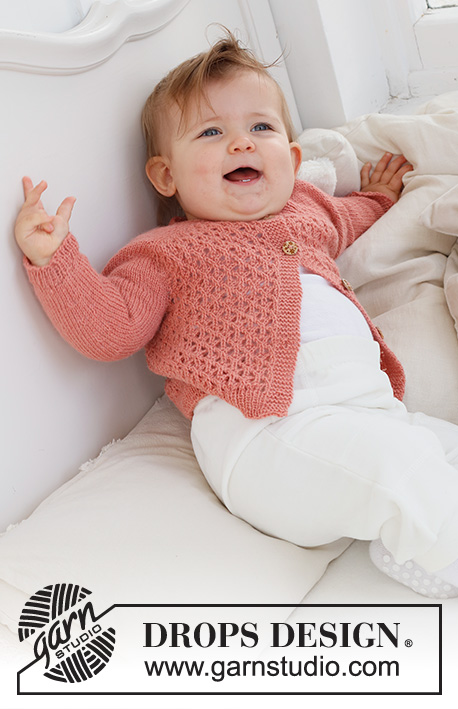
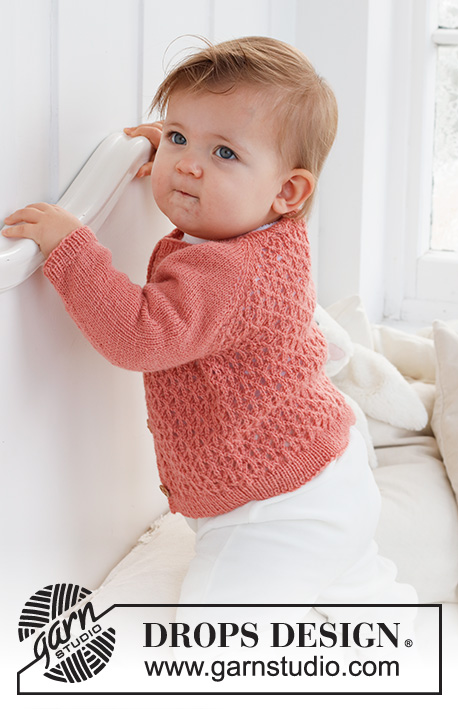
Knitted jacket for baby in DROPS Flora. The piece is worked top down, with raglan and lace pattern. Sizes 0 – 2 years.
DROPS Baby 43-2 |
||||||||||||||||||||||
|
------------------------------------------------------- EXPLANATIONS FOR THE PATTERN: ------------------------------------------------------- RIDGE/GARTER STITCH (worked back and forth): Knit all rows. 1 ridge = knit 2 rows. PATTERN: See diagrams A.1 to A.5. The diagrams show all rows in the pattern from the right side. BUTTONHOLES: Work buttonholes on the right band (when the garment is worn). Work from the right side when there are 4 stitches left on the row as follows: Make 1 yarn over, knit 2 together and knit 2. On the next row (wrong side), knit the yarn over to leave a hole. The first buttonhole is worked right after the neck. Then work the other 4 buttonholes with approx. 4½-4½ 5-5½-6 cm between each one. RAGLAN: All increases are worked from the right side! On the front and back pieces the increases are included in the diagram. Increase as follows on the sleeves: Increase 1 stitch after markers 1 and 3. Knit the marker-stitch, make 1 yarn over. Increase 1 stitch before markers 2 and 4. Work as far as the marker-stitch and make 1 yarn over, knit the marker-stitch. On the next row purl the yarn overs twisted to avoid holes! Repeat this increase every row from the right side a total of 10-12-14-16-17 times. DECREASE TIP (for sleeves): Decrease 1 stitch on either side of the marker as follows: Work until there are 3 stitches left before the marker, knit 2 together, knit 2 (marker sits between these 2 stitches), slip 1 stitch as if to knit, knit 1 and pass the slipped stitch over the knitted stitch. ------------------------------------------------------- START THE PIECE HERE: ------------------------------------------------------- JACKET – SHORT OVERVIEW OF THE PIECE. The neck and yoke are worked back and forth with circular needle, top down. The yoke is divided for body and sleeves and the body continued back and forth with circular needle. The sleeves are worked in the round with double pointed needles. NECK: Cast on 93-93-93-111-111 stitches with circular needle size 2.5 mm and DROPS Flora. Purl 1 row from the wrong side with 6 band stitches in GARTER STITCH – read description above, on each side. Then work rib as follows: 6 band stitches in garter stitch, * knit 1, purl 1 *, work from *-* until there are 7 stitches left, knit 1 and 6 band stitches in garter stitch. Work this rib for 2 cm. Change to circular needle size 3 mm. YOKE: Work the BUTTONHOLE on the right band – read description above! On the first row from the right side insert 4 markers and work as follows: Front piece: 6 band stitches in garter stitch, work A.1, then A.2 0-0-0-1-1 time, A.3. Sleeve: Insert marker 1 in the next stitch, work 12 stitches in stocking stitch and increase 4 stitches evenly over these stitches, insert marker 2 in the next stitch. Back piece: Work A.4, A.2 3-3-3-4-4 times, then A.3. Sleeve: Insert marker 3 in the next stitch, work 12 stitches in stocking stitch and increase 4 stitches evenly over these stitches, insert marker 4 in the next stitch. Front piece: Work A.4, A.2 0-0-0-1-1 time, A.5 and 6 band stitches in garter stitch. Continue this pattern on the next row from right side start to increase for sleeve – read description above. REMEMBER THE KNITTING TENSION! When A.1 to A.5 are completed, work the next row from the right side as follows: 6 band stitches in garter stitch, work A.1, A.2 1-1-1-2-2 times, A.3, work stocking stitch and increase as before over the sleeve as far as marker 2, work A.4, A.2 5-5-5-6-6 times, A.3, work stocking stitch and increase as before over the sleeve as far as marker 4, work A.4, A.2 1-1-1-2-2 times, A.5 and 6 band stitches in garter stitch. Repeat this pattern in height. Each time A.3 and A.4 are repeated in height, there is room for 1 more repeat of A.2 on the front pieces and 2 more repeats on the back piece. When A.3 and A.4 have been worked 2-2-3-3-3 times in height, the increases are finished on the front and back pieces; continue increasing only on the sleeves as explained above. Continue the pattern on the front and back pieces, but without further increases. When all the increases are finished there are 189-197-229-255-259 stitches. Now work pattern as follows: 6 band stitches in garter stitch, A.1 over 7 stitches, A.2 3-3-4-5-5 times, work 37-41-45-49-51 stitches in stocking stitch, A.2 9-9-11-12-12 times, work 37-41-45-49-51 stitches in stocking stitch, A.2 3-3-4-5-5 times, A.5 and 6 band stitches in garter stitch. Continue this pattern. When you work round 5 in A.2 on the back piece, knit the first stitch in the first repeat, the last stitch in the last repeat is worked over the first stitch on the sleeve. When the piece measures 12-13-14-15-16 cm from the cast-on edge, divide for the body and sleeves as follows: 6 band stitches in garter stitch, work 25-25-31-37-37 stitches as before, place the next 37-41-45-49-51 stitches on a thread for the sleeve, cast on 6 stitches under the sleeve, work 54-54-66-72-72 stitches, place the next 37-41-45-49-51 stitches on a thread for the sleeve, cast on 6 stitches under the sleeve, work 24-24-30-36-36 stitches as before and 6 band stitches in garter stitch. BODY: = 127-127-151-169-169 stitches. Continue back and forth as follows: 6 band stitches in garter stitch, work A.1, A.2 until there are 12 stitches left, work A.5 and 6 band stitches in garter stitch. When the piece measures 9-12-13-15-17 cm from the division, increase 20-20-22-26-26 stitches evenly spaced on the next row from the right side (do not increase over the bands) = 147-147-173-195-195 stitches. Change to circular needle size 2.5 mm and work rib from the wrong side as follows: 6 band stitches in garter stitch, * purl 1, knit 1 *, work from *-* until there are 7 stitches left, purl 1 and 6 band stitches in garter stitch. Continue this rib for 3 cm. Cast off. The jacket measures approx. 24-28-30-33-36 cm from the shoulder down. SLEEVES: Place the 37-41-45-49-51 stitches from the thread on the one side of the piece on double pointed needles size 3 mm and knit up 1 stitch in each of the 6 stitches cast on under the sleeve = 43-47-51-55-57 stitches. Insert a marker thread in the middle of the new stitches under the sleeve. Start at the marker and work stocking stitch in the round for 1 cm. Now decrease 2 stitches under the sleeve – read DECREASE TIP. Decrease like this every 2½-2-2-2-2½ cm a total of 3-5-6-7-8 times = 37-37-39-41-41 stitches. When the sleeve measures 10-12-15-16-22 cm from the division increase 5 stitches evenly spaced = 42-42-44-46-46 stitches. Change to double pointed needles size 2.5 mm and work rib (knit 1, purl 1) for 3 cm. Cast off with knit over knit and purl over purl. The sleeve measures approx. 13-15-18-19-25 cm from the division. Work the other sleeve in the same way. ASSEMBLY: Sew the buttons onto the left band. |
||||||||||||||||||||||
Diagram explanations |
||||||||||||||||||||||
|
||||||||||||||||||||||
 |
||||||||||||||||||||||
Have you finished this pattern?Tag your pictures with #dropspattern #cotswoldscardigan or submit them to the #dropsfan gallery. Do you need help with this pattern?You'll find 30 tutorial videos, a Comments/Questions area and more by visiting the pattern on garnstudio.com. © 1982-2025 DROPS Design A/S. We reserve all rights. This document, including all its sub-sections, has copyrights. Read more about what you can do with our patterns at the bottom of each pattern on our site. |
||||||||||||||||||||||


With over 40 years in knitting and crochet design, DROPS Design offers one of the most extensive collections of free patterns on the internet - translated to 17 languages. As of today we count 320 catalogues and 12093 patterns translated into English (UK/cm). 12093
We work hard to bring you the best knitting and crochet have to offer, inspiration and advice as well as great quality yarns at incredible prices! Would you like to use our patterns for other than personal use? You can read what you are allowed to do in the Copyright text at the bottom of all our patterns. Happy crafting!
Post a comment to pattern DROPS Baby 43-2
We would love to hear what you have to say about this pattern!
If you want to leave a question, please make sure you select the correct category in the form below, to speed up the answering process. Required fields are marked *.