
Looking for a yarn?


Comments / Questions (45)
![]() Marie wrote:
Marie wrote:
Les vidéos pour les tours 6,7 etc..... ne fonctionnent pas, pouvez-vous m'aider ? Merci
04.05.2025 - 19:27DROPS Design answered:
Bonjour Marie, essayez de nettoyer le cache, videz les cookies/l'historique etc.. vous devriez pouvoir visualiser toutes les vidéos. Bon crochet!
05.05.2025 - 08:28
![]() Sylvaine Marchand wrote:
Sylvaine Marchand wrote:
Bonjour Je n’ai pas bien saisi quand où comment A2 A3 et A4 Pourriez-vous m’aider? Merci
27.12.2024 - 16:25DROPS Design answered:
Bonjour Mme Marchand, vous commencez les tours par A.2 (cf les mailles en l'air au début de A.1 qui continuent sur A.2), puis vous crochetez 3 fois A.3 (= 3 coins du carré) et vous terminez le tour par A.4 (dernier coin du carré). Bon crochet!
02.01.2025 - 12:28
![]() Marchand Sylvaine wrote:
Marchand Sylvaine wrote:
Bonjour Pourriez-vous me dire combien de pelotes sont nécessaires pour faire le carré uni? Merci pour votre réponse
20.12.2024 - 18:50DROPS Design answered:
Bonjour Mme Marchand, nous n'avons malheureusement que les indications avec les différentes couleurs et n'avons plus le pull - additionnez la totalité des couleurs requises pour votre taille, il vous en faudra peut-être un peu moins. Bon crochet!
02.01.2025 - 09:19
![]() Angelique Jansen wrote:
Angelique Jansen wrote:
Graag wil ik de video bij dit patroon gebruiken alles geprobeerd maar krijg er geen geluid bij
21.07.2024 - 20:34DROPS Design answered:
Dag Angelique,
Dat klopt, er zit inderdaad geen geluid bij onze video's, omdat de video's in heel Europa bekeken worden. Er zit alleen begeleidende tekst bij.
22.07.2024 - 21:13
![]() Linda Mortis wrote:
Linda Mortis wrote:
I am attempting to do the sleeves now it’s going well but I don’t understand how to decrease from the written instructions, a video on how to do this would be very helpful, the other videos for this top have been so good. Please can you do a video for the decrease of the sleeve or talk me through it please. Thank you
19.07.2022 - 20:23DROPS Design answered:
Dear Linda, there is no video for the sleeves. To decrease, you can see the video: https://www.garnstudio.com/video.php?id=27&lang=en. This explains how to work decrease. The rows with decreases are the rows that include triple treble crochets. So, at the beginning and end of these rows, you work 2 triple treble crochets together. Happy crocheting!
20.07.2022 - 17:04
![]() Karin wrote:
Karin wrote:
Hallo, ik ben nu met de 5e toer bezig in een andere kleur.. Volgens mij is het patroon anders bij het filmpje.. Ik heb losse opgezet, 5 dubbele stokjes 1 losse.. dan moet je 6 dubbele stokjes doen in de grote lus.. volgens mij staan er op het patroon losse tussen de steken.. op het filmpje zie ik dit niet terug
29.11.2021 - 12:33DROPS Design answered:
Dag Karin,
Aan het begin van de toer haak je inderdaad 5 lossen en daarna dubbele stokjes met lossen ertussen. Als je goed kijkt is dit ook op het filmpje te zien dat er lossen tussen worden gehaakt.
01.12.2021 - 11:59
![]() Angela wrote:
Angela wrote:
Hallo, ich bin problemlos durch die Beschreibung bis zum dem Teil gekommen, an dem sich die Größen trennen. Ich versuche den Teil zu verstehen, der jetzt nicht mehr als Video zur Verfügung steht, sondern als Beschreibung der Größen L/XL - XXL/XXXL Vorderteil. Bis zum Punkt den Faden abschneiden ist alles i.o. Aber dann?? Was ist bei einem in Runden gearbeiteten Quadrat eine Rückreihe? Ich verstehe den Beginn absolut nicht. Kann mir bitte jemand helfen? Danke und Gruß Angla
04.06.2021 - 13:10DROPS Design answered:
Liebe Angela, dieses Video zeigt wie man die Schulter häkelt, dh die mittleren Maschen werden markiert (= Halsausschnitt = 9 Maschen wie im Video) und mit einer Rückreihe jetzt von der Halsauschnitt (nach diesen 9 Maschen) bis zur Ecke dann an jeder anderen Seite bis zur letzten Ecke vor diesen 9 Maschen wieder). Könnte das Ihnen weiterhelfen?
04.06.2021 - 13:53
![]() Berryl Vogelezang wrote:
Berryl Vogelezang wrote:
Moet ik bij het achterpand van maat L-XL, ook de rij dubbelestokjes voor de schouder haken? Als ik naar de tekenin met de afmetingen kijk lijkt het van wel. Als ik de beschrijving lees zie ik het niet terug. Daarom de twijfel én de vraag. Dank alvast.
08.06.2020 - 22:07DROPS Design answered:
Dag Berryl,
Als je klaar bent met A.7/A8, dan ga je verder met; 'MAAT L/XL (schouder)' en haak je inderdaad 1 dubbel stokje in ieder stokje van de vorige toer.
11.06.2020 - 14:16
![]() Eva wrote:
Eva wrote:
Porqué hace ondas el cuadrado? No esta estirado como en vuestro video. Estoy utilizando Nepal y aguja del 5. Gracias!!
22.09.2018 - 10:32DROPS Design answered:
Hola Eva, ya he respondido a tu anterior comentario, puedes ver la respuesta debajo.
29.09.2018 - 20:41
![]() Eva wrote:
Eva wrote:
Porque me hace ondas el cuadrado?? Estoy utilizando nepal y aguja del 5
22.09.2018 - 10:28DROPS Design answered:
Hola Eva, el cuadrado te forma ondas cuando la tensión no es correcta. Es muy importante mantener la tensión del tejido uniforme en el patrón. Si tienes problemas con la tensión de la labor, puedes probar con diferentes agujas hasta encontrar la adecuada para tu tensión personal.
29.09.2018 - 20:36
|
||||||||||||||||||||||||||||||||||||||||||||||||||||
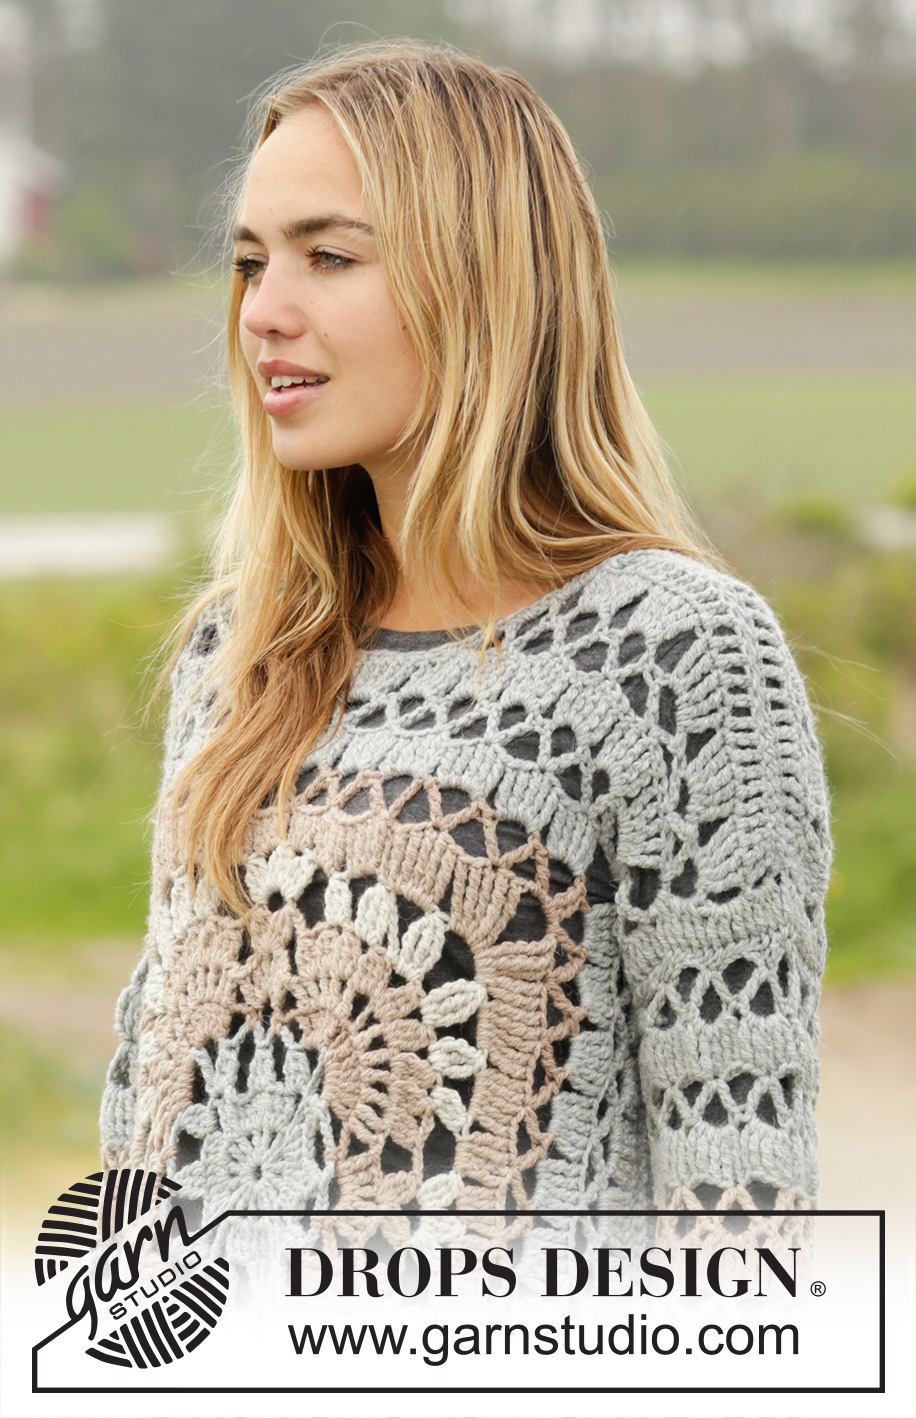
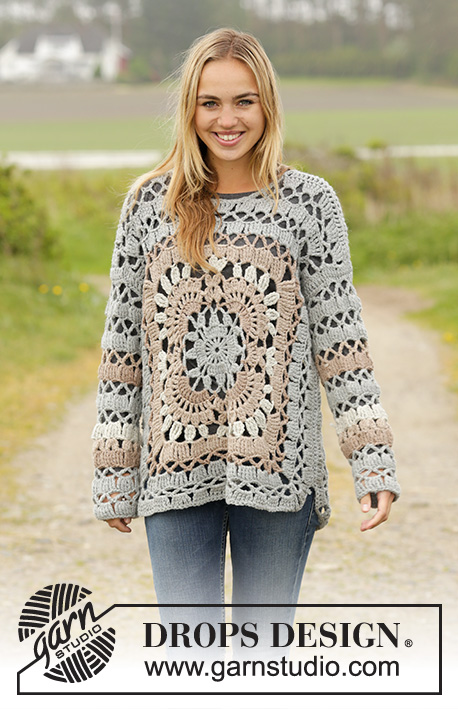
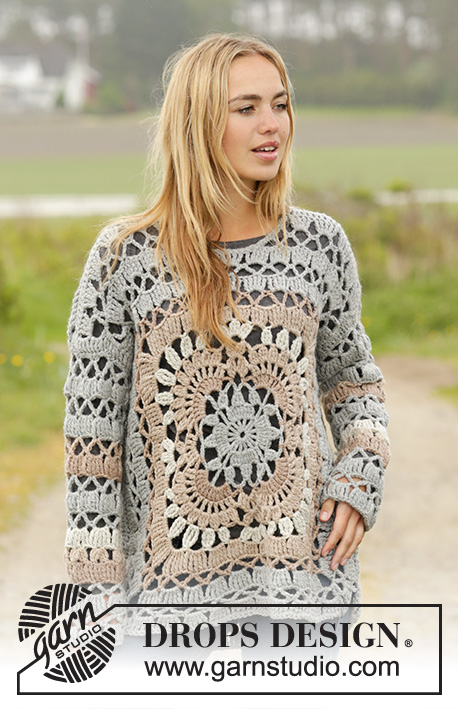
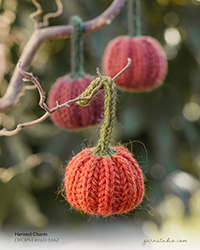
Harvest Love#harvestlovesweater |
||||||||||||||||||||||||||||||||||||||||||||||||||||
 |
 |
|||||||||||||||||||||||||||||||||||||||||||||||||||
Crochet DROPS jumper with crochet squares and lace pattern in ”Nepal”. Size: S - XXXL.
DROPS 171-35 |
||||||||||||||||||||||||||||||||||||||||||||||||||||
|
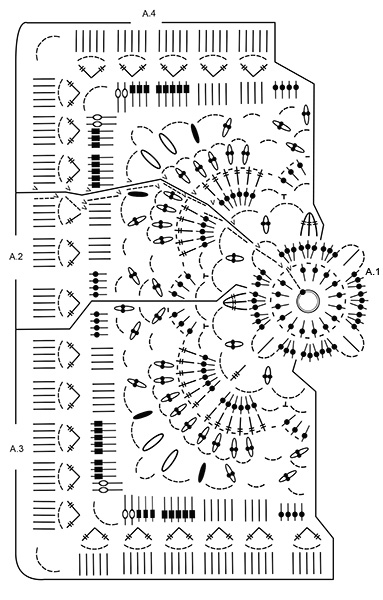
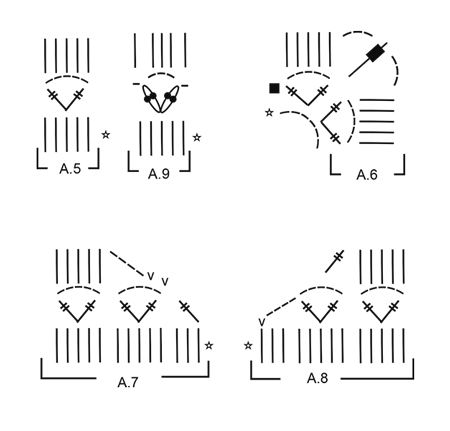
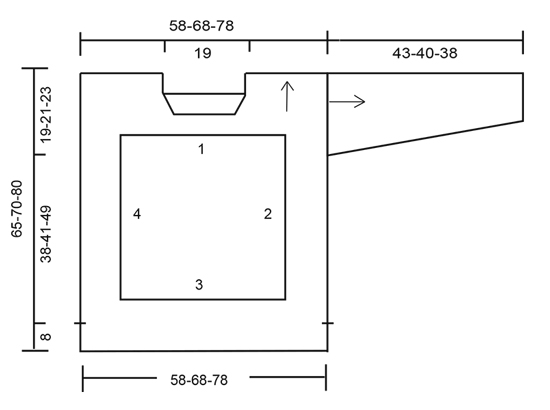
US/UK: This pattern is in US English. There are different crochet terms in British and US English. Conversion - see page 4. PATTERN: See diagrams A.1 to A.9. COLORS-1 (front/back piece): Rounds 1-3: gray Round 4: camel Rounds 5-6: beige Round 7: light gray Round 8: beige Round 9: camel Round 10: gray Then work with gray. COLORS-2 (sleeves): Work with gray to and with 5th-3rd-3rd round. Then 1 round beige, 1 round camel, 3 rounds gray, 1 round light gray, 1 round beige and 1 round camel. Continue with gray. CROCHET INFO-1: Replace first tr at beg of every tr round/row with 4 ch. Finish round with 1 sl st in 4th ch. Replace first dtr at beg of every dtr round/row with 5 ch. Finish round with 1 sl st in 5th ch, work sl sts until beg of next tr. CROCHET INFO-2 (applies to shoulder): At beg of every row with tr work ch 4, finish row with 1 tr in last dtr on row. Beg every row with dtr with ch 5, finish row with 1 dtr in last tr on row. DECREASE TIP: Work 1 dtr but wait with last pull through (= 2 sts on hook), then work next dtr but on last pull through, pull yarn through all sts on hook = 1 dc dec. TR TOG: 3 tr tog into 1 tr as follows: Work 1 tr but wait with last YO and pull through, work 1 more tr the same way, work 1 tr more but now pull last YO through all sts on hook. DTR TOG: Work 3 dtr into 1 dtr as follows: Work 1 dtr but wait with last YO and pull through, work 1 more dtr the same way, work 1 dtr more but now pull last YO through all sts on hook. 5-TR: Make 5 YOs on hook, get the yarn under ch-space, * 1 YO on hook, pull yarn through the next 2 sts on hook *, repeat from *-* 5 more times = 1 st on hook. 4-TR: Make 4 YOs on hook, get the yarn under ch-space, * 1 YO on hook, pull yarn through the next 2 sts on hook *, repeat from *-* 4 more times = 1 st on hook. 4-TR TOG: Work 3 4-tr into 1 4-tr as follows: ** Make 4 YOs on hook, get the yarn under ch-space, * 1 YO on hook, pull yarn through the next 2 sts on hook *, repeat from *-* 3 more times, **, repeat from **-** 2 more times (= 4 sts on hook), 1 YO on hook, pull through all sts = 1 st on hook. ---------------------------------------------------------- FRONT PIECE: First work a square the same way in all sizes. Then work in the round and back and forth on square (different in the different sizes). SQUARE: Work 6 ch on hook SIZE 5.5 mm/US 9 with gray and form a ring with 1 sl st in first ch. Continue in the round according to diagram A.1 - READ CROCHET INFO-1 and COLORS-1. Then work A.2, A.3 3 times in total in width, finish with A.4. REMEMBER THE CROCHET GAUGE! When A.2-A.4 have been worked, there are 55 dtr along each side, and 4 corner spaces. Square measures approx. 48 x 48 cm / 19" x 19". SIZE S/M: Then work in the round according to A.5 over dtr along each side, around each corner space work A.6. When A.5/A.6 have been worked, 10 dtr have been inc along each side (= 65 dtr). Cut the yarn. Now work left shoulder along side-1 (see chart) beg from WS as follows: The middle 9 dtr are no longer worked (= neck). Beg to work in next dtr as follows: Work A.8 over the first 13 dtr, A.5 the entire row as before, around corner space work A.5 (tr on 1st row in A.5 work around ch-space). When A.5 has been worked vertically, work 1 row as follows: Work 1 tr in each dtr Cut the yarn. Now work right shoulder along the end of side 1, beg from corner from WS: - READ CROCHET INFO-2. Work A.5 over ch-space, A.5 until 13 dtr remain before neck (= 9 dtr), work A.7 over the next 13 dtr. When A.5 has been worked vertically, work 1 row with 1 tr in every dtr. Fasten off. SIZE L/XL - XXL/XXXL: Then work in the round according to A.5 over dtr along each side, around each corner space work A.6. When A.5/A.6 have been worked, 10 dtr have been inc along each side (= 65 dtr). Cut the yarn. Now work back and forth along the end of side 1 (see chart), then work along side 2, 3, 4 and beg of side1 beg from WS as follows: The middle 9 dtr are no longer worked (= neck). Beg to work in next dtr as follows: Work A.8 over the first 13 dtr, A.5 the rest of row as before, then work A.6 around the corners and A.5 along the sides as before - work like this back and forth to and with last corner (i.e. along side 2, 3 and 4), then work along the beg of side 1 as follows: A.5 until 13 dtr remain before neck (= 9 dtr), work A.7 over the next 13 dtr. When A.7/A.8 have been worked vertically, there are 75 dtr along side 2, 3 and 4, and 25 dtr on each side of neck. Now work differently in the different sizes. SIZE L/XL (shoulder): Now work left shoulder, from WS as follows: - READ CROCHET INFO-2. Work 1 tr in every dtr the rest of row on side 1, around first ch-space in corner space work 5 tr. Fasten off. Work right shoulder the same way, but beg around corner space at beg of side 1 from WS. Size XXL/XXXL: Next row beg from WS. Work A.5 over A.8, continue A.5 along side 1, 2, 3, 4 and 1 and A.6 around corners as before, finish with A.5 over A.7. When A.5/A.6 have been worked 1 time vertically, work shoulder the same way as in size L/XL, fasten off. BACK PIECE: Work the same way as front piece but without dec for neck, i.e. work A.5 over all sts along side 1 (instead of A.7/neck/A.8). ASSEMBLY: Sew shoulder seams in outer loops of edge stss. Sew side seam as follows: Beg approx. 8 cm / 3⅛" from bottom edge (= vent), and sew up to approx. 19-21-23 cm / 7½"-8¼"-9" remain until shoulder (= armhole). SLEEVE: Work in the round from armhole and outwards. Beg from mid under armhole in the side. Work 50-55-60 tr on hook SIZE 5.5 mm/US 9 with gray evenly around armhole (work in/around dtr/ch-space) - READ COLORS-2 and remember CROCHET INFO-1! READ ALL OF SLEEVE BEFORE CONTINUING! Work as follows: Work A.5 (= 10-11-12 repetitions in width). Continue in the round until 5-4-4 repetitions have been worked vertically, then work A.9 over A.5 1 time in total vertically, and A.5 over A.9 2 times in total vertically, then size L/XL work 1 round with 1 tr in every dtr. AT THE SAME TIME dec 5 dtr evenly on round with dtr (= 1 repetition less on every round with dec) as follows: SIZE S/M: 5th, 7th and 13th round. SIZE L/XL-XXL/XXXL: 5th, 7th, 11th and 13th round. When all dec are done, there are 35-35-40 dtr on round (= 7-7-8 repetitions in width). Fasten off, sleeve measures approx. 43-40-38 cm / 17"-15¾"-15" (shorter measurements in the larger sizes because of wider shoulders). Work another sleeve the same way. NECK EDGE: Work an edge around the neck opening with gray. Start on shoulder and work as follows: * 1 sc around outermost st, ch 2, skip approx. 1½ cm / ½" *, repeat from *-* around the entire opening, finish with 1 sl st in first sc. Fasten off. |
||||||||||||||||||||||||||||||||||||||||||||||||||||
Diagram explanations |
||||||||||||||||||||||||||||||||||||||||||||||||||||
|
||||||||||||||||||||||||||||||||||||||||||||||||||||
 |
||||||||||||||||||||||||||||||||||||||||||||||||||||
 |
||||||||||||||||||||||||||||||||||||||||||||||||||||
 |
||||||||||||||||||||||||||||||||||||||||||||||||||||
Have you finished this pattern?Tag your pictures with #dropspattern #harvestlovesweater or submit them to the #dropsfan gallery. Do you need help with this pattern?You'll find 17 tutorial videos, a Comments/Questions area and more by visiting the pattern on garnstudio.com. © 1982-2025 DROPS Design A/S. We reserve all rights. This document, including all its sub-sections, has copyrights. Read more about what you can do with our patterns at the bottom of each pattern on our site. |
||||||||||||||||||||||||||||||||||||||||||||||||||||


With over 40 years in knitting and crochet design, DROPS Design offers one of the most extensive collections of free patterns on the internet - translated to 17 languages. As of today we count 319 catalogs and 12042 patterns - 12032 of which are translated into English (US/in).
We work hard to bring you the best knitting and crochet have to offer, inspiration and advice as well as great quality yarns at incredible prices! Would you like to use our patterns for other than personal use? You can read what you are allowed to do in the Copyright text at the bottom of all our patterns. Happy crafting!
Post a comment to pattern DROPS 171-35
We would love to hear what you have to say about this pattern!
If you want to leave a question, please make sure you select the correct category in the form below, to speed up the answering process. Required fields are marked *.