
Looking for a yarn?


Comments / Questions (26)
![]() Catherine wrote:
Catherine wrote:
Info importante peut-être : mes questions apparaissent enfin ! j'ai changé de navigateur , avec mozilla firefox tout est ok ! avec google chrome rien n'a fonctionné correctement pour que je puisse poser mes questions! bref....je suis pressée d'être aidée! merci
11.11.2024 - 13:29
![]() Catherine wrote:
Catherine wrote:
Suite : "Continuer en tour de B (crocheter 4 B dans l'arceau au tour suivant) " : à ce moment là du travail, est-ce que l'arceau dont vous parlez est bien le trou créé pour le pouce? Doit-on d'abord finir la mitaine et ensuite retourner avec un autre fil pour finir le pouce?
11.11.2024 - 13:27DROPS Design answered:
Bonjour Catherine, je ne suis pas bien sûre de comprendre; terminez la mitaine en rond comme indiqué (cf aussi réponse ci-dessous). Quand la mitaine est terminée, joignez le fil dans le trou de l'ouverture du pouce (les 4 mailles en l'air + les 4 brides + la bride de chaque côté) et crochetez 12 brides tout autour de cette ouverture, puis continuez en brides jusqu'à ce que le pouce mesure 2,5 cm environ (ajustez la longueur selon vos envies/besoins). Bon crochet!
11.11.2024 - 16:14
![]() Catherine wrote:
Catherine wrote:
Je comprends mal une indication sur l'ouverture du pouce. "faire 4 ml, sauter 4 B, continuer en B tout le tour" : s'agit-il uniquement du tour de pouce ou du tour complet de la mitaine? "Continuer en tour de B (crocheter 4 B dans l'arceau au tour suivant) " : à ce moment là du travail, est-ce que l'arceau dont vous parlez est - il bien le trou créé pour le pouce?
11.11.2024 - 13:26DROPS Design answered:
Bonjour Catherine, pour former l'ouverture du pouce de la mitaine gauche, vous crochetez les 8 ou 10 premières brides du tour, puis vous crochetez 4 mailles en l'air et vous sautez les 4 brides suivantes (l'ouverture du pouce est formée par ces 4 mailles en l'air + les 4 brides sautées) et vous terminez le tour en brides comme avant jusqu'à la fin du tour. Au tour suivant, crochetez 1 bride dans chaque bride + 4 brides dans l'arceau de 4 mailles en l'air . Continuez en brides jusqu'à 6-7 cm après les carrés, puis crochetez en ms pendant 1,5 cm environ. Bon crochet!
11.11.2024 - 16:12
![]() Catherine wrote:
Catherine wrote:
Et comme j\'insiste pour que vous ayez mes questions, voilà ce qui se passe maintenant : \"Désolé ! Vous êtes un spammeur ou vous avez fait trop de commentaires en peu de temps. Veuillez réessayer plus tard !\"
10.11.2024 - 19:19
![]() Catherine wrote:
Catherine wrote:
Aie !! j'allais continuer mes questions et j'ai un message qui dit "commentaire trop long" alors que c'était une question et que j'ai respecté le nombre de caractères!! il faut que je vous réécrive ma 1ere question où l'avez vous reçu???
10.11.2024 - 19:07DROPS Design answered:
Bonjour Catherine, votre question n'est effectivement pas passée, essayez de synthétiser ou, si vous avez différentes questions, de les poser en plusieurs fois pour respecter le nombre de caractères maximum. Merci pour votre compréhension.
11.11.2024 - 09:42
![]() Vaihere wrote:
Vaihere wrote:
Modèle très simple et rapide à réaliser.
05.04.2020 - 01:21Maria Leticia Lopez wrote:
Estan muy bonito el modelo, me gusto para regalo ... junto con el gorro y el cuello, preciosos.
25.10.2018 - 20:00
![]() Breways wrote:
Breways wrote:
Super modèle, facile à réaliser, j'ai du modifier légèrement le carré car mon fil employé était un peu trop épais et cela donne vraiment chouette ! J'adoooore..
31.10.2016 - 08:08
![]() Laura wrote:
Laura wrote:
Buongiorno, posso sapere quanti colori servono? Non capisco...parlate solo di 3 colori ma nella foto sembrano molti di più...grazie
18.01.2016 - 14:52DROPS Design answered:
Buonasera Laura, il filato indicato in questo modello è DROPS Delight nel colore n° 10: è un colore solo, la matassa ha diverse sfumature, qui può vedere le diverse sfumature di colore di DROPS Delight. Buon lavoro!
18.01.2016 - 21:36
![]() GMKillingley wrote:
GMKillingley wrote:
How is it possible that this pattern is for sale on e-bay; £3.95 from theknittingbazaar
06.12.2013 - 15:34
|
|
Magic Gloves#magicgloves |
|
|
|
|
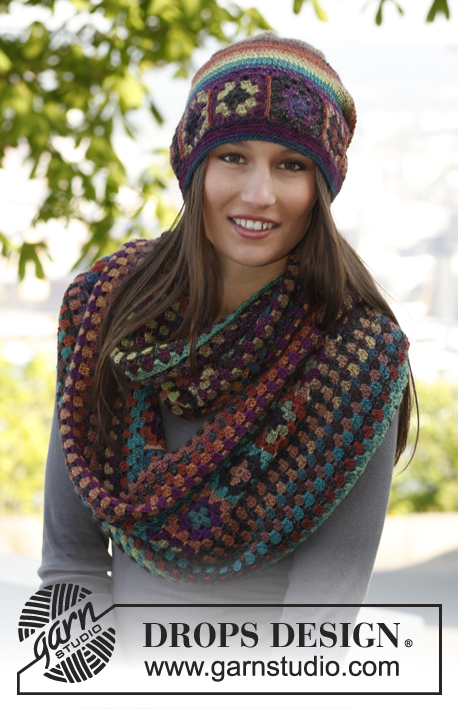
Crochet DROPS wrist warmers with squares in ”Delight”.
DROPS 143-41 |
|
|
ROUNDS WITH DC: Beg every round with dc with 3 ch (= 1st dc), finish round with 1 sl st in 3rd ch from beg of round. COLOR CHANGE: To get a nice color change work last sl st on round with the new thread. Continue on to next round with the new thread. ROUNDS WITH SC: Beg every round with sc with 1 ch (not counted as 1st sc) - NOTE! Work sc in back loop of every sc, finish with 1 sl st in 1st sc. -------------------------------------------------------- SQUARE: Ch 6 with Delight on hook size 3.5 mm/E/4 and form a ring with 1 sl st in 1st ch. Read ROUNDS WITH DC. ROUND 1: * Work 3 dc in ch-ring, ch 3 *, repeat from *-* a total of 4 times = 12 dc and 4 ch-spaces. Sl sts until next ch-space, cut the thread and switch to another color of the same ball (= new color each round) - READ COLOR CHANGE. ROUND 2: In every ch-space work as follows: 3 dc, ch 3 and 3 dc, 1 ch = 24 dc and 8 ch-spaces. Sl sts until next ch-space, cut the thread and switch to another color of the same ball. ROUND 3: * In next ch-space work as follows: 3 dc, 3 ch and 3 dc (= corner), ch 1, in next ch-space work 3 dc, 1 ch *, repeat from *-* the entire round = 36 dc and 12 ch-spaces. Cut and fasten the thread. Work a total of 3 squares. Work squares tog into 1 strip as follows: Place 2 and 2 squares on top of each other, insert hook through ch-space in the corner on both squares, ch 1 and 1 sc, * ch 3, 1 sc in next ch-space on both squares *, repeat from *-*, cut and fasten the thread. Work the ends of the strip tog the same way to form a ring. LEFT WRIST WARMER: Worked in the round - NOTE! Beg every round with ch 3 (= 1st dc). Work along one side of strip with squares as follows: SIZE S/M: In each of the 4 ch-spaces on every square work 3 dc = 36 dc. SIZE L/XL: In each of the 4 ch-spaces on every square work 3 dc - AT THE SAME TIME inc 4 sts evenly = 40 dc. All sizes: = 36-40 dc. Then work ROUNDS WITH DC - read explanation above - until piece measures 5-6 cm / 2"-2⅜" from strip = (bottom part of wrist warmer), cut and fasten the thread. Repeat the same way on the other side of strip with squares (= upper part of wrist warmer), but work an opening for thumb when piece measures approx. 2½-3 cm / ⅞"-1⅛"" from strip as follows: Work 8-10 dc, then ch 4, skip 4 dc, continue with dc the entire round. Continue with round with dc (work 4 dc in ch-space on next round) until piece measures 6-7 cm / 2⅜"-2¾" from strip with squares. Then work ROUNDS WITH SC - read explanation above. Cut and fasten the thread when edge in sc measures approx. 1½ cm / ½". Piece measures approx. 19-21 cm / 7½"-8¼" in length. THUMB: Worked in the round as follows: Work 12 dc along the entire opening (1st dc = 3 ch), finish with 1 sl st in 1st dc. Then work rounds with dc until thumb measures approx. 2½ cm / ⅞", cut and fasten the thread. RIGHT WRIST WARMER: Work the same way as on left wrist warmer but reversed - i.e. round with opening for thumb is worked when 12-14 dc remain, then ch 4, skip 4 dc, work the remaining 8-10 dc on round. |
|
Have you finished this pattern?Tag your pictures with #dropspattern #magicgloves or submit them to the #dropsfan gallery. Do you need help with this pattern?You'll find 5 tutorial videos, a Comments/Questions area and more by visiting the pattern on garnstudio.com. © 1982-2025 DROPS Design A/S. We reserve all rights. This document, including all its sub-sections, has copyrights. Read more about what you can do with our patterns at the bottom of each pattern on our site. |


With over 40 years in knitting and crochet design, DROPS Design offers one of the most extensive collections of free patterns on the internet - translated to 17 languages. As of today we count 319 catalogs and 11897 patterns - 11887 of which are translated into English (US/in).
We work hard to bring you the best knitting and crochet have to offer, inspiration and advice as well as great quality yarns at incredible prices! Would you like to use our patterns for other than personal use? You can read what you are allowed to do in the Copyright text at the bottom of all our patterns. Happy crafting!
Post a comment to pattern DROPS 143-41
We would love to hear what you have to say about this pattern!
If you want to leave a question, please make sure you select the correct category in the form below, to speed up the answering process. Required fields are marked *.