Comments / Questions (165)
![]() Virginia wrote:
Virginia wrote:
Hi. I think you answered this n French- but just checking- the instructions for joining the granny squares for the hat don’t match the picture. I am confused. Please confirm if we should join using the slip stitch method. Then the hat would measure approx 6.5 cm * 8=52 cm in the granny square band. Thank you!
22.04.2025 - 15:25DROPS Design answered:
Dear Virginia, you can use any technique you'd like to join squares, but here we didn't use the slip stitch technique but as explained at the end of section "squares" just before hat description. Happy crocheting!
22.04.2025 - 17:25
![]() Antonini Brigitte wrote:
Antonini Brigitte wrote:
Rébonjour je suis au début de l écharpe Sur la chaînette au début y a t il 1 ou 3 brides dans chaque maille de chaînette et sautez vous Des mailles de chaînette et combien Merci
29.08.2023 - 18:43DROPS Design answered:
Bonjour Mme Antonini, on ne monte pas de chaînette pour le tour de cou, on crochète des carrés que l'on assemble en une bande vrillée, puis on va crocheter le long des bords extérieurs des carrés (3 brides dans chaque arceau de chacun des carrés, avec 1 ml entre chaque groupe de 3 brides). Mais j'ai peut-être mal compris votre question, si tel est le cas, n'hésitez pas à préciser, merci d'avance pour votre compréhension.Bon crochet!
30.08.2023 - 08:03
![]() Antonini Brigitte wrote:
Antonini Brigitte wrote:
Bjr Je ne vois pas si on doit faire une bride ou 3 dans chaque maille de chaînette et ce n est pas indiqué merci pour votre réponse
29.08.2023 - 18:19
![]() Antonini Brigitte wrote:
Antonini Brigitte wrote:
Bjr Je ne vois pas si on doit faire une bride ou 3 dans chaque maille de chaînette et ce n est pas indiqué
29.08.2023 - 18:17DROPS Design answered:
Bonjour Mme Antonini, à quel niveau exact du bonnet ou du tour de cou en êtes vous? Merci d'avance pour vos précisions.
30.08.2023 - 07:59
![]() Dominiqhe wrote:
Dominiqhe wrote:
Je ne comprends pas comment faire l'assemblage de la bande TOUR DU COU. La torsion de la bande et ' travaille en même temps en haut et en bas. avez vous une vidéo pour cette partie de l'explication du tour du cou?
21.09.2022 - 18:06DROPS Design answered:
Bonjour Dominique, lors de l'assemblage des carrés, vous avez dû tourner la bande de carrés 1 fois pour coudre le carré de l'extrémité non pas pour former un anneau mais pour former un 8 (retournez simplement la bande et cousez les extrémités entre elles), vous allez continuer ensuite à crocheter tout autour de ce 8 et la forme va se faire automatiquement. Bon crochet!
22.09.2022 - 09:34
![]() Mirella Curcio wrote:
Mirella Curcio wrote:
Buongiorno , volendo fare lo scaldacollo meno lungo , quante lana ci vorrebbe ? Grazie
04.11.2021 - 08:21DROPS Design answered:
Buonasera Mirella, per un'assistenza così personalizzata può rivolgersi al suo rivenditore DROPS di fiducia. Buon lavoro!
04.11.2021 - 23:30
![]() Daphne wrote:
Daphne wrote:
Een mooi patroon. Ik snap alleen niet hoe je met dezelfde bol met een nieuwe kleur moet beginnen; als je het afknipt en zoekt naar de nieuwe kleur dan weer afknipt dan hou je toch allemaal stukjes draad over? Wat doe je daar dan mee?
18.08.2021 - 19:02DROPS Design answered:
Dag Daphne,
Ja, dat klopt, je houd inderdaad draadjes over. Je kunt dit ook negeren en doorhaken en dan gewoon kijken wat voor effect het op de kleurstelling heeft.
17.09.2021 - 11:11
![]() Sunny wrote:
Sunny wrote:
Hello! Likelymore.com sells this and other DropsDesign patterns as their products.
18.11.2019 - 20:26
![]() Carolin wrote:
Carolin wrote:
Hallo, diese Website (couleurdream.com) benutzt eines Ihrer Bilder zu u.a. dieser Mütze. Legal ist das wohl nicht!
26.09.2019 - 12:54
![]() Margje wrote:
Margje wrote:
Hallo, allereerst vind ik het echt een super leuk design. Graag wil ik aan het patroon beginnen maar ik snap het een en ander niet helemaal. Met stk. bedoelen jullie daar nou een stokje mee of een steek? En hoe moet ik het patroon lezen als ik hem met vasten wil halen? Er staat namelijk toer met stk of toer met V.in het patroon wordt alleen zover ik kan lezen verwezen naar die met de stk. Wellicht dat ik te moeilijk denk, maar wil graag goed starten. Alvast bedankt voor de reactie, groet Margje
15.12.2018 - 22:51
Magic#magicset |
|
 |
 |
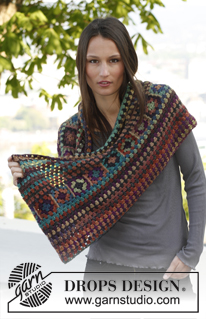
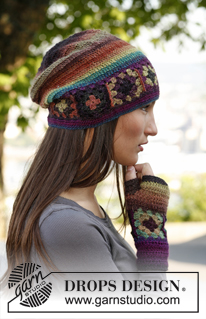
Crochet DROPS moebius neck warmer and hat with squares in ”Delight”.
DROPS 143-40 |
|
|
NECK WARMER: ROUNDS WITH DC: Beg every round with dc with 3 ch (= 1st dc), finish round with 1 sl st in 3rd ch from beg of round. COLOR CHANGE: To get a nice color change work last sl st on round with the new thread. Continue on to next round with the new thread. -------------------------------------------------------- SQUARE: Ch 6 with Delight on hook size 3.5 mmE/4 and form a ring with 1 sl st in 1st ch. Read ROUNDS WITH DC. ROUND 1: * Work 3 dc in ch-ring, 3 ch *, repeat from *-* a total of 4 times = 12 dc and 4 ch-spaces. Sl sts until next ch-space, cut the thread and switch to another color of the same ball (= new color each round) - READ COLOR CHANGE. ROUND 2: In every ch-space work as follows: 3 dc, 3 ch and 3 dc, 1 ch = 24 dc and 8 ch-spaces. Sl sts until next ch-space, cut the thread and switch to another color of the same ball. ROUND 3: * In next ch-space work as follows: 3 dc, 3 ch and 3 dc (= corner), ch 1, in next ch-space work 3 dc, 1 ch *, repeat from *-* the entire round = 36 dc and 12 ch-spaces. Cut and fasten the thread. Work a total of 25 squares. Work squares tog into 1 strip as follows: Place 2 and 2 squares on top of each other, insert hook through ch-space in the corner on both squares, work 1 ch and 1 sc, * ch 3, 1 sc in next ch-space on both squares *, repeat from *-*, cut and fasten the thread. Work the ends of the strip tog the same way to form a ring – NOTE: twist the strip 1 time to form a twisted ring, before working the ends tog. NECK WARMER: Worked from middle of piece = the twisted ring and out towards the outer edges - i.e. work upwards and downwards at the same time. NOTE! Beg every round with 3 ch (= 1st dc). Work 1st round along the strip as follows: In each of the 4 ch-spaces on every square work 3 dc and ch 1, finish round with 1 sl st in 3rd ch from beg of round (= 1st dc), sl st until next ch-space. Continue to work as follows: In every ch-space work 3 dc, ch 1, finish round with 1 sl st in 3rd ch from beg of round (= 1st dc), sl st until next ch-space. Continue like this until neck warmer measures approx. 36 cm / 14¼" vertically (the entire piece, not just from the middle and outwards). Cut and fasten the thread. -------------------------------------------------------- HAT: ROUNDS WITH DC: Beg every round with dc with 3 ch (= 1st dc), finish round with 1 sl st in 3rd ch from beg of round. DECREASE TIP 1: Dec 1 dc by working the next 2 dc tog as follows: Work 1 dc but wait with last pull through (= 2 sts on hook), work next dc but on last pull through, pull thread through all 3 sts on hook. ROUNDS WITH SC: Beg every round with sc with 1 ch (not counted as 1st sc) - NOTE! Work sc in back loop of every sc, finish with 1 sl st in 1st sc. DECREASE TIP 2: Dec 1 sc by working 2 sc tog as follows: * Insert hook in back loop of next sc, get thread *, repeat from *-* one more time, make 1 YO and pull thread through all 3 sts on hook. COLOR CHANGE: To get a nice color change work last sl st on round with the new thread. Continue on to next round with the new thread. -------------------------------------------------------- SQUARE: Ch 6 with Delight on hook size 3.5 mm/E/4 and form a ring with 1 sl st in 1st ch. Read ROUNDS WITH DC. ROUND 1: * Work 3 dc in ch-ring, 3 ch *, repeat from *-* a total of 4 times = 12 dc and 4 ch-spaces. Sl sts until next ch-space, cut the thread and switch to another color of the same ball (= new color each round) - READ COLOR CHANGE. ROUND 2: In every ch-space work as follows: 3 dc, 3 ch and 3 dc, 1 ch = 24 dc and 8 ch-spaces. Sl sts until next ch-space, cut the thread and switch to another color of the same ball. ROUND 3: * In next ch-space work as follows: 3 dc, 3 ch and 3 dc (= corner), ch 1, in next ch-space work 3 dc, 1 ch *, repeat from *-* the entire round = 36 dc and 12 ch-spaces. Cut and fasten the thread. Work a total of 8-9 squares. Work squares tog into 1 strip as follows: Place 2 and 2 squares on top of each other, insert hook through ch-space in the corner on both squares, work 1 ch and 1 sc, * ch 3, 1 sc in next ch-space on both squares *, repeat from *-*, cut and fasten the thread. Work the ends of the strip tog the same way to form a ring. HAT: Worked in the round. Work along one side of strip as follows: In each of the 4 ch-spaces on every square work 3 dc, finish with 1 sl st in 3rd ch (= 1st dc) from beg of round = 96-108 dc. Then work ROUNDS WITH DC - read explanation above - as follows: 3 ch (= 1st dc), skip 1st dc from previous round, 1 dc in every dc, finish round with 1 sl st in 3rd ch from beg of round. Continue until hat measures approx. 16 cm / 6¼" from bottom edge. Then dec as follows: ROUND 1: * 1 dc in each of the next 6-7 dc, dec 1 dc - READ DECREASE TIP 1 *, repeat from *-* the entire round = 84-96 dc (= 12 sts dec). ROUND 2: * 1 dc in each of the next 5-6 dc, dec 1 dc *, repeat from *-* the entire round = 72-84 dc. ROUND 3: * 1 dc in each of the next 4-5 dc, dec 1 dc *, repeat from *-* the entire round = 60-72 dc. ROUND 4: * 1 dc in each of the next 3-4 dc, dec 1 dc *, repeat from *-* the entire round = 48-60 dc. ROUND 5: * 1 dc in each of the next 2-3 dc, dec 1 dc *, repeat from *-* the entire round = 36-48 dc. ROUND 6: * 1 dc in each of the next 1-2 dc, dec 1 dc *, repeat from *-* the entire round = 24-36 dc. SIZE S/M: Work all dc on round tog 2 by 2 = 12 dc, cut the thread and sew the last dc tog with thread end. SIZE L/XL: ROUND 7: * 1 dc in next dc, dec 1 dc *, repeat from *-* the entire round = 24 dc. ROUND 8: Work all dc on round tog 2 by 2 = 12 dc, cut the thread and sew the last dc tog with thread end. EDGE: Work an edge along bottom edge of hat (along the other side of strip with squares) as follows: Work ch 1, in each of the 4 ch-spaces on every square work 4 sc = 128-144 sc, finish with 1 sl st in 1st sc from beg of round. Then work ROUNDS WITH SC - read explanation above. When edge measures approx. 1 cm / ½", dec 16-20 sc evenly on round - READ DECREASE TIP 2 = 112-124 sc. Continue until edge measures approx. 2 cm / ¾", cut and fasten the thread. The hat measures approx. 24-25 cm / 9½"-9¾" vertically. |
|
Have you finished this pattern?Tag your pictures with #dropspattern #magicset or submit them to the #dropsfan gallery. Do you need help with this pattern?You'll find 8 tutorial videos, a Comments/Questions area and more by visiting the pattern on garnstudio.com. © 1982-2025 DROPS Design A/S. We reserve all rights. This document, including all its sub-sections, has copyrights. Read more about what you can do with our patterns at the bottom of each pattern on our site. |
|






Post a comment to pattern DROPS 143-40
We would love to hear what you have to say about this pattern!
If you want to leave a question, please make sure you select the correct category in the form below, to speed up the answering process. Required fields are marked *.