
Popular categories
Looking for a yarn?


Comments / Questions (12)
![]() Carolynn wrote:
Carolynn wrote:
Hi there! I’m starting the front piece and the pattern calls for 1 edge stitch in garter stitch for the 1st and last stitch. What is an edge stitch? Slip stitch purl wise the first stitch and then Knit the last stitch of every row ? Please advise Thank you!
02.12.2022 - 13:58DROPS Design answered:
Dear Carolyn, we work here in stocking stitch with 1 stitch in garter stitch on each side, this means the first and last stitch will be knitted on every row, while the stitches in between will be knitted from right side and purled from wrong side (see video) - This jumper was a knitalong for some years, you can find more pictures here. Happy knitting!
02.12.2022 - 15:14
![]() Linda wrote:
Linda wrote:
Hei. Kan man gjøre denne til rundfelling? Hvordan gjør jeg det eventuelt?
29.11.2022 - 00:34DROPS Design answered:
Hej Linda, den er med raglan og der er taget 2 masker ind ved hver overgang, ialt 8 masker for hver 2.omgang. Det kan du altid følge... Eller så finder du en bluse i Snow med rundfelling og strikker nissen på maven :)
30.11.2022 - 15:27
![]() Sigrid Agathos wrote:
Sigrid Agathos wrote:
Guten Tag, können Sie mir bitte sagen in welchem Material der Pullover auf den Fotos gestrickt ist - Drops Air oder Nepal? Vielen Dank!
17.10.2022 - 11:50DROPS Design answered:
Liebe Frau Agathos, der Pullover auf dem Foto wurde mit Air gestrickt. Viel Spaß beim stricken!
18.10.2022 - 09:00
![]() Nati wrote:
Nati wrote:
Hola, me encanta hacer Jerseys de Navidad para mis nietos, el año pasado no hubo uno nuevo y ya he hecho.todos. este año habra?
24.07.2021 - 17:07
![]() Maligno wrote:
Maligno wrote:
Bonjour Je fais la taille 3’4 ans j ai presque terminé les diminutions du raglan.le chapeau du père Noël n est pas encore terminé , je suis perturbé car on me demande de mettre en attente les mailles pour l encolure .je suis un peu perdue.pourriez vous svp me renseigner.merci je vous souhaite bonne réception. Josee
17.12.2020 - 13:53DROPS Design answered:
Bonjour Mme Maligno, ce modèle avait fait l'objet d'un DROPS-Along, vous pourez trouver les photos de la réalisation du devant ici, en espérant que ceci puisse vous aider - pensez aussi bien vérifier votre tension en largeur autant qu'en hauteur. Bon tricot!
17.12.2020 - 17:02
![]() Nati Retana wrote:
Nati Retana wrote:
Buenos días, yo todos los años le hago un jersey de Navidad a mi nieto y nieta. Este año no hay patrón nuevo de jersey de Navidad? Gracias.
25.11.2020 - 11:55DROPS Design answered:
Hola Nati, este año no hay patrón nuevo de jersey de Navidad. Puedes hacer otros que estan en nuestra pagina AQUI. Buen trabajo!
25.11.2020 - 16:13
![]() Marimar wrote:
Marimar wrote:
Bonjour, J'adore vos modèles. . ! Je suis toujours impatiente pour le kal de noël ..y en aura t il un cette année ? Merci
16.11.2020 - 16:22DROPS Design answered:
Bonjour et merci beaucoup pour votre message, cette année, nous n'aurons pas de kal de Noël, peut-être l'an prochain? Bon tricot!
17.11.2020 - 11:08
![]() Tikva wrote:
Tikva wrote:
Ich möchte den Pullover in einer Männergröße stricken. Kann man auch dafür bitte eine Anleitung schreiben, in welcher auch die Größe des Santa an die Breite und Höhe des männlichen Pulli angepasst ist? Denn wenn ich jetzt die Größe des Santa von dem Kinderpulli übernehme, verliert sich dieser auf dem Männerpulli..
03.11.2020 - 08:01DROPS Design answered:
Liebe Tikva, leider können wir jeder Anleitung nach jedem individuellen Frage anpassen und einzelne Modelle auf individuellen Wunsch hin umrechnen. Gerne können Sie sich von ähnlichen Modelle in die richtige Grösse inspirieren lassen. Wenn sie Hilfe damit brauchen, wenden Sie sich bitte an dem Laden wo Sie die Wolle gekauft haben, dort hilft man Ihnen gerne weiter. Viel Spaß beim stricken!
03.11.2020 - 09:09
![]() Tina Gade Hansen wrote:
Tina Gade Hansen wrote:
Kan det virkelig passe med maskeantal? Til str 3-4 år 62 m. Det giver næsten 40 cm i bredden, når strikkefasthed overholdes. Jeg kender ingen så store børn
29.09.2020 - 17:05DROPS Design answered:
Hej Tina. Ja det stämmer, du ser alla mått längst ner på måttskissen i de olika storlekarna. Mvh DROPS Design
30.09.2020 - 07:43
![]() Jessica Rangel wrote:
Jessica Rangel wrote:
Is there a way we can purchase sweaters?
14.09.2020 - 08:19DROPS Design answered:
Dear Mrs Rangel, we only provide the free patterns for the sweaters, you can ask our DROPS stores or ask a knitter in our DROPS Worskhop. Happy knitting!
14.09.2020 - 09:46
|
||||||||||||||||||||||||||||
Sleepy Santa Sweater#sleepysantasweater |
||||||||||||||||||||||||||||
 |
 |
|||||||||||||||||||||||||||
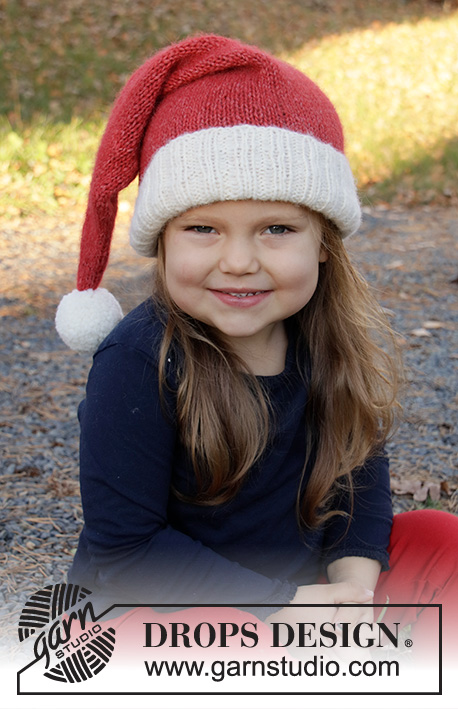
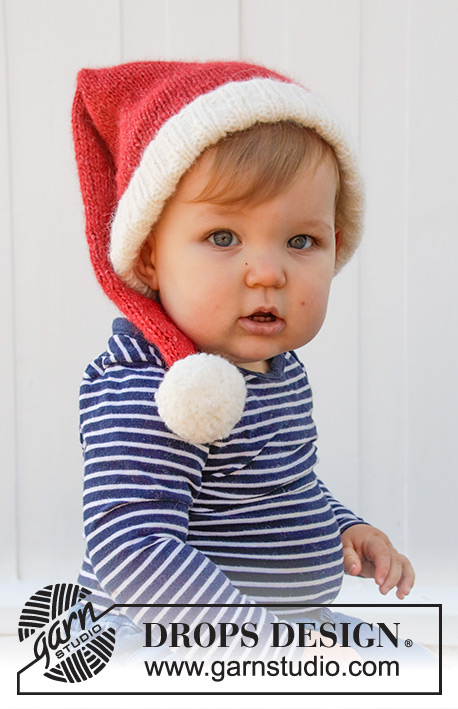
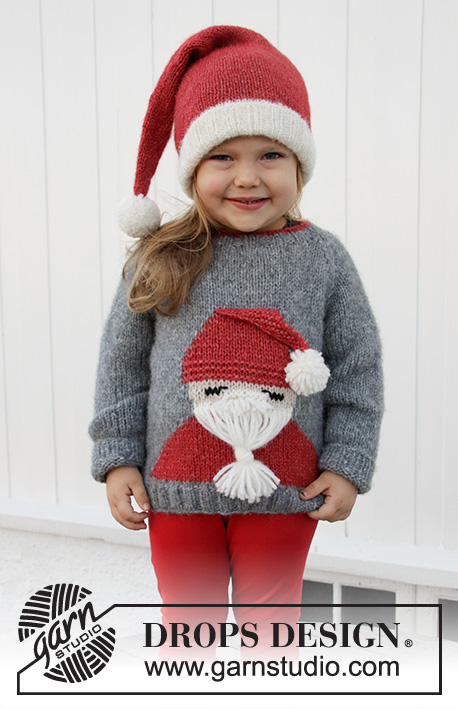
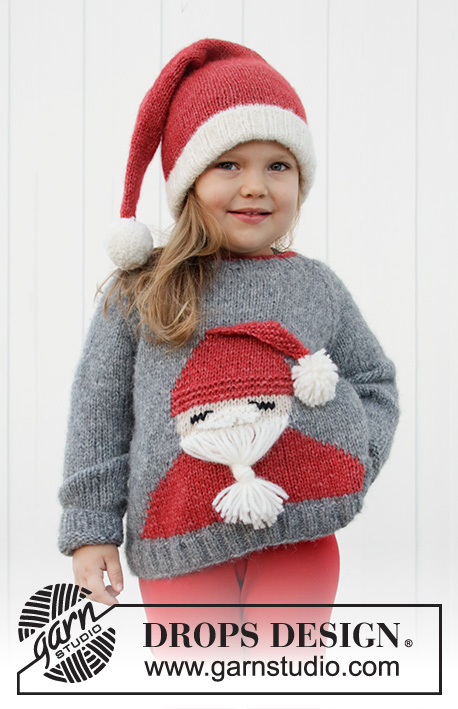
Knitted Christmas jumper with Santa for children in DROPS Air or Nepal. Sizes 2 – 12 years. Theme: Christmas.
DROPS Children 32-20 |
||||||||||||||||||||||||||||
|
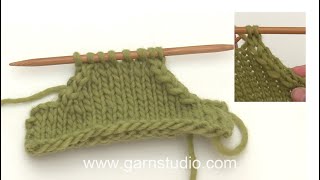
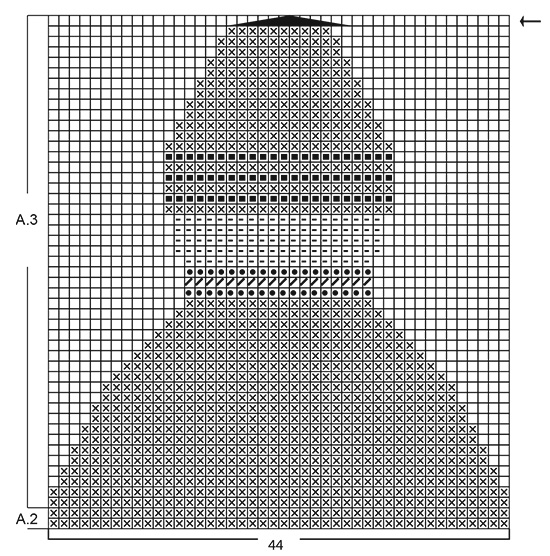
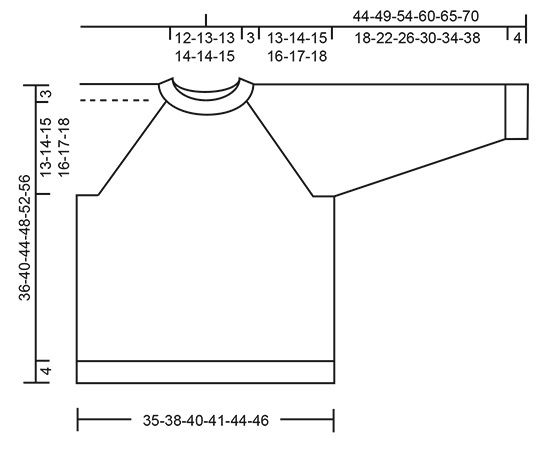
------------------------------------------------------- EXPLANATIONS FOR THE PATTERN: ------------------------------------------------------- RIDGE/GARTER STITCH (worked back and forth): Knit all rows. 1 ridge in height = Knit 2 rows. DECREASE TIP (evenly spaced): To work out how to decrease evenly, count the total number of stitches on the needle (e.g. 70 stitches), and divide by the number of decreases to be made (e.g. 12) = 5.8. In this example, decrease by working together approx. each 5th and 6th stitch. PATTERN: See diagrams A.1/A.3 and A.2 (A.2 applies only to sizes 7/8 – 9/10 – 11/12 years). To avoid long strand-lengths at the back of the piece when working pattern work with 3 balls; i.e. work with 1 ball of grey on each side of Santa and 1 ball of each colour in the middle of the jumper (i.e. A.1/A.3). To avoid holes when changing colour, twist the strands together. When A.1 has been completed continue with medium grey over all stitches to finished length. RAGLAN: All decreases are worked from the right side! Decrease as follows at the beginning of the row: Work 1 edge stitch in garter stitch, slip 1 stitch as if to knit, knit 1 and pass the slipped stitch over the knitted stitch (= 1 stitch decreased). Decrease as follows at the end of the row: Work until there are 3 stitches left on the row, knit 2 together and work 1 edge stitch in garter stitch (= 1 stitch decreased). INCREASE TIP (for mid under sleeve): Start 1 stitch after the marker thread, make 1 yarn over, work until there is 1 stitch left on the round, make 1 yarn over and knit 1 (= 2 stitches increased). On the next round knit the yarn overs twisted to avoid holes. ------------------------------------------------------- START THE PIECE HERE: ------------------------------------------------------- JUMPER – SHORT OVERVIEW OF THE PIECE: The front and back pieces are worked back and forth with circular needle. The pieces are worked separately, bottom up. The sleeves are worked bottom up and in the round with double pointed needles/short circular needle as far as the armholes, then finished back and forth. First a loose piece is worked for the hat and is later combined with the front/back pieces on the last row of the pattern; it hangs outside the jumper. The jumper is worked in DROPS Air or DROPS Nepal. HAT (loose piece): Cast on 3 stitches with needle size 5.5 mm and raspberry Air or deep red Nepal. ROW 1 (= wrong side): Knit. ROW 2 (= right side): Knit 1, Knit 2 in each of the last 2 stitches (= 2 stitches increased) ROW 3 (= wrong side): Knit 2 in first stitch (= 1 stitch increased), knit until there are 2 stitches left, knit 2 together (= 1 stitch decreased). ROW 4 (= right side): Slip 1 stitch as if to knit, knit 1 and pass the slipped stitch over the knitted stitch (= 1 stitch decreased), knit until there are 2 stitches left, knit 2 in each of the last 2 stitches (= 2 stitches increased). Repeat rows 3 - 4 six more times, then repeat row 3 one time = 12 stitches on the row. Knit 2 rows, last row = wrong side (when this loose piece is worked together with the front piece, work from the right side). Lay to one side and work the front piece. If you would like a hat on the back piece work 2 hats. FRONT PIECE: Cast on 70-74-78-82-86-90 stitches with circular needle size 4.5 mm and medium grey Air or grey Nepal. Purl 1 row (= wrong side). The next row is worked as follows from the right side: 1 edge stitch in GARTER STITCH – read description above, * knit 2, purl 2 * work from *-* until there is 1 stitch left on the row and finish with 1 edge stitch in garter stitch. Continue this rib for 4 cm – adjust so the next row is worked from the right side. Knit 1 row where you decrease 12-12-12-14-14-14 stitches evenly spaced – read DECREASE TIP = 58-62-66-68-72-76 stitches. Change to circular needle size 5.5 mm. Work stocking stitch (edge stitches on each side worked in garter stitch on every row) for 1-1-4-4-6-8 cm (the piece measures approx 5-5-8-8-10-12 cm from the edge). Now work stocking stitch (edge stitches in garter stitch) and pattern in the different sizes as follows from the right side REMEMBER THE KNITTING TENSION!: SIZES 2 – 3/4 – 5/6 years: Work 1 edge stitch in garter stitch, 6-8-10 stitches in stocking stitch, A.1 (= 44 stitches) – read PATTERN, work 6-8-10 stitches in stocking stitch and finish with 1 edge stitch in garter stitch. SIZES 7/8 – 9/10 – 11/12 years: Work 1 edge stitch in garter stitch, 11-13-15 stitches in stocking stitch, A.2 (= 44 stitches) – read PATTERN, work 11-13-15 stitches in stocking stitch and finish with 1 edge stitch in garter stitch. When the piece measures 11-16-20 cm work pattern A.1 over pattern A.2. ALL SIZES: When the piece measures 20-23-26-29-32-35 cm – adjust so the next row is worked from the right side, cast off 2-2-2-3-3-3 stitches at the beginning of the next 2 rows for the armholes = 54-58-62-62-66-70 stitches. Continue with stocking stitch, A.1 (only in the smallest sizes) and 1 edge stitch in garter stitch in each side AT THE SAME TIME on the next row from the right side decrease for RAGLAN – read description above. Decrease for raglan every other row (meaning each row from the right side) a total of 13-14-15-16-17-18 times – AT THE SAME TIME when 2 decreases are left for raglan (piece measures approx. 31-35-39-42-47-52 cm mid front), put the middle 22-24-26-24-26-28 stitches on 1 thread for neck and each shoulder are worked separately. Left shoulder – start from the right side: 1 edge stitch in garter stitch, decrease for raglan as before, knit 2 stitches together, turn work. Purl from the wrong side, 1 edge stitch in garter stitch, turn work. 1 edge stitch in garter stitch, decrease for raglan, turn and cast off stitches by purling. Work right shoulder from the right as follows: knit 2 stitches together, decrease for raglan, 1 edge stitch in garter stitch, turn work and work 1 stitch in garter stitch, purl from the wrong side, turn work. Decrease for raglan, 1 edge stitch in garter stitch, turn work and cast off stitches by purling. BACK PIECE (with Santa): Cast on 70-74-78-82-86-90 stitches with circular needle size 4.5 mm and medium grey Air or grey Nepal. Purl 1 row (= wrong side). The next row is worked as follows from the right side: 1 edge stitch in GARTER STITCH – read description above, * knit 2, purl 2 * work from *-* until there is 1 stitch left on the row and finish with 1 edge stitch in garter stitch. Continue this rib for 4 cm – adjust so the next row is worked from the right side. Knit 1 row where you decrease 12-12-12-14-14-14 stitches evenly spaced – read DECREASE TIP = 58-62-66-68-72-76 stitches. Change to circular needle size 5.5 mm. Work stocking stitch (edge stitches on each side worked in garter stitch on every row) for 1-1-4-4-6-8 cm (the piece measures a total of 5-5-8-8-10-12 cm from the edge). Now work stocking stitch (edge stitches in garter stitch) and pattern in the different sizes as follows from the right side: SIZES 2 – 3/4 – 5/6 years: Work 1 edge stitch in garter stitch, 6-8-10 stitches in stocking stitch, A.3 (= 44 stitches) – read PATTERN, work 6-8-10 stitches in stocking stitch and finish with 1 edge stitch in garter stitch. Continue this pattern. SIZES 7/8 – 9/10 – 11/12 years: Work 1 edge stitch in garter stitch, 11-13-15 stitches in stocking stitch, A.2 (= 44 stitches) – read PATTERN, work 11-13-15 stitches in stocking stitch and finish with 1 edge stitch in garter stitch. When the piece measures 11-16-20 cm, work pattern A.3 over pattern A.2. Continue this pattern. ALL SIZES: When the piece measures 20-23-26-29-32-35 cm – adjust so the next row is worked from the right side, cast off 2-2-2-3-3-3 stitches at the beginning of the next 2 rows for the armholes = 54-58-62-62-66-70 stitches. Continue with stocking stitch, A.3 (only in the smallest sizes) and 1 edge stitch in garter stitch on each side – AT THE SAME TIME on the next row from the right side decrease to RAGLAN – read description above. Decrease to raglan every 2nd row (i.e. each row from the right side) a total of 13-14-15-16-17-18 times. When all the decreases to raglan are finished there are 28-30-32-30-32-34 stitches on the needle, cast off. BACK PIECE (without Santa): Cast on 70-74-78-82-86-90 stitches with circular needle size 4.5 mm and medium grey Air or grey Nepal. Purl 1 row (= wrong side). The next row is worked as follows from the right side: 1 edge stitch in GARTER STITCH – read description above, * knit 2, purl 2 * work from *-* until there is 1 stitch left on the row and finish with 1 edge stitch in garter stitch. Continue this rib for 4 cm – adjust so the next row is worked from the right side. Knit 1 row where you decrease 12-12-12-14-14-14 stitches evenly spaced – read DECREASE TIP = 58-62-66-68-72-76 stitches. Change to circular needle size 5.5 mm and work stocking stitch with 1 edge stitch in garter stitch on each side. REMEMBER THE KNITTING TENSION! When the piece measures 20-23-26-29-32-35 cm – adjust so the next row is worked from the right side, cast off 2-2-2-3-3-3 stitches at the beginning of the next 2 rows for the armholes = 54-58-62-62-66-70 stitches. Continue with stocking stitch and 1 edge stitch in garter stitch on each side – AT THE SAME TIME on the next row from the right side decrease to RAGLAN – read description above. Decrease to raglan every 2nd row (i.e. each row from the right side) a total of 13-14-15-16-17-18 times. When all decreases to raglan are finished there are 28-30-32-30-32-34 stitches on the row, cast off. SLEEVE: Cast on 30-32-32-34-34-36 stitches with double pointed needles size 4.5 mm and medium grey Air or grey Nepal. Knit 1 round then work rib (= knit 1/ purl 1) for 4 cm. Change to double pointed needles size 5.5 mm. Insert 1 marker thread at the beginning of the round (= mid-under sleeve). Knit 1 round where you decrease 4 stitches evenly spaced in all sizes – remember DECREASE TIP = 26-28-28-30-30-32 stitches. Then continue with stocking stitch in the round. When the piece measures 6 cm, increase 2 stitches mid-under sleeve – read INCREASE TIP. Increase like this every 2½-3½-3½-4-5-5½ cm a total of 6-6-7-7-7-7 times = 38-40-42-44-44-46 stitches. When the piece measures 22-26-30-34-38-42 cm, cast off 2-2-2-4-4-4 stitches mid-under sleeve (cast off 1-1-1-2-2-2 stitches on each side of the marker thread) = 36-38-40-40-40-42 stitches. Then work stocking stitch back and forth with 1 edge stitch in garter stitch on each side of the piece – AT THE SAME TIME on the first row from the right side decrease to RAGLAN – read description above. Decrease to raglan every 2nd row (i.e. each row from the right side) a total of 13-14-15-16-17-18 times. When all decreases to raglan are finished there are 10-10-10-8-6-6 stitches on the row, cast off. Work the other sleeve in the same way. ASSEMBLY: Sew the raglan-seams top down to mid-under sleeve – sew inside the 1 edge stitch. Sew the side seams inside the 1 edge stitch. NECK: Knit up from the right side approx. 67-71-75-68-68-72 stitches around the neck (including the stitches on the thread in front) using short circular needle size 4.5 mm and medium grey Air or grey Nepal. Knit 1 round where you decrease evenly to 60-60-64-64-68-68 stitches. Then work rib in the round (= knit 2/ purl 2) for 2 cm. Change to raspberry Air or deep red Nepal and work rib in the round for 1 cm. Loosely cast off with knit over knit and purl over purl. The jumper measures approx. 36-40-44-48-52-56 cm from the shoulder down. POM POM (for hat): Make a pom pom with off-white of approx. 5-6 cm in diameter; leave 2 strands to fasten the pom pom with. Fasten the pom pom to the end of the loose hat on the front piece. BEARD: 1 fringe= 1 strand of 45 cm using off-white. Cut 18 fringes. Each fringe is fastened above the purled stitch on the neck of the Santa. Fold the fringe double, thread the loop around the stitch, then thread the strand-ends through the loop and tighten. Fasten a similar fringe in each of the 17 remaining stitches over the purled stitch. Then tie a loose knot using all the strands; tie the knot approx. in the middle of the strands. Trim the beard to the required length. MOUSTACHE: 1 fringe= 1 strand of 7 cm using off-white. Cut 8 fringes. Fold the fringes double and thread the loop around a stitch beneath a purled stitch on the face of Santa, then thread the strand-ends through the loop and tighten. Fasten a similar fringe beneath each of the purled stitches. Trim the moustache to the required length. EYES: Using a left-over of black, sew grafting stitches over 3 stitches and sew 1 stitch across the next stitch towards the middle. |
||||||||||||||||||||||||||||
Diagram explanations |
||||||||||||||||||||||||||||
|
||||||||||||||||||||||||||||

|
||||||||||||||||||||||||||||
|
||||||||||||||||||||||||||||
|
||||||||||||||||||||||||||||
Have you finished this pattern?Tag your pictures with #dropspattern #sleepysantasweater or submit them to the #dropsfan gallery. Do you need help with this pattern?You'll find 42 tutorial videos, a Comments/Questions area and more by visiting the pattern on garnstudio.com. © 1982-2025 DROPS Design A/S. We reserve all rights. This document, including all its sub-sections, has copyrights. Read more about what you can do with our patterns at the bottom of each pattern on our site. |
||||||||||||||||||||||||||||


With over 40 years in knitting and crochet design, DROPS Design offers one of the most extensive collections of free patterns on the internet - translated to 17 languages. As of today we count 314 catalogues and 11821 patterns translated into English (UK/cm).
We work hard to bring you the best knitting and crochet have to offer, inspiration and advice as well as great quality yarns at incredible prices! Would you like to use our patterns for other than personal use? You can read what you are allowed to do in the Copyright text at the bottom of all our patterns. Happy crafting!
Post a comment to pattern DROPS Children 32-20
We would love to hear what you have to say about this pattern!
If you want to leave a question, please make sure you select the correct category in the form below, to speed up the answering process. Required fields are marked *.