DROPS Nepal
DROPS Nepal
65% Wool, 35% Alpaca
from 3.30 $ /50g
Get the yarn to make this pattern from 36.30$.

The yarn cost is calculated from the pattern’s smallest size and the yarn’s cheapest product type. Looking for an even better price? You might find it on the DROPS Deals!

DROPS Super Sale

Roses at Dawn Jacket

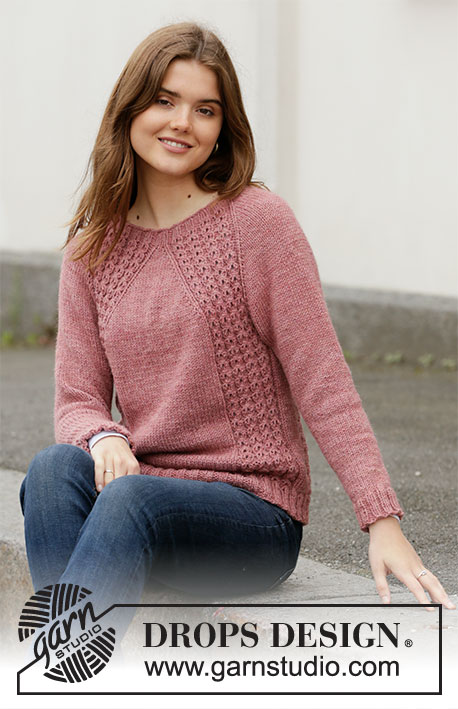
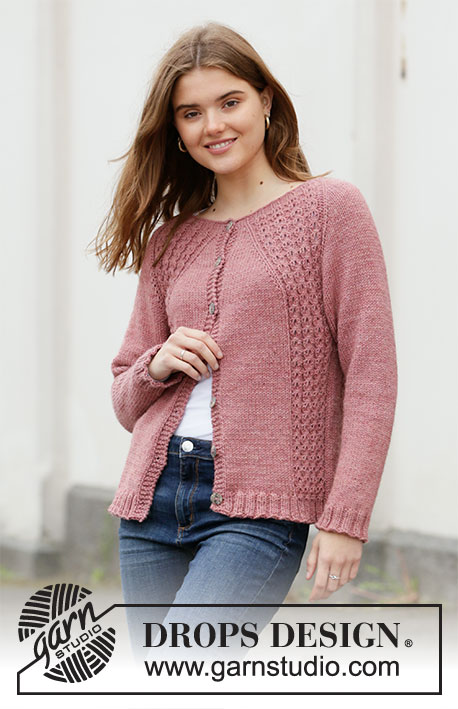
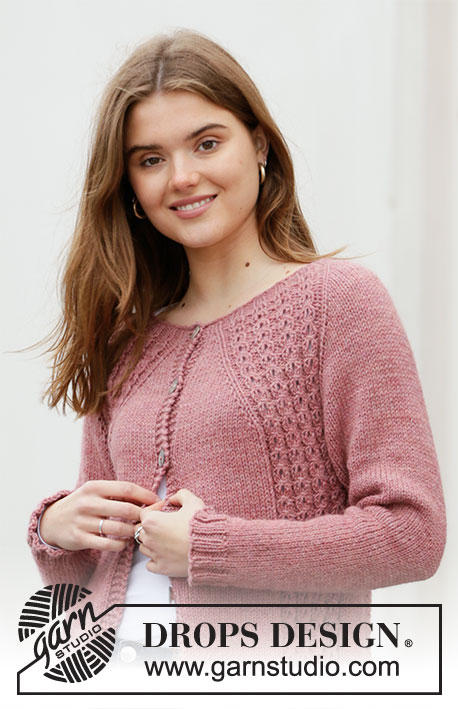
Knitted jacket with raglan in DROPS Nepal. Piece is knitted top down with cables. Size: S - XXXL

DROPS 206-26
DROPS design: Pattern ne-311
Yarn group C or A + A
----------------------------------------------------------

SIZE:
S - M - L - XL - XXL – XXXL

Finished measurements:
Chest measurements: 94-102-110-120-132-144 cm = 37”-40”-43 3/8”-47 1/4”-52”-56 1/2”
Full length: 56-58-60-62-64-66 cm = 22"-22 3/4"-23 5/8"-24 3/8"-25 1/4"-26"

All measurements in chart are in cm.

MATERIALS:
DROPS NEPAL from Garnstudio (belongs to yarn group C)
550-600-700-750-800-900 g color no 8912, blush

KNITTING GAUGE:
16 stitches in width and 20 rows vertically in stockinette stitch = 10 x 10 cm = 4” x 4”.

NEEDLES:
DROPS DOUBLE POINTED NEEDLES SIZE 5.5 mm = US 9
DROPS CIRCULAR NEEDLE SIZE 5.5 mm = US 9: Length 40 and 80 cm = 16” and 32” for stockinette stitch.
DROPS DOUBLE POINTED NEEDLES SIZE 4.5 mm = US 7
DROPS CIRCULAR NEEDLE SIZE 4.5 mm = US 7: Length 80 cm = 32” for rib.
Needle size is only a suggestion! If you have too many stitches on 10 cm = 4” switch to larger needles. If you have too few stitches on 10 cm = 4” switch to smaller needles.

DROPS MOTHER-OF-PEARL BUTTON ARCHED (white), NO 522: 7-7-7-8-8-8 pieces

-------------------------------------------------------

Alternative Yarn – See how to change yarns here
Yarn Groups A to F – Use the same pattern and change the yarn here
Yarn usage using an alternative yarn – Use our yarn converter here

-------------------------------------------------------

DROPS Nepal
DROPS Nepal
65% Wool, 35% Alpaca
from 3.30 $ /50g
Get the yarn to make this pattern from 36.30$.

The yarn cost is calculated from the pattern’s smallest size and the yarn’s cheapest product type. Looking for an even better price? You might find it on the DROPS Deals!

DROPS Super Sale

SAVE 30% on 6 cotton favorites!
Valid until 04.12.2024

Pattern instructions

NOTE: This pattern is written in American English. All measurements in charts are in cm. For conversion from inches to cm - click here. There are different terms for crocheting in American and British English. If this pattern includes crochet, click for "crochet terms" here. For this pattern in British English, please click here.
----------------------------------------------------------

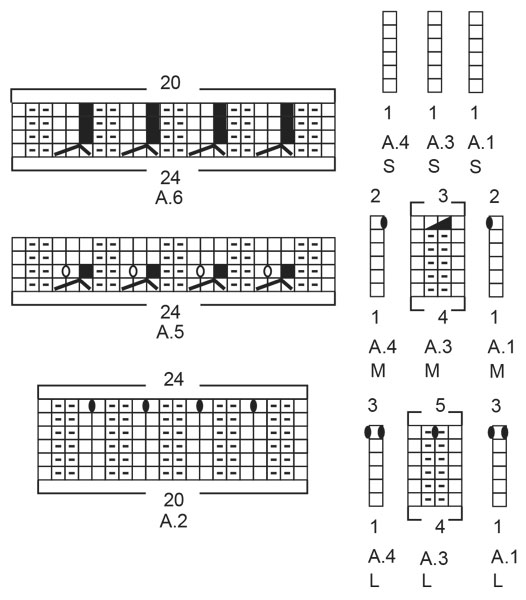
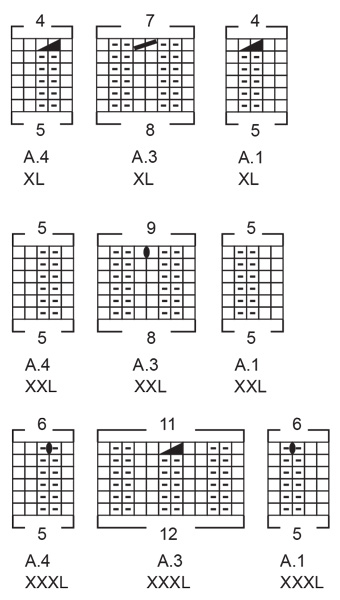
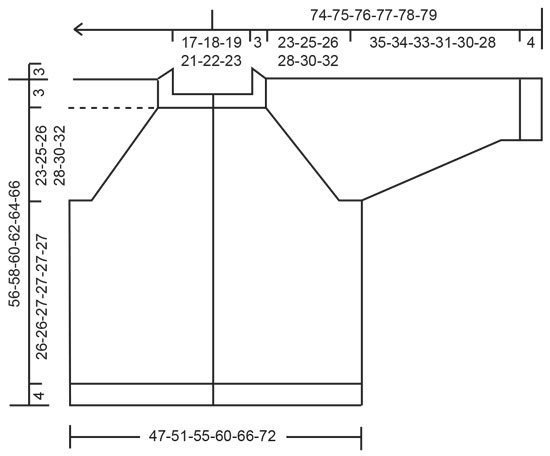
EXPLANATION FOR THE PATTERN:

----------------------------------------------------------

GARTER STITCH (back and forth):
Knit all rows.
1 ridge vertically = knit 2 rows.

PATTERN:
See diagrams A.1 to A.6. Choose diagram for your size.

RAGLAN:
Increase 1 stitch on each side of every repetition of A.5 (= 8 stitches increased on round). Increase 1 stitch by making 1 yarn over. On next row (from wrong side) purl yarn over twisted to avoid holes. Then work the new stitches in stockinette stitch.

DECREASE TIP (applies to sleeves):
Decrease 1 stitch on each side of marker thread as follows: Work until 3 stitches remain before marker thread and knit 2 together, knit 2 (marker thread is between these stitches), slip 1 stitch knitwise, knit 1, pass slipped stitch over stitch worked.

INCREASE TIP (evenly):
To calculate how to increase evenly, count the stitches to be increased (e.g. 19 stitches) and divide this number by stitches of increases to be done (e.g. 6) = 3.1. In this example increase by making 1 yarn over after approx. every 3rd stitch. On next row work yarn overs twisted to avoid holes.

BUTTONHOLES:
Decrease for buttonholes on right band (when garment is worn). Decrease from right side when 3 stitches remain on row as follows: Make 1 yarn over, knit the next 2 stitches together, knit last stitch. On next row knit yarn over to make holes.
Decrease first buttonhole when rib in neck measures approx. 1½-2 cm = 1/2”-3/4”. Then decrease the next 6-6-6-7-7-7 buttonholes, approx. 8½-8½-9-8-8½-8½ cm = 3 1/4”-3 1/4”-3 1/2”-3 1/8”-3 1/4”-3 1/4” between each.

----------------------------------------------------------

START THE PIECE HERE:

----------------------------------------------------------

JACKET - SHORT OVERVIEW OF THE PIECE:
Worked back and forth on circular needle, top down. Work sleeves in the round on double pointed needles/a short circular needle, top down.

NECK EDGE:
Cast on 97-100-100-112-112-116 stitches on circular needle size 4.5 mm = US 7 with Nepal. Purl 1 row from wrong side, then work rib as follows from right side:
4 band stitches in GARTER STITCH - read explanation above, work A.1 (= 1-1-1-5-5-5 stitches), work A.2 (= 20 stitches), knit 3, work A.2 (= 20 stitches), work A.3 (= 1-4-4-8-8-12 stitches), work A.2 (= 20 stitches), knit 3, work A.2 (= 20 stitches), work A.4 (= 1-1-1-5-5-5 stitches) and 4 band stitches in garter stitch. Continue back and forth like this until the 6 rows in diagrams have been worked vertically and remember BUTTONHOLES - read explanation above. There are now 113-117-121-125-129-133 stitches on needle.

YOKE:
Switch to circular needle size 5.5 mm = US 9. Work next row as follows (right side): 4 band stitches in garter stitch,
Knit 1-2-3-4-5-6, work A.5 (= 24 stitches) over A.2 (= left front piece), * 1 yarn over, knit 1, *, work from *-* 3 times in total, 1 yarn over (= 7 stitches sleeve), work A.5 * (= 24 stitches) over A.2, knit 1-3-5-7-9-11 (= mid back), and work A.5 (= 24 stitches) over A.2 (= back piece), * 1 yarn over, knit 1 *, work from *-* 3 times in total, 1 yarn over (= 7 stitches sleeve), work A.5 (= 24 stitches) over A.2, knit 1-2-3-4-5-6 and 4 band stitches in garter stitch (= right front piece). Work 1 row in pattern, purl the 4 yarn overs in each side over each sleeve twisted to avoid holes = 121-125-129-133-137-141 stitches on needle. REMEMBER THE KNITTING GAUGE!
Now continue with A.5, 4 band stitches in garter stitch in each side towards mid front and stockinette stitch over the remaining stitches, AT THE SAME TIME on first row increase 1 stitch on each side of every A.5 for RAGLAN – read explanation above. Increase like this every other row 18-20-22-25-27-31 times in total = 265-285-305-333-353-389 stitches. Now continue increase on sleeves 4-4-3-2-1-0 more times (= 22-24-25-27-28-31 stitches increased in each side of sleeves), work the remaining stitches in pattern as before. When all increases are done there are 281-301-317-341-357-389 stitches on row. Piece measures approx. 25-27-28-30-31-34 cm = 9 3/4”-10 5/8”-11”-11 3/4”-12 1/4”-13 3/8” from cast-on edge and down mid front. Work as before but without increases until piece measures 26-28-29-31-33-35 cm = 10 1/4”-11”-11 3/8”-12 1/4”-13”-13 3/4” from cast-on edge and down mid front.
Work next row as follows:
Work the first 47-50-53-57-60-65 stitches (= front piece), slip the next
51-55-57-61-63-69 stitches on a stitch holder (= sleeve), cast on 6-6-8-8-10-10 new stitches on needle (= in the side under sleeve), work the next 85-91-97-105-111-121 stitches (= back piece), slip the next 51-55-57-61-63-69 stitches on a stitch holder (= sleeve), cast on 6-6-8-8-10-10 new stitches on needle (= in the side under sleeve), work the remaining 47-50-53-57-60-65 stitches (= front piece). NOW MEASURE PIECE FROM HERE!

BODY:
There are now 191-203-219-235-251-271 stitches for body.
Continue back and forth with A.5 as before, 4 band stitches in garter stitch towards mid front and stockinette stitch over the remaining stitches. When piece measures 26-26-27-27-27-27 cm = 10 1/4”-10 1/4”-10 5/8”-10 5/8”-10 5/8”-10 5/8” from division – adjust to finish after a whole repetition of A.5 vertically, work pattern as follows (right side):
4 band stitches in garter stitch, stockinette stitch over the next 19-22-25-29-32-37 stitches and increase at the same time 6-3-4-4-5-4 stitches evenly – read INCREASE TIP, work A.6 (= 24 stitches) over A.5, stockinette stitch over the next 6-6-8-8-10-10 stitches and increase at the same time 2-2-0-0-2-2 stitches evenly, work A.6 (= 24 stitches) over A.5, stockinette stitch over the next 37-43-49-57-63-73 stitches and increase at the same time 11-9-11-15-17-19 stitches evenly, work A.6 (= 24 stitches) over A.5, stockinette stitch over the next 6-6-8-8-10-10 stitches and increase at the same time 2-2-0-0-2-2 stitches evenly, work A.6 (= 24 stitches) over A.5, stockinette stitch over the next 19-22-25-29-32-37 stitches and increase at the same time 6-3-4-4-5-4 stitches evenly, and finish with 4 band stitches in garter stitch = 202-206-222-242-266-286 stitches on needle.
Switch to circular needle size 4.5 mm = US 7. Now work rib as follows from wrong side: 4 band stitches in garter stitch, * purl 2, knit 2 *, work from *-* until 6 stitches remain on needle, purl 2 and 4 band stitches in garter stitch – NOTE: Rib should fit knit over knit and purl over purl over stitches in A.6. When rib measures 4 cm = 1 1/2”, binding off with knit over knit and purl over purl. Jacket measures approx. 56-58-60-62-64-66 cm = 22"-22 3/4"-23 5/8"-24 3/8"-25 1/4"-26" from shoulder and down.

SLEEVE:
Slip the 51-55-57-61-63-69 stitches on stitch holder in one side back on a short circular needle/double pointed needles size 5.5 mm = US 9 and pick in addition up 1 stitch in each of the 6-6-8-8-10-10 stitches cast on under sleeves = 57-61-65-69-73-79 stitches. Insert a marker thread in the middle of the 6-6-8-8-10-10 new stitches under sleeve (= 3-3-4-4-5-5 new stitches on each side of marker thread). Work in stockinette stitch in the round. When sleeve measures 4 cm = 1 1/2” from division, decrease 1 stitch on each side of marker thread under sleeve - read DECREASE TIP. Decrease like this approx. every 2½-2-2-1½-1½-1 cm = 7/8”-3/4”-3/4”-1/2”-1/2”-3/8” 11-12-13-14-16-18 times in total = 35-37-39-41-41-43 stitches. Work until sleeve measures 35-34-33-31-30-28 cm = 13 3/4”-13 3/8”-13”-12 1/4”-11 3/4”-11” (or desired measurements, approx. 4 cm = 1 1/2” remain until finished measurements- NOTE: Shorter measurements in the larger sizes because of wider neck and longer yoke). On next round increase 5-7-5-7-7-9 stitches evenly = 40-44-44-48-48-52 stitches. Switch to double pointed needles size 4.5 mm = US 7. Work rib (knit 2/purl 2) in the round for 4 cm = 1 1/2”. Binding off stitches with knit over knit and purl over purl. Sleeve measures approx. 39-38-37-35-34-32 cm = 15 1/4”-15”-14 1/2”-13 3/4”-13 3/8”-12 1/2”. Work the other sleeve the same way.

ASSEMBLY:
Sew the buttons on to the left band.

This pattern has been corrected.

Updated online: 05.03.2021
Diagram A.4, size XL updated.

Diagram

All measurements in charts are in cm.

symbols = knit from the right side, purl from the wrong side
symbols = purl from the right side, knit from the wrong side
symbols = purl 2 together
symbols = knit 2 together
symbols = work 3 stitches, pass first stitch worked over the last 2 stitches so that this stitch is around the other two stitches (= 1 stitch decreased)
symbols = between 2 stitches make 1 yarn over. On next row (from right side) knit the yarn over to make a hole
symbols = between 2 stitches make 1 yarn over. On next row (from wrong side) purl yarn over twisted to avoid holes.
symbols = this square is not a stitch, go directly to next symbol in diagram
diagram
diagram
diagram

Each of our patterns has specific tutorial videos to help you.

Do you have a question? See a list of frequently asked questions (FAQ)

Knitting tension is what determines the final measurements of your work, and is usually measured per 10 x 10 cm. It is provided like so: number of stitches in width x number of rows in height - eg: 19 stitches x 26 rows = 10 x 10 cm.

The knitting tension is very individual; some people knit/crochet loosely while others work tightly. You adjust the knitting tension with the needle size, which is why the suggested needle size only serve as a guide! You need to adjust this (up or down) to ensure that YOUR knitting tension matches the knitting tension provided in the pattern. If you work with a different knitting tension than provided you will have a different yarn consumption, and your work will have different measurements than what the pattern suggests.

The knitting tension also determines which yarns can replace each other. As long as you achieve the same knitting tension you can replace one yarn with another.

See DROPS lesson: How to measure your tension/gauge

See DROPS video: How to make a gauge tension swatch

The required amount of yarn is provided in grams, eg: 450 g. To calculate how many balls you’ll need you first need to know how many grams are in 1 ball (25g, 50g or 100g). This information is available if you click on the individual yarn quality on our pages. Divide the amount required with the amount of each ball. For example, if each ball is 50g (the most common amount), the calculation will be as follows: 450 / 50 = 9 balls.

The important thing when changing from one yarn to another is that the knitting/crochet tension remains the same. This is so that the measurements of the finished piece will be the same as on the sketch provided. It is easier to achieve the same knitting tension using yarns from the same yarn group. It is also possible to work with multiple strands of a thinner yarn to achieve the knitting tension of a thicker one. Please try our yarn converter. We recommend you to always work a test swatch.

Please NOTE: when changing yarn the garment might have a different look and feel to the garment in the photo, due to individual properties and qualities of each yarn.

See DROPS lesson: Can I use a different yarn than the one mentioned in the pattern?

All our yarns are categorised into yarn groups (from A to F) according to thickness and knitting tension – group A contains the thinnest yarns and group F the thickest. This makes it easier for you to find alternative yarns to our patterns, should you wish to switch yarn. All yarns within the same group have a similar knitting tension and can easily replace each other. However, different yarn qualities have different structures and properties which will give the finished work a unique look and feel.

Click here for an overview of the yarns in each yarn group

At the top of all our patterns you’ll find a link to our yarn converter, which is a helpful tool should you wish to use a different yarn than suggested. By filling in the yarn quality you wish to replace, the amount (in your size) and number of strands, the converter will present good alternative yarns with the same knitting tension. Additionally it will tell you how much you’ll require in the new qualities and whether you’ll need to work with multiple strands. Most skeins are 50g (some are 25g or 100g).

If the pattern is worked with multiple colours, every colour will have to be converted separately. Similarly, if the pattern is worked with several strands of different yarns (for example 1 strand Alpaca and 1 strand Kid-Silk) you will have to find alternatives for each, individually.

Click here to see our yarn converter

Since different yarns have different qualities and textures we have chosen to keep the original yarn in our patterns. However, you can easily find options among our available qualities by using our yarn converter, or simply pick a yarn from the same yarn group.

It is possible that some retailers still have discontinued yarns in stock, or that someone has a few skeins at home that they would like to find patterns for.

The yarn converter will provide both alternative yarn as well as required amount in the new quality.

If you think it's hard to decide what size to make, it can be a good idea to measure a garment you own already and like the size of. Then you can pick the size by comparing those measures with the ones available in the pattern's size chart.

You'll find the size chart at the bottom of the pattern.

See DROPS lesson: How to read size chart

The needle size provided in the pattern serves only as a guide, the important thing is to follow the knitting tension. And since knitting tension is very individual, you will have to adjust the needle size to ensure that YOUR tension is the same as in the pattern – maybe you’ll have to adjust 1, or even 2 needle sizes, up or down to achieve the correct tension. For this, we recommend that you work test swatches.

Should you work with a different knitting tension than the one provided, the measurements of the finished garment might deviate from the measurement sketch.

See DROPS lesson: How to measure your tension/gauge

See DROPS video: How to make a gauge tension swatch

Working a garment top-down provides more flexibility and room for personal adjustment. For example it is easier to try the garment on while working, as well as making adjustments to length of yoke and shoulder caps.

The instructions are carefully explaining every step, in the correct order. Diagrams are adjusted to the knitting direction and are worked as usual.

The diagram depicts all rows/rounds, and every stitch seen from the right side. It is read from bottom to top, from right to left. 1 square = 1 stitch.

When working back and forth, every other row is worked from the right side and every other row is worked from the wrong side. When working from the wrong side, the diagram will have to be worked reversed: from left to right, knit stitches are purled, purl stitches are knit etc.

When working in the round every round is worked from the right side and the diagram are worked from right to left on all rounds.

See DROPS lesson: How to read knitting diagrams

The diagram depicts all rows/rounds, and every stitch seen from the right side. It is worked from bottom to top, from right to left.

When working back and forth every other row is worked from the right side: from right to left and every other row is worked from the wrong side: from left to right.

When working in the round, every row in the diagram are worked from the right side, from right to left.

When working a circular diagram you start in the middle and work your way outwards, counter clockwise, row by row.

The rows usually start with a given number of chain stitches (equivalent to the height of the following stitch), this will either be depicted in the diagram or explained in the pattern.

See DROPS lesson: How to read crochet diagrams

Instructions for working several diagrams after each other on the same row/round, will often be written like so: “work A.1, A.2, A.3 a total of 0-0-2-3-4 times". This means you work A.1 once, then A.2 is worked once, and A.3 is repeated (in width) the number of times provided for your size – in this case like so: S = 0 times, M = 0 times, L=2 times, XL= 3 times and XXL = 4 times.

The diagrams are worked as usual: begin with the first row in A.1, then work the first row in A.2 etc.

See DROPS lesson: How to read knitting diagrams

See DROPS lesson: How to read crochet diagrams

The total width of the garment (from wrist-to-wrist) will be larger in the larger sizes, despite the actual sleeves being shorter. The larger sizes have longer sleeve caps and wider shoulders, so there will be a good fit in all sizes.

The measurement sketch/schematic drawing provides information regarding the full length of the garment. If it’s a jumper or a jacket the length is measured from the highest point on the shoulder (usually closest to the neckline), and straight down to the bottom of the garment. It is NOT measured from the tip of shoulder. Similarly, the length of yoke is measured from the highest point on the shoulder and down to where yoke is split into body and sleeves.

See DROPS lesson: How to read a schematic drawing

Diagrams are often repeated on the round or in height. 1 repeat is the diagram the way it appears in the pattern. If it says to work 5 repeats of A.1 in the round, then you work A.1 a total of 5 times after/next to each other in the round. If it says to work 2 repeats of A.1 vertically/in height you work the entire diagram once, then begin again at the start and work the entire diagram one more time.

Chain stitches are slightly narrower than other stitches and to avoid working the cast-on edge too tight, we simply chain more stitches to begin with. The stitch count will be adjusted on the following row to fit the pattern and measurement sketch.

The rib edge is more elastic and will contract slightly compared to, for example, stocking stitch. By increasing before the rib edge, you avoid a visible difference in width between the rib edge and the rest of the body.

It’s very easy to cast off too tightly, and by making yarn overs while casting off (and simultaneously casting these off) you avoid a too tight cast off edge.

See DROPS video: How to bind off with yarn overs (yo)

To achieve an even increase (or decrease) you can increase on, for example: every 3rd and 4th row alternately, like so: work 2 rows and increase on the 3rd row, work 3 rows and increase on the 4th. Repeat this until the increase is complete.

See DROPS lesson: Increase or decrease 1 st on every 3rd and 4th row alternately

Should you prefer to work in the round instead of back and forth, you may of course adjust the pattern. You’ll need to add steeks mid-front (usually 5 stitches), and follow the instructions. When you would normally turn and work from the wrong side, simply work across the steek and continue in the round. At the end you’ll cut the piece open, pick up stitches to work bands, and cover the cut edges.

See DROPS video: How to knit steeks and cut open

Should you prefer to work back and forth instead of in the round, you may of course adjust the pattern so you work the pieces separately and then assemble them at the end. Divide the stitches for the body in 2, add 1 edge stitch in each side (for sewing) and work the front and back pieces separately.

See DROPS lesson: Can I adapt a pattern for circular needles into straight needles?

Pattern repeats can vary slightly in the different sizes, in order to get the correct proportions. If you’re not working the exact same size as the garment in the photo, yours might deviate slightly. This has been carefully developed and adjusted so that the complete impression of the garment is the same in all sizes.

Make sure to follow instructions and diagrams for your size!

If you have found a pattern you like which is available in women’s size it’s not very difficult to convert it to men’s size. The biggest difference will be the length of sleeves and body. Start working on the women size that you think would fit across the chest. The additional length will be worked right before you cast off for the armhole/sleeve cap. If the pattern is worked top-down you can add the length right after the armhole or before the first decrease on sleeve.

Regarding additional yarn amount, this will depend on how much length you add, but it is better with a skein too many than too few.

All yarns will have excess fibres (from production) that might come off as lint or shedding. Brushed yarns (ie hairier yarns) have more of these loose, excess fibres, causing more shedding.

Shedding also depends on what is worn under or over the garment, and whether this pulls at the yarn fibres. It’s therefore not possible to guarantee that there will be no shedding

Below are some tips on how to get the best result when working with hairier yarns:

1. When the garment is finished (before you wash it) shake it vigorously so the looser hairs come off. NOTE: do NOT use a lint roller, brush or any method that pulls at the yarn.

2. Place the garment in a plastic bag and put it in your freezer - the temperature will cause the fibres to become less attached to each other, and excess fibres will come off easier.

3. Leave in the freezer for a few hours before taking it out and shaking it again.

4. Wash the garment according to the instructions on the yarn label.

Pilling is a natural process that happens to even the most exclusive of fibers. It's a natural sign of wear and tear that is hard to avoid, and that is most visible in high friction areas of your garment like a sweater's arms and cuffs.

You can make your garment look as new by removing the pilling, using a fabric comb or a pill/lint remover.

Still can't find the answer you need? Then scroll down and leave your question so one of our experts can try to help you. This will be done normally within 5 to 10 working days.
In the meantime, you can read the questions and answers that others have left to this pattern or join the DROPS Workshop on Facebook to get help from fellow knitters/crocheters!

You might also like...

Post a comment to pattern DROPS 206-26

We would love to hear what you have to say about this pattern!

If you want to leave a question, please make sure you select the correct category in the form below, to speed up the answering process. Required fields are marked *.

Comments / Questions (17)

country flag Avril wrote:

I’m enjoying knitting this pattern . At the end of the main body instructions it says to increase a certain number of stitches and to work A6 over A5. It then says to change needles and work the ribbing. Please could you confirm that before I do the ribbing I complete all 4 rows of A6. \r\nThank you.

03.01.2024 - 17:44

DROPS Design answered:

Hi Avril, Yes, it is neatest if you finish A.6 before working the rib. Happy knitting!

04.01.2024 - 07:56

country flag Lil wrote:

I made 2 of these. Had to re-write thebpattern to change the increases because I dodnt like how the pattern increases look. But what an amazing look. My mother loved hers

20.05.2022 - 17:31

country flag Gun Carne wrote:

I diagrammet A4 för storlek XL en vimpel där spetsen visas till höger vad betyder den? Har försökt sticka detta mönster i en hel vecka stickat o repat upp, vägrar att ge upp. Tänkte om jag stickar en annan storlek, kanske det skulle lösa sig o att jag skulle förstå bättre. Då möts jag av problem som detta på engång. Har läst om förklaringar, hur man läser diagram men hittar inget svar. Vore så kul att kunna sticka denna kofta , blir glad för alla tips.

05.03.2021 - 07:13

DROPS Design answered:

Hej Gun, Vi skal få lagt til en symbolforklaring til denne også. Tak for info :)

05.03.2021 - 13:18

country flag Gun Carne wrote:

Hej hoppas på hjälp, jag stickar i storlek L. Har rätt antal maskor efter att jag börjat med halskant 121 maskor när jag börjar med OK så efter första varvet har jag 113 maskor, när det ska vara 129. Jag har räknat 7 maskor till ärmar och det stämmer, Nu har jag försökt sticka detta två gånger o varje gång blir det fel här 113 maskor verkar mer logisk eftersom man minskar med en maska i A5 4 gånger. Jag får det inte rätt. Hoppas på hjälp.

19.02.2021 - 16:11

DROPS Design answered:

Hej Gun. Det är nog dessvärre vi som skrivit det lite otydligt, det är efter du har stickat ett varv tillbaka du har det antalet maskor på stickan. Den textraden om antal maskor har nu flyttats till efter nästa varv. Tack för info! Mvh DROPS Design

22.02.2021 - 12:11

country flag Kathrine Sandmo wrote:

Hei. Jeg er ferdig med halskant og har 113 m som stemmer, ferdig med bærestykket's første omgang og da står det at jeg skal ha 121m på pinnen, men jeg har bare 105m??? Hvor, hva gjør jeg feil?

27.04.2020 - 21:16

DROPS Design answered:

Hej Kathrine, 4 rille, 1 rett, A.5 (= 24 masker)(= venstre forstykke), * 1 kast, 1 rett, *, strikk fra *-* totalt 3 ganger= 6m, 1 kast (= 7 masker erme), strikk A.5 (= 24 masker) , 1 masker rett (= midt bak), og strikk A.5 (= 24 masker) = bakstykke), * 1 kast, 1 rett *, strikk fra *-* totalt 3 ganger = 6, 1 kast (= 7 masker erme), strikk A.5 (= 24 masker)strikk 1 rett og 4 rille (= høyre forstykke) = 121 masker på pinnen. Det vil sige 29+7+49+7+29=121 m.

28.04.2020 - 14:03

country flag Daniela Hoffmann wrote:

Hallo, Zur Halsblende, wenn ich in 3 Runden 8 Maschen zunehme habe ich doch statt 121 wie inder Anleitung steht, 124 Maschen???? Und wenn ich laut Strickschrift A2 noch einen Umschlag zwischen 2 Maschen mache habe ich doch noch mehr, ich bin verwirrt🙈 Danke für die Antwort

10.02.2020 - 16:44

DROPS Design answered:

Liebe Frau Hoffmann, bei der letzten Reihe von den Diagrammen haben Sie: 4 M kraus rechts, A.1 (= 3 M), A.2 (= 24 M), 3 M re, A.2 (= 24 M), A.3 (= 5 M), A.2 (= 24 M), 3 M re, A.2 (= 24 M), A.4 (= 3 M), 4 M kraus re dh = 4+3+24+3+24+5+24+3+24+3+4= 121 M. Viel Spaß beim stricken!

11.02.2020 - 09:21

country flag L Hansen wrote:

Jeg skal tage ud i hver side af ærmerne 4 gange, og det skal give 24 masker i alt, men det giver da kun 16 m 🤔 Hvad gør jeg galt?

21.01.2020 - 13:01

DROPS Design answered:

Hei L Hansen. Litt usikker på hvor du er i oppskriften, under BÆRESTYKKE? Hvilken størrelse strikker du og hvor mange masker har du på pinnen? mvh DROPS design

27.01.2020 - 14:07

country flag Monica wrote:

Hej får inte ökningarna att stämma, öka varannat varv på oket 22 ggr står det efter 11 ökningar stämmer mask antalet. Har jag gjort fel nån stans tro? Eller är det fel i mönstret, ska kolla igenom mönster i morgon igen /Monica

03.01.2020 - 23:08

DROPS Design answered:

Hei Monica. Det skal økes 8 masker 22 ganger på annenhver rad, dette tilsvarer 176 masker økt, og gir et totalt maskeantall på 305 masker. Pass på å bare øke på annenhver rad og at det bare økes 8 masker per rad. Lykke til!

06.01.2020 - 10:55

country flag Anja Wade wrote:

Working on the yoke, started with the right number of stitches. How can I end up with more stitches at the end when the first row of A5 is all about decreasing? I am so confused, ready to give up.

10.12.2019 - 00:19

DROPS Design answered:

Hi Anja, The decreases in A.5 are increased again with yarn overs on the next row, so A.5 has no effect on the number of stitches. In addition you have yarn-overs between the patterns which increase the overall number of stitches. Hope this helps and happy knitting!

10.12.2019 - 09:00

country flag Małgorzata wrote:

Bardzo ładny ,oryginalny.Od razu chciałoby się go dziergać.

15.11.2019 - 12:29