
Looking for a yarn?


Comments / Questions (37)
![]() Skye wrote:
Skye wrote:
Jeg var igang med at strikke kjolen men nu er strikkeanvisning væk fra siden
21.04.2025 - 16:59DROPS Design answered:
Hej, jo jeg kan se opskriften her på siden... hvad mener du med at den er væk.... ?
30.04.2025 - 12:14
![]() Randy wrote:
Randy wrote:
Can I make it longer
18.04.2025 - 06:53DROPS Design answered:
Dear Randy, yes, you can lengthen it by continuing straight in off white or making the stripes longer, so that they are equally spread for the new length. Happy knitting!
20.04.2025 - 23:16
![]() San De Costa wrote:
San De Costa wrote:
Goede middag, ik ben nu bij A1. Moet ik dit toepassen boven de tweede markeerdraad (mouw) en de vierde markeerdraad (mouw)? Of boven alle vier de markeerdraden
13.10.2024 - 14:32DROPS Design answered:
Dag San,
Je breit A.1 over alle raglanlijnen, dus bij alle overgangen tussen het lijf en de mouwen. Dus 4 keer in totaal. Inderdaad boven alle vier de markeerdraden.
19.10.2024 - 11:09
![]() Inger Valberg wrote:
Inger Valberg wrote:
Jeg liker ikke kjoler med splitt; vil det være problemer i forhold til bevegelighet hvis jeg ikke deler inn i splitter?
10.08.2024 - 19:00DROPS Design answered:
Hei Inger, Fasongen på skjørtet er såpass løs at det burde ikke hindre bevegelighet om du strikker kjolen uten splitt i hver side. God fornøyelse!
12.08.2024 - 06:36
![]() Hélène Gervais wrote:
Hélène Gervais wrote:
Bonjour, je suis rendue à dos/devant et je ne comprends pas car si je tricote le dos et le devant séparément, il devra y avoir une couture au final. Merci
12.05.2024 - 18:30DROPS Design answered:
Bonjour Mme Gervais, après la division pour les manches, vous tricotez en rond jusqu'à ce que l'ouvrage mesure 43 ou 44 cm (cf taille) à partir de la division, puis vous terminez le devant et le dos séparément pour les fentes des côtés. Bon tricot!
13.05.2024 - 08:10
![]() Hélène Gervais wrote:
Hélène Gervais wrote:
Pour le A1 si je fais une jetée, je vais augmenter ma quantité de mailles et c’est écrit qu’on n’augmente plus. Merci de m’éclairer
02.05.2024 - 01:14DROPS Design answered:
Bonjour Mme Gervais, effectivement, lorsque l'on tricote A.1, on n'augmente plus, mais on conserve les jetés des raglans pour que la ligne des trous/jours continue comme avant jusqu'à la fin de l'empiècement. Bon tricot!
02.05.2024 - 08:31
![]() Hélène Gervais wrote:
Hélène Gervais wrote:
Bonjour et merci d'avance. Comment fait-on un jeté torse et une maille torse. J'aime beaucoup les vidéos, ça m'aide à comprendre si vous en avez une.
01.05.2024 - 13:55DROPS Design answered:
Bonjour Mme Gervais, dans cette vidéo, nous montrons comment tricoter un pull de haut en bas, les augmentations sont faites avec 1 jeté qui est tricoté torse à l'endroit au tour suivant; vous pourrez procéder de la même façon pour cette robe. Bon tricot!
02.05.2024 - 07:53
![]() Maria Johansson wrote:
Maria Johansson wrote:
Finns det mönster så man kan sticka denna klänning nerifrån och upp
19.04.2024 - 17:52DROPS Design answered:
Hei Maria. Nei, denne er kun skrevet ovenfra og ned. Men har du strikket litt fra før, er det er ikke så vanskelig å konventrer den til å kunne strikkes nedenifra og opp. mvh DROPS Design
22.04.2024 - 13:19
![]() Marianna Valtasola wrote:
Marianna Valtasola wrote:
Missä on Evening Out mekon ruutupiirros?
20.04.2023 - 16:57DROPS Design answered:
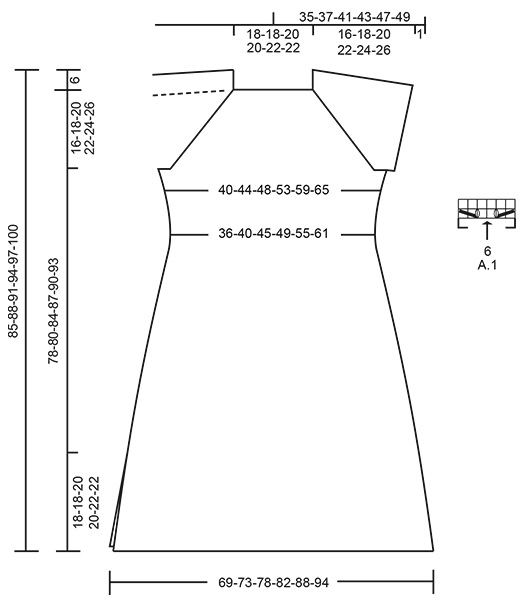
Piirros löytyy mittapiirroksen oikealta puolelta.
20.04.2023 - 17:07
![]() Eva wrote:
Eva wrote:
Hej Jeg forstår ikke hvad jeg skal gøre med A1. Kan godt se diagrammet. Skal jeg strikke alm ret 6 masker ? Håber I kan hjælpe
21.05.2022 - 21:26DROPS Design answered:
Hei Eva. Når du øker til raglan lages det et kast før og etter merketrådene (= 8 kast/økninger på omgnagen). På neste omgang strikkes kastene rett slik at det blir hull (hullmønstret i raglanlinjen du ser på bildet). Når du er ferdig med alle økningene til raglan er det fremdeles noen cm til arbeidet skal deles (hvor mange cm kommer an på hvilken str. du strikker), derfor må man nå strikke etter diagram A.1, slik at hullmønstret fortsettes. A.1 strikkes i hver overgang mellom bol og ermekanter (pilen i A.1 markerer merketråden i raglanlinjen). mvh DROPS Design
23.05.2022 - 09:22
|
|||||||||||||
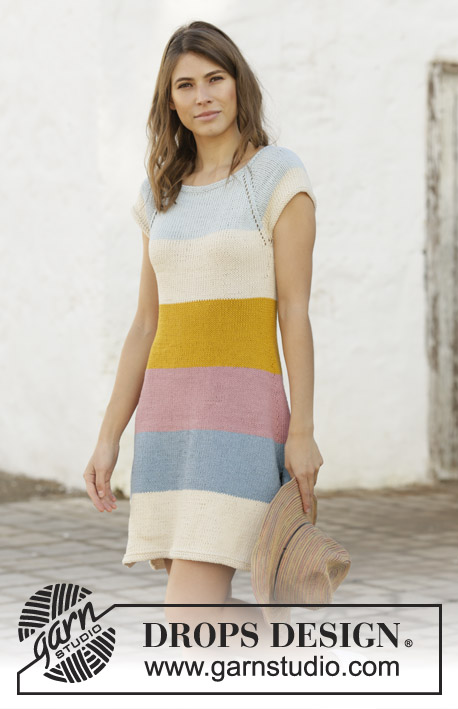
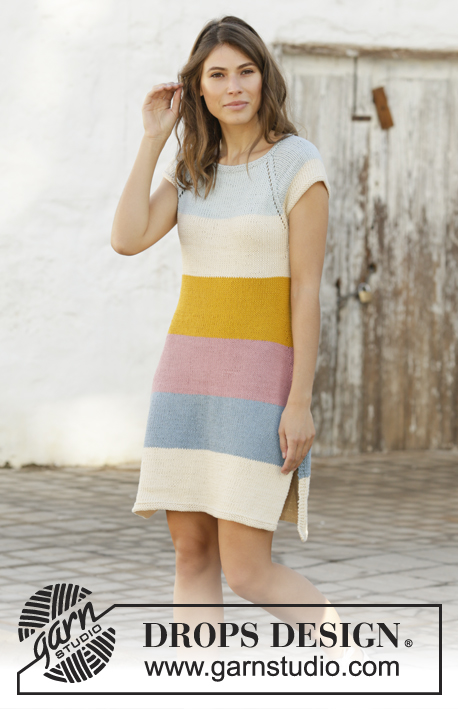
Evening Out#eveningoutdress |
|||||||||||||
 |
 |
||||||||||||
Knitted dress in DROPS Paris with stripes, raglan and split in sides, worked top down. Sizes S - XXXL.
DROPS 200-24 |
|||||||||||||
|
------------------------------------------------------- EXPLANATIONS FOR THE PATTERN: ------------------------------------------------------- RIDGE/GARTER STITCH (worked in the round): 1 ridge = 2 rounds. Knit 1 round and purl 1 round. RIDGE/GARTER STITCH (worked back and forth): 1 ridge = Knit 2 rows. INCREASE TIP-1 (for yoke): To work out how to increase evenly, count the total number of stitches on needle (e.g. 88 stitches) and divide by the number of increases to be made (e.g. 12) = 7.3. In this example, increase by making 1 yarn over after approx. each 7th stitch. On the next round knit the yarn overs twisted to avoid holes. PATTERN (for raglan): See diagram A.1. STRIPES: The whole body is worked in stockinette stitch and with 6 stripes; each stripe is worked to a height of 13-13.5-14-14.5-15-15.5 cm = 5⅛"-5¼"-5½"-5¾"-6"-6⅛" in the following colors: First ice blue, then off white, mustard, old pink, light blue and off white. RAGLAN: Increase to raglan on each side of the 4 marker threads as follows: Start 1 stitch before the marker thread, 1 yarn over, knit 2 (marker thread sits in middle of these 2 stitches), 1 yarn over (= 8 stitches increased on round). On the next round knit the yarn overs to leave holes. DECREASE TIP (for sides of dress): Start 5 stitches before marker thread, knit 2 together, knit 6 (marker thread sits in middle of these 6 stitches), slip 1 stitch as if to knit, knit 1 and pass slipped stitch over the knitted stitch (= 2 stitches decreased). INCREASE TIP-2 (for sides of dress): Start 3 stitches before marker thread, 1 yarn over, knit 6 (marker thread sits in middle of these 6 stitches) 1 yarn over (= 2 stitches increased). On the next round work yarn overs twisted to avoid holes. ------------------------------------------------------- START THE PIECE HERE: ------------------------------------------------------- DRESS: The piece is worked in the round with circular needle, top down to where the split begins. Then front and back pieces are finished separately, back and forth. The sleeve-edges are worked in the round with double pointed needles. NECK: Cast on 88-88-96-96-102-102 stitches with short circular needle size 4 mm = US 6 and ice blue. Work 2 RIDGES in the round – see description above. Change to circular needle size 5 mm = US 8. Knit 1 round where you increase 12-12-12-12-14-14 stitches evenly spaced – read INCREASE TIP-1 = 100-100-108-108-116-116 stitches. Insert 4 marker threads for raglan in the piece as follows, without working the stitches: First marker thread is inserted after the first 15-15-17-17-19-19 stitches (= ½ back piece), 2nd marker thread after the next 20 stitches (= sleeve), 3rd after the next 30-30-34-34-38-38 stitches (= front piece) and 4th marker thread is inserted after the next 20 stitches (= sleeve). There are 15-15-17-17-19-19 stitches left on round after the last marker thread. Then work yoke as described below. YOKE: Work the colors as described in STRIPES – see description above. AT THE SAME TIME on the first round increase to RAGLAN – see description above, on each side of the 4 marker threads (= 8 stitches increased). Increase like this every 2nd round a total of 14-17-18-22-23-26 times. REMEMBER THE KNITTING GAUGE! After the last increase there are 212-236-252-284-300-324 stitches on needle. Continue with stripes without further increases to raglan, but to avoid the rows of holes along the raglan lines being broken, work A.1 in each transition between body and sleeves (arrow in A.1 marks the marker thread in raglan line). When the piece measures 16-18-20-22-24-26 cm = 6¼"-7"-8"-8¾"-9½"-10¼" from the cast-on edge mid front, divide the piece for body and sleeves as follows: Work the first 31-34-37-41-45-49 stitches (= ½ back piece), place the next 44-50-52-60-60-64 stitches on 1 thread for sleeve, cast on 6-6-8-8-10-12 stitches on needle (= in side under sleeve), work the next 62-68-74-82-90-98 stitches (= front piece), place the next 44-50-52-60-60-64 stitches on 1 thread for sleeve, cast on 6-6-8-8-10-12 stitches on needle (= in side under sleeve) and work the remaining 31-34-37-41-45-49 stitches (= ½ back piece). Cut the strand. Body and sleeves are finished separately. THE PIECE IS NOW MEASURED FROM HERE! BODY: = 136-148-164-180-200-220 stitches. Insert 1 marker thread in the middle of the 6-6-8-8-10-12 stitches cast on in each side = 68-74-82-90-100-110 stitches between the 2 marker threads. Start the round at the marker thread on the right side (when garment is worn). AT THE SAME TIME when the piece measures 2 cm = ¾" from the division, decrease 2 stitches in each side – read DECREASE TIP (= 4 stitches decreased). Decrease like this every 2 cm = ¾" a total of 3 times in each side = 124-136-152-168-188-208 stitches. When the piece measures 16 cm = 6¼" from the division increase 2 stitches in each side – read INCREASE TIP-2 (= 4 stitches increased). Increase like this every 1½ cm = ½" a total of 28 times in each side. AT THE SAME TIME when the piece measures 43-44-43-44-43-43 cm = 17"-17¼"-17"-17¼"-17"-17" divide for split in sides at both marker threads and front and back pieces are finished separately. Leave the stitches for the back piece on needle or place on 1 thread. Continue with stockinette stitch back and forth, but the 3 outermost stitches on each side are worked in GARTER STITCH – see description above - but NOTE: After the split on each side you continue to increase in each side, but you now increase inside the 3 edge stitches in garter stitch on each side. After the last increase there are 118-124-132-140-150-160 stitches on needle. After the last stripe, the piece measures 78-81-84-87-90-93 cm = 30¾"-32"-33"-34¼"-35½"-36⅝" mid front (the full length of the dress will be 6 cm = 2⅜" longer at the shoulder) – if you want a longer dress then add the length here. Then change to needle size 4 mm = US 6 and work 3 ridges back and forth over all stitches. Bind off with knit from the right side. Work back piece in the same way. SLEEVE EDGE: Place the 44-50-52-60-60-64 stitches from the thread on the one side of the piece on double pointed needle size 4 mm = US 6 and knit up 1 stitch in each of the 6-6-8-8-10-12 stitches cast on under the sleeve = 50-56-60-68-70-76 stitches. Work 2 ridges using the same color as the thread-stitches, and then bind off with knit. Work the other sleeve-edge in the same way. |
|||||||||||||
Diagram explanations |
|||||||||||||
|
|||||||||||||
|
|||||||||||||
Have you finished this pattern?Tag your pictures with #dropspattern #eveningoutdress or submit them to the #dropsfan gallery. Do you need help with this pattern?You'll find 27 tutorial videos, a Comments/Questions area and more by visiting the pattern on garnstudio.com. © 1982-2025 DROPS Design A/S. We reserve all rights. This document, including all its sub-sections, has copyrights. Read more about what you can do with our patterns at the bottom of each pattern on our site. |
|||||||||||||


With over 40 years in knitting and crochet design, DROPS Design offers one of the most extensive collections of free patterns on the internet - translated to 17 languages. As of today we count 314 catalogs and 11822 patterns - 11812 of which are translated into English (US/in).
We work hard to bring you the best knitting and crochet have to offer, inspiration and advice as well as great quality yarns at incredible prices! Would you like to use our patterns for other than personal use? You can read what you are allowed to do in the Copyright text at the bottom of all our patterns. Happy crafting!
Post a comment to pattern DROPS 200-24
We would love to hear what you have to say about this pattern!
If you want to leave a question, please make sure you select the correct category in the form below, to speed up the answering process. Required fields are marked *.