
Looking for a yarn?


Comments / Questions (36)
![]() Kirsten Møller wrote:
Kirsten Møller wrote:
Ser flot ud! Prøver at gå i gang 👍
28.05.2024 - 08:18
![]() Dorthe I wrote:
Dorthe I wrote:
Allerførst tusind tak for de mest fantastiske opskrifter - og garn👌\r\nMit spørgsmål lyder 202 -11 Birch Wood skal efter 1.pil’s indtagning have 251 masker .\r\nDer står; strik 23 mønstre i bredden i A8.\r\nJeg får altså 24 mønstre i bredden ( 251- 10 =241:10 = 24.
15.08.2023 - 22:32
![]() Doris Brøns wrote:
Doris Brøns wrote:
Prøver da bare igen Jeg er i gang med at strikke 202-12. Så mit spørgsmål er: er det rigtig at jeg får 20 rapporter. Samtidig vil jeg høre hvorfor skal man tage ud midt i det hele og ind igen. Med venlig hilsen Doris Brøns
26.06.2023 - 09:51DROPS Design answered:
Hei Doris. Du skal strikke 21 rapporter av A.2. I str. XXL har du 231 masker og etter at du har byttet til rundpinne 5,5 strikker du 5 stolpemasker + A.1 (over 10 masker) + A.2 21 ganger (1 rapport på 10 masker x 21 ganger) + A.3 (1 maske) + 5 stoplemasker = 5+10+210+1+5= 231 masker. Du øker masker i diagrammene slik at det ikke snurper seg, men heller får en penere overgang mellom hullmønster og glattstrikkpartiene. mvh DROPS Design
26.06.2023 - 13:48
![]() Doris Brøns wrote:
Doris Brøns wrote:
Jeg er igang med at strikke 202-12 i strikke xl. Der står at der er 19 rapporter a 10 masker, kan det så være rigtig at jeg har 20 rapporter? Er det rigtig at man skal tage ud på A,5 og ind igen. Med venlig hilsen Doris Brøns
26.06.2023 - 09:45DROPS Design answered:
Hei Doris. Se våre svar over. mvh DROPS Design
26.06.2023 - 13:49
![]() Yasmine wrote:
Yasmine wrote:
Merci pour ce beau modèle de veste !
29.09.2022 - 02:41
![]() Yasmine wrote:
Yasmine wrote:
Bonjour ! J’ai 3 questions concernant les symboles du motif A.1\r\n1) Le 1er rang est- il à l’envers ?\r\n2) On commence le rang par 1 jeté et 2 mailles ensemble à l’envers, puis 3 mailles (endroit ou envers) puis 1 jeté et 2 mailles ensemble ou un surjet simple ?\r\n3) Les 2 symboles signifient chacun 1 jeté, 3 m. ensemble à l’envers, 1 jeté. Ce qui nous donne 8 mailles au lieu de 10 \r\nMerci de m’éclairer et de m’excuser si je me suis trompée !
29.09.2022 - 02:23DROPS Design answered:
Bonjour Yasmine, le 1er rang de A.1 ainsi que tous les rangs impairs se tricotent sur l'endroit, tricotez ainsi: (1 jeté, 2 m ens à l'end, 3 m end, 1 jeté, 1 surjet simple, 3 m end) =1+1+3+1+1+3=10. Pensez à bien mettre un marqueur entre chaque diagramme (après A.1 puis après chaque A.2) pour bien vérifier votre nombre de mailles à chaque rang. Bon tricot!
29.09.2022 - 08:50
![]() Patty Walk wrote:
Patty Walk wrote:
On the body of this jacket, do you do A4 A5 A6 two times or three times before you get to the yoke? The pattern says to repeat A4 A5 A6 one more time but the picture shows the pattern repeated three times total before the yoke section.
06.08.2022 - 10:09DROPS Design answered:
Dear Patty, if you have the correct gauge there should be only 2 repeats up to armholes. You have 31-34 cm from the start to the yoke. This is approx. 70 rows (if you have the right gauge). The lace pattern diagrams (A.4, A.5 and A.6) have 25 rows each. With 2 repeats of each, you would have 50 rows worked. Adding the first rows with diagrams A.1 and A.2, you would not have enough rows for a third repeat, or else the body would be much longer. Also, afterwards, you continue the yoke with A.7, A.8 and A.9 (which are similarly looking). Happy knitting!
07.08.2022 - 22:38
![]() Patty Walk wrote:
Patty Walk wrote:
The directions for the sleeve say to work A5 vertically and then repeat A4 A5 A6 1 more time. The sleeve is not long enough with only one repeat of A4 A5 A6 so shouldn't I do this diagram one more time--a total of three times? The picture looks like the diagram is repeated 3 times.
06.07.2022 - 10:50DROPS Design answered:
Dear Mrs Walk, A.5-A.6 are worked only 2 times in height on sleeves - you will then work A.7/A.8 on yoke together with body. Just cast off the middle sts for armhole on the last round of the diagrams. Happy knitting!
06.07.2022 - 14:12
![]() Patty Walk wrote:
Patty Walk wrote:
Do I continue doing the A5 diagram only until I finish all of the increases and then do diagram A4, A5, A6? What if I finish the increases in the middle of the A5 diagram? Do I finish A5 before I begin A4 A5 A6?
01.07.2022 - 09:09DROPS Design answered:
Dear Mrs Walk, you are starting increases mid under sleeve when working stocking stitch but at the same time you work A.5 when piece measures 21-19-19-18-16-14 cm (continue increases if they are not done - just make sure the middle stitch on the upper sleeve is the stitch with a star in the diagram), and work the new stitches as shown in A.4./A.5/A.6 so that after all increases are done the sts on needle are worked as follows: Knit 0-3-1-3-0-1, A.4 (= 10 stitches), A.5 (= 4-4-5-5-6-6 repetitions of 10 stitches), A.6 over 1 stitch and knit 0-3-1-3-0-1 (see your size). Happy knitting!
01.07.2022 - 16:06
![]() Patty Walk wrote:
Patty Walk wrote:
When working the sleeve, how do you do the row following the yarn overs where you are supposed to do a twisted stitch but you are purling ? How do you do a twisted stitch to avoid a hole when you are purling? Thank you for your help.
30.06.2022 - 10:27DROPS Design answered:
Dear Mrs Walk, this video shows (time code 01:12 ) how to purl a yarn over twisted, ie purl it in the back loop - can this help? Happy knitting!
30.06.2022 - 14:18
|
||||||||||||||||||||||||||||||||||
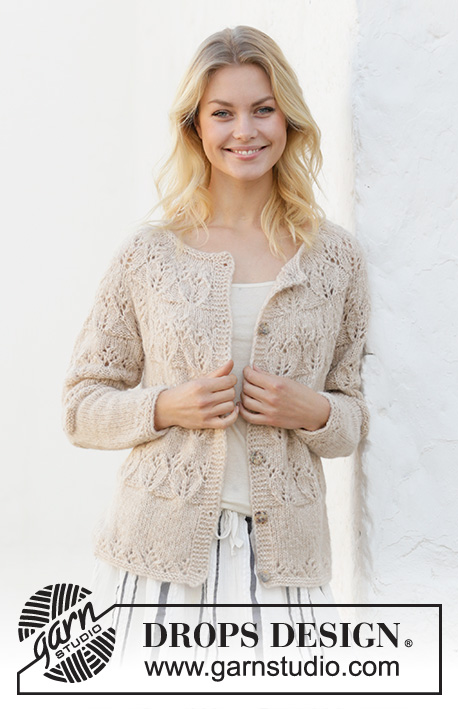
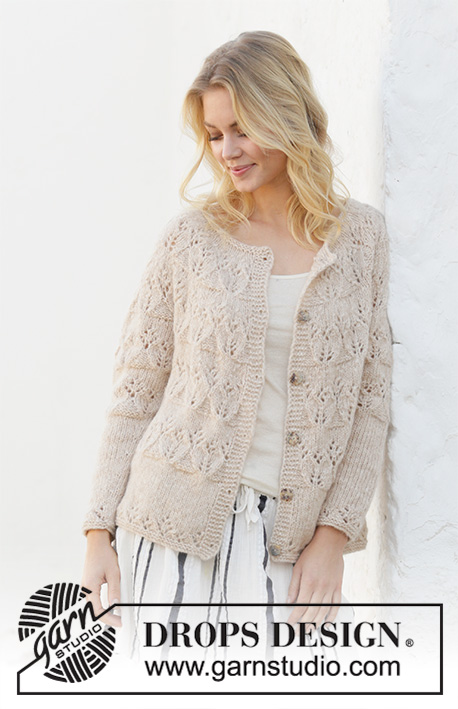
Birch Woods Jacket#birchwoodsjacket |
||||||||||||||||||||||||||||||||||
 |
 |
|||||||||||||||||||||||||||||||||
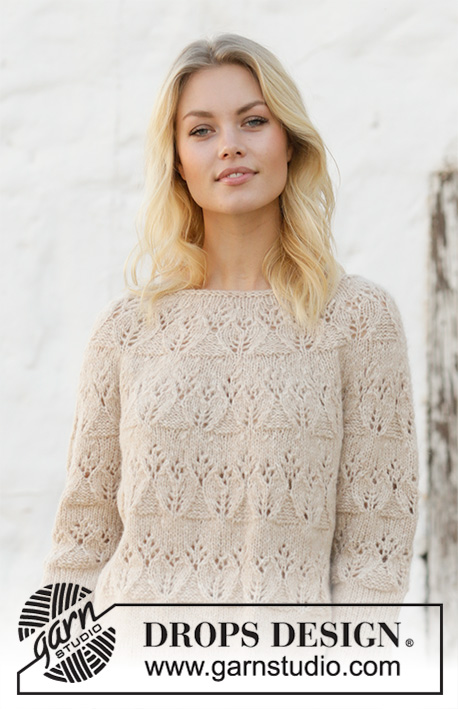
Knitted jacket with round yoke in DROPS Air. Piece is knitted with lace pattern. Size: S - XXXL
DROPS 202-12 |
||||||||||||||||||||||||||||||||||
|
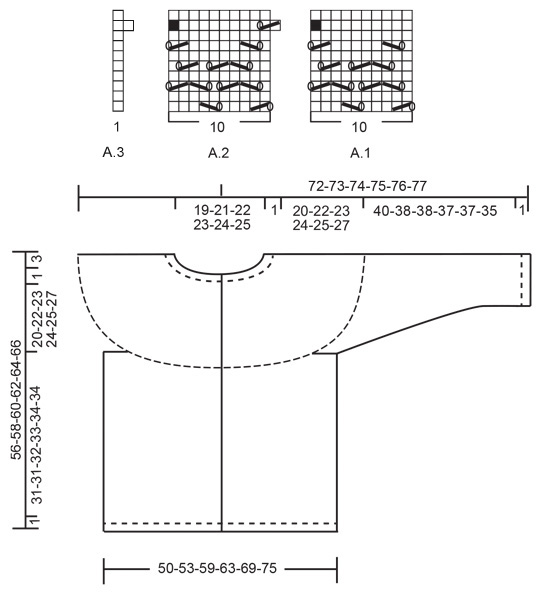
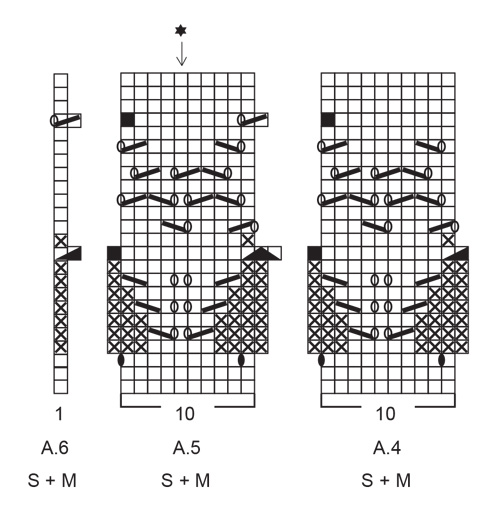
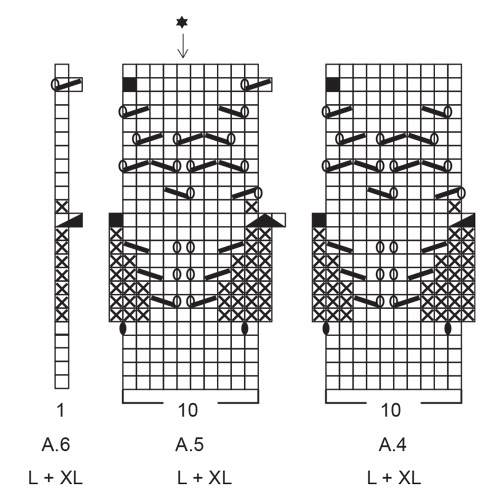
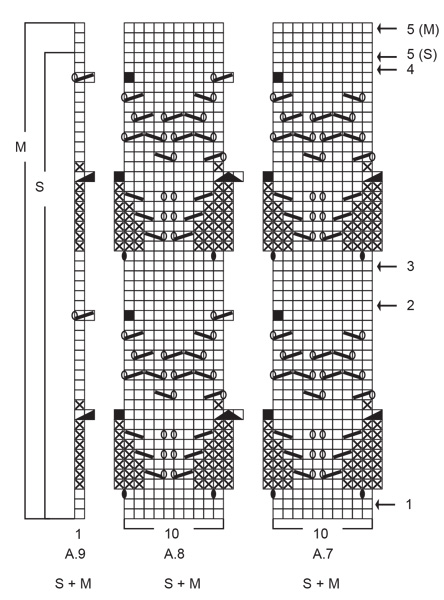
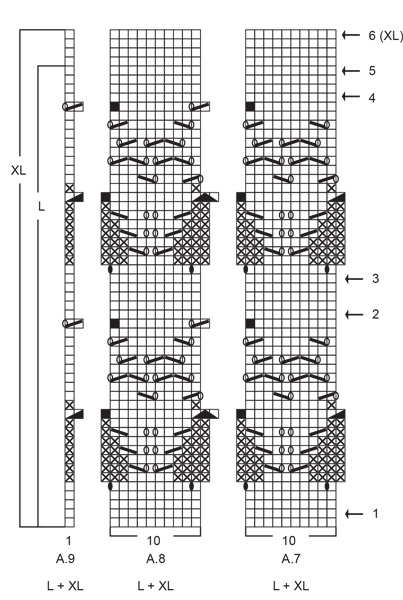
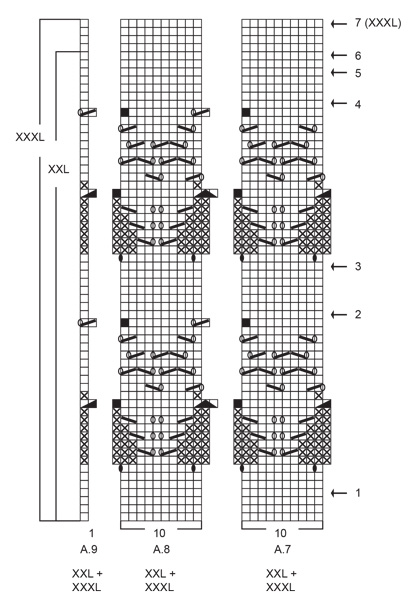
---------------------------------------------------------- EXPLANATION FOR THE PATTERN: ---------------------------------------------------------- GARTER STITCH (back and forth): Knit all rows. 1 ridge vertically = knit 2 rows. GARTER STITCH (worked in the round): 1 ridge = 2 rounds. Knit 1 round and purl 1 round. BUTTONHOLES: Decrease for buttonholes on right band. 1 BUTTONHOLE = knit third and fourth stitch from edge together and make 1 yarn over. On next row knit yarn over = hole. Decrease for buttonholes when piece measures: S: 3, 12, 22, 32, 42 and 51 cm = 1⅛", 4¾", 8¾", 12½", 16½" and 20" M: 3, 13, 23, 33, 43 and 53 cm = 1⅛", 5⅛", 9", 13", 17" and 21" L: 4, 15, 25, 35, 45 and 55 cm = 1½", 6", 9¾", 13¾", 17¾" and 21⅝" XL: 3, 12, 21, 30, 39, 48 and 57, cm = 1⅛", 4¾", 8¼", 11 3/4, 15 1/4, 19" and 22½" XXL: 3, 13, 22, 31, 40, 49 and 59 cm = 1⅛", 5⅛", 8¾", 12¼", 15¾", 19¼" and 23¼" XXXL: 4, 15, 24, 33, 42, 51 and 61 cm = 1½", 6", 9½", 13",16½", 20" and 24" PATTERN: See diagrams A.1 to A.9. Choose diagram for your size (applies to A.4 to A.9). INCREASE TIP (applies to sleeves): Work until 1 stitch remains before marker thread, 1 yarn over, knit 2 (marker thread is in the middle of these 2 stitches), 1 yarn over. On next round knit yarn overs twisted to avoid holes. Then work the new stitches in stockinette stitch/pattern. DECREASE TIP (evenly): All decreases are done from the right side! To calculate how to decrease evenly, use the total number of stitches on row (e.g. 249 stitches), minus band stitches (10 stitches) and divide the remaining stitches by number of decreases to be done (e.g. 38) = 6.3. In this example decrease by knitting alternately approx. every 5th and 6th stitch and every 6th and 7th stitch together. ---------------------------------------------------------- START THE PIECE HERE: ---------------------------------------------------------- JACKET - SHORT OVERVIEW OF THE PIECE: Work back and forth on circular needle from mid front, and work bottom up to armholes. Work sleeves in the round on double pointed needles/a short circular needle, bottom up. Then slip body and sleeves together and finish yoke back and forth on circular needle from mid front. BODY: Cast on 171-181-201-211-231-251 stitches (including 5 band stitches in each side towards mid front) on circular needle size 5 mm = US 8 with Air. Work 2 ridges in GARTER STITCH back and forth - read explanation above! Remember BUTTONHOLES on right band - read explanation above. Switch to circular needle size 5.5 mm = US 9 and work from right side as follows: 5 band stitches in garter stitch, A.1 over the next 10 stitches, repeat A.2 until 6 stitches remain (= 15-16-18-19-21-23 repetitions of 10 stitches), A.3 over next stitch, finish with 5 band stitches in garter stitch. Continue until A.1, A.2 and A.3 have been worked vertically. Then work in stockinette stitch with 5 band stitches in garter stitch towards mid front until piece measures 12-12-13-14-13-13 cm = 4¾"-4¾"-5⅛"-5½"-5⅛"-5⅛" (or desired measurements - adjust the length of garment here is desired) - REMEMBER THE KNITTING GAUGE! Work next row from right side as follows: 5 band stitches in garter stitch, A.4 over the next 10 stitches, repeat A.5 until 6 stitches remain (= 15-16-18-19-21-23 repetitions of 10 stitches), A.6 over next stitch, finish with 5 band stitches in garter stitch. Continue this pattern until A.4, A.5 and A.6 have been worked vertically. Repeat A.4, A.5 and A.6 1 more time vertically, but work last row from wrong side as follows: Work 42-45-49-51-55-59 stitches as before (= left front piece), bind off the next 6-6-8-8-10-12 stitches for armhole, work 75-79-87-93-101-109 stitches as before (= back piece), bind off the next 6-6-8-8-10-12 stitches for armhole and work the last 42-45-49-51-55-59 stitches as before (= right front piece) = 159-169-185-195-211-227 stitches. Piece measures approx. 32-32-33-34-35-35 cm = 12½"-12½"-13"-13⅜"-13¾"-13¾". Put piece aside and work the sleeves. SLEEVE: Cast on 31-33-35-37-39-41 stitches on double pointed needles size 5 mm = US 8 with Air. Work 2 ridges in GARTER STITCH in the round - read explanation above. Insert 1 marker at beginning of round and move the marker thread upwards when working. Use marker thread later when increasing mid under sleeve. Switch to double pointed needles/circular needle size 5.5 mm = US 9. Work next round as follows: Knit 0-1-2-3-4-0, A.1 over the next 10 stitches, repeat A.2 until 1-2-3-4-5-1 stitch remains on round (= 2-2-2-2-2-3 repetitions of 10 stitches), finish by knitting 1-2-3-4-5-1. Continue until A.1 and A.2 have been worked vertically. Then work in stockinette stitch - REMEMBER THE KNITTING GAUGE! When piece measures 7-7-8-7-9-8 cm = 2¾"-2¾"-3⅛"-2¾"-3½"-3⅛", increase 1 stitch on each side of marker thread mid under sleeve - read INCREASE TIP. Increase like this every 3½-2½-2-2-1½-1½ cm = 1¼"-1"-¾"-¾"-½"-½" 10-12-14-15-16-16 times in total = 51-57-63-67-71-73 stitches. AT THE SAME TIME when piece measures 21-19-19-18-16-14 cm = 8¼"-7½"-7½"-7"-6¼"-5½" (or desired measurements - adjust the sleeve length here if desired), work A.5 over all stitches – adjust so that stitch with star is mid on top of sleeve, and adjust pattern out to each side. I.e. when increases under sleeve are done, work as follows: Knit 0-3-1-3-0-1, A.4 (= 10 stitches), A.5 (= 4-4-5-5-6-6 repetitions of 10 stitches), A.6 over 1 stitch and knit 0-3-1-3-0-1. Work the stitches that do not fit the pattern in stockinette stitch, and work the increased stitches in pattern A.4/A.5/A.6 (make sure to have the same number of decreases and yarn overs in the pattern). Continue this pattern until A.5 has been worked vertically. Repeat A.4/A.5/A.6 1 more time vertically, but work last round as follows: Bind off the first 3-3-4-4-5-6 stitches for armhole, work 45-51-55-59-61-61 stitches as before and bind off the last 3-3-4-4-5-6 stitches for armhole = 45-51-55-59-61-61 stitches. Piece measures approx. 41-39-39-38-38-36 cm = 16⅛"-15¼"-15¼"-15"-15"-14¼" (shorter measurements in the larger sizes because of longer yoke). Put piece aside and knit the other sleeve the same way. YOKE: Slip sleeves on to same circular needle 5.5 mm = US 9 as body where armholes were bind off = 249-271-295-313-333-349 stitches (including 5 band stitches in each side towards mid front). NOW MEASURE PIECE FROM HERE! Begin from right side and work first row as follows: 5 band stitches in garter stitch, A.7 over the next 10 stitches, repeat A.8 until 6 stitches remain (number of stitches does not fit on 1st row – except in size M), A.9 over next stitch, finish with 5 band stitches in garter stitch. Continue this pattern - AT THE SAME TIME on round marked with arrow in A.7/A.8 decrease evenly as explained below: ARROW-1 (= wrong side): Decrease 38-40-44-42-42-38 stitches evenly - read DECREASE TIP = 211-231-251-271-291-311 stitches. (Now work A.8 19-21-23-25-27-29 times in width). ARROW-2 (= wrong side): Decrease 40-50-50-50-40-40 stitches evenly = 171-181-201-221-251-271 stitches. (Now work A.8 15-16-18-20-23-25 times in width). ARROW-3 (= wrong side): Decrease 40-40-40-40-40-40 stitches evenly = 131-141-161-181-211-231 stitches. (Now work A.8 11-12-14-16-19-21 times in width). ARROW-4 (= wrong side): Decrease 28-30-42-30-40-40 stitches evenly = 103-111-119-151-171-191 stitches. ARROW-5: Decrease 16-20-18-28-42-30 stitches evenly = 87-91-101-123-129-161 stitches. SIZE: XL-XXL: ARROW-6: Decrease 18-20 stitches evenly = 105-109 stitches. SIZE XXXL: ARROW-6 (= wrong side): Decrease 28 stitches evenly = 133 stitches. ARROW-7 (= wrong side): Decrease 20 stitches evenly = 113 stitches. ALL SIZES: When entire A.7, A.8 and A.9 have been worked, yoke measures approx. 20-22-23-24-25-27 cm = 8"-8¾"-9"-9½"-9¾"-10⅝". Switch to circular needle size 5 mm = US 8 and work 2 ridges in garter stitch back and forth. Loosely bind off by knitting from right side but make sure to avoid a tight bind-off edge (switch to larger needle size if needed). ASSEMBLY: Sew the opening under the sleeves. Sew the buttons on to the left band. |
||||||||||||||||||||||||||||||||||
Diagram explanations |
||||||||||||||||||||||||||||||||||
|
||||||||||||||||||||||||||||||||||
|
||||||||||||||||||||||||||||||||||
|
||||||||||||||||||||||||||||||||||
|
||||||||||||||||||||||||||||||||||

|
||||||||||||||||||||||||||||||||||
|
||||||||||||||||||||||||||||||||||
|
||||||||||||||||||||||||||||||||||
|
||||||||||||||||||||||||||||||||||
Have you finished this pattern?Tag your pictures with #dropspattern #birchwoodsjacket or submit them to the #dropsfan gallery. Do you need help with this pattern?You'll find 27 tutorial videos, a Comments/Questions area and more by visiting the pattern on garnstudio.com. © 1982-2025 DROPS Design A/S. We reserve all rights. This document, including all its sub-sections, has copyrights. Read more about what you can do with our patterns at the bottom of each pattern on our site. |
||||||||||||||||||||||||||||||||||


With over 40 years in knitting and crochet design, DROPS Design offers one of the most extensive collections of free patterns on the internet - translated to 17 languages. As of today we count 314 catalogs and 11822 patterns - 11812 of which are translated into English (US/in).
We work hard to bring you the best knitting and crochet have to offer, inspiration and advice as well as great quality yarns at incredible prices! Would you like to use our patterns for other than personal use? You can read what you are allowed to do in the Copyright text at the bottom of all our patterns. Happy crafting!
Post a comment to pattern DROPS 202-12
We would love to hear what you have to say about this pattern!
If you want to leave a question, please make sure you select the correct category in the form below, to speed up the answering process. Required fields are marked *.