
Looking for a yarn?


Comments / Questions (49)
![]() Sabine Liegl wrote:
Sabine Liegl wrote:
Hallo zusammen, ich bin etwas unsicher bei den Seitenteilen.. Häkle ich einmal Reihe 1-3 und dann mehrmals Reihe 2- 3 mit Dreifachstäbchen an den entsprechenden Stellen? Ich bin etwas verwirrt. Danke!
30.11.2023 - 12:18DROPS Design answered:
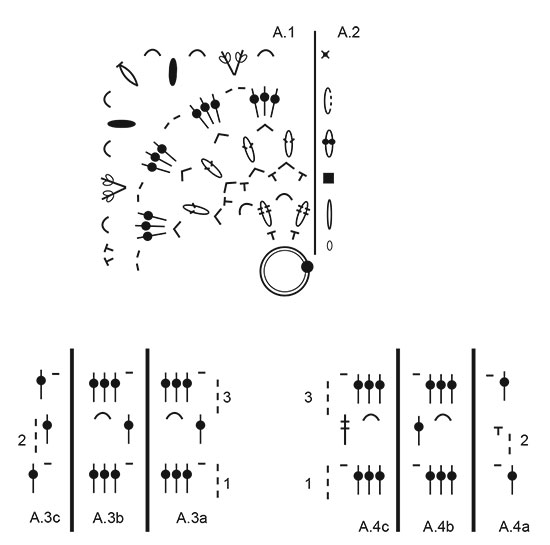
Liebe Frau Liegl, meinen Sie mit Diagram A.3? Dann ja man häkelt zuerst die 3 Reihen dann wird man nur die 2 letzten Reihen wiederholen., und gleichzeitig, bei der 2. Reihe (nicht bei der 3.) wird man die 8 ersten Maschen als Dreifachstäbchen (anstatt "normale" Stäbchen) häkeln, die anderen Maschen werden wie im Diagram gehäkelt. Viel Spaß beim häkeln!
30.11.2023 - 16:15
![]() Maria Alfonso wrote:
Maria Alfonso wrote:
Hola, me encantaría hacer este patrón pero el hilo no está disponible. Me gustaría saber que hilos podria utilizar para que la gama de colores quede similar. Muchas gracias!
15.10.2023 - 23:20DROPS Design answered:
Hola María Alfonso, podrías usar otro hilo del grupo C, pero no hay multicolores. Para usar hilos multicolores podrías usar 2 hilos de DROPS Fabel.
15.10.2023 - 23:41
![]() Alessandra wrote:
Alessandra wrote:
Nelle spiegazioni non vengono indicati tutti i colori utilizzati e in quale successione. E' possibie avere le spiegazioni anche di questo? grazie
19.11.2022 - 09:32DROPS Design answered:
Buonasera Michela, il modello è lavorato con DROPS Big Delight, un filato che è variegato, quindi non ci sono gomitoli di colore diverso. Buon lavoro!
24.11.2022 - 20:04
![]() Marie Bäcke wrote:
Marie Bäcke wrote:
Hej. Finns inte detta garn att köpa i dessa färger längre till denna kofta: DROPS BIG DELIGHT? Marie
01.08.2022 - 21:07DROPS Design answered:
Hej Marie, nej desværre, men du kan hækle den i 1 tråd DROPS Delight eller DROPS Fabel sammen med 1 tråd DROPS Alpaca og få samme effekt :)
05.08.2022 - 09:01
![]() Macarena Domínguez Vinagre wrote:
Macarena Domínguez Vinagre wrote:
Estoy teniendo mucha confusión con los cambios de colores
20.10.2021 - 06:36
![]() Madarena Domínguez Vinagre wrote:
Madarena Domínguez Vinagre wrote:
Preguntó si es posible un tutorial video para la flor.
20.10.2021 - 06:34DROPS Design answered:
Hola Madarena. Todos los vídeos que pueden ayudarte a realizar la labor se encuentran bajo el patrón. No realizamos vídeos personalizados.
20.10.2021 - 22:36
![]() Karen Hagen Liste wrote:
Karen Hagen Liste wrote:
Oppskriften overfor (på nettet) mangler de første 4 symboler på diagramet for firkantene som er basisen for modellen. Kan dere være så snill å forteller meg hva de er og kanskje rette på oppskriften på nettet? Med vennlig hisen og takk for fine opskrifter. Karen
10.10.2021 - 16:44DROPS Design answered:
Hei Karen. Litt usikker på hva du mener. Du starter med 4 luftmasker og hekler 1 kjedemaske i den 1. luftmasken. Se og les forklaringen til sirkelen med en sort prikk (første symbolet til diagrammene). Eller er det et annet diagram du mener, skriv gjerne hvilket diagram, så skal vi se på det. mvh DROPS Design
11.10.2021 - 13:10
![]() Alicja wrote:
Alicja wrote:
Dostałam odpowiedź: "Witaj Alicjo, niekoniecznie. Możesz użyć po 2 moteczki każdego koloru, a później przesuwać nitkę z boku robótki, zobacz film TUTAJ. " Tutaj ta sytuacja nie może mieć miejsca, bo nitka kolor1 po przerobieniu pierwszego rzędu zawsze zostaje końcu (patrząc od prawej strony róbótki), a ja ja będę potrzebowała w 3 rzędzie na początku . Identycznie nitka kolor 2, zawsze kończę na początku (patrząc od prawej strony), a zaczynam na końcu.
22.09.2021 - 13:58DROPS Design answered:
Witaj Alicjo, masz rację. Wykonujesz nieparzystą liczbę rzędów, więc niestety będzie trzeba odcinać nitki, a później je wrabiać. Pozdrawiamy!
22.09.2021 - 16:30
![]() Alicja wrote:
Alicja wrote:
Robiąc paski 2, po każdym rzędzie muszę ciąć nitkę? Widzę, że zmiany koloru są co 1 rząd, nie wracam z kolorem na początek, nie ma więc chyba innego wyjścia?
22.09.2021 - 00:25DROPS Design answered:
Witaj Alicjo, niekoniecznie. Możesz użyć po 2 moteczki każdego koloru, a później przesuwać nitkę z boku robótki, zobacz film TUTAJ. Pozdrawiamy!
22.09.2021 - 12:02
![]() Cristina wrote:
Cristina wrote:
Tengo un cierto lío con las lanas propuestas. Hay dos colores el 02 y el 13, pero solo se especifica utilizar gris al Hacer los cuadros, lo que no casa con la fotografía. Que color ea para qué?
14.06.2021 - 14:43DROPS Design answered:
Hola Cristina, en las explicaciones para el patrón, en el apartado Franjas-1 te dicen que se trabaja 1 vuelta con cada color. Cuando mencionan en el patrón trabajar en Franjas-1 quiere decir trabajar 1 vuelta de cada color.
27.06.2021 - 19:31
|
|||||||||||||||||||||||||||||||||||||||||||||||||||||||||||||||||||||||||
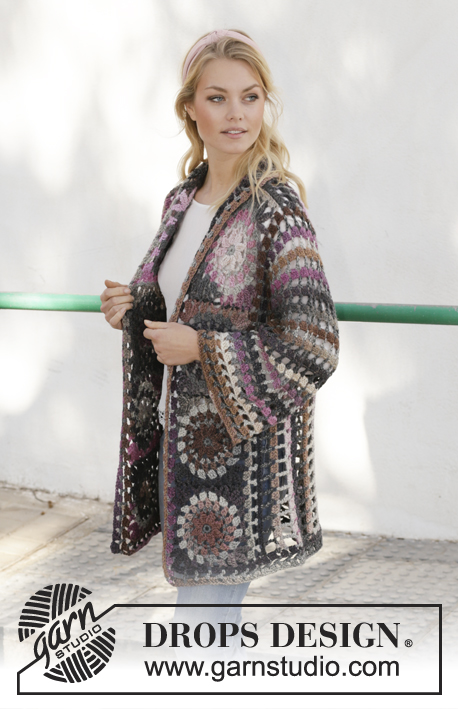
My Wildflower#mywildflowerjacket |
|||||||||||||||||||||||||||||||||||||||||||||||||||||||||||||||||||||||||
 |
 |
||||||||||||||||||||||||||||||||||||||||||||||||||||||||||||||||||||||||
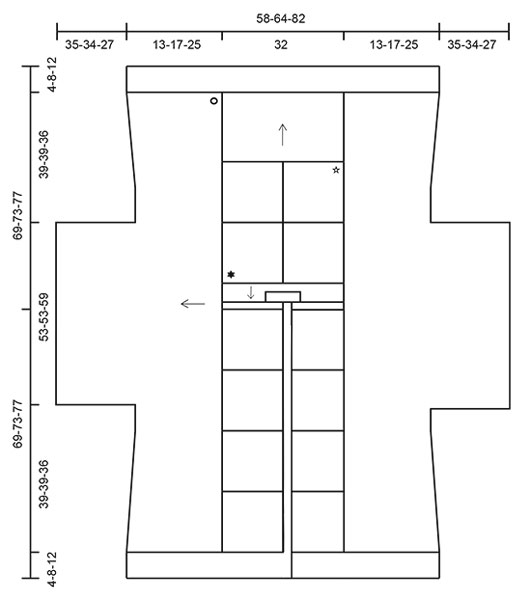
Crocheted long jacket in DROPS Big Delight. Piece is crocheted with stripes and crochet squares. Size: S - XXXL
DROPS 201-28 |
|||||||||||||||||||||||||||||||||||||||||||||||||||||||||||||||||||||||||
|
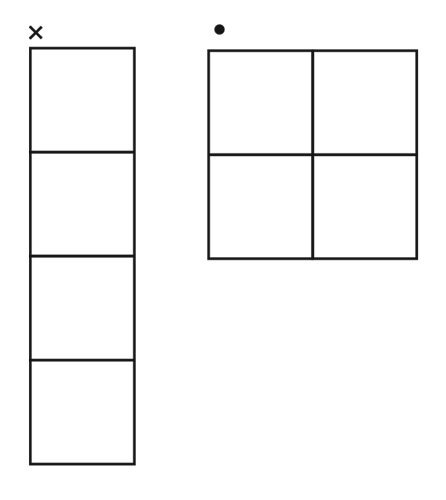
---------------------------------------------------------- EXPLANATION FOR THE PATTERN: ---------------------------------------------------------- PATTERN: See diagrams A.1 to A.4. CROCHET TIP: When working double treble crochets at the beginning of row, work 5 chain stitches instead of 3 chain stitches at the beginning of row. STRIPES-1: * Work 1 round with grey, 1 round with summer meadow *, work from *-*. STRIPES-2: Row from right side (3 double crochets + 1 chain stitch): summer meadow. Row from wrong side (1 double crochet + 4 chain stitches): grey. COLOR CHANGE: When working diagrams A.1 and A.2 you crochet stripes in the round, every other stripe in each color. To avoid having to cut the strand after every round, the strand you’re not currently working with can be pulled along until the next round. When working stripes back and forth the strand needs to be cut and fastened after every row. ---------------------------------------------------------- START THE PIECE HERE: ---------------------------------------------------------- JACKET - SHORT OVERVIEW OF THE GARMENT: Work first 12 crochet squares in total. For front pieces work 4 square together into one long strip. For back piece work 4 squares together into a square, then work down along body and up towards shoulders. When front and back pieces are done, sew shoulder together before working outwards in each side for body and sleeves. Then work collar and band. CROCHET SQUARES: Work 4 chain stitches with grey on hook size 5 mm = US H/8 and form a ring with a slip stitch in first chain stitch. Now work STRIPES-1 - see explanation above, and A.1 4 times in total on round (A.2 shown how round begins and ends). REMEMBER THE CROCHET GAUGE! When A.1 and A.2 have been worked vertically, crochet square measures approx. 16 x 16 cm = 6¼" x 6¼". Work 12 crochet squares in total. SQUARE ASSEMBLY: Back piece: Work 4 crochet squares together into a large square - see illustration with black dot. Place 2 crochet squares with right side against right side and work together from wrong side through both layers with grey as follows: Fasten strand with 1 single crochet in stitch in the corner, 2 chain stitches, 1 single crochet around next chain space, * 4 chain stitches, 1 single crochet around next chain space *, work from *-* 5 times in total, 2 chain stitches, 1 single crochet in stitch in the corner. 2 of the crochet squares are now worked together. Work the other 2 together the same way. Now work the squares together so that there are 2 squares in width and 2 squares vertically: Fasten strand with 1 single crochet in stitch in the corner, 2 chain stitches, 1 single crochet around next chain space, * 4 chain stitches, 1 single crochet around next chain space *, work from *-* 5 times in total, 4 chain stitches, 1 single crochet on next crochet square, * 4 chain stitches, 1 single crochet around next chain space *, work from *-* 5 times in total, 2 chain stitches, 1 single crochet in stitch in the corner. Right and left front piece: Work 4 crochet squares into a strip to get 4 x 1 crochet square - see illustration with cross. Place 2 crochet squares with right side against right side and work together from wrong side through both layers with grey as follows: Fasten strand with 1 single crochet in stitch in the corner, 2 chain stitches, 1 single crochet around next chain space, * 4 chain stitches, 1 single crochet around next chain space *, work from *-* 5 times in total, 2 chain stitches, 1 single crochet in stitch in the corner. 2 of the crochet square are now worked together. Work the other crochet squares together to form a long strip of 1 x 4 crochet squares. Work the other front piece the same way. BACK PIECE: Work down the back as follows: Begin with summer meadow and from right side. Fasten strand with 1 single crochet in the corner with white star - see chart. Work STRIPES-2 and pattern from first row in A.3a to A.3c as follows: Work A.3a around first chain space, A.3b around each of the next 11 chain spaces, finish with A.3c in stitch in the corner. Continue back and forth and repeat the 2 last rows in A.3a - A.3c until piece measures 26 cm = 10¼" from crochet squares – adjust to finish after a row that equals 2nd row in A.3a - A.3c. Now work chain spaces down along the side of rows with A.3a from wrong side and with grey as follows: Work * 3 chain stitches, skip approx. 2½ cm = 1", 1 single crochet *, work from *-* evenly until 10 chain spaces have been worked along the side on back piece up to first crochet square (with white star). Cut the yarn and repeat in the other side. Work shoulder in opposite side of the 4 crochet squares as follows: Begin with summer meadow and from right side. Fasten strand with 1 single crochet in the corner with black star - see chart. Work STRIPES-2 and pattern from first row in A.3a - A.3c as follows: Work A.3a around first chain space, work A.3b around each of the next 11 chain spaces, finish with A.3c in the corner. Continue back and forth until entire diagram has been worked vertically 1 time. Now work left shoulder from 2nd row in diagrams as follows: A.3c, A.3b 3 times in total, A.3a. Turn and work last row from right side. Cut the strand and work right shoulder from 2nd row in diagrams as follows: Skip 4 double crochet groups for neck and fasten yarn (grey) with 1 single crochet around next chain stitch. Work A.3c, A.3b 3 times in total, A.3a. Turn and work last row from right side. Cut the yarn. The back piece is finished. RIGHT AND LEFT FRONT PIECE: Now work 1 row upwards towards the shoulder, along one square at the end of strip with 4 crochet squares. Begin with summer meadow and work from right side. Fasten strand with 1 single crochet in corner, work A.3a around first chain space, A.3b around each of the next 5 chain spaces, finish with A.3c in the corner. Cut and fasten the yarn. Work left front piece the same way as on right front piece. SHOULDER ASSEMBLY: Sew shoulder seams. Start the seam on the outermost end of the shoulder and sew towards the neck, one stitch at a time. RIGHT SIDE AND SLEEVE: Begin with summer meadow and from right side. Fasten strand with a single crochet in the corner with circle - see chart. Work STRIPES-2 and pattern from first row in A.3a - A.3c as follows: Work A.3a around first chain space, A.3b around each of the next 9 chain spaces, continue with A.3b around each chain space along each of the next 2 crochet squares on back piece (= 12 repetitions A.3b), work 3 repetitions A.3b evenly up to shoulder seam and 1 repetition A.3b in last row on front piece, continue with A.3b in every chain space along each crochet square on front piece (= 24 repetitions A.3b), finish with A.3c in the corner at the bottom of front piece. There are now 1 repetition A.3a, 49 repetitions A.3b and 1 repetition A.3c along the side of piece. When entire A.3a – A.3c have been worked vertically, repeat the last 2 rows the same way, but on 2nd row in diagrams work the first 8 double crochets as double treble crochets – read CROCHET TIP, work the next 6 double crochets as treble crochets, work the next 22 double crochets as double crochets as before, work the next 6 double crochets as treble crochets, work the last 8 double crochets as double treble crochets (work 3rd row as shown in diagram). Continue back and forth the same way (ie: on row 2 in the diagram you work double treble crochets and treble crochets in the beginning and end of row as explained, and row 3 is worked as before) until piece measures 13-17-25 cm = 5⅛"-6¾"-9¾" at the bottom of front and back piece - adjust to finish after 3rd row in diagram. Cut the yarn. Now work sleeve, begin from wrong side: Skip the first 15-15-14 double crochet groups (= A.3a/A.3b). Fasten strand (grey) with 1 single crochet around next chain stitch, work 3 chain stitches, 1 double crochet around the same chain stitch (= A.3c), A.3b 19 times in total, A.3c. Turn and work 3rd row back from right side - continue STRIPES-2 as before. Continue back and forth like this until piece measures approx. 48-50-52 cm = 19"-19¾"-20½" from crochet squares – adjust to finish after a row from right side. Cut the yarn. LEFT SIDE AND SLEEVE: Work left side and sleeve the same way as on right side and sleeve but begin from right side in the corner at the bottom of front piece instead of back piece - adjust measurements according to right side and sleeve. ASSEMBLY: Fold the jacket so that right side is against right side and work through both layer from wrong side with summer meadow as follows: Begin at the bottom of sleeve with a single crochet, * work 4 chain stitches, skip approx. 1 cm = ⅜", work 1 single crochet *, work from *-* under sleeve and down along the side. Cut the yarn. Repeat in the other side. EDGE AT THE BOTTOM OF BODY: Begin from right side at the bottom of front piece towards mid front and work with summer meadow as follows: Fasten strand with 1 single crochet in stitch in the corner, work A.3a around first chain space, A.3b around each of the next 5 chain spaces, work A.3b evenly 11-14-20 times along the piece until part on back piece worked down on the 4 crochet squares at the back, work A.3b 12 times in total as before over the next 12 repetitions on back piece, work A.3b 11-14-20 times along the side of piece until crochet square on front piece, work A.3b 6 times in total along crochet square and finish with A.3c around stitches in the corner. There are now 1 repetition A.3a, 45-51-63 repetitions A.3b and 1 repetition A.3c on row. Continue back and forth with the 2 last rows in diagram (continue STRIPES-2 as before) until edge measures 4-8-12 cm = 1½"-3⅛"-4¾" from crochet squares on front piece - adjust to finish after last row in diagrams. Cut the yarn. COLLAR: Work collar back and forth in 1 part from left front piece and sew to neck and right front piece when finished. Work entire collar in summer meadow. Begin from right side with 1 single crochet on the inside at left shoulder seam (towards the neck) on left front piece and work from 2nd row in diagrams as follows: A.4a, A.4b, A.4c (work 2nd row from right side and 3rd row from wrong side). Continue back and forth like this and repeat the last 2 rows until 20 rows have been worked vertically. Then work the next to last row in diagram one more time. Cut the yarn. Sew the last row worked to the edge at the top on right front piece and sew collar along the back of neck (sew with small stitches to avoid a chunky seam). BAND: Begin from right side with summer meadow in the corner at the bottom of front piece. Work 1 single crochet around bottom row on the edge, work 4 chain stitches, 3 double crochets around next row along the edge (= A.3a), work 0-1-2 repetitions A.3b evenly up to first crochet square, continue with A.3b around every chain space along each of the 4 crochet squares on right front piece (= 6 repetitions A.3b along each of the crochet squares), continue with 1 repetition A.3b around every row along the collar (= 20 repetitions), continue down along left band the same way as on right band. When entire A.3a to A.3b have worked vertically, the band is done. Cut and fasten the yarn. |
|||||||||||||||||||||||||||||||||||||||||||||||||||||||||||||||||||||||||
Diagram explanations |
|||||||||||||||||||||||||||||||||||||||||||||||||||||||||||||||||||||||||
|
|||||||||||||||||||||||||||||||||||||||||||||||||||||||||||||||||||||||||
|
|||||||||||||||||||||||||||||||||||||||||||||||||||||||||||||||||||||||||
|
|||||||||||||||||||||||||||||||||||||||||||||||||||||||||||||||||||||||||
|
|||||||||||||||||||||||||||||||||||||||||||||||||||||||||||||||||||||||||
Have you finished this pattern?Tag your pictures with #dropspattern #mywildflowerjacket or submit them to the #dropsfan gallery. Do you need help with this pattern?You'll find 13 tutorial videos, a Comments/Questions area and more by visiting the pattern on garnstudio.com. © 1982-2025 DROPS Design A/S. We reserve all rights. This document, including all its sub-sections, has copyrights. Read more about what you can do with our patterns at the bottom of each pattern on our site. |
|||||||||||||||||||||||||||||||||||||||||||||||||||||||||||||||||||||||||


With over 40 years in knitting and crochet design, DROPS Design offers one of the most extensive collections of free patterns on the internet - translated to 17 languages. As of today we count 314 catalogs and 11822 patterns - 11812 of which are translated into English (US/in).
We work hard to bring you the best knitting and crochet have to offer, inspiration and advice as well as great quality yarns at incredible prices! Would you like to use our patterns for other than personal use? You can read what you are allowed to do in the Copyright text at the bottom of all our patterns. Happy crafting!
Post a comment to pattern DROPS 201-28
We would love to hear what you have to say about this pattern!
If you want to leave a question, please make sure you select the correct category in the form below, to speed up the answering process. Required fields are marked *.