
Popular categories
Looking for a yarn?


Comments / Questions (33)
![]() Roswitha Schulenburg wrote:
Roswitha Schulenburg wrote:
Hallo, ich finde dieses Tuch wunderschön, kann aber keine verkürzten Reihen stricken. Gibt es die Möglichkeit, das Tuch ohne verkürzten Reihen zu stricken. Würde mich sehr über eine Antwort freuen. Vielen Dank für ihre Mühe. Herzliche Grüße
06.06.2024 - 21:18DROPS Design answered:
Liebe Freu Schulenberg, wenn Sie die verkürzten Reihen hier nicht stricken, dann wird das Tuch nicht das gleiche aussehen; am besten stricken Sie sie damit oder schmökern Sie alle unsere Modellen (siehe hier). Viel Spaß beim Stricken!
07.06.2024 - 07:42
![]() Elisa wrote:
Elisa wrote:
Bonjour, c'est la première fois que je tricote en rangs raccourcis. Je me demande si on doit tricoter la maille avec le marqueur avant de tourner le travail ou si on la laisse sur l'autre aiguille ? Merci !
31.08.2022 - 08:47DROPS Design answered:
Bonjour Elisa, on ne tricote pas la maille avec le marqueur, on tourne juste avant (elle reste donc sur l'aiguille gauche). Bon tricot!
31.08.2022 - 09:47
![]() Anna wrote:
Anna wrote:
Dzień dobry, napisalam o markerach, bo tutaj w pytaniach i odpowiedziach, udzielano kilkakrotnie odpowiedzi od pracowników Dropsa, że zamiast nitki w oczko, co dla wielu jest niezrozumiałym rozwiązaniem, można stosować markery. Wzor jest niepotrzebnie skomplikowany, co również kilkakrotnie tutaj napisano. Czy mogę więc stosować markery? Bo raz piszecie, że tak, ponizej, innym klientom, potem, że nie. Czy ktoś pomoże mi z tym wzorem? Help!
19.08.2022 - 13:30DROPS Design answered:
Witaj Aniu, oczywiście możesz użyć markerów. Co do zwiększania się liczby oczek: zanim dojdziesz do rzędów skróconych będziesz dodawać oczka, w jednym rzędzie będzie to PRZED każdym oczkiem z markerem, a w kolejnym rzędzie z narzutami (dodawaniem oczek) ZA każdym oczkiem z markerem. Jak na drutach będzie 37 oczek, to powinnaś mieć 3 oczka przed 1-szym oczkiem z markerem i 3 oczka za ostatnim oczkiem z markerem w rzędzie. Mam nadzieję, że udało mi się pomóc. Miłej pracy!
19.08.2022 - 14:08
![]() Anna wrote:
Anna wrote:
Korzystam z markerów, więc gdy mam 13 oczek M umieszczam PO 2-4-6-8-10-12 oczku. Narzut robię przed markerem. To sprawia, że na prawej str., na tzw. początku rzędu, ocz. PRZED M. się zwiększają, na końcu zaś PO M. wciąż mam tylko 1 ocz. Liczba oczek się zgadza, mam ich 37, ale gdy przechodzę do rzędów skróc. to w rzędzie 2 do Markera mam tylko 1 oczko. W rz. 1 natomiast do markera mam 6 oczek. Co robię nie tak?
17.08.2022 - 23:44DROPS Design answered:
Witaj Aniu, markerów nie umieszczasz między oczkami, tylko w oczka. Czyli markery muszą być włożone w 2,4,6,8,10,12-te oczko. Patrz opis 'nitki markery są umieszczane w oczka (a nie między oczkami) i są przesuwane w miarę postępu robótki'. Pozdrawiamy!
19.08.2022 - 13:11
![]() Mrs Louise Irvine wrote:
Mrs Louise Irvine wrote:
Hi. Thank you for all the lovely free patterns, and your yarn is fab! Am I right in thinking that the short rows are only from the start of the right/wrong side, to the first stitch marker? Thanks in anticipation.
13.11.2020 - 12:30DROPS Design answered:
Deaer Mrs Irvine, thank you very much for your feedback - and you are right, short rows are worked from the beg of row to the first marker on each side only. Happy knitting!
13.11.2020 - 15:27
![]() Camilla wrote:
Camilla wrote:
När det står att man ska sticka fram till första maskan med markör på vid VARV 1 på förkortat varv. Ska man sticka den maskan också eller bara sticka till den maskan som är innan maskan med markör på? Och sen när man vänder för att sticka räta maskor tillbaka på det aviga varvet, ska man då lyfta den första maskan?
27.05.2020 - 21:33DROPS Design answered:
Hej Camilla, ja du stickar bara till den maskan med markör och vänder innan. Ja man kan lyfta första maskan och man kan även sticka den. Titta gärna hur man kan göra i vår video längst ner på sidan i mönstret :)
05.06.2020 - 09:23
![]() Lucia Dhaenens wrote:
Lucia Dhaenens wrote:
Kan deze omslagsjaal ook met gewone breinaalden gemaakt worden ? Ik heb geen ervaring met rondbreinaalden en dat lijkt mij niet praktisch. Met vriendelijke groet
28.04.2020 - 13:58DROPS Design answered:
Dag Lucia,
Deze omslagdoek wordt met de rondbreinaald gebreid omdat je op een gegeven moment heel veel steken op de naald hebt. (Meer dan 500.) Met gewone naalden lukt dat niet.
28.04.2020 - 20:00
![]() Anne wrote:
Anne wrote:
Vielen Dank für die vielen vielen tollen Strickanleitungen. Achtung allerdings, bei dieser: ich bin mit den Garnmengen hier nicht hingekommen: man braucht meines Erachtens 150g von jeder Farbe. Ich habe mit den angegeben Mengen schließlich die weiße Bordüre mit Apriko gestrickt, musste sie allerdings etwas verkürzen um hinzukommen. Den I-Cord-Abschluss hab ich dann mit dem weißen Rest gemacht. Viel Spaß beim Stricken!
22.01.2020 - 11:29
![]() Massetti Anna Maria wrote:
Massetti Anna Maria wrote:
Sto realizzando il modello Strawberry Sorbet, ma sono un difficoltà a proseguire la parte finale in bianco. Non mi è chiaro se la ripetizione dei ferri 1 e 2 la devo fare subito. E poi cosa vuol dIre lavorare 1 costa e leggerela descrizione sopra, ma dove? Se potete aiutarmi. Grazie
30.11.2019 - 09:59DROPS Design answered:
Buonasera Anna Maria, quando inizia a lavorare a strisce, lavorerà il ferro 1 e 2 con il panna e il 3 e 4 con il rosa. Lavora in questo modo fino a 51 cm, poi solo con il panna e inizierà con il ferro 1 e 2. Per la costa, abbiamo aggiunto le spiegazioni all'inizio, comunque deve lavorare 2 ferri a diritto. Buon lavoro!
30.11.2019 - 21:02
![]() Anna Maria Massetti wrote:
Anna Maria Massetti wrote:
Non riesco a comprendere il ferro 1 a ferri accorciati del modello Strawberry Sorbet o meglio, dopo il primo giro del lavoro al primo segnapunti come proseguo sul resto del lavoro e perchè dice di diminuire prima/dopo le maglie con i segnapunti? Sarebbe utile un video di spiegazione. Ho acquistato la lana ed ora non riesco ad andare avanti nella realizzazione del modello. Grazie
15.10.2019 - 14:56DROPS Design answered:
Buongiorno Anna Maria. Abbiamo corretto il testo: si deve aumentare. Lavora il primo ferro a ferri accorciati come segue: lavora come indicato fino alla maglia con il 1° segnapunti, gira e lavora il ferro di ritorno a diritto. Poi lavora il ferro successivo aumentando o prima o dopo ogni maglia con il segnapunti (quando aumenta, alterna gli aumenti una volta prima, una volta dopo i segnapunti come fatto fino ad adesso). Buon lavoro!
15.10.2019 - 16:11
|
||||||||||||||||
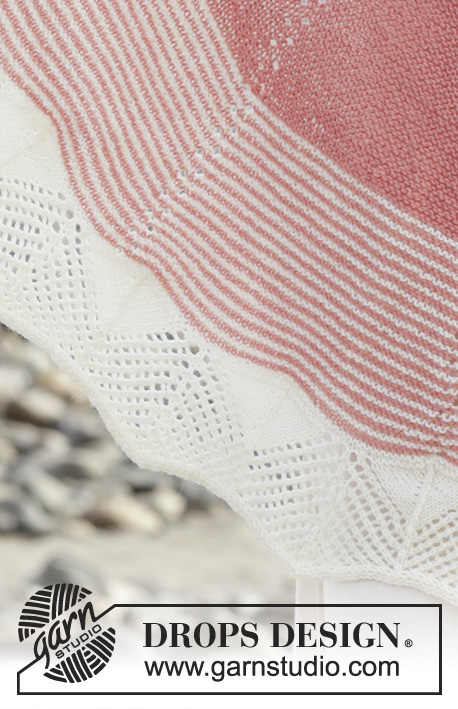
Strawberry Sorbet#strawberrysorbetshawl |
||||||||||||||||
 |
 |
|||||||||||||||
Knitted shawl with garter stitch, lace pattern and semi-circle shape. The piece is worked top down in DROPS Flora.
DROPS 190-15 |
||||||||||||||||
|
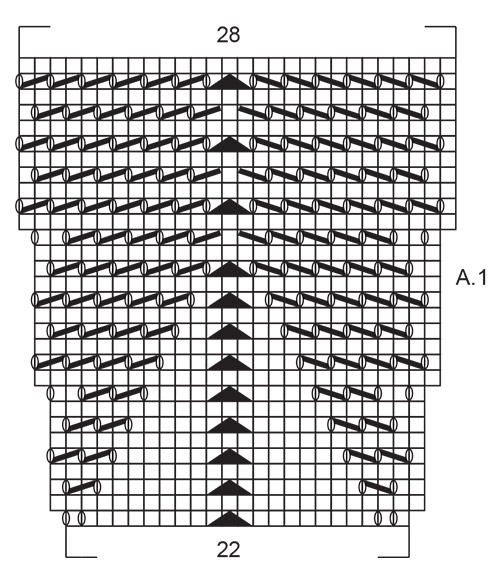
INFORMATION FOR THE PATTERN: RIDGE/GARTER STITCH (worked back and forth): 1 ridge = Knit 2 rows. PATTERN: See diagram A.1. The diagram shows all the rows in the pattern seen from the right side. ---------------------------------------------------------- SHAWL: The shawl is worked top down. Work back and forth on circular needle so that you have room for all the stitches. Cast on 7 stitches with circular needle size 4.5 mm and peach pink. Work as follows from the right side: Knit 1 stitch, * 1 yarn over, knit1 stitch *, repeat from *-* a total of 6 times = 13 stitches. Knit 1 row from the wrong side. Now insert 6 marker threads in the piece without working the stitches, the marker threads are inserted in the stitches and follow your work upwards. Insert the marker threads in the following stitches: Stitch 2, stitch 4, stitch 6, stitch 8, stitch 10 and stitch 12. Then work and increase as follows: Knit 1 row and increase by making a yarn over before each stitch with a marker thread = 6 yarn overs. NOTE! All yarn overs are then knitted to leave holes. Knit 1 row from the wrong side, knit 1 row from the right side (without increasing) and knit 1 row from the wrong side = 19 stitches. Knit 1 row and increase by making a yarn over after each stitch with a marker thread = 6 yarn overs. Knit 1 row from the wrong side, knit 1 row from the right side (without increasing) and knit 1 row from the wrong side = 25 stitches. Knit 1 row and increase by making a yarn over before each stitch with a marker thread = 6 yarn overs. Knit 1 row from the wrong side, knit 1 row from the right side (without increasing) and knit 1 row from the wrong side = 31 stitches. Knit 1 row and increase by making a yarn over after each stitch with a marker thread = 6 yarn overs. Knit 1 row from the wrong side, knit 1 row from the right side (without increasing) and knit 1 row from the wrong side = 37 stitches. Continue with the same increases, but in addition, you will work short rows. Work as follows: ROW 1 with short row (= right side): Knit 2 stitches, 1 yarn over and knit to first stitch with a marker thread on this row, turn and knit back from the wrong side. Then knit 1 row from the right side where you increase before/after the marker thread stitches. ROW 2 with short row (= wrong side): Knit 2 stitches, 1 yarn over and knit to first stitch with a marker thread on this row, turn and knit back from the right side. Then knit 1 row from the wrong side = a total of 8 stitches increased on rows 1-2. ROW 3 (= right side): Knit. ROW 4 (= wrong side): Knit. Continue by repeating rows 1-4 (increase alternately before and after the marker thread stitches as before) until the piece measures approx. 35 cm (rows 1-4 have been worked a total of 30 times) and there are 277 stitches on the needle. Now work stripes with off white and peach pink as follows: * Change to off white and work rows 1 and 2 (with short rows). Change to peach pink and work rows 3 and 4 *. Repeat from *-* until the piece measures approx. 51 cm (rows 1-4 are worked with stripes a total of 16 times) and there are 405 stitches on the needle. From here, work with off white to finished length. Repeat rows 1-2 one more time = 413 stitches on needle. Work 1 RIDGE - see description above, and increase 10 stitches evenly on the first row of these ridges as follows: Knit 22 stitches, * 1 yarn over, knit 41 stitches *, repeat from *-* a total of 9 times and make 1 yarn over and knit 22 stitches. Knit 1 row where all yarn overs are knitted twisted = 423 stitches (the number of stitches is divisible by 22 + 5 stitches). Now continue working according to diagram A.1 with off white and stocking stitch. (Row 1 = right side): Work 2 edge stitches in garter stitch, work A.1 over the next 418 stitches (= 19 times in width and there are 3 stitches left on the row), work 1 stitch stocking stitch and 2 edge stitches in garter stitch. Work the diagram like this 1 time in height. The piece measures approx. 63 cm and there are 537 stitches on the needle. CASTING OFF: On the next row from the right side, you will cast off with i-cord casting off. It is important that the edge is cast off loosely so that the shawl has a nice shape and hangs neatly. You can use a larger needle size to cast off if necessary and make sure that all stitches are loose. Work and cast off as follows: * Knit 2 stitches, the next 2 stitches are knitted twisted together. Push the 3 stitches from the right needle back onto the left needle (in the same order) *, repeat from *-* until all stitches on the left needle have been cast off and there are 3 stitches left on the right needle. Push the stitches onto the left needle and cast them off with knit. Cut the strand and sew together the cast-off from the last 3 stitches so that the end of the shawl is neat. Fasten all loose strands. |
||||||||||||||||
Diagram explanations |
||||||||||||||||
|
||||||||||||||||
|
||||||||||||||||
Have you finished this pattern?Tag your pictures with #dropspattern #strawberrysorbetshawl or submit them to the #dropsfan gallery. Do you need help with this pattern?You'll find 22 tutorial videos, a Comments/Questions area and more by visiting the pattern on garnstudio.com. © 1982-2025 DROPS Design A/S. We reserve all rights. This document, including all its sub-sections, has copyrights. Read more about what you can do with our patterns at the bottom of each pattern on our site. |
||||||||||||||||


With over 40 years in knitting and crochet design, DROPS Design offers one of the most extensive collections of free patterns on the internet - translated to 17 languages. As of today we count 314 catalogues and 11822 patterns translated into English (UK/cm).
We work hard to bring you the best knitting and crochet have to offer, inspiration and advice as well as great quality yarns at incredible prices! Would you like to use our patterns for other than personal use? You can read what you are allowed to do in the Copyright text at the bottom of all our patterns. Happy crafting!
Post a comment to pattern DROPS 190-15
We would love to hear what you have to say about this pattern!
If you want to leave a question, please make sure you select the correct category in the form below, to speed up the answering process. Required fields are marked *.