
Popular categories
Looking for a yarn?


Comments / Questions (11)
![]() Lene Johansen wrote:
Lene Johansen wrote:
Hva er brystmålene på de ulike størrelsene?
11.04.2025 - 21:27DROPS Design answered:
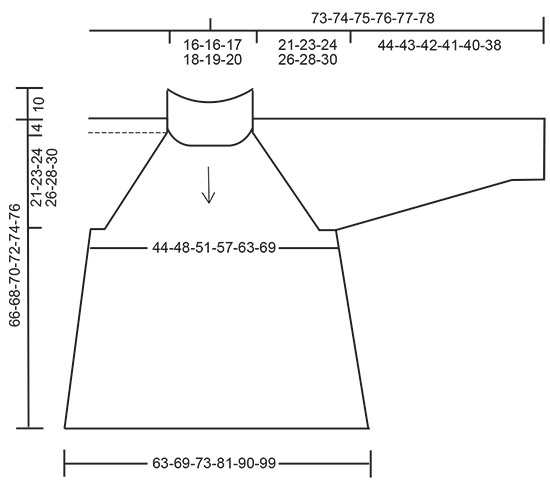
Hei lene, Du finner en målskisse på bunnen av oppskriften, med alle mål til de forskjellige størrelsene. God påske!
13.04.2025 - 18:00
![]() Robert Sylvie wrote:
Robert Sylvie wrote:
Bonjour, pourquoi ne pas tricoter le dos et le devant en rond ensemble ? Cela me paraît plus simple et sans couture, non ? Merci de votre réponse.
06.01.2024 - 07:50DROPS Design answered:
Bonjour Mme Robert, c'est probablement un choix de la styliste, notez que les coutures sur les côtés peuvent apporter une sorte de stabilité de l'ouvrage. Bon tricot!
08.01.2024 - 09:46
![]() Noémie wrote:
Noémie wrote:
Bonjour je viens de comprendre j’avais mal lu les explications excusez moi et merci
08.01.2023 - 16:42
![]() Noémie wrote:
Noémie wrote:
Bonjour, pour le raglan, le fil marqueur se trouvant au milieu de la diminution (deux mailles ensembles) il ne suit pas l’ouvrage. Où faut-il le placer à ce moment ? Merci.
08.01.2023 - 16:26DROPS Design answered:
Bonjour Noémie, on doit ici augmenter pour le raglan, vous avez 2 mailles pour chaque ligne du raglan, avec 1 fil marqueur entre chaque et vous augmenterez comme indiqué sous RAGLAN, autrement dit, tricotez jusqu'à ce qu'il reste 1 maille avant le fil marqueur, faites 1 jeté, tricotez 2 m end (le fil marqueur est entre ces 2 m), 1 jeté. Répétez à chaque fil marqueur et à chaque tour d'augmentations. Bon tricot!
09.01.2023 - 10:20
![]() Selina wrote:
Selina wrote:
Why are the front and back knitted separately after the yoke is finished? Thanks.
26.05.2022 - 23:54DROPS Design answered:
Dear Selina, this might be a designer's choice, adding seams on the side can give more stability to the piece. Happy knitting!
27.05.2022 - 09:09
![]() Cecilia wrote:
Cecilia wrote:
Buongiorno mi chiedevo come mai questo maglione non abbia lo scollo piu' pronunciato nella parte anteriore (tipo ferri accorciati tanto per capirci) , non tira una volta indossato; sono una principiante , vi prego di scusarmi se la domanda dovesse sembrare sciocca. Grazie mille per la vostra attenzione Cecilia
10.03.2022 - 09:41DROPS Design answered:
Buonasera Cecilia, se preferisce una scollatura diversa può modellarla con dei ferri accorciati. Buon lavoro!
10.03.2022 - 23:10
![]() Annika wrote:
Annika wrote:
Hvorfor skilles for- og bakstykke etter at man har satt erme-maskene til side? Er det ikke mye enklere å fortsette med glattstrikk rundt og rundt på rundpinne?
23.11.2020 - 23:58DROPS Design answered:
Hei Annika. Noen liker å strikke frem og tilbake, andre rundt. Om du ønsker å strikke rundt kan du tilpasse oppskriften slik at du kan strikke rundt. mvh DROPS design
24.11.2020 - 11:38
![]() Céline wrote:
Céline wrote:
Bonjour, je voudrais réaliser le pull Pandereta avec 1 fil Népal et 1 fil Brushed Alpaca Silk plutôt qu'avec 1 fil Eskimo. Est-ce possible ? Si oui, de quelle quantité de chaque qualité de fil ai-je besoin ? Merci.
11.11.2020 - 10:45DROPS Design answered:
Bonjour Céline, vous pouvez tout à fait remplacer 1 fil du groupe E = Eskimo par 2 fils du groupe C = Nepal + Brushed Alpaca Silk, naturellement, la texture sera différente car la composition de ces laines est différente - pensez à bien vérifier votre tension au préalable - comme d'habitude - retrouvez ici comment calculer la nouvelle quantité dans les alternatives choisies. Bon tricot!
11.11.2020 - 14:01
![]() Sandie Jackson wrote:
Sandie Jackson wrote:
I love the Pandereta pattern and would like to try it but cannot see where the actual pattern is? I can see tips for various sections of the project but not the pattern itself. Thankyou, Sandie Squamish, BC 🇨🇦
13.02.2019 - 18:27DROPS Design answered:
Dear Mrs Jackson, the written explanations always start with some informations about the pattern (techniques used), then you will see SWEATER with some notes about how the pattern will be worked, then start with YOKE below. Happy knitting!
14.02.2019 - 09:49
![]() Caroline wrote:
Caroline wrote:
Jeg skjønner ikke helt hvor mange nøster man trenger til de ulike størrelsene
06.02.2019 - 13:40DROPS Design answered:
Hej Caroline Størrelse: S - M - L - XL - XXL - XXXL Materialer: DROPS ESKIMO fra Garnstudio S=550-M=600-L=650-XL=700-XXL=800-XXL=850 g farge 07, orange - God fornøjelse!
08.02.2019 - 15:35
|
||||
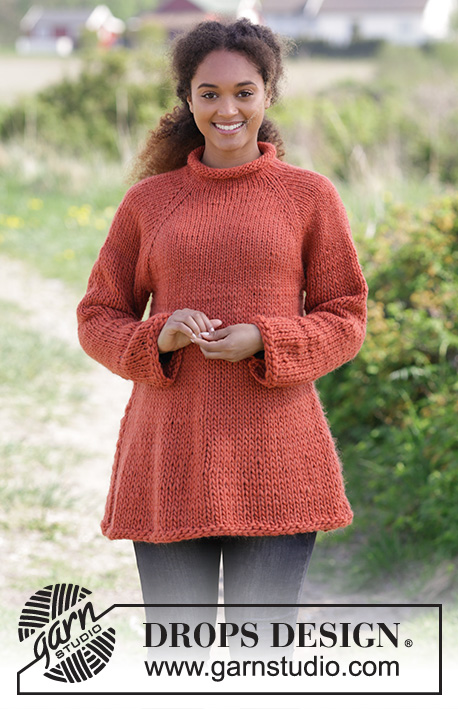
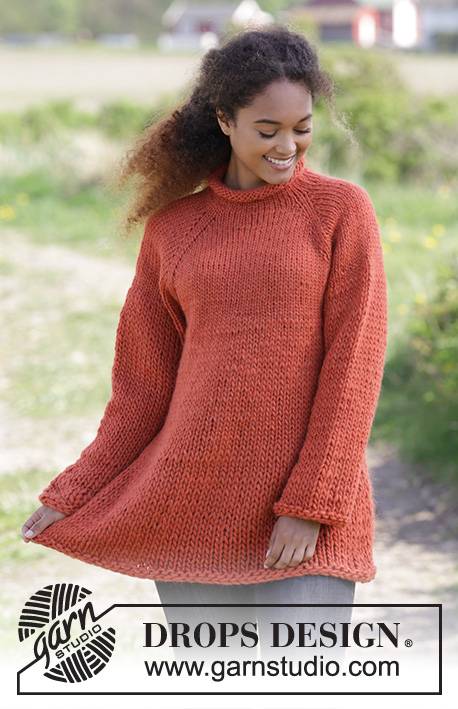
Pandereta#panderetasweater |
||||
 |
 |
|||
Knitted jumper with high neck, raglan and stocking stitch, worked top down. Sizes S - XXXL. The piece is worked in DROPS Snow.
DROPS 184-14 |
||||
|
INFORMATION FOR THE PATTERN: RAGLAN: Increase to raglan on each side of each marker thread. Increase as follows, start 1 stitch before the marker thread: Make 1 yarn over, knit 2 stitches (marker thread sits in middle of these 2 stitches), make 1 yarn over. Repeat at each marker thread (= 8 stitches increased). On the next round knit the yarn overs twisted to avoid holes. KNITTING TIP: To get a neat transition when changing needle size, work * 1 round with the thicker needle, 1 round with the thinner needle *, work from *-* a total of 2 times, then just work with the thicker needle. DECREASE TIP (for sleeves): All decreases are worked from the right side! Knit 1 stitch, slip 1 stitch as if to knit, knit 1, pass slipped stitch over (= 1 stitch decreased), work until there are 3 stitches left on needle, knit 2 together (= 1 stitch decreased), knit 1. ---------------------------------------------------------- JUMPER: First work the yoke in the round and top down from mid back with double pointed needles/circular needle. Then the front and back pieces are worked separately, back and forth on needle. The sleeves are worked back and forth to finish. The yoke is first worked in the round with double pointed needles size 9 mm, until you have enough stitches to use circular needle size 9 mm, then the front and back pieces are worked with circular needle size 12 mm and finally with circular needle size 15 mm YOKE: The piece is worked in the round. Cast on 48-48-50-52-54-56 stitches with double pointed needles size 9 mm and Snow, change to circular needle when you have enough stitches. Work stocking stitch for 10 cm. REMEMBER THE KNITTING TENSION! Insert 1 marker in the piece, THE PIECE IS NOW MEASURED FROM HERE! Insert 4 marker threads in the piece, the first after 8-8-8-9-9-10 stitches (= half the back piece), the second after 8 new stitches (= sleeve), the third after 16-16-17-18-19-20 new stitches (= front piece) and the fourth after 8 new stitches (= sleeve), there are 8-8-9-9-10-10 stitches left after the last marker thread (= half the back piece). Allow the marker to stay in the same place; the marker threads follow your work onwards! Continue with stocking stitch and increase to raglan – see description above. Increase every 2nd round a total of 11-13-14-16-17-19 times. When all the increases to raglan are finished, there are 136-152-162-180-190-208 stitches on the round. Continue working until piece measures 21-23-24-26-28-30 cm from the marker (the piece measures a total of 31-33-34-36-38-40 cm). The next round is worked as follows: Work the first 19-21-22-25-27-30 stitches (= half the back piece), place the next 30-34-36-39-40-43 stitches on a thread for sleeve, cast on 6-6-6-6-8-8 new stitches under the sleeve, work the next 38-42-45-51-55-61 stitches (= front piece), place the next 30-34-36-39-40-43 stitches on a thread for sleeve, cast on 6-6-6-6-8-8 new stitches under the sleeve, work the last 19-21-23-26-28-31 stitches (= half the back piece). BACK PIECE: The piece is worked back and forth. Keep the first 22-24-25-28-31-34 and the last 22-24-26-29-32-35 stitches on the round on the needle, place the 44-48-51-57-63-69 stitches from front piece on a thread = 44-48-51-57-63-69 stitches on back piece. Change to circular needle size 12 mm – READ KNITTING TIP! Insert 1 marker in the piece, THE PIECE IS NOW MEASURED FROM HERE! Work stocking stitch to finished length. When piece measures 21-21-22-22-22-22 cm change to circular needle size 15 mm – REMEMBER KNITTING TIP! When piece measures 40-40-41-41-41-41 cm knit 1 row from the wrong side, then cast off with knit. The piece measures approx. 76-78-80-82-84-86 cm in total, measured from cast-on to cast-off edge. FRONT PIECE: Place the 44-48-51-57-63-69 stitches back on circular needle size 12 mm. Work as for back piece. SLEEVE: The sleeves are worked back and forth with circular needle and sewn together to finish. Place the 30-34-36-39-40-43 stitches from the thread on circular needle size 12 mm and cast on 3-3-3-3-4-4 new stitches in each side = 36-40-42-45-48-51 stitches. Insert 1 marker in the piece, THE PIECE IS NOW MEASURED FROM HERE! Work stocking stitch. When piece measures 3 cm, decrease 1 stitch in each side of the piece – READ DECREASE TIP. Decrease in this way every 6½-4½-4-3-3-2cm a total of 6-8-9-10-11-12 times = 24-24-24-25-26-27 stitches. When piece measures 29 cm change to circular needle size 15 mm. Continue with stocking stitch until piece measures 43-42-41-40-39-37 cm (shorter measurements in larger sizes because of wider neck and longer yoke). Knit 1 row from wrong side, then cast off with knit. Work the other sleeve in the same way. ASSEMBLY: Sew side and under-sleeve seams in the outermost loop of the outermost stitch. |
||||
Diagram explanations |
||||
|
||||
|
||||
Have you finished this pattern?Tag your pictures with #dropspattern #panderetasweater or submit them to the #dropsfan gallery. Do you need help with this pattern?You'll find 26 tutorial videos, a Comments/Questions area and more by visiting the pattern on garnstudio.com. © 1982-2025 DROPS Design A/S. We reserve all rights. This document, including all its sub-sections, has copyrights. Read more about what you can do with our patterns at the bottom of each pattern on our site. |
||||


With over 40 years in knitting and crochet design, DROPS Design offers one of the most extensive collections of free patterns on the internet - translated to 17 languages. As of today we count 314 catalogues and 11822 patterns translated into English (UK/cm).
We work hard to bring you the best knitting and crochet have to offer, inspiration and advice as well as great quality yarns at incredible prices! Would you like to use our patterns for other than personal use? You can read what you are allowed to do in the Copyright text at the bottom of all our patterns. Happy crafting!
Post a comment to pattern DROPS 184-14
We would love to hear what you have to say about this pattern!
If you want to leave a question, please make sure you select the correct category in the form below, to speed up the answering process. Required fields are marked *.