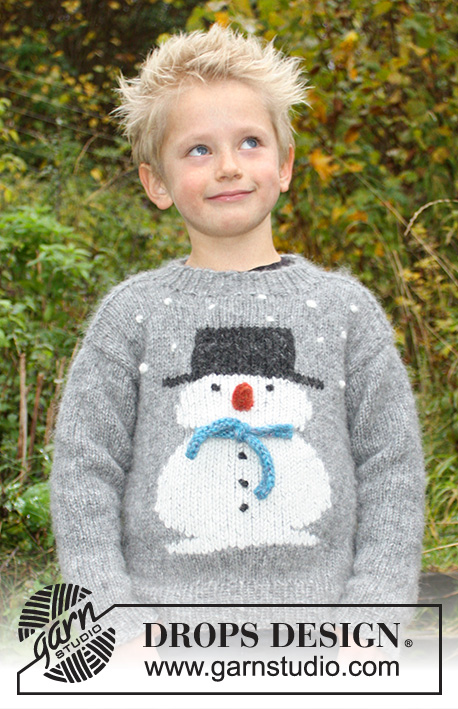
Back piece without snowman
INFORMATION FOR THE PATTERN: RIDGE/GARTER STITCH (worked back and forth): 1 ridge = Knit 2 rows.
Back piece is worked back and forth with circular needle from the bottom to the top.
INCREASE TIP (sleeve):
Work until 1 st remains before marker, 1 YO, knit 2 sts (marker sits between these 2 sts), 1 YO. On next round purl yarn overs twisted to avoid holes.
Cast on 52-54-58-60-64-68 stitches with circular needle size US 7 /4.5 mm and medium grey Air or grey Nepal. Work rib (knit 1, purl 1) until the piece measures 2 inches, change to circular needle size US 9 /5.5 mm and then work stocking stitch until the piece measures 9-10-11-12-13-14 inches. Now cast off 1 stitch in each side for armhole = 50-52-56-58-62-66 stitches. Work until piece measures 13-14-15-17-18-20 in. Now cast off the middle 16-18-20-22-22-24 stitches for neck and each shoulder is finished separately. Continue with stocking stitch and cast off 1 stitch on next row from neck = 16-16-17-17-19-20 stitches left on shoulder.
Continue working until piece measures 34-37-40-44-48-52 cm/13½-14½-15 3/4-17 1/4-19-20 1/2 in, work 2 RIDGES, see description above, over all stitches, then LOOSELY cast off. The piece measures approx. 35-38-41-45-49-53 cm/13 3/4-15-16 1/8-17 3/4-19 1/4-21 inches from the shoulder down. Work the other shoulder in the same way.
Back piece with snowman
PATTERN:
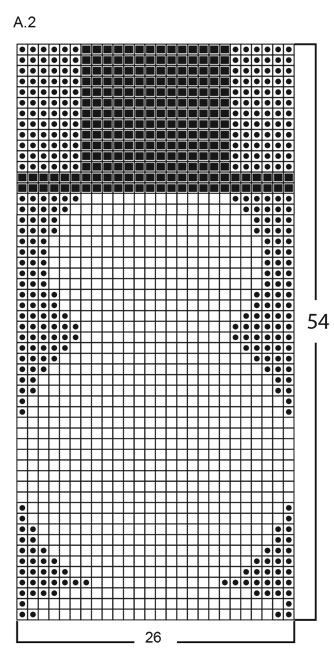
See diagram A.2
Diagram A.2 (snowman): The whole diagram is worked in stocking stitch. Worked with 3 balls, so that you avoid long carrying loops on the wrong side. In other words, work with 1 ball of medium grey Air/ grey Nepal on each side of jumper and 1 ball of pattern colour in middle of jumper. NOTE: To avoid holes when changing colours, you need to twist the strands together. See Video: How to knit with 3 skeins at the same time
Back piece is worked back and forth with circular needle from the bottom to the top.
Cast on 52-54-58-60-64-68 stitches with circular needle size 4.5 mm and medium grey Air or grey Nepal. Work rib (knit 1, purl 1) until piece measures 2 in, change to circular needle size 5.5 mm and then work stocking stitch.
When piece measures approx. 2-3-3-4-4-4 inches work as follows from right side: 13-14-16-17-19-21 stitches stocking stitch, A.2 (= 26 stitches) - read PATTERN, 13-14-16-17-19-21 stitches stocking stitch. Continue in this way until piece measures 9-10-11-12-13-14 in. Now decrease 1 stitch in each side for armholes = 50-52-56-58-62-66 stitches. Continue with stocking stitch and A.2. When A.2 has been completed, work stocking stitch and medium grey Air / grey Nepal until piece measures 13-14-15-17-18-20 inches. Now cast off the middle 16-18-20-22-22-24 stitches for neck and each shoulder is finished separately. Continue with stocking stitch and cast off 1 stitch on next row from neck = 16-16-17-17-19-20 stitches left on shoulder.
Continue working until piece measures 34-37-40-44-48-52 cm/13½-14½-15 3/4-17 1/4-19-20 1/2 in, work 2 RIDGES (see description above) over all stitches, then LOOSELY bind off. Piece measures approx. 35-38-41-45-49-53 cm/13 3/4-15-16 1/8-17 3/4-19 1/4-21 inches from shoulder down. Work the other shoulder in the same way.
FRONT PIECE:
Cast on 52-54-58-60-64-68 stitches with circular needle size 4.5 mm and medium grey Air or grey Nepal. Work rib (knit 1, purl 1) until piece measures 2 inches, change to circular needle size 5.5 mm and then work stocking stitch. When piece measures approx. 2-3-3-4-4-4 inches work as follows from right side: 13-14-16-17-19-21 stitches stocking stitch, A.2 (= 26 stitches)- read PATTERN, 13-14-16-17-19-21 stitches stocking stitch. Continue in this way until piece measures 9-10-11-12-13-14 inches. Now cast off 1 stitch in each side for armholes = 50-52-56-58-62-66 stitches. Continue with stocking stitch and A.2, when A.2 has been completed, continue with stocking stitch and medium grey Air / grey Nepal until piece measures 12-13-14-16-17-19 inches. Now place the middle 10-12-14-16-16-18 stitches on 1 thread for neck and each shoulder is finished separately. Cast off to neck at beginning of each row from neck as follows: 2 stitches 1 time and 1 stitch 2 times = 16-16-17-17-19-20 stitches left on shoulder. Continue until piece measures 13- 15-16-17-19-20 inches, work 2 RIDGES over all stitches, then loosely cast off. Piece measures approx. 14-15-16-18-19-21 inches from the shoulder down. Work the other shoulder in the same way.
SLEEVE:
The sleeves are worked in the round.
Cast on 28-28-30-30-32-32 stitches with double pointed needles size 4.5 mm and medium grey Air or grey Nepal. Insert 1 marker thread at the beginning of the round = mid under sleeve. Work rib (knit 1, purl 1) until piece measures 1 ½ inches, change to circular needle size 5.5 mm and then work stocking stitch. When piece measures 2 inches increase 2 stitches mid under sleeve – read INCREASE TIP. Increase in this way every 1 ½-1 ½-1 ½-1 ½-1 ½- 1 ½ inches a total of 5-7-7-9-10-11 times = 38-42-44-48-52-54 stitches. When piece measures 11-13-14-16-17-19 inches loosely cast off. Work another sleeve in the same way.
ASSEMBLY:
Sew shoulder seams inside the cast-off edge.
Sew the front and back pieces together in the outermost stitch.
Sew in sleeves.
After sewing all the pieces together we knit the neckline.
NECKLINE:
Knit up from right side approx. 58 to 68 stitches (number of stitches must be divisible by 2) around the neck (including stitches on thread at front) with short circular needle size US 7/4.5 mm and medium grey Air or grey Nepal. Work rib (knit 1, purl 1) until piece measures 1 ½ inches. Cast off with knit over knit and purl over purl - make sure the cast-off edge is not tight.
NOSE:
Cast on 8 stitches with 2 strands orange Air or Nepal with needle size US 9/5.5 mm (leave strand lengths of approx. 12 inches, these are used as stuffing afterwards). Then continue with 1 strand. Purl 1 row. The next row is worked as follows: Knit 1, knit 2 together, knit 5 = 7 stitches. Purl 1 row. Knit 3, knit 2 together, knit 2 = 6 stitches. Purl 1 row. Knit 1, knit 2 together, knit 3 = 5 stitches. Cut the strand (leave a strand-length of approx. 12 inches; this is used to fasten), pull it through the remaining stitches. Sew together in the side and push the long strands from casting-on inside the nose as stuffing. Sew the nose to the middle of the snowman’s head on the front piece.
SCARF:
Cast on 62 stitches with needle size US 9/ 5.5 mm and peacock blue Air or deep ocean Nepal. Work 2 rows stocking stitch. Cast off. Thread the scarf through the sweater by the neck of the snowman (on the front piece) and back to right side on the other side of the neck. Tie the scarf ends together with a double knot in front.
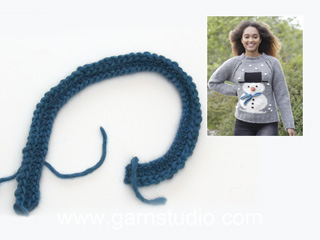
SNOW, BUTTONS AND EYES:
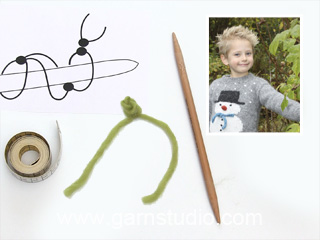
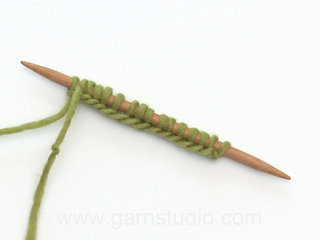
Make 12 knots with off white Air or Nepal for snow and 5 knots with a left-over of black Air or Nepal for buttons and eyes as follows: 1 knot: Cut 1 strand of approx. 16 inches. Make 4 knots around a needle size US 9/5.5 mm - see diagram A.3 (i.e. make 3 LOOSE knots, make 1 more knot and tighten the strand on this knot = 1 knot). Position the knots on the front piece, thread the strand ends through each side of 1 stitch and tie at wrong side - see photo.


Comments / Questions (29)
Buonasera.vorrei realizzare questa maglia con i ferri del 4 (ho già la lana).mio figlio veste 8/9 anni.se seguo le indicazioni per il modello 11/12 anni può andare bene? Saranno sufficienti le maglie x ottenere la misura giusta ? Grazie
18.12.2020 - 22:38DROPS Design answered:
Buonasera Roberta, purtroppo in questa sede non possiamo fornirle un'assistenza così personalizzata, ma può rivolgersi al suo rivenditore DROPS di fiducia. Buon lavoro!
18.12.2020 - 22:43Buonasera, il maglioncino e' anche per bambine? grazie
02.10.2020 - 15:20DROPS Design answered:
Buongiorno Luciana, certo, il maglione è sia per bimbi che per bimbe. Verrà sicuramente benissimo per una bimba! Se vuole può condividere il risultato finale con noi! Non vediamo l'ora di vederlo! Buon lavoro!
02.10.2020 - 15:24Hallo,ich stricke den wunderschönen Schneemann Pullover für Kinder. Meine Frage wird das Muster auch in der Rückrunde gestrickt oder wird die Vorderseite nur wiederholt. Ich bin totale Anfängerin was Motiv stricken betrifft . Lg Gabriele
30.09.2020 - 11:16DROPS Design answered:
Liebe Frau Thesing, die Diagramme zeigen alle Reihen, dh die Hin- sowie die Rückreihen, hier lesen Sie mehr über Diagramme - Dieses Modell wird als DROPS-Along gestrickt, hier lesen Sie mehr. Viel Spaß beim stricken!
30.09.2020 - 14:01Hallo, muss ich bei Muster A2 die Fäden auch überkreuzen (d.h. den, den neuen grauen in der aktuellen Reihe mit dem weißen der vorigen Reihe), wenn der Farbwechsel nicht übereinanderliegt (d.h., der Faden über mehrere Maschen mitwandert)? Danke
23.09.2020 - 21:25DROPS Design answered:
Liebe Sabine, ja, die Fäden am beste immer miteinander kreuzen, dieses Video zeigt, wie man mit 3 Knäueln strickt. Viel Spaß beim stricken!
24.09.2020 - 09:31Ho provato a fare la taglia di 10 anni, ma mi ritrovo dalla spalla fino allo scalfo 40 maglie per il davanti e 40 per il dietro, in totale 80, mentre la manica ne ha 52, allora ho pensato di riprendere i bordi del davanti e del dietro e di diminuire le maglie in 3 giri: 6 diminuzioni al primo giro, 6 diminuzioni al secondo giro e 2 diminuzioni al terzo giro, così da avere 26 maglie sul davanti e 26 maglie sul dietro del maglione, che corrispondono alle 52 della manica.
10.06.2020 - 10:22I have been a knitter for more than 40 years. I have to say this is the worse written pattern I have ever read. Tonight I will finish this sweater for my grandson. I look forward to putting this pattern in the recyle bin before going to bed. I would not suggest a beginner knitter start with this one.
01.12.2019 - 02:40Hallo, wie können denn Drops Air oder Drops Nepal Garn angegeben werden; sie haben doch völlig unterschiedliche Lauflängen? oder muss Drops Air mit doppeltem Faden gestrickt werden? MfG M.W.
13.11.2019 - 12:02DROPS Design answered:
Liebe Frau Weihrauch, Air und Nepal gehören zur gleichen Garngruppe (C), dh sie haben beide gleiche Maschenprobe aber eine unterschiedliche Lauflänge, deshalb brauchen Sie eine unterschiedliche Gewichtanzahl/Knäuelanzahl. hier lesen Sie mehr über Garnatlternativen. Der Pulli wird dann mit nur 1 Faden Air oder Nepal gestrickt. Viel Spaß beim stricken!
13.11.2019 - 12:18I am confused with the A2 pattern. Do I count the rows from wrong side too into 54 rows? If I follow the pattern from RS only I seem to end up with too many rows. I had to unravel it twice. Example, to decrease from the body towards the neck do I knit 2 from the RS , thus knitting 2 coming back before I decrease again? I don't get this A2 instructions at all. Please help. Thank you.
25.10.2019 - 16:10DROPS Design answered:
Dear Mrs Maine, Diagram A.2 is 54 rows, ie read diagram from the right towards the left from RS and from the left towards the right from WS, in other words, diagram shows all rows both from RS and form WS. Happy knitting!
25.10.2019 - 16:36I just wish to say thank you for your lovely patterns and in particular for including in you video demo how to make the knots. I asked fir this last year and you listened. I am grateful and I will now knit this sweater.
02.10.2019 - 19:39Nel diagramma A2 ( non il nodo del diagramma A3 per la neve)il pallino nero indica il nodo singolo . Non ho capito come si realizza
02.12.2018 - 00:22DROPS Design answered:
Buongiorno Martina. Nel diagramma A.2 il quadrato con il tondino nero all’interno indica quale colore deve usare quando lavora quella maglia. Non ci sono nodi in questo diagramma. I nodi sono solo nel diagramma A3 e servono per la neve, i bottoni e gli occhi. Il video sotto può esserle di aiuto. Buon lavoro!
02.12.2018 - 14:49