DROPS Kid-Silk uni colour 75% Mohair, 25% Silk |
4.60 £ /25g |
Order |
Clicking the ORDER button will redirect you to Wool Warehouse Direct Ltd website
The yarn cost is calculated from the pattern’s smallest size and the yarn’s cheapest product type. Looking for an even better price? You might find it on the DROPS Deals!
-------------------------------------------------------
Alternative Yarn – See how to change yarns here
Yarn Groups A to F – Use the same pattern and change the yarn here
Yarn usage using an alternative yarn – Use our yarn converter here
-------------------------------------------------------
DROPS Kid-Silk uni colour 75% Mohair, 25% Silk 4.60 £ /25g Order |
Clicking the ORDER button will redirect you to Wool Warehouse Direct Ltd website
The yarn cost is calculated from the pattern’s smallest size and the yarn’s cheapest product type. Looking for an even better price? You might find it on the DROPS Deals!
This pattern has been corrected. Click here to see the correction/s.
= knit from right side | |
= knit from wrong side, purl from right side | |
= between 2 stitches make 1 yarn over | |
= knit 2 together | |
= slip 1 stitch as if to knit, knit 1, pass the slipped stitch over the knitted stitch | |
= slip 1 stitch as if to knit, knit 2 together, pass the slipped stitch over the knitted together stitches | |
= knitting direction |
Each of our patterns has specific tutorial videos to help you.
These step-by-step tutorials might also help you:
Why is the knitting/crochet tension so important?
Knitting tension is what determines the final measurements of your work, and is usually measured per 10 x 10 cm. It is provided like so: number of stitches in width x number of rows in height - eg: 19 stitches x 26 rows = 10 x 10 cm.
The knitting tension is very individual; some people knit/crochet loosely while others work tightly. You adjust the knitting tension with the needle size, which is why the suggested needle size is only meant as a guide! You need to adjust this (up or down) to ensure that YOUR knitting tension matches the knitting tension provided in the pattern. If you work with a different knitting tension than provided you will have a different yarn consumption, and your work will have different measurements than what the pattern suggests.
The knitting tension also determines which yarns can replace each other. As long as you achieve the same knitting tension you can replace one yarn with another.
See DROPS lesson: How to measure your tension/gauge
See DROPS video: How to make a gauge tension swatch
How do I know how many balls of yarn I need?
The required amount of yarn is provided in grams, eg: 450 g. To calculate how many balls you’ll need you first need to know how many grams are in 1 ball (25g, 50g or 100g). This information is available if you click on the individual yarn quality on our pages. Divide the amount required with the amount of each ball. For example, if each ball is 50g (the most common amount), the calculation will be as follows: 450 / 50 = 9 balls.
Can I use a different yarn than what the pattern suggests?
The important thing when changing from one yarn to another is that the knitting/crochet tension remains the same. This is so that the measurements of the finished piece will be the same as on the sketch provided. It is easier to achieve the same knitting tension using yarns from the same yarn group. It is also possible to work with multiple strands of a thinner yarn to achieve the knitting tension of a thicker one. Please try our yarn converter. We recommend you to always work a test swatch.
Please NOTE: when changing yarn the garment might have a different look and feel to the garment in the photo, due to individual properties and qualities of each yarn.
See DROPS lesson: Can I use a different yarn than the one mentioned in the pattern?
What are the yarn groups?
All our yarns are categorised into yarn groups (from A to F) according to thickness and knitting tension – group A contains the thinnest yarns and group F the thickest. This makes it easier for you to find alternative yarns to our patterns, should you wish to switch yarn. All yarns within the same group have a similar knitting tension and can easily replace each other. However, different yarn qualities have different structures and properties which will give the finished work a unique look and feel.
How do I use the yarn calculator?
At the top of all our patterns you’ll find a link to our yarn calculator, which is a helpful tool should you wish to use a different yarn than suggested. By filling in the yarn quality you wish to replace, the amount (in your size) and number of strands, the calculator will present good alternative yarns with the same knitting tension. Additionally it will tell you how much you’ll require in the new qualities and whether you’ll need to work with multiple strands. Most skeins are 50g (some are 25g or 100g).
If the pattern is worked with multiple colours, every colour will have to be calculated separately. Similarly, if the pattern is worked with several strands of different yarns (for example 1 strand Alpaca and 1 strand Kid-Silk) you will have to find alternatives for each, individually.
Why do you show discontinued yarns in the patterns?
Since different yarns have different qualities and textures we have chosen to keep the original yarn in our patterns. However, you can easily find options among our available qualities by using our yarn calculator, or simply pick a yarn from the same yarn group.
It is possible that some retailers still have discontinued yarns in stock, or that someone has a few skeins at home that they would like to find patterns for.
The yarn calculator will provide both alternative yarn as well as required amount in the new quality.
What size should I knit?
If you think it's hard to decide what size to make, it can be a good idea to measure a garment you own already and like the size of. Then you can pick the size by comparing those measures with the ones available in the pattern's size chart.
You'll find the size chart at the bottom of the pattern.
See DROPS lesson: How to read size chart
Why do I get the wrong knitting tension with the suggested needle size?
The needle size provided in the pattern serves only as a guide, the important thing is to follow the knitting tension. And since knitting tension is very individual, you will have to adjust the needle size to ensure that YOUR tension is the same as in the pattern – maybe you’ll have to adjust 1, or even 2 needle sizes, up or down to achieve the correct tension. For this, we recommend that you work test swatches.
Should you work with a different knitting tension than the one provided, the measurements of the finished garment might deviate from the measurement sketch.
See DROPS lesson: How to measure your tension/gauge
See DROPS video: How to make a tension/gauge swatch
Why is the pattern worked top-down?
Working a garment top-down provides more flexibility and room for personal adjustment. For example it is easier to try the garment on while working, as well as making adjustments to length of yoke and shoulder caps.
The instructions are carefully explaining every step, in the correct order. Diagrams are adjusted to the knitting direction and are worked as usual.
How do I work according to a knitting diagram?
The diagram depicts all rows/rounds, and every stitch seen from the right side. It is read from bottom to top, from right to left. 1 square = 1 stitch.
When working back and forth, every other row is worked from the right side and every other row is worked from the wrong side. When working from the wrong side, the diagram will have to be worked reversed: from left to right, knit stitches are purled, purl stitches are knit etc.
When working in the round every round is worked from the right side and the diagram are worked from right to left on all rounds.
See DROPS lesson: How to read knitting diagrams
How do I work according to a crochet diagram?
The diagram depicts all rows/rounds, and every stitch seen from the right side. It is worked from bottom to top, from right to left.
When working back and forth every other row is worked from the right side: from right to left and every other row is worked from the wrong side: from left to right.
When working in the round, every row in the diagram are worked from the right side, from right to left.
When working a circular diagram you start in the middle and work your way outwards, counter clockwise, row by row.
The rows usually start with a given number of chain stitches (equivalent to the height of the following stitch), this will either be depicted in the diagram or explained in the pattern.
See DROPS lesson: How to read crochet diagrams
How do I work several diagrams simultaneously on the same row/round?
Instructions for working several diagrams after each other on the same row/round, will often be written like so: “work A.1, A.2, A.3 a total of 0-0-2-3-4 times". This means you work A.1 once, then A.2 is worked once, and A.3 is repeated (in width) the number of times provided for your size – in this case like so: S = 0 times, M = 0 times, L=2 times, XL= 3 times and XXL = 4 times.
The diagrams are worked as usual: begin with the first row in A.1, then work the first row in A.2 etc.
See DROPS lesson: How to read knitting diagrams
See DROPS lesson: How to read crochet diagrams
Why are the sleeves shorter in larger sizes?
The total width of the garment (from wrist-to-wrist) will be larger in the larger sizes, despite the actual sleeves being shorter. The larger sizes have longer sleeve caps and wider shoulders, so there will be a good fit in all sizes.
Where on the garment is the length measured?
The measurement sketch/schematic drawing provides information regarding the full length of the garment. If it’s a jumper or a jacket the length is measured from the highest point on the shoulder closest to the neckline, and straight down to the bottom of the garment. It is NOT measured from the tip of shoulder. Similarly, the length of yoke is measured from the highest point on the shoulder and down to where yoke is split into body and sleeves.
On a jacket measures are never taken along bands, unless specifically stated. Always measure inside band stitches when measuring the length.
See DROPS lesson: How to read a schematic drawing
What is a repeat?
Diagrams are often repeated on the round or in height. 1 repeat is the diagram the way it appears in the pattern. If it says to work 5 repeats of A.1 in the round, then you work A.1 a total of 5 times after/next to each other in the round. If it says to work 2 repeats of A.1 vertically/in height you work the entire diagram once, then begin again at the start and work the entire diagram one more time.
Why does the piece start with more chain stitches than it’s worked with?
Chain stitches are slightly narrower than other stitches and to avoid working the cast-on edge too tight, we simply chain more stitches to begin with. The stitch count will be adjusted on the following row to fit the pattern and measurement sketch.
Why increase before the rib edge when the piece is worked top-down?
The rib edge is more elastic and will contract slightly compared to, for example, stocking stitch. By increasing before the rib edge, you avoid a visible difference in width between the rib edge and the rest of the body.
Why increase in the cast-off edge?
It’s very easy to cast off too tightly, and by making yarn overs while casting off (and simultaneously casting these off) you avoid a too tight cast off edge.
See DROPS video: How to bind off with yarn overs (yo)
How do I increase/decrease on every 3rd and 4th row/round alternately?
To achieve an even increase (or decrease) you can increase on, for example: every 3rd and 4th row alternately, like so: work 2 rows and increase on the 3rd row, work 3 rows and increase on the 4th. Repeat this until the increase is complete.
See DROPS lesson: Increase or decrease 1 st on every 3rd and 4th row alternately
How can I work a jacket in the round instead of back and forth?
Should you prefer to work in the round instead of back and forth, you may of course adjust the pattern. You’ll need to add steeks mid-front (usually 5 stitches), and follow the instructions. When you would normally turn and work from the wrong side, simply work across the steek and continue in the round. At the end you’ll cut the piece open, pick up stitches to work bands, and cover the cut edges.
See DROPS video: How to knit steeks and cut open
Can I work a jumper back and forth instead of in the round?
Should you prefer to work back and forth instead of in the round, you may of course adjust the pattern so you work the pieces separately and then assemble them at the end. Divide the stitches for the body in 2, add 1 edge stitch in each side (for sewing) and work the front and back pieces separately.
See DROPS lesson: Can I adapt a pattern for circular needles into straight needles?
Why is the pattern slightly different than what I see in the photo?
Pattern repeats can vary slightly in the different sizes, in order to get the correct proportions. If you’re not working the exact same size as the garment in the photo, yours might deviate slightly. This has been carefully developed and adjusted so that the complete impression of the garment is the same in all sizes.
Make sure to follow instructions and diagrams for your size!
How do I make a women’s size garment into a men’s size one?
If you have found a pattern you like which is available in women’s size it’s not very difficult to convert it to men’s size. The biggest difference will be the length of sleeves and body. Start working on the women size that you think would fit across the chest. The additional length will be worked right before you cast off for the armhole/sleeve cap. If the pattern is worked top-down you can add the length right after the armhole or before the first decrease on sleeve.
Regarding additional yarn amount, this will depend on how much length you add, but it is better with a skein too many than too few.
How do I prevent a hairy garment from shedding?
All yarns will have excess fibres (from production) that might come off as lint or shedding. Brushed yarns (ie hairier yarns) have more of these loose, excess fibres, causing more shedding.
Shedding also depends on what is worn under or over the garment, and whether this pulls at the yarn fibres. It’s therefore not possible to guarantee that there will be no shedding
Below are some tips on how to get the best result when working with hairier yarns:
1. When the garment is finished (before you wash it) shake it vigorously so the looser hairs come off. NOTE: do NOT use a lint roller, brush or any method that pulls at the yarn.
2. Place the garment in a plastic bag and put it in your freezer - the temperature will cause the fibres to become less attached to each other, and excess fibres will come off easier.
3. Leave in the freezer for a few hours before taking it out and shaking it again.
4. Wash the garment according to the instructions on the yarn label.
Why does my garment pill?
Pilling is a natural process that happens to even the most exclusive of fibers. It's a natural sign of wear and tear that is hard to avoid, and that is most visible in high friction areas of your garment like a sweater's arms and cuffs.
You can make your garment look as new by removing the pilling, using a fabric comb or a pill/lint remover.
Song of the Sea |
||||||||||||||||||||||
|
|
|||||||||||||||||||||
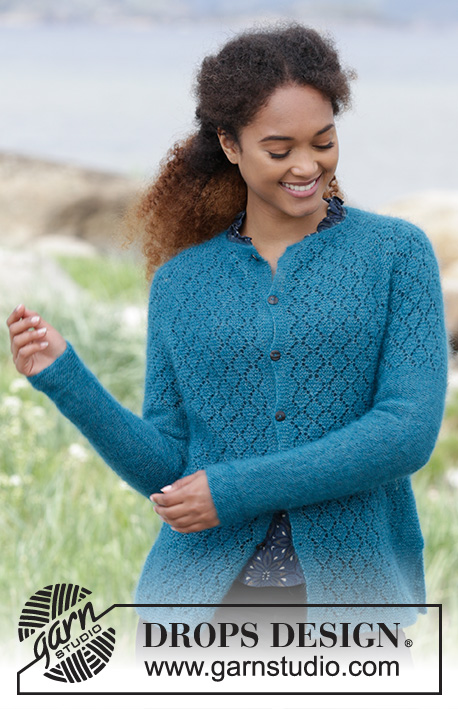
Knitted jumper with raglan, lace pattern, garter stitch and split in the side, worked top down. Sizes S - XXXL. The piece is worked in DROPS Kid-Silk.
DROPS 181-22 |
||||||||||||||||||||||
INFORMATION FOR THE PATTERN: RIDGE/GARTER STITCH (worked back and forth): 1 ridge = Knit 2 rows. RIDGE/GARTER STITCH (worked in the round): 1 ridge = 2 rounds. Knit 1 round and purl 1 round. PATTERN: See diagrams A.1 to A.3. The diagrams show all the rows in the pattern seen from the right side. RAGLAN: Start 1 stitch before the marker thread, make 1 yarn over, knit 2 (the marker thread sits between these 2 stitches), make 1 yarn over (= 2 stitches increased). Repeat by all 4 marker threads (= a total of 8 stitches increased). On the next round, work the yarn overs twisted to prevent holes. INCREASE TIP-2 (for the sides in front and back pieces): All increases are worked from the right side. Increase 1 stitch on the inside of 2 stitches in each side of the piece as follows: Work 2 stitches garter stitch, 1 yarn over, work pattern as before until there are 2 stitches left, 1 yarn over, 2 stitches garter stitch. On the next round, knit the yarn overs twisted to prevent holes. INCREASE TIP-1 (for yoke) To work out how to increase evenly, count the total number of stitches on the needle (e.g. 16 stitches) and divide by the number of increases to be made (e.g. 11) = 1.4. In this example, increase alternately after approx. every first and 2nd stitch. DECREASE TIP (for sleeve): All decreases are worked from the wrong side (i.e. with knit) Knit 2, knit 2 together (= 1 stitch decreased), knit until there are 4 stitches left, slip 1 stitch as if to knit, knit 1, pass the slipped stitch over the knitted stitch (= 1 stitch decreased), finish with knit 2. ---------------------------------------------------------- JUMPER: The yoke is worked in the round, top down, with circular needle, before dividing for the front and back pieces, which are worked back and forth with circular needle. The sleeves are worked back and forth with circular needle. YOKE: Cast on 98-104-104-116-116-126 stitches with circular needle size 2.5 mm and 2 strands Kid-Silk. Remove one of the strands and continue with 1 strand Kid-Silk. Work 2 RIDGES – see description above. Work, increase and insert 4 marker threads as follows: Knit 16 stitches at the same time as you increase 11 stitches evenly over these stitches – read INCREASE TIP-1, insert 1 marker thread (= left sleeve), knit 33-36-36-42-42-47 stitches at the same time as you increase 10-15-15-17-17-20 stitches evenly (= front piece), insert 1 marker thread, knit 16 stitches at the same time as you increase 11 stitches evenly (= right sleeve), insert 1 marker thread, knit 32-35-35-41-41-46 stitches at the same time as you increase 10-15-15-17-17-20 stitches evenly, insert 1 marker thread and finish with 1 stitch garter stitch (= back piece) = 140-156-156-172-172-188 stitches. Purl 1 round. Change to circular needle size 3.5 mm. Then work as follows: Work 1 stitch in garter stitch, A.1 over the next 8 stitches, A.2 over the next 8 stitches, A.3 over the next 9 stitches, 2 stitches garter stitch (the marker thread sits in the middle of these stitches = left sleeve), work A.1 over the next 8 stitches, work A.2 over the next 24-32-32-40-40-48 stitches, A.3 over the next 9 stitches, 2 stitches garter stitch (the marker thread sits in the middle of these stitches = front piece), A.1 over the next 8 stitches, A.2 over the next 8 stitches, A.3 over the next 9 stitches, 2 stitches garter stitch (the marker thread sits in the middle of these stitches = right sleeve), work A.1 over the next 8 stitches, work A.2 over the next 24-32-32-40-40-48 stitches, A.3 over the next 9 stitches, 1 stitch in garter stitch (= back piece) REMEMBER THE KNITTING TENSION! Continue with pattern and increase to RAGLAN – see description above. The increased stitches are worked into the pattern as you go. Increase every 2nd round 1-2-6-6-7-7 times, then every 4th round 21-23-22-24-26-28 times (= a total of 22-25-28-30-33-35 times). After all the increases, there are 316-356-380-412-436-468 stitches on the needle. The piece measures approx. 21-23-24-26-28-30 cm. The next round is worked as follows: Place the first 66-74-82-86-92-92 stitches on a thread for sleeve, cast on 8-8-12-12-16-16 new stitches on the needle (= in the side under the sleeve), continue pattern over the next 92-104-108-120-126-142 stitches (= front piece), place the next 66-74-82-86-92-92 stitches on a thread for sleeve, cast on 8-8-12-12-16-16 new stitches on the needle (= in the side under the sleeve), continue with pattern over the next 92-104-108-120-126-142 stitches (= back piece). Insert a marker in the middle of the new stitches under the sleeves in both sides. These markers mark the divide between the front and back pieces. The front piece, back piece and sleeves are now finished separately. THE PIECE IS NOW MEASURED FROM HERE! BACK PIECE: = 100-112-120-132-142-158 stitches. The piece is now worked back and forth. The next row is worked as follows from the right side: Adjust so that the pattern matches the pattern on the yoke. Work 5-7-7-5-6-6 stitches garter stitch, A.1 over the next 8 stitches, A.2 over the next 72-80-88-104-112-128 stitches, A.3 over the next 9 stitches, 6-8-8-6-7-7 stitches garter stitch. Continue pattern in this way. When the piece measures 5 cm from the separation, increase 1 stitch inside 2 stitches in each side of the piece (= 2 stitches increased) – read INCREASE TIP-2! The increased stitches are worked in garter stitch. Increase in this way every 4-5-5-5-3-4 cm a total of 5-4-4-4-6-5 times = 110-120-128-140-154-168 stitches. Continue the pattern until the piece measures 32-32-33-33-33-33 cm from the separation (the piece measures 56-58-60-62-64-66 cm in total from shoulder), finish the pattern after a complete or half repeat in height. Work 5 RIDGES – see description above, over all stitches, then loosely cast off with double strand. FRONT PIECE: Work as for back piece. SLEEVE: Place the 66-74-82-86-92-92 stitches from the thread in the one side of the piece on circular needle size 3.5 mm and cast on 4-4-6-6-8-8 stitches in each side of the piece at the end of the next 2 rows = 74-82-94-98-108-108 stitches. Work stocking stitch back and forth, but the wrong side should face outwards (purl from right side, knit from wrong side). When the piece measures 2 cm from the separation, decrease 1 stitch in each side – read DECREASE TIP. Decrease in this way every 2½-2-1½-1½-1-1 cm a total of 13-16-21-21-25-24 times = 48-50-52-56-58-60 stitches. Continue working until the sleeve measures 39-38-38-36-35-33 cm from the separation (shorter measurements in larger sizes because of wider neck and longer yoke). Change to circular needle size 2.5 mm. Now work garter stitch back and forth over all stitches for 4 cm. Then loosely cast off with double strand. The sleeve measures 43-42-42-40-39-37 cm from the separation and down. Work the other sleeve in the same way. ASSEMBLY: Sew the underarm sleeves, from the separation and down – sew inside the 1 edge stitch in each side. Sew the side seams from the separation and down – sew edge to edge in the outermost loop of the outermost stitch, so that the seam is flat, but stop when you have approx.12 cm left in each side (= split). Sew the seam in the other side in the same way. |
||||||||||||||||||||||
Diagram explanations |
||||||||||||||||||||||
|
||||||||||||||||||||||
Have you made this or any other of our designs? Tag your pictures in social media with #dropsdesign so we can see them! Do you need help with this pattern?You'll find tutorial videos, a Comments/Questions area and more by visiting the pattern on garnstudio.com. © 1982-2024 DROPS Design A/S. We reserve all rights. This document, including all its sub-sections, has copyrights. Read more about what you can do with our patterns at the bottom of each pattern on our site. |
With over 40 years in knitting and crochet design, DROPS Design offers one of the most extensive collections of free patterns on the internet - translated to 17 languages. As of today we count 304 catalogues and 11422 patterns - 11422 of which are translated into English (UK/cm).
We work hard to bring you the best knitting and crochet have to offer, inspiration and advice as well as great quality yarns at incredible prices! Would you like to use our patterns for other than personal use? You can read what you are allowed to do in the Copyright text at the bottom of all our patterns. Happy crafting!
Comments / Questions (20)
Agnès wrote:
Merci pour la correction. Je vais pouvoir continuer mon ouvrage en déplaçant les marqueurs ;-)
23.10.2017 - 17:39Cecilia wrote:
Hej, jag skulle vilja vilja fortsätta och sticka hela plagget runt på rundsticka, varför har ni inte anpassat mönstret till detta? Det går ju så mycket snabbare! Vad ska jag tänka på när jag gör detta? Tack för alla fantastiska mönster! /Cecilia
13.10.2017 - 10:54DROPS Design answered:
Denna modell har vi valt att sticka fram- och bakst fram och tillbaka. Ofta får plagget en fin form, då man syr sidsömmar. Men visst kan du sticka fram- och bakst runt på rundst. Du kan då minska bort 1 kantmaska i varje sida på fram- och bakstycket, eftersom du inte behöver sy sidsömmarna.
13.10.2017 - 14:26Agnès wrote:
Bonjour, Je commence enfin ce superbe modèle et voilà mon premier soucis. A1+A2+A3 = 25 mailles et la manche en compte 27! Donc mes deux mailles mousse se trouvent avant le marqueur!? Ce dernier n'est donc pas entre ces 2 mailles. Dois-je déplacer mon marqueur, ai - je mal compris les explications ou est - ce une coquille dans le libellé de ces dernières? Merci de votre attention et de votre aide.
08.10.2017 - 13:39DROPS Design answered:
Bonjour Agnès, une correction a été faite pour réorganiser les mailles comme il le faut. Le texte en ligne est correct, retrouvez la correction sous l'onglet à côté des fournitures. Bon tricot!
09.10.2017 - 08:51Borriello wrote:
Modèle 181-22: Dans le 3ème rang à l’endroit du motif, après les 2 mailles ensemble à l’endroit , le jeté, faut il tricoter 5 mailles et faire « 1 jeté, glisser une maille.... » ou tricoter 6 mailles et faire « 1 jeté, glisser une maille.... » merci
01.10.2017 - 13:53DROPS Design answered:
Bonjour Mme Boriello, il faut tricoter 5 m avant le jeté suivant, la dernière maille de A.1 va se tricoter avec la diminution du début de A.2 et le jeté avant cette diminution viendra remplacer la dernière m de A.2 (même chose à la transition de A.2 et A.3). Bon tricot!
02.10.2017 - 10:00Agnès wrote:
Bonjour, après d'autres ouvrages tricotés,je reviens sur ce superbe pull. Puis-je utiliser la méthode "long-tail" pour le montage ou m'en conseillez-vous une autre? Merci de votre attention.
28.09.2017 - 19:14DROPS Design answered:
Bonjour Agnès, vous pouvez utiliser la technique de montage que vous souhaitez, veillez juste à ce que les mailles montées ne soient pas trop serrées. Bon tricot!
29.09.2017 - 09:05Pernille wrote:
Hej. I opskriften står der så vidt jeg kan læse, ar ærmerne strikkes i ret strik, men på billedet er der mønster. Hvordan skal det strikkes, Vh Pernille
01.08.2017 - 07:51DROPS Design answered:
Hei Pernille. Ermene skal strikkes i glattstrikk, men vrangsiden skal vende ut (vrang fra retten, rett fra vrangen). Når du er ferdig med bærestykket er du også ferdig med det du ser av mønster på ermene. God Fornøyelse!
14.08.2017 - 16:42Pascale wrote:
Hello. After I start from the top and increase to Raglan, I don't understand how th work the increased stiches into the pattern. The pattern starts with diagram A.1, but it has 8 stiches. How do I work 1 extra stitch? Please if you can clarify this...I am a beginner kintting. Thank you.
18.07.2017 - 17:13DROPS Design answered:
Dear Pascale, work new sts in A.1 at the beg of a piece reading diagram from left to right - at the end of piece work new sts in A.3 reading diagram from right to left. By and by previous A.1/A.3 will be worked in A.2 and new sts will be all worked in A.1/A.3 and so on - make sure you have enough sts to make the dec and YO as in diagram. Happy knitting!
19.07.2017 - 08:49Agnès wrote:
Superbe ce modèle! Pensez-vous que je puisse remplacer " glisser 1 maille à l'endroit, tricoter 1 maille endroit, passer la maille glissée par-dessus la maille tricotée " par un "GGT", à savoir, "glisser, glisser, tricoter" ("SSK" en anglais)? Merci de votre réponse et bravo pour cette collection 2017/2018.
14.07.2017 - 20:07DROPS Design answered:
Bonjour Agnès, vous pouvez tout à fait dans la mesure où vous obtenez le même résultat dans les 2 cas. Bon tricot!
17.07.2017 - 08:10Roswitha wrote:
Sehr edel! Wunderschön.
28.06.2017 - 00:44Rosa wrote:
Precioso❤
17.06.2017 - 18:17