
Popular categories
Looking for a yarn?


|
||||||||||||||||||||||
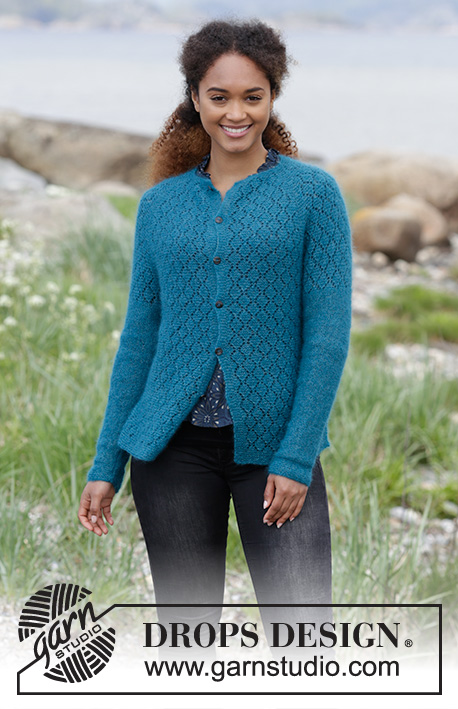
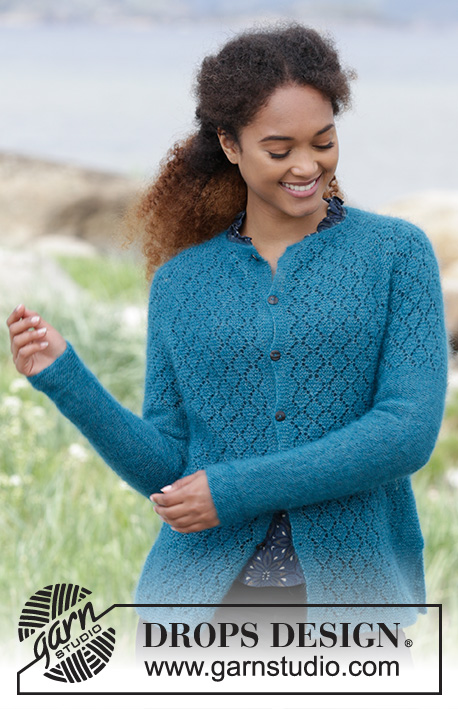
Song of the Sea Cardigan |
||||||||||||||||||||||
 |
 |
|||||||||||||||||||||
Knitted jacket with raglan, lace pattern, garter stitch and split in the side, worked top down. Sizes S - XXXL. The piece is worked in DROPS Kid-Silk.
DROPS 181-21 |
||||||||||||||||||||||
|
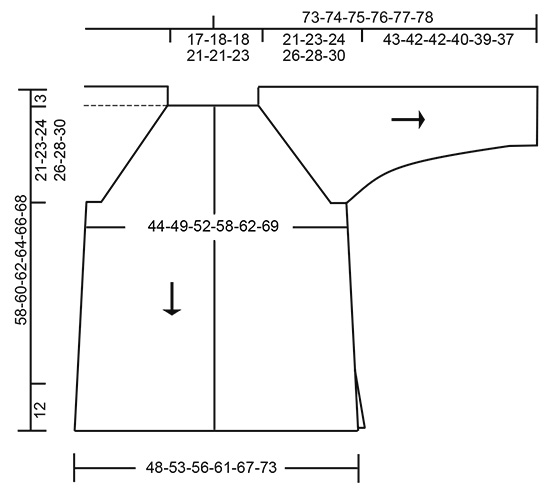
INFORMATION FOR THE PATTERN: RIDGE/GARTER STITCH (worked back and forth): 1 ridge = Knit 2 rows. PATTERN: See diagrams A.1 to A.5. The diagrams show all the rows in the pattern seen from the right side. Diagrams A.1 and A.5 are for sizes S-XL-XXL only. INCREASE TIP-1 (for yoke) To work out how to increase evenly, count the total number of stitches on the needle (e.g. 17 stitches) and divide by the number of increases to be made (e.g. 5) = 3.4. In this example, increase alternately after approx. every 3rd and 4th stitch. RAGLAN: All increases are worked from the right side! Start 1 stitch before the marker thread, make 1 yarn over, knit 2 (the marker thread sits between these 2 stitches), make 1 yarn over (= 2 stitches increased). Repeat by all 4 marker threads (= a total of 8 stitches increased). On the next round, work the yarn overs twisted to prevent holes. INCREASE TIP-2 (for body): All increases are worked from the right side! Increase 1 stitch on each side of the marker thread as follows: Work until there is 1 stitch left before the marker thread, 1 yarn over, 2 stitches garter stitch (the marker thread sits in the middle of these stitches), 1 yarn over. Repeat by both marker threads. On the next round, knit the yarn overs twisted to prevent holes. DECREASE TIP (for sleeve): All decreases are worked from the wrong side (i.e. with knit) Knit 2, knit 2 together (= 1 stitch decreased), knit until there are 4 stitches left, slip 1 stitch as if to knit, knit 1, pass the slipped stitch over the knitted stitch (= 1 stitch decreased), finish with knit 2. BUTTONHOLE: Work buttonholes on the right band (when the garment is worn): Work from the right side until there are 3 stitches left on the needle, make 1 yarn over, purl the next 2 stitches together, purl the next stitch. On the next row purl the yarn over so that there is a hole. The first buttonhole is worked on the first row from the right side after the garter stitch edge in the neck. The next 5-5-5-6-6-6 are worked with 8 cm between each. ---------------------------------------------------------- JACKET: The piece is worked back and forth, top down, with circular needle from mid front. The sleeves are worked back and forth with circular needle. YOKE: Cast on 109-114-114-126-126-137 stitches (including 5 band stitches in each side towards mid front) with circular needle size 2.5 mm and 2 strands Kid-Silk. Remove one of the strands and continue working with 1 strand Kid-Silk. Work 2 RIDGES – see description above, with 5 band stitches in each side towards mid front which are purled on every row to finished length. Work, increase and insert 4 marker threads from the right side as follows: Purl 5 band stitches, knit 17-18-18-21-21-24 stitches at the same time as you increase 5-8-8-9-9-10 stitches evenly over these stitches – read INCREASE TIP-1, insert 1 marker thread (= left front piece), knit 16 stitches at the same time as you increase 11 stitches evenly, insert 1 marker thread (= left sleeve), knit 33-36-36-42-42-47 stitches at the same time as you increase 10-15-15-17-17-20 stitches evenly (= back piece), insert 1 marker thread, knit 16 stitches at the same time as you increase 11 stitches evenly (= right sleeve), insert 1 marker thread, knit 17-18-18-21-21-24 stitches at the same time as you increase 5-8-8-9-9-10 stitches evenly (= right front piece), finish with purl 5 band stitches – remember BUTTONHOLE on the band – see description above = 151-167-167-183-183-199 stitches. Knit 1 row from the wrong side with 5 band stitches purl in each side of the piece. Change to circular needle size 3.5 mm. Work the next row from the right side as follows: Left front piece: Purl 5 band stitches, work A.1 over the next 4-0-0-4-4-0 stitches, A.2 over the next 0-8-8-0-0-8 stitches, A.3 over the next 8-8-8-16-16-16 stitches, A.4 over the next 9 stitches, 2 stitches in garter stitch (the marker thread sits in the middle of these stitches). Left sleeve: Work A.2 over the next 8 stitches, A.3 over the next 8 stitches, A.4 over the next 9 stitches, 2 stitches garter stitch (the marker thread sits in the middle of these stitches). Back piece: Work A.2 over the next 8 stitches, work A.3 over the next 24-32-32-40-40-48 stitches, A.4 over the next 9 stitches, 2 stitches garter stitch (the marker thread sits in the middle of these stitches). Right sleeve: Work as for left sleeve. Right front piece: Work A.2 over the next 8 stitches, A.3 over the next 8-8-8-16-16-16 stitches, A.4 over the next 0-9-9-0-0-9 stitches, A.5 over the next 5-0-0-5-5-0 stitches and finish with 5 band stitches in purl. REMEMBER THE KNITTING TENSION! Continue with pattern and increase to RAGLAN – see description above. The increased stitches are worked into the pattern, i.e. work in garter stitch until there is enough stitches for a half or a whole repeat of the pattern in each side. Increase every 2nd row 1-2-6-6-7-7 times, then every 4th row 21-23-22-24-26-28 times (= a total of 22-25-28-30-33-35 times). After all the increases, there are 327-367-391-423-447-479 stitches on the needle. The piece measures approx. 21-23-24-26-28-30 cm. The next row is worked as follows from the right side: 5 band stitches in purl, continue pattern over the next 46-52-54-60-63-71 stitches (= left front piece), place the next 66-74-82-86-92-92 stitches on a thread for sleeve, cast on 8-8-12-12-16-16 new stitches on the needle (= in the side under the sleeve), insert 1 marker thread in the middle of these stitches, continue the pattern over the next 93-105-109-121-127-143 stitches (= back piece), place the next 66-74-82-86-92-92 stitches on a thread for sleeve, cast on 8-8-12-12-16-16 new stitches on the needle (= in the side under the sleeve), insert 1 marker thread in the middle of these stitches, continue the pattern over the next 46-52-54-60-63-71 stitches and finish with 5 band stitches in purl (= right front piece). Body and sleeves are now finished separately. THE PIECE IS NOW MEASURED FROM HERE! BODY: = 211-235-251-275-295-327 stitches. Knit 1 row over all stitches from the wrong side. Then work as follows from the right side: Adjust so that the pattern matches the pattern on the yoke. Left front piece: Purl 5 band stitches, A.1 over the next 4-0-0-4-4-0 stitches as before, A.2 over the next 0-8-8-0-0-8 stitches as before, A.3 over the next 32-32-40-48-56-56 stitches, A.4 over the next 9 stitches, 5-7-3-5-2-6 stitches garter stitch. Back piece: Work 6-8-8-6-7-7 stitches garter stitch, A.2 over the next 8 stitches, A.3 over the next 72-80-88-104-112-128 stitches, A.4 over the next 9 stitches, 6-8-8-6-7-7 stitches garter stitch. Right front piece: Work 5-7-3-5-2-6 stitches garter stitch, A.2 over the next 8 stitches, A.3 over the next 32-32-40-48-56-56 stitches, A.4 over the next 0-9-9-0-0-9 stitches, A.5 over the next 5-0-0-5-5-0 stitches and finish with 5 band stitches in purl. Continue the pattern in this way. When the piece measures 5 cm from the separation, increase 1 stitch on each side of each marker thread (= 4 stitches increased) – read INCREASE TIP-2! The increased stitches are worked in garter stitch. Increase in this way every 4-5-5-5-3-4 cm a total of 5-4-4-4-6-5 times = 231-251-267-291-319-347 stitches. When the piece measures 22-22-23-23-23-23 cm from the separation, finish the front and back pieces separately, adjust so that the last row is from the wrong side (= 12 cm split). LEFT FRONT PIECE: = the 60-65-69-75-82-89 first stitches from the right side. Work as follows from the right side: Purl 5 band stitches, pattern as before over the next 45-49-57-61-69-73 stitches, 10-11-7-9-8-11 stitches garter stitch. Continue the pattern in this way until the piece measures 32-32-33-33-33-33 cm from the separation (the piece measures a 56-58-60-62-64-66 cm in total from shoulder), finish the pattern after a complete or half repeat in height. Work 5 ridges over all the stitches, then loosely cast off with double strand. BACK PIECE: = 111-121-129-141-155-169 stitches. Work 11-12-12-10-13-12 stitches garter stitch, pattern as before over the next 89-97-105-121-129-145 stitches, 11-12-12-10-13-12 stitches garter stitch. Continue the pattern in this way until the piece measures 32-32-33-33-33-33 cm from the separation, adjust to match the left front piece. Work 5 ridges over all the stitches, then loosely cast off with double strand. RIGHT FRONT PIECE: = 60-65-69-75-82-89 stitches. Work as follows from the right side: Work 10-11-7-9-8-11 stitches garter stitch, pattern as before over the next 45-49-57-61-69-73 stitches, finish with 5 band stitches in purl. Continue the pattern in this way until the piece measures 32-32-33-33-33-33 cm from the separation, adjust to match the left front piece. Work 5 ridges over all the stitches, then loosely cast off with double strand. SLEEVE: Place the 66-74-82-86-92-92 stitches from the thread in the one side of the piece on circular needle size 3.5 mm and cast on 4-4-6-6-8-8 stitches in each side of the piece at the end of the next 2 rows = 74-82-94-98-108-108 stitches. Work stocking stitch back and forth, but the wrong side should face outwards (purl from right side, knit from wrong side). When the piece measures 2 cm from the separation, decrease 1 stitch in each side – read DECREASE TIP. Decrease in this way every 2½-2-1½-1½-1-1 cm a total of 13-16-21-21-25-24 times = 48-50-52-56-58-60 stitches. Continue working until the sleeve measures 39-38-38-36-35-33 cm from the separation (shorter measurements in larger sizes because of wider neck and longer yoke). Change to circular needle size 2.5 mm. Now work garter stitch back and forth over all stitches for 4 cm. Then loosely cast off with double strand. The sleeve measures 43-42-42-40-39-37 cm from the separation and down. Work the other sleeve in the same way. ASSEMBLY: Sew the underarm seams – sew inside 1 edge stitch in each side. Sew on the buttons. |
||||||||||||||||||||||
Diagram explanations |
||||||||||||||||||||||
|
||||||||||||||||||||||

|
||||||||||||||||||||||
|
||||||||||||||||||||||
|
Have you made this or any other of our designs? Tag your pictures in social media with #dropsdesign so we can see them! Do you need help with this pattern?You'll find tutorial videos, a Comments/Questions area and more by visiting the pattern on garnstudio.com. © 1982-2024 DROPS Design A/S. We reserve all rights. This document, including all its sub-sections, has copyrights. Read more about what you can do with our patterns at the bottom of each pattern on our site. |
||||||||||||||||||||||


With over 40 years in knitting and crochet design, DROPS Design offers one of the most extensive collections of free patterns on the internet - translated to 17 languages. As of today we count 304 catalogues and 11422 patterns - 11422 of which are translated into English (UK/cm).
We work hard to bring you the best knitting and crochet have to offer, inspiration and advice as well as great quality yarns at incredible prices! Would you like to use our patterns for other than personal use? You can read what you are allowed to do in the Copyright text at the bottom of all our patterns. Happy crafting!
Comments / Questions (18)
Begin van het patroon wordt gezegd brei rechtermouw hetzelfde als linkermouw. Is dat in spiegelbeeld:? A4-A3-A2? Of inderdaad hetzelfde: A2-A3-A4
05.05.2023 - 15:49DROPS Design answered:
Dag Bauke,
Je kunt de andere mouw inderdaad precies op dezelfde manier breien.
08.05.2023 - 20:50Hvad er grunden til, at de 5 kantmasker strikkes vrang på alle pinde? Ville det ikke give samme resultat, om de blev strikket ret på alle pinde?
11.06.2020 - 11:59DROPS Design answered:
Hej Anni, hvis du strikker dem vrang, så vil de blive lidt forskudt i forhold til de retstrikkede pinde i mønsteret. Men du kan gøre som du vil :)
11.06.2020 - 15:02Da jeg skulle strikke ærmerne, vendte jeg trøjen om på vrangen, samlede maskerne op på strømpepinde og strikkede de 2x4 nye masker op i lænkerne fra de nye masker på trøjen. Så kunne jeg bare strikke ret hele vejen. Det er hurtigere, nemmere og giver en mere ensartet resultat. Desuden er der ingen sømme langs ærmet og under armen. Flot resultat.
11.06.2020 - 11:58Str S, bærestykke færdigt. Fra venstre 5 Vr, mønster 46 M. Det er A1, 4xA3, A4 OG EN KANTMASKE før 66 på tråd. Slår 8 op. Det ny bagstykke er så 4 ny M, 4 M fra venstre ærme og hele gamle bagstykke, startende med 3 kantmasker som ikke gik i mønster og så A1. Skal starte bagstykke med 6 R og 8 M A2 før jeg når A3. Men når jeg skal starte på A3 svarende til tidligere pinde har jeg en maske for meget, 4 ny, 4 gamle, 3 kant og A1. Skal bruge 14 til ret og A2. Regnet galt hvor?
30.12.2018 - 23:25Daginn er til kenslumyndband fyrir 181-21 mynstur A.2 fæ þetta ekki til að stemma, prjóna alltaf 9 lykkjur í staðinn fyrir 8
30.11.2018 - 19:48DROPS Design answered:
Blessuð Margrét, ég fann ekkert kennslumyndband varðandi þetta því miður. Ég bar saman norsku uppskriftina og þýðinguna á íslensku og fann ekki mismun á lykkjufjölda á milli uppskrifta.
03.12.2018 - 11:19Når man øger i raglan og løbende skal tilføje nye rapporter... nogen forslag til hvilket af diagrammerne man bruger hvor, så det bliver pænt.Andet spørgsmål. Når jeg strikker pind 3 i diagrammerne, slå om, løs af, to ret sammen, den løse over, slå om, og derefter et antal retmasker, så passer masketallet ikke. Fx i A3, der læser jeg at der skal strikkes 6 retmasker, men der kommer til at mangle masker til sidst. Hvad har jeg misforstået?
28.10.2018 - 08:45DROPS Design answered:
Hei N L. Siden du strikker riller helt til du har plass til en hel/halv rapport av mønster kan du tilpasse det slik du vil. Poenget er at mønsteret skal fortsette som før. Det er A.4 og A.2 som strikkes rett før/rett etter raglanen. Du kan for eksempel strikke 1 rapport mer av A.3 og så strikke de økte maskene i A.4/A.2 når du har økt 9 masker på hver side. Eller så kan du strikke A.5/A.1 når du har økt 5/4 masker, om du syntes det blir mange rillemasker. Du mener nok 5 omgang i mønsteret. Det strikkes 5 rettmasker mellom hvert symbol for kast-felling-kast. God fornøyelse
05.11.2018 - 09:07Hei. Hvordan skal jeg gjøre når det står at jeg skal fortsette med mønster og øke til ragland, og de økte maskene skal strikkes fortløpende inn i mønster? Jeg forstår hvor jeg skal øke, men forstår ikke helt hvordan de skal inn i mønsteret.
23.01.2018 - 11:58DROPS Design answered:
Hei Kathrine. Mønsteret fra bol og ermer skal fortsette mot raglanlinjen så langt det går, dvs at de økte maskene strikkes i riller til det er nok masker til å strikke de inn i mønsteret fortløpende. God fornøyelse.
26.02.2018 - 13:00Er virkelig modellen strikket i garnet som er oppgitt i oppskriften? Synes ikke det ser sånn ut.
14.01.2018 - 11:49DROPS Design answered:
Hei Heidi. Det er det. Om du ønsker et annet garn, kan du velge kvaliteter vi har i garngruppe A. Husk strikkefastheten. God Fornøyelse!
15.01.2018 - 10:08Jag får inte ihop att det ska räcka med 150 g garn. Går åt mycket mer... 🤔
28.11.2017 - 20:31Mängden garn kan inte stämma. Räcker verkligen 150 gram till storlek L?
08.11.2017 - 21:53