
Looking for a yarn?


Comments / Questions (22)
![]() Nicole wrote:
Nicole wrote:
Thank you so much! The mistake was all on me, I was using the wrong needle!! Its coming out so great!
25.11.2021 - 19:08
![]() Nicole wrote:
Nicole wrote:
Also, I know someone asked if 1 or 2 strands of the Kid silk was used and you said only 1. However, in the picture the white is showing up much more than in what I am making with the same yarn. Are you sure only 1 strand is used because the picture definitely looks like 2?
25.11.2021 - 04:49DROPS Design answered:
Dear Nicole, yes we are sure :) The stripes you can see with natural are due to the lenght in colour natural of the yarn DROPS Delight, colour 02 - see also shadecard. Happy knitting!
25.11.2021 - 09:16
![]() Nicole wrote:
Nicole wrote:
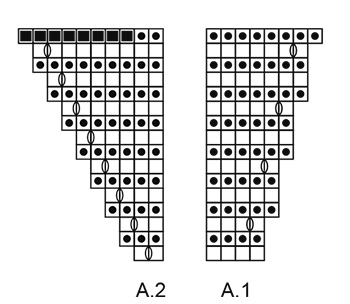
I am almost done with the last row of the diagram for the first repeat and the part on the diagram for A.2 depicted by the colored in box. What does that part of the diagram mean? It reads : stitch that is bimd off with knit on wrong side. That does not make sense. Are we binding off those stitches?
25.11.2021 - 04:00DROPS Design answered:
Hi Nicole, Yes, the black squares are stitches which are bound off with knit from the wrong side. Happy knitting!
25.11.2021 - 06:57
![]() Kathi wrote:
Kathi wrote:
"A.2 über 2 Maschen." Wird dann A2 nicht nur über 2 Maschen, sondern ständig zunehmend gestrickt? Das klingt in der Beschreibung nämlich anders. Dann ist mir jetzt klar, wie man am Ende auf die 10 M kommt. Danke!
05.03.2020 - 11:54
![]() Kathi wrote:
Kathi wrote:
Ich meine etwas anderes. In der Anleitung heißt es: "1. R: Alle M re str. ; 2. R: 1 M re, 1 Umschlag, 2 M re, 1 Markierung, 1 Umschlag, 1 M re = 6 M. ; 3. R: Alle M re str. [...] A.1 über 4 Maschen [...] , A.2 über 2 Maschen." In A2 nehme ich aber doch schon in der ersten Reihe des Musters 1M zu? Somit habe ich danach 7 M (s. Diagramm, 2. Reihe = 7 M). In A1 werden noch 4M zugenommen = 11 Maschen am Ende von A1 bzw. A2 statt 10 wie in der Anleitung.
04.03.2020 - 17:28DROPS Design answered:
Liebe Kathi, also das bedeutet hier, daß man bei der nächsten Reihe A.1 über die 4 ersten Maschen und A.2 über die 2 letzten Maschen strickt, und dann wird es so weitergestrickt und wie im Diagram zugenommen. Am Ende der 1. Reihe haben Sie dann (von der Vorderseite gesehen)4 M in A.1 und 3 M in A.2. Wenn Sie dann die Diagramme in der Höhe wiederholen, wird A.1 über die 4 ersten M gestrickt und A.2 über die 2 letzten Maschen gestrickt, aber ja genau, die Maschenanzahl in jedem Diagram wird wie gezeigt zunehmen. Viel Spaß beim stricken!
05.03.2020 - 10:03
![]() Kathi wrote:
Kathi wrote:
Wenn ich in Reihe 4 A1 über vier Maschen stricke und dann A2 über zwei Maschen, dann muss ich einen Umschlag in A2 machen. Somit sind 7 Maschen auf der Nadel (4 für A1, Markierer, 3 für A2). Am Ende von A1/A2 habe ich dann 11 Maschen auf der Nadel. Es wird aber immer in der 1. Reihe A2 eine Masche zugenommen, somit stimmt die ganze Maschenzahl künftig nicht.
04.03.2020 - 15:57DROPS Design answered:
Liebe Kathy, bei der 4. Reihe haben Sie 5 Maschen in A.1 (es ist 1 Umschlag bei der 3. Reihe, nach der 1. Masche). Also 3. Reihe ist eine Rückreihe und wird so gestrickt: A.2 = 4 Maschen Rechts, Markierung, A.1 = 4 Maschen rechts = es sind 8 Maschen. Bei der 5. Reihe werden Sie 1 Masche in A.2 zunehmen (es wird in A.2 in jede Hinreihe zugenommen und in A.1 ab 3. Reihe und dann in jede 4. Reihe zugenommen). Viel Spaß beim stricken!
04.03.2020 - 17:01
![]() Angela wrote:
Angela wrote:
Verwendet man von Kid-Silk einen oder zwei Fäden?
16.10.2019 - 17:03DROPS Design answered:
Liebe Angela, nur 1 Faden Kid-Silk wird hier verwendet, dh die Streifen stricken Sie: *2 Reihen mit 1 Faden Kid-Silk, 2 Reihe mit 1 Faden Delight*, und von *-* wiederholen. Viel Spaß beim stricken!
17.10.2019 - 09:46
![]() BiBi wrote:
BiBi wrote:
Merci pour ce très joli châle! J'ai de laine Drops Delight en violet/vert ( Purple-Green, No. 14). Quel couleur conseillez-vous pour la laine Drops Kid Silk pour réaliser un aussi joli châle? Pourriez-vous me donner deux alternatives? Merci beaucoup pour toutes vos idées et tous vos conseils! Cordialement, B.
31.03.2019 - 18:53DROPS Design answered:
Bonjour Bibi, merci de bien vouloir contacter directement votre magasin DROPS, même par mail ou téléphone, on pourra vous conseiller la couleur exacte par rapport à vos préférences. Bon tricot!
01.04.2019 - 14:01
![]() Knitmaur wrote:
Knitmaur wrote:
Pattern works , trust it...I have a lovely Dragon Heart Shawl
20.02.2019 - 21:50
![]() Monique Deraeve wrote:
Monique Deraeve wrote:
Echt mooi maar kan je hem op 2 nld breien
30.01.2019 - 15:06
|
|||||||||||||
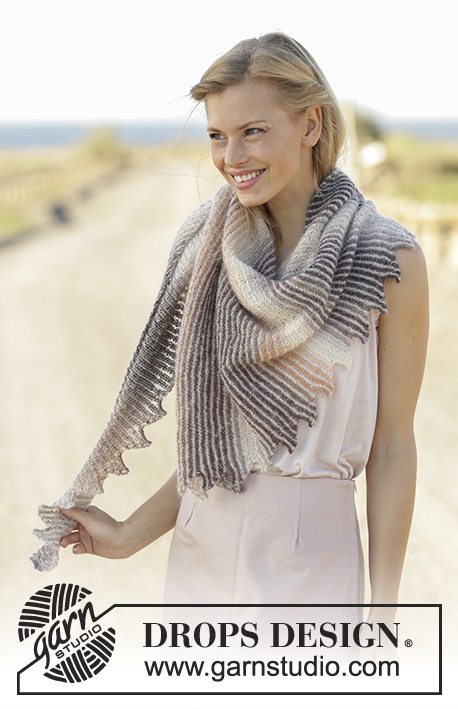
Dragon Heart#dragonheartshawl |
|||||||||||||
 |
 |
||||||||||||
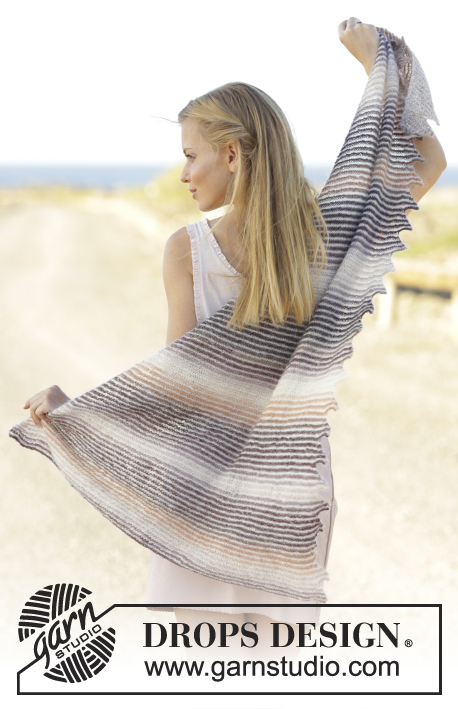
Knitted shawl with stripes and tips in DROPS Delight and Kid-Silk.
DROPS 176-28 |
|||||||||||||
|
GARTER STITCH (back and forth): 1 ridge = knit 2 rows. PATTERN: See diagrams A.1 and A.2. Diagrams show all rows in pattern seen from the right side. STRIPES: * Knit 2 rows with Kid-Silk, knit 2 rows with Delight *, repeat from *-* until finished measurements. ---------------------------------------------------------- SHAWL: Work piece back and forth on circular needle. The entire shawl is worked in GARTER STITCH - see explanation above. Cast on 4 stitches on circular needle size 4 mm / US 6 with Delight. ROW 1 (= wrong side): Knit all stitches. ROW 2 (= right side): Knit 1, 1 yarn over, knit 2, insert 1 marker thread before next stitch and move it upwards when working, 1 yarn over, knit 1 = 6 stitches. ROW 3 (= wrong side): Knit all stitches, knit yarn overs from previous row twisted to avoid holes. Then work according to diagram while working STRIPES - see explanation above. Switch to Kid-Silk and begin from right side as follows: Work A.1 over 4 stitches (marker thread is after the last of these 4 stitches), work A.2 over 2 stitches. Continue to work according to diagram A.1 and A.2 and REMEMBER STRIPES. When diagrams have been worked 1 time vertically, 4 stitches have been increased in right hand side of piece = 10 stitches on needle. REMEMBER THE KNITTING GAUGE Continue to work according to diagrams A.1 and A.2 as follows: Work A.1 over 4 stitches, work until marker thread, work A.2 over 2 stitches. Continue to work diagrams like this, every time diagrams have been worked 1 time vertically, 4 stitches have been increased between marker thread and A.1. Work until diagrams has been worked 34 times in total vertically. Then work diagrams one last time vertically and on last row from wrong side bind off all the 146 stitches. There are 35 tips in left side, piece measures approx. 73 cm / 28¾" along bind-off and approx. 140 cm / 55" measured along marker thread. Fasten off. |
|||||||||||||
Diagram explanations |
|||||||||||||
|
|||||||||||||
|
|||||||||||||
Have you finished this pattern?Tag your pictures with #dropspattern #dragonheartshawl or submit them to the #dropsfan gallery. Do you need help with this pattern?You'll find 12 tutorial videos, a Comments/Questions area and more by visiting the pattern on garnstudio.com. © 1982-2025 DROPS Design A/S. We reserve all rights. This document, including all its sub-sections, has copyrights. Read more about what you can do with our patterns at the bottom of each pattern on our site. |
|||||||||||||


With over 40 years in knitting and crochet design, DROPS Design offers one of the most extensive collections of free patterns on the internet - translated to 17 languages. As of today we count 314 catalogs and 11821 patterns - 11811 of which are translated into English (US/in).
We work hard to bring you the best knitting and crochet have to offer, inspiration and advice as well as great quality yarns at incredible prices! Would you like to use our patterns for other than personal use? You can read what you are allowed to do in the Copyright text at the bottom of all our patterns. Happy crafting!
Post a comment to pattern DROPS 176-28
We would love to hear what you have to say about this pattern!
If you want to leave a question, please make sure you select the correct category in the form below, to speed up the answering process. Required fields are marked *.