
Popular categories
Looking for a yarn?


Comments / Questions (83)
![]() Christelle wrote:
Christelle wrote:
Bonjour, Modèle en L : je viens de terminer les 8cm du début pour entamer les 14 diminutions sur les côtes. Or je ne comprends pas les explications pour y parvenir : "1 m end, glisser la m suiv à l'end, 1 m end, passer la m glissée par-dessus la m tricotée [jusqu'ici ça va], tricoter jusqu'à ce qu'il reste 3 m, 2 m ens à l'end, 1 m end". La fin est obscure pour moi. Pourriez-vous être plus clair ? Merci d'avance.
03.01.2025 - 18:26DROPS Design answered:
Bonjour Christelle, le paragraphe DIMINUTIONS ne s'applique que lorsque l'on doit diminuer le nombre de mailles des sections en jersey (= 1 maille après la 1ère maille jersey et avant la dernière maille jersey sur les côtés (les autres mailles du tour se tricotent comme avant en point fantaisie)), à partir de 10 cm de hauteur totale, autrement dit, quand les 8 cm de côtes sont terminées, tricotez les2 derniers tours des diagrammes A.1 à A.3 et, en même temps, diminuer 14 mailles à intervalles réguliers (cf cette leçon dans les côtes de chaque côté du pull. Bon tricot!
06.01.2025 - 08:14
![]() Christelle wrote:
Christelle wrote:
Bonjour, Modèle en L : je viens de terminer les 8cm du début pour entamer les 14 diminutions sur les côtes. Or je ne comprends pas les explications de ces diminutions : "1 m end, glisser la m suiv à l\'end, 1 m end, passer la m glissée par-dessus la m tricotée [jusqu'ici ça va] tricoter jusqu'à ce qu'il reste 3 m, 2 m ens à l'end, 1 m end." La dernière partie est obscure. Pouvez-vous être plus clair ? D'avance merci.
03.01.2025 - 18:23
![]() Sofia Laursen wrote:
Sofia Laursen wrote:
Hej jeg har lidt svært ved at forstå halsen i den her opskrift. :) Når man strikker den løse hals, skal maskerne så slås op på pinden eller direkte på halskanten? Og hvis de skal slås op på pinden, skal den løse hals så sys fast til halskanten bagefter? Vh Sofia
20.09.2024 - 17:32
![]() Annica Åkermark wrote:
Annica Åkermark wrote:
Men ett så vansinnigt mönster 🤢
04.03.2024 - 22:29
![]() Jane Clarke wrote:
Jane Clarke wrote:
I asked about the decreasing of 50 stitches in the rib and you replied that " So you have A.1 4 times, A.2 4 times and A.3 twice. That is 2x4 +3 x4 + 2x5 = 30 decreases. “ However I can’t see where in A1, A.2 and A.3 where I put these 30 decreases in on rows 1 and 2 of these diagrams. I’m so confused
29.01.2024 - 07:59DROPS Design answered:
Dear Jane, the decreases are in the last 2 rounds of A.1-A.3. As stated in the pattern: "Repeat the first 2 rounds in A.1 - A.3 until piece measures 8 cm, Then work the last 2 rounds in A.1 - A.3, AT THE SAME TIME dec 10-10-14-20-18-16 sts evenly over the 30-38-46-62-70-78 sts rib in each side = 172-188-196-216-236-256 sts." So the decreases are worked at the same time as you work the last 2 rounds in A.1-A.3. As shown above, A.1 to A.3, repeated as stated in the first row, will have 30 decreases (you can see the triangle/ purl 2 together symbol in these rows of the charts). So you will have 30 decreases + the decreases on each side = 50 decreases. Happy knitting!
29.01.2024 - 23:16
![]() Jane Clarke wrote:
Jane Clarke wrote:
I have knitted to the last two rows of the rib of the body where I did cast on 238 stitches. I am now to decrease to 188 stitches so a decrease of 50 stitches. 20 decreases to be made over A1 - A3 and 10 stitches decreased evenly over the 38 rib stitches on each side. This only comes to a decrease of 40 stitches not 50, unless my interpretation is wrong. Can you help me please? Thank you
28.01.2024 - 22:28DROPS Design answered:
Dear Jane, there are 30 decreases in A.1-A.3: "* P 1, rib K 2/P 2 over the first 12-16-20-28-32-36 sts, K 2, A.1 (= 10 sts) A.2 (= 15 sts), P 2, A.3 (= 27 sts), P 2, A.2, A.1, K 2, rib P 2/K 2 over the next 12-16-20-28-32-36 sts, P 1 *, repeat from *-* 1 more time. " So you have A.1 4 times, A.2 4 times and A.3 twice. That is 2x4 +3 x4 + 2x5 = 30 decreases. Then decrease 10 sts over the rib stitches on each side (so 10+10). In total, you should have 50 decreases. Happy knitting!
28.01.2024 - 23:30
![]() Katinka wrote:
Katinka wrote:
Ik kom niet uit de halsmindering van het achterpand. Na de armsgatminderingen heb ik voor de kleinste maat 66 steken. Dan kant ik voor de hals 20 steken af, over 46 steken dus 23 aan elke schouder. Vervolgens zou ik in de volgende naald 1 steek aan elke kant af moeten kanten, dan heb ik dus 22 steken aan elke kant over niet 20. Bij het voorpand kom ik wel op 20 steken aan iedere kant uit.
05.11.2023 - 09:32DROPS Design answered:
Dag Katinka,
Het aantal steken dat je af moet kanten voor de hals aan de achterkant klopte niet. Dit is nu aangepast en het zou nu wel moeten kloppen.
05.11.2023 - 19:26
![]() Katrien wrote:
Katrien wrote:
Bij de beschrijving van de mouw staat... brei tot een hoogte van 11cm,meerder 1 st aan elke kant van de markeerder....is het 11 cm van in het begin, met de boord erbij ,of na de 10 cm van de boord,op een totaal van 21 cm beginnen met meerderen?Groetjes,Katrien.
28.07.2023 - 17:26DROPS Design answered:
Dag Katrien,
De 11 cm wordt gemeten vanaf het begin, dus vanaf het opzetten.
01.08.2023 - 20:50
![]() Christine wrote:
Christine wrote:
C'est toujours moi, désolée. A4, A5 et A6 : au rang suivant, doit-on tricoter le jeté en maille torse (en fait, je ne l'avais pas vu sur le diagramme) ? Sur la photo du modèle, on voit nettement un trou, bien ouvert. Merci
24.03.2023 - 17:21DROPS Design answered:
Bonjour Christine, les jetés de A.4, A.5 et A.6 se tricotent normalement (dans le brin avant) = à l'endroit sur l'endroit (quand on tricote en rond) et à l'envers sur l'envers (quand on tricote en allers et retours). Bon tricot!
27.03.2023 - 08:41
![]() Christine wrote:
Christine wrote:
Merci beaucoup. Le petit signe de la troisième maille sur le diagramme ressemble à un petit trait et non un petit rond, alors j'avais peur de me tromper. Je voyais un petit trait, "env sur end ou end sur env", pas "jeté", ça n'avait pas de sens... :-)
24.03.2023 - 16:28
|
||||||||||||||||||||||||||||
Snow Tracks#snowtrackssweater |
||||||||||||||||||||||||||||
 |
 |
|||||||||||||||||||||||||||
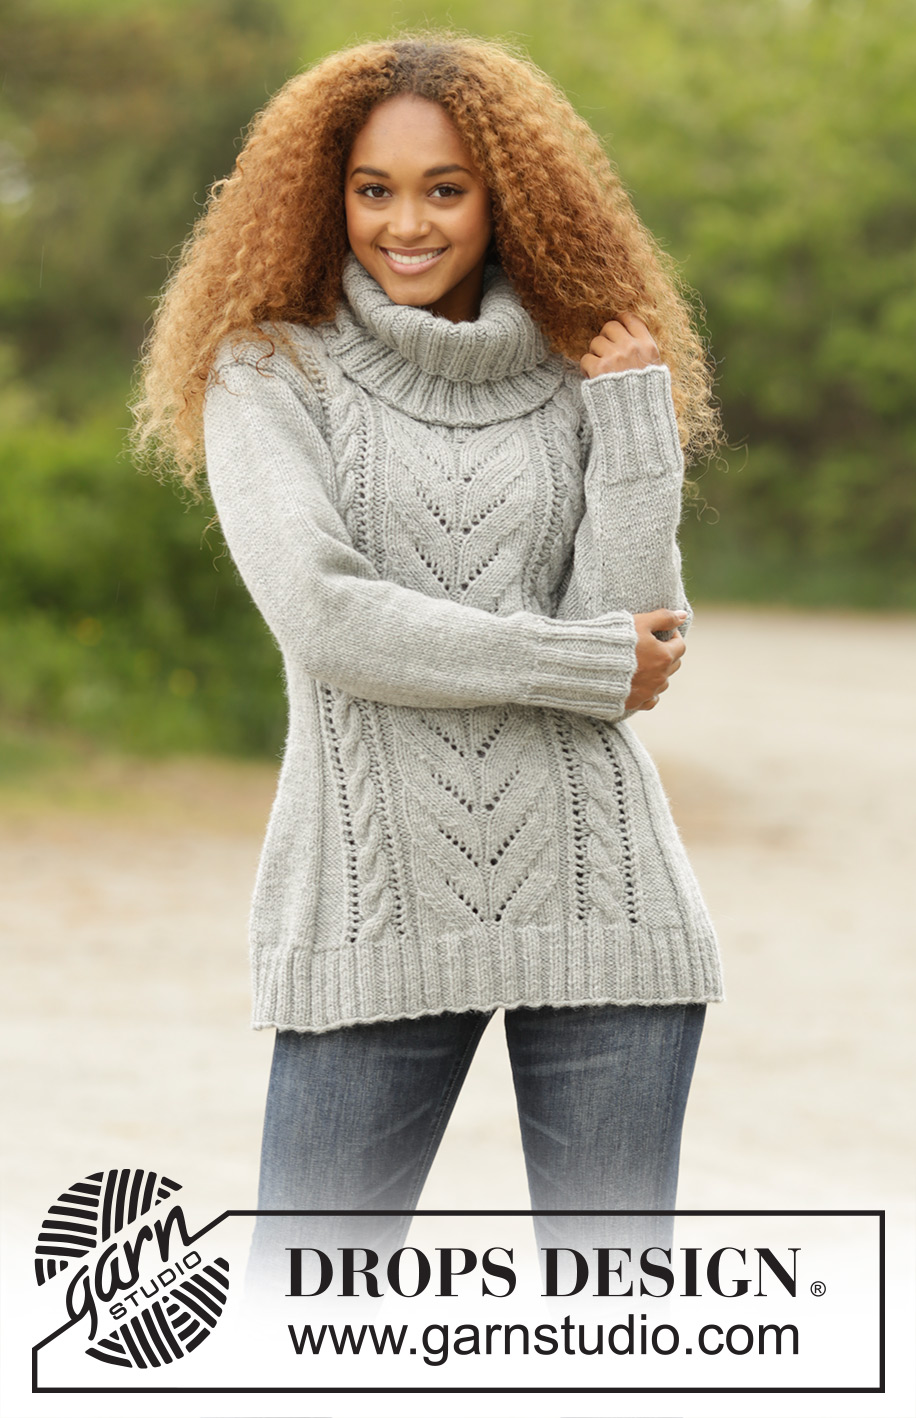
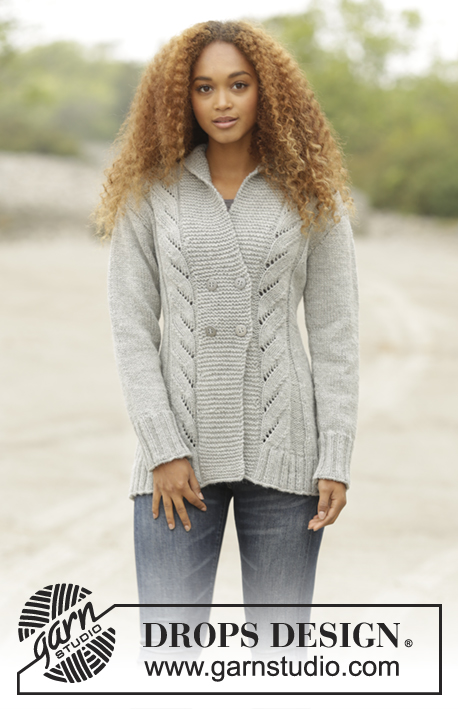
Knitted DROPS jumper with cables and detachable collar in ”Nepal”. Size: S - XXXL.
DROPS 171-20 |
||||||||||||||||||||||||||||
|
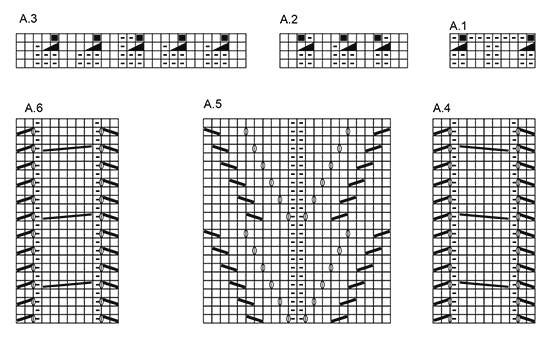
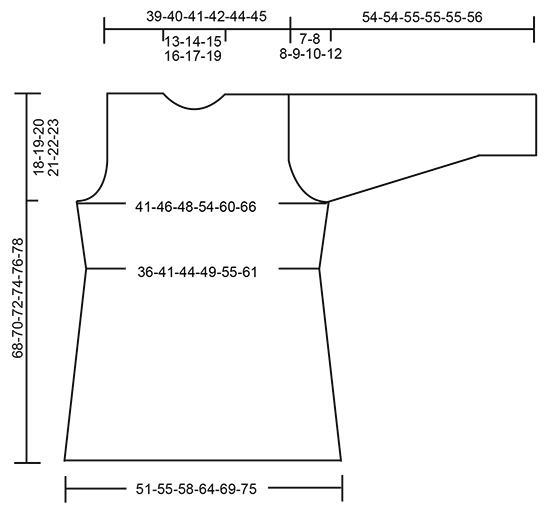
PATTERN: See diagrams A.1 to A.6. DECREASE TIP: Dec 1 st in each side of section in stocking st as follows: K 1, slip next st as if to K, K 1, psso, work until 3 sts remain, K 2 tog, K 1. INCREASE TIP: Inc with 1 YO inside first and last st in stocking st, work the inc sts twisted on next round to avoid holes. GARTER ST (worked in the round): 1 ridge = 2 rounds. * K 1 round and P 1 round *, repeat from *-*. ---------------------------------------------------------- JUMPER: Worked in the round on circular needle. BODY: Cast on 222-238-254-286-302-318 sts on circular needle size 4.5 mm with Nepal. K 1 round, then work as follows: * P 1, rib K 2/P 2 over the first 12-16-20-28-32-36 sts, K 2, A.1 (= 10 sts) A.2 (= 15 sts), P 2, A.3 (= 27 sts), P 2, A.2, A.1, K 2, rib P 2/K 2 over the next 12-16-20-28-32-36 sts, P 1 *, repeat from *-* 1 more time. REMEMBER THE KNITTING TENSION Repeat the first 2 rounds in A.1 - A.3 until piece measures 8 cm, then work the last 2 rounds in A.1 - A.3, AT THE SAME TIME dec 10-10-14-20-18-16 sts evenly over the 30-38-46-62-70-78 sts rib in each side = 172-188-196-216-236-256 sts. Switch to circular needle size 5 mm. Then work as follows: * K 10-14-16-21-26-31, P 8, A.4 (= 12 sts), P 2, A.5 (= 22 sts), P 2, A.6 (= 12 m), P 8, K 10-14-16-21-26-31 *, repeat from *-* 1 more time. When piece measures 10 cm, dec 1 st in every P section with P 8 and dec 1 st in each side of section in stocking st - READ DECREASE TIP (= 8 sts dec), dec the same way every 4 cm, 6 times in total, dec alternately on right and left side of P sections = 124-140-148-168-188-208 sts. When piece measures 34 cm, inc 1 st in every P section with a dec, and 1 st in every section in stocking st (= 8 sts inc) - READ INCREASE TIP, repeat inc when piece measures 46-47-48-49-50-51 cm = 140-156-164-184-204-224 sts. When piece measures 50-51-52-53-54-55 cm, work as follows from RS: Cast off the first 2-3-3-3-3-3 sts, work the next 66-72-76-86-96-106 sts as before, cast off the next 4-6-6-6-6-6 sts, work the next 66-72-76-86-96-106 sts as before and cast off the last 2-3-3-3-3-3 sts. Each part is worked separately back and forth on circular needle. BACK PIECE: = 66-72-76-86-96-106 sts. Continue pattern as before, AT THE SAME TIME continue to cast off in each side for armholes on every other row: Cast off 2 sts 0-1-1-2-3-4 times and 1 st 0-0-1-3-5-7 times = 66-68-70-72-74-76 sts. Continue the pattern as before. When piece measures 66-68-70-72-74-76 cm, cast off the middle 24-26-28-30-32-34 sts for neck and finish each shoulder separately. On next row cast off 1 st towards the neck = 20 sts remain on each shoulder. Cast off when piece measures 68-70-72-74-76-78 cm. FRONT PIECE: = 66-72-76-86-96-106 sts. Continue pattern as before and cast off for armholes as on back piece = 66-68-70-72-74-76 sts. Continue the pattern like this. When piece measures 60-62-64-66-68-70 cm, slip the middle 18-20-22-24-26-28 sts on a stitch holder for neck and finish each shoulder separately. Then cast off on every row towards neck, 2 sts 1 time, 1 st 2 times = 20 sts remain on shoulder. Work sts that do not fit the pattern in stocking st. Cast off when piece measures 68-70-72-74-76-78 cm. SLEEVE: Worked in the round on double pointed needles. Cast on 45-45-50-50-50-50 sts on double pointed needles size 4.5 mm with Nepal. K 1 round, then work rib = K 2/P 3. When rib measures 10 cm, K 1 round while dec 11-9-12-10-10-8 sts evenly = 34-36-38-40-40-42 sts. Switch to double pointed needles size 5 mm and continue in stocking st. Insert 1 marker at the beg of round. When piece measures 11 cm, inc 1 st on each side of marker, inc every 4-3½-3-2½-2-1½ cm a total of 9-10-11-13-15-17 times = 52-56-60-66-70-76 sts. When piece measures 47-47-47-46-45-44 cm (NOTE! Shorter measurements in the larger sizes because of broader shoulders), cast off 6 sts mid under sleeve (= 3 sts on each side of marker), now finish piece back and forth on needle. Cast off for sleeve cap at beg of every row in each side as follows: 2 sts 3 times and 1 st 0-1-1-2-3-5 times, cast off 2 sts in each side of piece until piece measures 53-53-54-54-54-55 cm, cast off 3 sts in each side and cast off the remaining sts. Piece measures 54-54-55-55-55-56 cm in total. NECK EDGE: Pick up approx. 64 to 86 sts around the neck (incl sts on stitch holder) on a short circular needle size 5 mm with Nepal. Work 2 ridges in GARTER ST – see explanation above, then cast off. DETACHABLE COLLAR: Cast on 108 sts on a short circular needle size 4.5 mm with grey. K 1 round, then work rib = K 2/P 2. Work rib for 25 cm, then cast off with K over K and P over P. ASSEMBLY: Sew shoulder seams and sew in sleeves. |
||||||||||||||||||||||||||||
Diagram explanations |
||||||||||||||||||||||||||||
|
||||||||||||||||||||||||||||
|
||||||||||||||||||||||||||||
|
||||||||||||||||||||||||||||
Have you finished this pattern?Tag your pictures with #dropspattern #snowtrackssweater or submit them to the #dropsfan gallery. Do you need help with this pattern?You'll find 27 tutorial videos, a Comments/Questions area and more by visiting the pattern on garnstudio.com. © 1982-2025 DROPS Design A/S. We reserve all rights. This document, including all its sub-sections, has copyrights. Read more about what you can do with our patterns at the bottom of each pattern on our site. |
||||||||||||||||||||||||||||


With over 40 years in knitting and crochet design, DROPS Design offers one of the most extensive collections of free patterns on the internet - translated to 17 languages. As of today we count 314 catalogues and 11822 patterns translated into English (UK/cm).
We work hard to bring you the best knitting and crochet have to offer, inspiration and advice as well as great quality yarns at incredible prices! Would you like to use our patterns for other than personal use? You can read what you are allowed to do in the Copyright text at the bottom of all our patterns. Happy crafting!
Post a comment to pattern DROPS 171-20
We would love to hear what you have to say about this pattern!
If you want to leave a question, please make sure you select the correct category in the form below, to speed up the answering process. Required fields are marked *.