
Looking for a yarn?


Comments / Questions (27)
![]() Tiina wrote:
Tiina wrote:
Onko piirroksessa myös nurjat kerrokset vai vain oikeat
27.04.2025 - 07:47DROPS Design answered:
Hei, piirrokset näyttävät kaikkia kerroksia oikealta puolelta katsottuna.
28.04.2025 - 12:24
![]() Sue wrote:
Sue wrote:
Hello, I am having trouble understanding the Work back stitches from the WS in the back piece after changing the size of the circular needle to US 11, what is the difference from the normal WS row? Since it’s from the beginning , not like the video showed short rows from the middle.
22.01.2025 - 21:16DROPS Design answered:
Dear Sue, we say "Work back" on full WS rows when the pattern is changed in RS rows. So work back would be work with the same pattern as in the RS row (for example, in this case, K over K, P over P, garter st over garter st, and sts in A.4 are worked as shown in diagram for 2nd row). But it's the same as working a WS row, just pay attention to the pattern established in the previous row. Happy knitting!
25.01.2025 - 18:34
![]() Carolyn wrote:
Carolyn wrote:
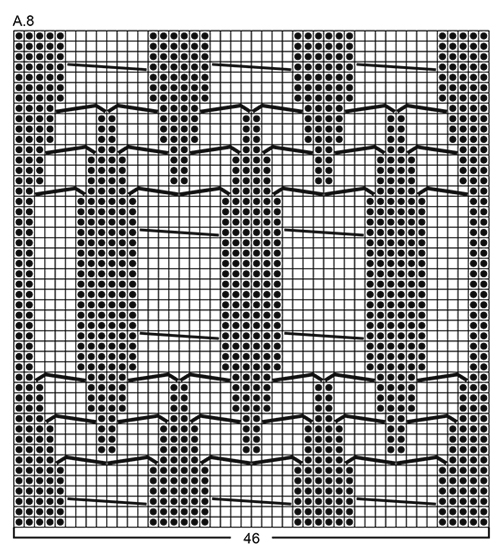
I am working on back to the point of ...”Now work sts in cables in A.8 tog 2 by 2 (= 12sts dec)” I’m confused - can you clarify ? Of the 6 cables in A8 I should knit 2tog twice in each cable? Thanks!
24.01.2019 - 14:30DROPS Design answered:
Dear Carolyn, you have to decrease 12 stitches over the cables in A.8: there are 8 sts in each cable in A.8, K these 8 sts tog (= K2 tog x 4 ) = 4 sts remain and 4 sts have been decreased, repeat this over all 3 cables in A.8 = 12 sts have been decreased. Happy knitting!
24.01.2019 - 16:57
![]() Ellen Anne Sormerud wrote:
Ellen Anne Sormerud wrote:
Hvor kommer rettelsen inn? Rett etter 12 cm vr. bord?
24.08.2018 - 09:55DROPS Design answered:
Hej Ellen, opskriften på nettet er rettet, så hvis du har skrevet den ud efter 25/8-2017 så er opskriften rigtig. God fornøjelse!
30.08.2018 - 13:59
![]() Marie wrote:
Marie wrote:
Bonjour, je me demandais si avant le 70 cm de longueur (taille medium) si on pouvais diminuer dans les torsade de A.8 2 par 2 à n'importe quel rang ou si cela est à un rang spécifique parce que diminuer dans un rang ou on est rendu a faire un torsade cela ne doit pas être évident. merci a l'avance.
27.09.2017 - 19:51DROPS Design answered:
Bonjour Marie, oui, peu importe le rang, ce qui compte c'est de diminuer le nombre de mailles de la torsade pour conserver la bonne largeur quand on va rabattre les mailles (si on ne diminuait pas, les épaules seraient trop larges). Bon tricot!
28.09.2017 - 09:39
![]() Marie wrote:
Marie wrote:
Bonjour, une petite question, est-ce quand A.8 est fini en hauteur, on recommence en bas. merci
05.09.2017 - 19:52DROPS Design answered:
Bonjour Marie, oui tout à fait, on reprend au 1er rang. Bon tricot!
06.09.2017 - 09:05
![]() Marie wrote:
Marie wrote:
Bonjour, j'ai tricoter 3 m POINT MOUSSE , 3 m end, 3 m env, A.1 (= 21 m), puis celles du diagramme A.2 (= 42 m), puis celles de A.1 (= 21 m), 3 m env, 3 m end , et terminer par 3 m point mousse pour la taille médium , est- ce correct que le rang du retour soit 3 mailles end ./ 3 mailles env. et finir par 3 mailles env. / 3 mailles end. car après mes 12 cm je me retrouve avec 9 maille point mousse de chaque coté de A1
03.09.2017 - 23:55DROPS Design answered:
Bonjour Marie, les 3 m end/3 m env après les 3 premières mailles point mousse et avant les 3 dernières mailles point mousse se tricotent en côtes, vous avez ainsi bien 3 m point mousse de chaque côté. Bon tricot!
04.09.2017 - 11:00
![]() France wrote:
France wrote:
Bonjour, je ne comprend pas c'est écrit: tricoter et diminuer en suivant le diagramme A3 (une fois) tricoter et diminuer en suivant le diagramme A4 (une fois) .. ou faut-il diminuer?? il y a quand même 28 diminutions.
25.08.2017 - 17:18DROPS Design answered:
Bonjour, les diminutions sont inclues dans les schemats A.3 et A.4. Donc tricoter (et diminuer) en suivant le diagramme A.3 (1 fois), tricoter (et diminuer) en suivant le diagramme A.4 (1 fois), tricoter (et diminuer) en suivant le diagramme A.3 (1 fois)... Bon tricot!
25.08.2017 - 22:37
![]() MARIE wrote:
MARIE wrote:
Bonjour,, je ne sais pas trop ou diminuer apres les 12cm. diminuer au dessus de ces mailles, au dessus de quelles mailles , merci
25.08.2017 - 14:43DROPS Design answered:
Bonjour Marie. Par example, dans la taille M, en même temp que vous tricotez 6 m end, vous diminuez 4 m dans ces 6 m (le 6 m end deviennent donc 2 m end). Bon tricot!
25.08.2017 - 15:13
![]() Ingeborg wrote:
Ingeborg wrote:
Hvilken størrelse har modellen på seg? Bruker alle garnstudio modeller den ene størrelsen? mvh Ingeborg
25.04.2017 - 00:40DROPS Design answered:
Hei Ingeborg. Vanligvis blir plaggene strikket opp i størrelse S (eller M). For å finne hvilken størrelse som du ønsker, må man se på målskissen helt nederst på siden. Om det er flere modeller som bruker det samme plagget, er det som regel den ene størrelsen som er blitt strikket opp.
25.04.2017 - 08:14
|
||||||||||||||||||||||||||||||||||
Warm Wine#warmwinesweater |
||||||||||||||||||||||||||||||||||
 |
 |
|||||||||||||||||||||||||||||||||
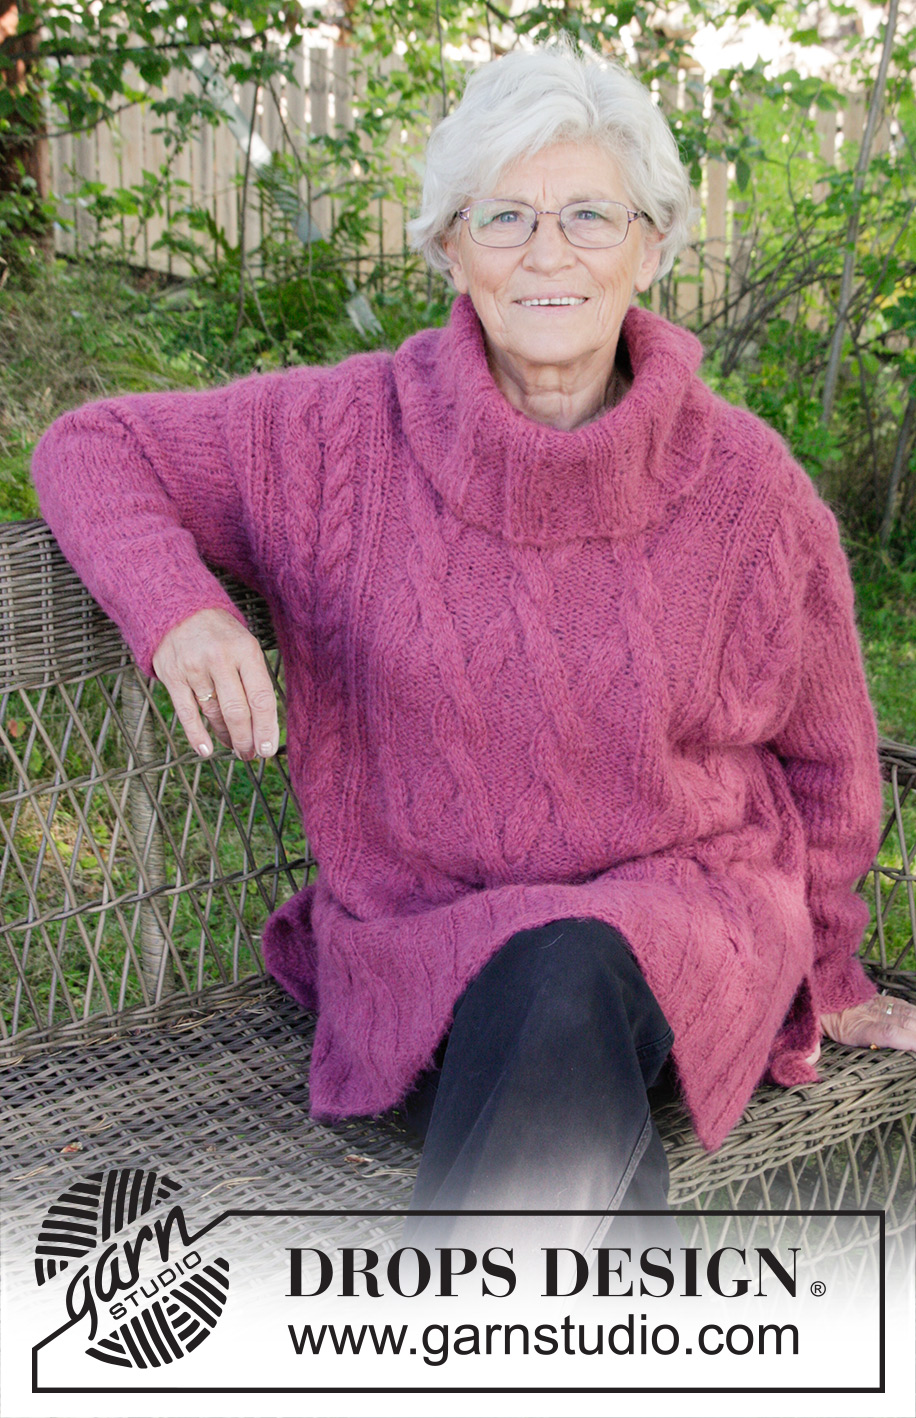
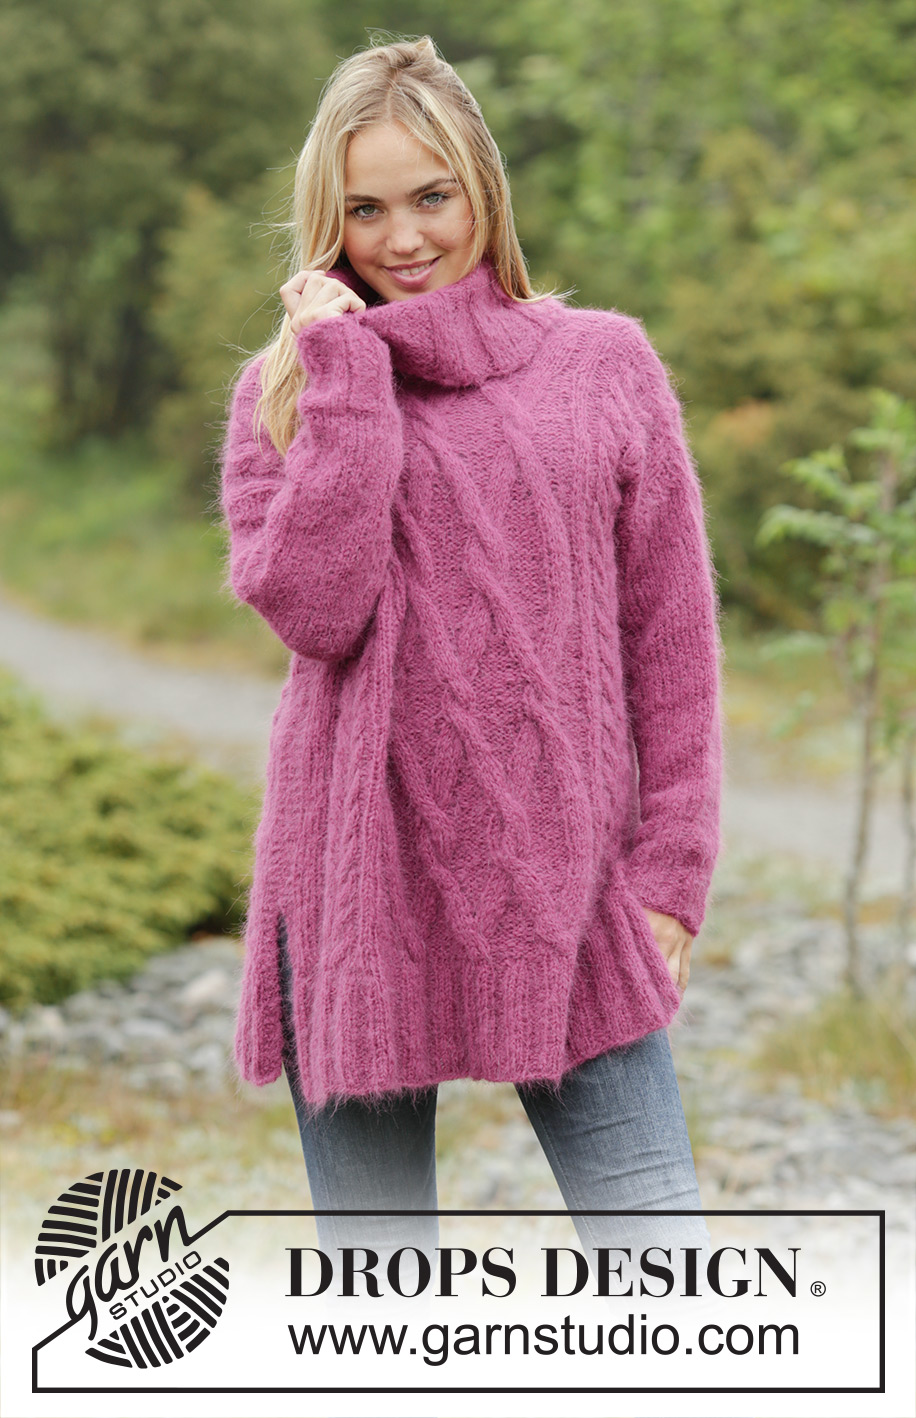
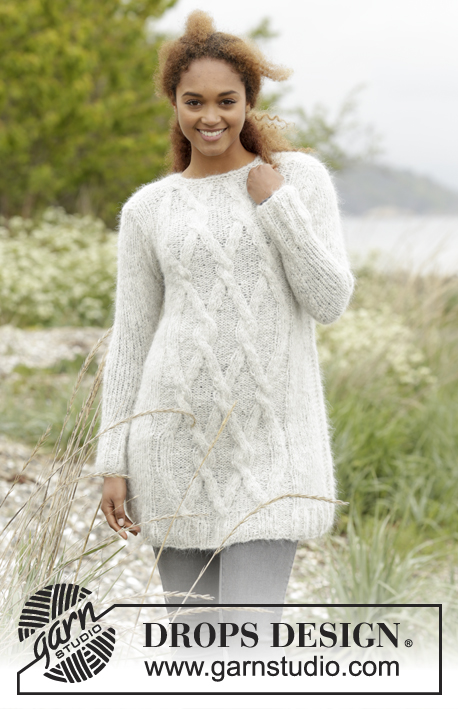
Knitted DROPS oversized jumper with cables and turtle neck in ”Melody”. Size: S - XXXL.
DROPS 172-36 |
||||||||||||||||||||||||||||||||||
|
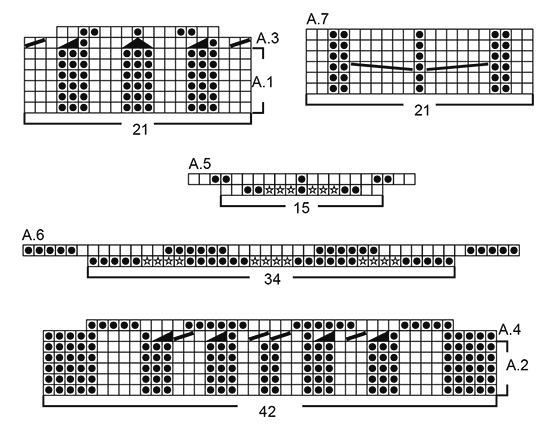
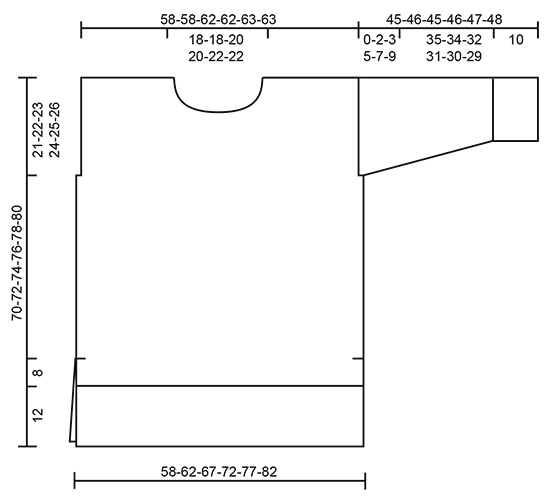
GARTER ST (back and forth): K all rows. 1 ridge = K2 rows. PATTERN: See diagrams A.1 to A.8. The diagrams show all rows in pattern seen from RS. INCREASE TIP-1 (applies to sleeve): Beg 1 st before marker, make 1 YO, K 2 and make 1 YO. On next round K YOs twisted to avoid holes. INCREASE TIP-2 (applies to neck): Inc 1 st by making 1 YO in transition between K and P. On next round work YO twisted to avoid holes. ---------------------------------------------------------- JUMPER: Work front and back piece back and forth on circular needle. Work sleeves in the round on double pointed needles. BACK PIECE: LOOSELY cast on 90-102-102-114-114-126 sts on circular needle size 7 mm / US 10.75 with Melody. P 1 row from WS. Work next row as follows from RS: 3 edge sts in GARTER ST – see explanation above, * K 3, P 3 *, repeat from *-* 0-1-1-2-2-3 times in total (i.e. in size S do not work K 3/P 3), work rib according to diagram A.1 (= 21 sts), work rib according to diagram A.2 (= 42 sts), work rib according to diagram A.1 (= 21 sts), * P 3, K 3 *, repeat from *-* 0-1-1-2-2-3 times in total (i.e. in size S do not work P 3/K 3) and finish with 3 edge sts in garter st. Continue rib like this until piece measures 12 cm / 4¾". Work next row as follows from RS: 3 edge sts in garter st, K over the first 0-6-6-12-12-18 sts AT THE SAME TIME dec 0-4-1-4-1-4 sts evenly over these sts, work and dec according to diagram A.3 (one time), work and dec according to diagram A.4 (one time), work and dec according to diagram A.3 (one time), K the next 0-6-6-12-12-18 sts AT THE SAME TIME dec 0-4-1-4-1-4 sts evenly over these sts and finish with 3 edge sts in garter st = 70-74-80-86-92-98 sts. Switch to circular needle size 8 mm / US 11 and work back from WS with K over K, P over P and garter st over garter st, but sts in A.4 are worked as shown in diagram. Work next row as follows from RS: 3 edge sts in garter st, 0-2-5-8-11-14 sts in stockinette st, work and inc according to diagram A.5 (= 15 sts that inc to 21 sts), A.6 (= 34 sts that inc to 46 sts), A.5 (= 15 sts that inc to 21 sts), 0-2-5-8-11-14 sts in stockinette st and 3 edge sts in garter st = 94-98-104-110-116-122 sts on needle. Work back from WS with K over K, P over P and garter st over garter st. Work next row as follows from RS: 3 edge st in garter st, 0-2-5-8-11-14 sts in stockinette st, A.7 (= 21 sts), A.8 (= 46 sts), A.7 (= 21 sts), 0-2-5-8-11-14 sts in stockinette st, 3 edge st in garter st. Continue pattern like this. REMEMBER THE KNITTING GAUGE When piece measures 49-50-51-52-53-54 cm / 19¼"-19¾"-20"-20½"-21"-21¼", bind off the first 0-2-3-6-8-11 sts at beg of the next 2 rows for armholes = 94-94-98-98-100-100 sts (in size S do not bind off any sts but insert a marker in each side to mark armholes). Work next row as follows from RS: 3 edge sts in garter st, 0-0-2-2-3-3 sts in stockinette st, continue A.7, A.8 and A.7 as before, work 0-0-2-2-3-3 sts in stockinette st and 3 edge sts in garter st. Continue the pattern like this until 1 row remains before piece measures 68-70-72-74-76-78 cm / 26¾"-27½"-28⅜"-29⅛"-30"-30¾". Now work sts in cables in A.8 tog 2 by 2 (= 12 sts dec). On next row, bind off the middle 20-20-22-22-24-24 sts for neck and finish each shoulder separately. Continue to bind off 1 st on next row from neck = 30-30-31-31-31-31 sts remain on the shoulder. Work until 1 row remain before piece measures 70-72-74-76-78-80 cm / 27½"-28⅜"-29⅛"-30"-30¾"-31½. Work sts in the remaining cables tog 2 by 2 (= 6 sts dec). On next row bind off the remaining 25-25-26-26-26-26 sts on shoulder (it is important to avoid a tight bind-off edge on shoulder). Repeat on the other shoulder. FRONT PIECE: Cast on and work as on back piece until 1 row remains before piece measures 64-66-67-69-70-72 cm / 25¼"-26"-26½"-27"-27½"-28½". Now work sts in cables in A.8 tog 2 by 2 (= 12 sts dec). On next row slip the middle 14-14-16-16-18-18 sts on 1 stitch holder for neck. Continue to bind off for neck at beg of every row from neck as follows: bind off 2 sts 1 time and 1 st 2 times = 30-30-31-31-31-31 sts remain on shoulder. Work until 1 row remain before piece measures 70-72-74-76-78-80 cm / 27½"-28⅜"-29⅛"-30"-30¾"-31½. Work sts in the remaining cables tog 2 by 2 (= 6 sts dec). On next row bind off the remaining 25-25-26-26-26-26 sts on shoulder (it is important to avoid a tight bind-off edge). Repeat on the other shoulder. SLEEVE: Work in the round on double pointed needles, switch to circular needle when needed. Cast on 30-30-36-36-36-36 sts on double pointed needles size 7 mm / US 10.75 with Melody. K 1 round. Then work rib in the round = K 3/P 3 for 10 cm / 4". K 1 round while at the same time dec 2-2-6-6-4-4 sts evenly = 28-28-30-30-32-32 sts. Insert 1 marker at beg of round = mid under sleeve. Switch to double pointed needles size 8 mm / US 11 and work in stockinette st. When piece measures 11-11-11-13-13-11 cm / 4½"-4½"-4½"-5"-5"-4½", inc 2 sts mid under sleeve - READ INCREASE TIP-1. Inc like this every 3½-3-3-2-2-2 cm / 1¼"-1"-1"-¾"-¾"-¾" 10-11-11-13-13-14 times in total = 48-50-52-56-58-60 sts. When piece measures 45-44-42-41-40-39 cm / 17¾"-17¼"-16½"-16"-15¾"-15¼", insert 1 marker at the beg of round. Then work piece back and forth on circular needle until sleeve measures 45-46-45-46-47-48 cm / 17¾"-18"-17¾"-18"-18½"-19" (i.e. approx. 0-2-3-5-7-9 cm / 0-¾"-1"-2"-2¾"-3½" from marker), bind off (make sure to avoid a tight bind-off edge). Make another sleeve. ASSEMBLY: Sew shoulder seams inside bind-off edge. Sew side seams sew edge to edge - sew in outer loops of edge sts to get a flat seam (make sure to avoid a tight seam) BUT stop when approx. 20 cm / 8" remain in each side (= vent). Place sleeve in under edge in garter st along armhole (marker on sleeve should fit with side on body at marker). Sew neatly along armhole (edge in garter st along armhole should be on top of sleeve) and in bottom of armhole from marker and in towards garment. NECK: Pick up from RS approx. 50 to 64 sts around the neck (includes sts on stitch holder at the front) on short circular needle size 7 mm / US 10.75. K 1 round while inc evenly to 66-66-72-72-78-78 sts. Work rib in the round (= K 3/P 3). When neck measures 10 cm / 4", inc all K 3 to K 4 - READ INCREASE TIP-2 = 77-77-84-84-91-91 sts. When neck measures 20 cm / 8", inc all K 4 to K 5 = 88-88-96-96-104-104 sts. When neck measures 22 cm / 8¾", inc all P 3 to P 4 = 99-99-108-108-117-117 sts. Continue rib K 5/P 4 until neck measures 27-27-28-28-29-29 cm / 10½"-10½"-11"-11"-11½"-11½". LOOSELY bind off sts with K over K and P over P - NOTE: Make 1 YO after approx. every 9th st while binding off (bind off YOs as sts) to make the bind-off edge more elastic (bind off YOs as normal sts). |
||||||||||||||||||||||||||||||||||
Diagram explanations |
||||||||||||||||||||||||||||||||||
|
||||||||||||||||||||||||||||||||||
|
||||||||||||||||||||||||||||||||||
|
||||||||||||||||||||||||||||||||||
|
||||||||||||||||||||||||||||||||||
Have you finished this pattern?Tag your pictures with #dropspattern #warmwinesweater or submit them to the #dropsfan gallery. Do you need help with this pattern?You'll find 28 tutorial videos, a Comments/Questions area and more by visiting the pattern on garnstudio.com. © 1982-2025 DROPS Design A/S. We reserve all rights. This document, including all its sub-sections, has copyrights. Read more about what you can do with our patterns at the bottom of each pattern on our site. |
||||||||||||||||||||||||||||||||||


With over 40 years in knitting and crochet design, DROPS Design offers one of the most extensive collections of free patterns on the internet - translated to 17 languages. As of today we count 314 catalogs and 11822 patterns - 11812 of which are translated into English (US/in).
We work hard to bring you the best knitting and crochet have to offer, inspiration and advice as well as great quality yarns at incredible prices! Would you like to use our patterns for other than personal use? You can read what you are allowed to do in the Copyright text at the bottom of all our patterns. Happy crafting!
Post a comment to pattern DROPS 172-36
We would love to hear what you have to say about this pattern!
If you want to leave a question, please make sure you select the correct category in the form below, to speed up the answering process. Required fields are marked *.