
Looking for a yarn?


Comments / Questions (185)
![]() Vinnie Andersen wrote:
Vinnie Andersen wrote:
Hvor mange nøgler skal jeg bruge i str l
30.06.2025 - 17:49DROPS Design answered:
Hej Vinnie, du skal bruge 650 g = 13 nøgler DROPS Cotton Light :)
01.07.2025 - 11:19
![]() Gudrun Sandberg wrote:
Gudrun Sandberg wrote:
På ärmen står det virka en stolpe I var och en av de tre första, sedan A2 6ggr , sticka stolpar i de resterande 3 m. Hur gör jag på nästa varv? Ska det då också vara 3 stolpar i början och slutet av varvet? Tack på förhand//Gudrun
13.06.2025 - 08:41DROPS Design answered:
Hei Gudrun. Ja, du hekler de 3 stolpar, men når du begynner å øke masker, hekles de nye maskene fortløpende inn i mønstret, slik at det kan bli færre enn 3 stolpar etterhvert, men det må alltid være minimum 1 stav / 3 luftmaskeri hver side av arbeidet. mvh DROPS Design
16.06.2025 - 10:49
![]() Jana wrote:
Jana wrote:
Hallo, bei meinem Brustumfang von ca 115 cm habe ich mich für Größe XL entschieden. Das Rückenteil ist bereits fertig, erscheint mir aber sehr weit. Wie viel Luftmaschen sollte ich dann besser für das Vorderteil anschlagen? Danke für Hilfe.
20.03.2025 - 16:02DROPS Design answered:
Liebe Jana, sollte Ihre Maschenprobe (16 Stb = 10 cm) stimmen, dann sollten die 104 Maschen in XL ca 65 cm messen (so wird der Umfang ca 130 cm messen. Viel Spaß beim Stricken!
21.03.2025 - 07:37
![]() Anita wrote:
Anita wrote:
Ich verstehe die 2 reie nicht bitte um genauerer Erklärung
19.03.2025 - 13:18DROPS Design answered:
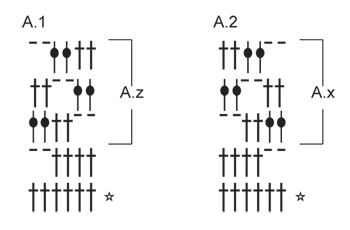
Liebe Anita, am Anfang jeder Reihe häkeln Sie 3 Luftmaschen dann lesen Sie das Diagram rechts nach links bein den Hin-Reihen und links nach rechts bei den Rückreihen, so wird man bvei der 1. Reihe A.1 so häkeln: *1 Stb in je die nächsten 4 Stb, 2 Lm, die 2 nächste Maschen überspringen*, von *bis* wiederholen und 1 Stb in die 3. Luftmaschen vom Anfang der vorigen Reihe häkeln. Die 2. Reihe (Rückreihe = 1. Reihe A.z) häklen Sie so: 3 Lm, *2 Stäbchen in das 2-Lm-Bogen, 1 Stäbchen in je die nächsten 2 Stb, 2 Lm, 2 Stb überspringen*, von * bis* wiederholen und mit 1 Stb in die 3. Lm am Anfang der vorigen Reihen häkeln. Viel Spaß beim Häkeln!
19.03.2025 - 16:24
![]() Katrin Eller wrote:
Katrin Eller wrote:
Hallo, wie häkle ich folgendes: Hallo liebe Häkelfreunde, Ich traue mich das erste Mal an ein Shirt. Ich komme mit folgendem nicht klar, oder stehe auf der auf der Leitung😁 Wie hakle ich folgendes? 1 Stäbchen (Stb) in die 4. Lm ab der Nadel (3 Lm + 1 Stb = 2 Stb ? Dankeschön
02.03.2025 - 12:36DROPS Design answered:
Liebe Frau Eller, die 3 letzten Luftmaschen der Luftmaschenketten ersetzen das 1. Stäbchen, so bei der 1. Reihe häkeln Sie 1 Stäbchen in die 4. Luftmasche ab der Häkelnadel= die vorigen 3 Luftmaschen ersetzen das 1. Stäbchen + dieses Stäbchen = so haben Sie 2 Stäbchen insgesamt. Viel Spaß beim Häkeln!
03.03.2025 - 10:01
![]() Gaby wrote:
Gaby wrote:
Alguien me puede ayudar a entender cómo se hace el escote por favor. Muchas gracias desde ya por sus respuestas.
25.10.2024 - 22:37DROPS Design answered:
Hola Gaby, trabajas un borde decorativo en la parte superior del delantero/espalda. Comienzas el primer punto en el centro de la parte superior del hombro: 1 p.b en el 1º pt, 3 p.de cad, saltar aprox. 1cm del borde, 1 p.b en el siguiente punto, 3 p. de cad, saltar aprox. 1cm del borde. Sería algo similar a este vídeo, pero alrededor del cuello en vez de un cuadrado: https://www.garnstudio.com/video.php?id=180&lang=es.
27.10.2024 - 19:07
![]() Dorte Dynesen wrote:
Dorte Dynesen wrote:
Ja, men det er jo ikke det der står når du læser beskrivelsen på ryggen, der står at du skal slå x antal lm op og starte med en stm i 4 lm fra nålen og 5 stang masker i de næste 5 lm 1 stm i de næste 6 lm spring 1 lm over gentag fra * til*’
29.08.2024 - 12:28DROPS Design answered:
Hej Dorte, jeg forstod ikke rigtig om du var startet på diagrammet, så ja det stemmer, første række hækler du ifølge opskriften, så da får du 13st efter hinanden :)
29.08.2024 - 14:08
![]() Dorte Dynesen wrote:
Dorte Dynesen wrote:
Har jeg forstået det rigtigt, når man starter på bagstykket får man 13 stm uden at springe over 1 lm ?
29.08.2024 - 09:04DROPS Design answered:
Hej Dorte, første række i diagrammet består af kun stangmasker og den er beskrevet i opskriften, så du hækler A.1 som består af skiftevis 4 stangmasker 2 luftmasker :)
29.08.2024 - 11:59
![]() Julia Bogerd wrote:
Julia Bogerd wrote:
Ik snap de 1e toer al niet. Je begint met 7 stokjes volgens mij. Daarna 6x 3 stk bij elkaar. Maar dan?
20.06.2024 - 15:49DROPS Design answered:
Dag Julia,
Na het haken van de lossenlus maak je het eerste stokje in de 4e losse vanaf de haaknaald, je hebt dan 2 stokjes (want de eerste 3 lossen vervangen het eerste stokje), dan 1 stokje in elk van de volgende 5 stokjes haken, dus dan heb je 7 stokjes in totaal. Vervolgens herhaal je steeds wat tussen de sterretjes staat, dus 6 stokjes haken en 1 losse overslaan. Tot slot haak je nog 1 stokje in de laatste losse.
20.06.2024 - 22:10
![]() Marlies wrote:
Marlies wrote:
Beste Drops, Kunt u mij vertellen waarom op het achterpand de strepen diagonaal naar links moeten lopen, dus patroon A1, en op het voorpand naar rechts? Dus patroon A2? Is dat noodzakelijk?
07.06.2024 - 10:57DROPS Design answered:
Dag Marlies,
Tja, ik denk dat de ontwerper dit gewoon zo bedacht heeft. Volgens mij zitten er verder niets achter.
12.06.2024 - 16:43
|
|||||||||||||
Just Me#justmesweater |
|||||||||||||
 |
 |
||||||||||||
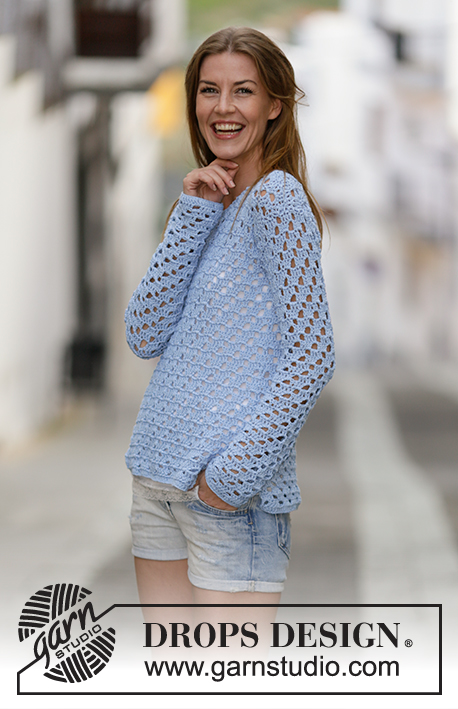
Crochet DROPS jumper with lace pattern in ”Cotton Light”. Size: S - XXXL.
DROPS 162-3 |
|||||||||||||
|
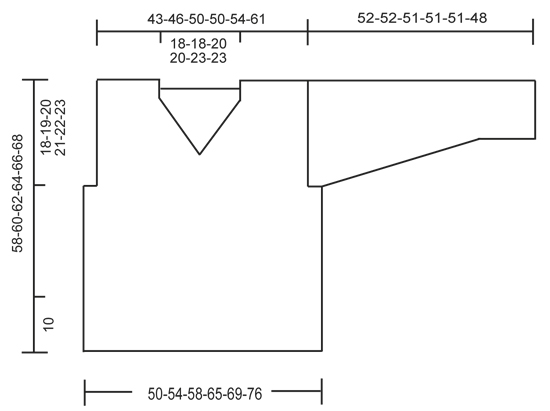
PATTERN: See diagrams A.1-A.2. CROCHET INFO: Replace first dc at beg of every dc row with 3 ch. 3 DC TOG: Work 3 dc into 1 dc as follows: * Work 1 dc but wait with last pull through (= 2 strands on hook) *, repeat from *-* 1 more time, then work next dc but on last pull through, pull yarn through all sts on hook. ---------------------------------------------------------- BACK PIECE: Work back and forth. Work 94-101-108-122-129-143 ch on hook size 4.5 mm/US 7 with Cotton Light. Work 1 dc in 4th ch from hook (= 2 dc), 1 dc in each of the next ch 5, * 1 dc in each of the next ch 6, skip 1 ch *, repeat from *-* until 1 ch remains, 1 dc in last ch = 80-86-92-104-110-122 dc. Then work as follows: 3 ch - READ CROCHET INFO, skip 1 dc (replaced by the 3 ch), A.1 (= 6 sts) 13-14-15-17-18-20 times in total, finish with 1 dc in last dc. Continue pattern like this. Eyelet holes in A.1 goes diagonally towards the left 2 sts on every row (seen from RS) until hole meets the one dc in left side of piece. REMEMBER THE CROCHET GAUGE! When A.1 has been worked 1 time vertically, repeat A.z until finished measurements. Fasten off when piece measures 40-41-42-43-44-45 cm / 15¾''-16 1/8''-16½''-17''-17¼''-17¾''. Now work pattern as before over the middle 68-74-80-80-86-98 sts (= 6-6-6-12-12-12 sts in each side for armhole). When piece measures 54-56-58-60-62-64 cm / 21¼''-22''-22¾''-23 5/8''-24 3/8''-25¼'', adjust so that next row is from RS. Work over the first 20-23-24-24-24-31 sts (= shoulder) as follows: Work 1 dc in every dc and 2 dc in every ch-space = 20-23-24-24-24-31 dc. Work 2 rows with 1 dc in every dc. Fasten off. Do the same on the other shoulder FRONT PIECE: Work as back piece but work A.2 instead of A.1, i.e. eyelet holes goes diagonally towards the right (seen from RS). Repeat A.x until finished measurements. When piece measures 45-47-48-50-51-53 cm / 17 3/4"-18½"-19"-19 3/4"-20"-21", adjust after a whole repetition of A.x dec for neck (next row is from WS) as follows: Work as before over the first 31-34-37-37-40-46 dc, work 3 dc TOG - see explanation above. Turn piece. Repeat this dec on every row toward mid-front 7-7-8-8-9-9 times in total = 20-23-24-24-25-31 sts remain for shoulder. Then work 1 row with 1 dc in every dc and 2 dc in every ch-space. Work 2 rows with 1 dc in every dc. Fasten off. Do the same on the other shoulder SLEEVE: Work back and forth. Work 45-45-49-49-52-52 ch on hook size 4.5 mm/US 7 with Cotton Light. Work 1 dc in 4th ch from hook (= 2 dc), 1 dc in each of the next 5-5-7-7-5-5 ch, * 1 dc in each of the next ch 6, skip 1 ch *, repeat from *-* until 1-1-3-3-1-1 ch remains, 1 dc in the last 1-1-3-3-1-1 ch = 38-38-42-42-44-44 dc. Work 1 dc in each of the first 1-1-3-3-1-1 dc, A.2 until 1-1-3-3-1-1 dc remain, (= 6-6-6-6-7-7 times in width), 1 dc in each of the last 1-1-3-3-1-1 dc. When A.2 has been worked 1 time vertically, repeat A.x until finished measurements. When piece measures 8-8-8-10-10-10 cm / 4'', inc 1 dc by working 2 dc in first and last dc on row (= 2 dc inc). Repeat inc every 4½-4-4-3-3-2½ cm / 1 3/4"-1½"-1½"-1"-1"-7/8" 9-10-10-12-12-14 more times = 58-60-64-68-70-74 sts. Work the inc sts in pattern. NOTE: There is always 1 dc (or 3 ch = 1 dc) in each side of piece. Fasten off when piece measures 52-52-51-51-51-48 cm / 20½"-20½"-20"-20"-20"-19" (shorter measurements in the larger sizes because of wider shoulders). Work another sleeve the same way. ASSEMBLY: Work the shoulder seams tog from WS as follows through both layers: 1 sc in first dc, * ch 1, skip 1 dc, 1 sc in next dc *, repeat from *-*. Sew in sleeves. Work the under arm seams and side seams tog from WS as follows through both layers: * 1 sc in outer loop, ch 3, skip 1 row *, repeat from *-* until approx. 10 cm / 4'' remain on body for vent in each side. Fasten off. NECK EDGE: Work an edge around the neck as follows from mid on top of shoulder: 1 sc, * ch 3, skip approx. 1 cm / ½'', 1 sc *, repeat from *-* around the entire neck and finish with 1 sl st in first sc on round. Fasten off. |
|||||||||||||
Diagram explanations |
|||||||||||||
|
|||||||||||||
|
|||||||||||||
|
|||||||||||||
Have you finished this pattern?Tag your pictures with #dropspattern #justmesweater or submit them to the #dropsfan gallery. Do you need help with this pattern?You'll find 5 tutorial videos, a Comments/Questions area and more by visiting the pattern on garnstudio.com. © 1982-2025 DROPS Design A/S. We reserve all rights. This document, including all its sub-sections, has copyrights. Read more about what you can do with our patterns at the bottom of each pattern on our site. |
|||||||||||||


With over 40 years in knitting and crochet design, DROPS Design offers one of the most extensive collections of free patterns on the internet - translated to 17 languages. As of today we count 314 catalogs and 11822 patterns - 11812 of which are translated into English (US/in).
We work hard to bring you the best knitting and crochet have to offer, inspiration and advice as well as great quality yarns at incredible prices! Would you like to use our patterns for other than personal use? You can read what you are allowed to do in the Copyright text at the bottom of all our patterns. Happy crafting!
Post a comment to pattern DROPS 162-3
We would love to hear what you have to say about this pattern!
If you want to leave a question, please make sure you select the correct category in the form below, to speed up the answering process. Required fields are marked *.