
Popular categories
Looking for a yarn?


Comments / Questions (16)
![]() Monaco Marianna wrote:
Monaco Marianna wrote:
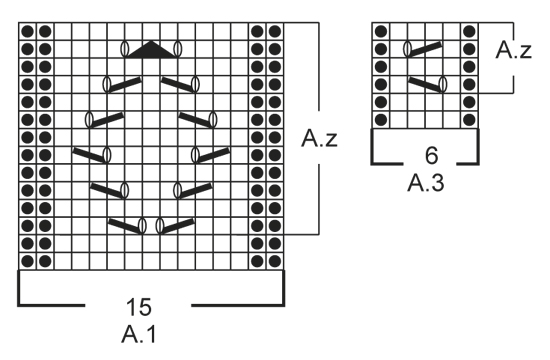
Salve, non capisco perchè nel Motivo 1 manca il 3° ferro e nel 2 il 6°. Potete aiutarmi? Mi sfugge qualcosa.
07.12.2021 - 17:32DROPS Design answered:
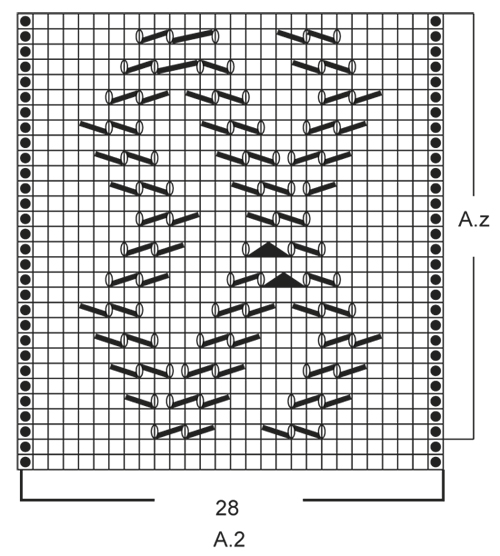
Buonasera Marianna, nel motivo 1 i ferri 2, 3 e 4 sono lavorati a diritto, e nel motivo 2 i ferri 5, 6, 7 e 8 sono lavorati a diritto. Buon lavoro!
07.12.2021 - 21:44
![]() Lorie wrote:
Lorie wrote:
I would like to make this but I'd like to make the back length as long as the front, long enough to cover my butt. Can the pattern be easily modified to do this?
05.01.2018 - 21:18DROPS Design answered:
Dear Lorie, having the front longer is the basic characteristic of this type (square) cardigans, so you can't really have the back side as long as the frint, without significantly changing the look. However, if you really want to cover your backside, you can make the entire piece wider, and having a kind of wrap with sleeves instead of a sweater. Or you can start with less stitches at the front and increase, then after knitting the bac decrease to the same number of stitches, but then again it will have a significantly different look, more like a wrap cardigan left open. I hope this helped. Happy Knitting!
06.01.2018 - 13:19
![]() Liliana wrote:
Liliana wrote:
Buona sera sto facendo questo modello ma ho un dubbio devo fare ancora 4 ferri per terminare la prima ripetizione di AZ a2 devo ricominciare con AZ a1 o di questa sezione faccio 4 ferri a diritto per trovarmi pari con lo schema?Con la parte AZ a3 non ho problemi dato che A2 é un multiplo di a3 mentre non lo è di a1. Grazie della risposta spero di essermi spiegata .
27.11.2016 - 21:33DROPS Design answered:
Buonasera Liliana, deve riprendere a lavorare A.z (A.1). Buon lavoro!
27.11.2016 - 22:49
![]() Luciana wrote:
Luciana wrote:
Ho trovato il problema! Era un'errore mio: scusate!
29.10.2016 - 11:07
![]() Luciana wrote:
Luciana wrote:
Buongiorno! Sto provando ad eseguire questo modello nella taglia XXL ed ho avviato le maglie come indicato (139) ma al primo giro, quando bisogna impostare la sequenza dei motivi, il conto delle maglie non torna! Risultano 133 anziché le 139 avviate. Per essere sicura di non sbagliare ho anche trascritto lo schema sulla carta millimetrata ma niente, le maglie non coincidono! Cosa manca? Grazie!
29.10.2016 - 11:00DROPS Design answered:
Buongiorno Luciana. Le confermiamo che il numero delle m e la distribuzione dei diagrammi sono corretti. Buon lavoro!
29.10.2016 - 13:04
![]() Atty wrote:
Atty wrote:
Voorkant vind ik erg mooi, achterkant jammer genoeg niet. Ik weet dus niet of ik hem ga maken.
25.04.2016 - 09:55
![]() LN wrote:
LN wrote:
Bonsoir j'ai commandé la laine pour faire ce modèle mais je ne comprends pas comment commencer! Sur la photo, on voit les 1ers rangs ajourés, merci de me donner la solution
12.02.2016 - 21:50DROPS Design answered:
Bonjour Mme LN, quand vous avez monté le nbe de mailles indiqué pour votre taille, tricotez en point fantaisie-1 (= 8 rangs donc 1 rang de jours), puis continuez dans les différents points fantaisie en suivant les diagrammes avec 10 m de bordure de chaque côté tricotées comme pour le point fantaisie 1. Bon tricot!
15.02.2016 - 10:00
![]() Lorella Sorrenti wrote:
Lorella Sorrenti wrote:
Ti ringrazio tanto per la risposta, sei veramente gentile. secondo te è possibile i ferri normali per questo modello.? i ferri circolari li ho comprati ma sono ancora un po' impacciata! grazie ancora
16.10.2015 - 21:55DROPS Design answered:
Buongiorno Lorella. Vengono suggeriti i ferri circolari per avere maggiore spazio per le maglie; sui ferri dritti potrebbero risultare un po' più fitte. Il capo è lavorato avanti e indietro sui ferri, quindi può usare i ferri dritti e seguire le spiegazioni così come riportate. Buon lavoro!
17.10.2015 - 08:25
![]() Lorella Sorrenti wrote:
Lorella Sorrenti wrote:
In questo modello quando si dice "lavorare tutte le maglie a diritto, non lavorare i gettati a ritorto, devono fare i buchi" vuol dire che il gettato lo lasciò cadere o che lo passo senza lavorarlo?
15.10.2015 - 21:04DROPS Design answered:
Buonasera Lorella, si intende che deve lavorare i gettati a diritto come le altre maglie, non a diritto ritorto. Buon lavoro!
15.10.2015 - 21:24
![]() Andrea Schöttler wrote:
Andrea Schöttler wrote:
Hallo! Würde die Jacke auch in der Kombination Alpaka und Lace so schön wirken? Ich möchte sie gerne in Alpaka 2918 stricken und finde in dem Farbton bei Kid Silk keine Entsprechung.
09.10.2015 - 11:21DROPS Design answered:
Mit Kid-Silk wird die Jacke flauschiger, weil es ja ein Flauschgarn mit losen Fasern ist, Lace ist glatt, aber grundsätzlich können Sie auch Lace verwenden. Als Farbton könnte ich mir bei Kid-Silk petrol vorstellen, zu Alpaca 2918. Aber das ist natürlich Geschmackssache, es hebt den Farbton dann etwas ins Dunklere und die Jacke bekommt einen etwas "melierteren" Charakter.
13.10.2015 - 12:55
|
|||||||||||||||||||||||||
June Gloom#junegloomjacket |
|||||||||||||||||||||||||
 |
 |
||||||||||||||||||||||||
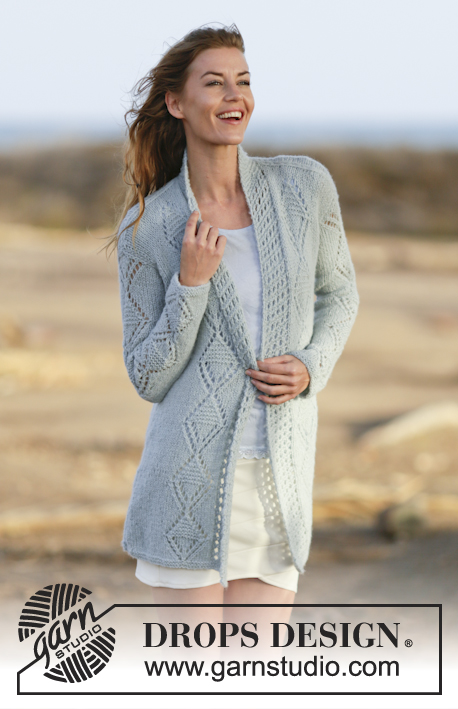
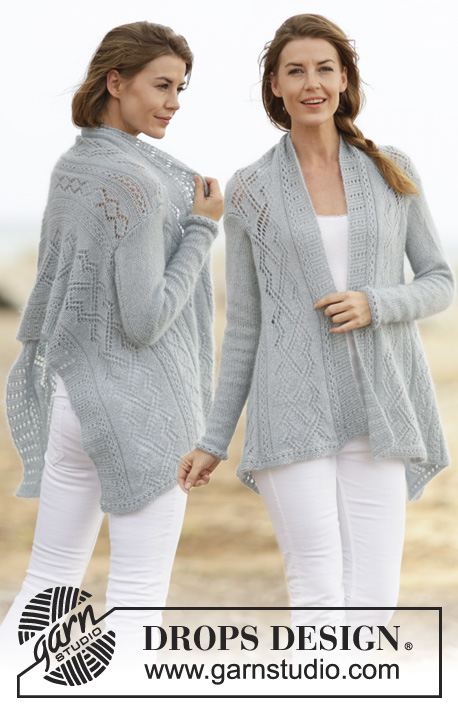
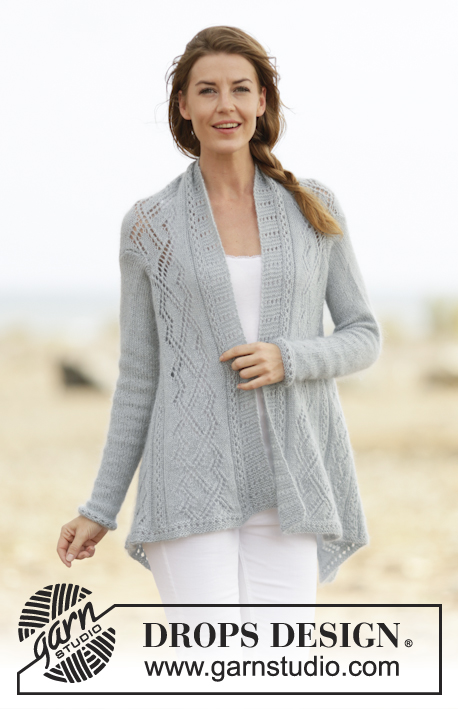
Knitted DROPS jacket with lace pattern in ”Alpaca” and ”Kid-Silk”. Worked sideways. Size: S - XXXL.
DROPS 161-15 |
|||||||||||||||||||||||||
|
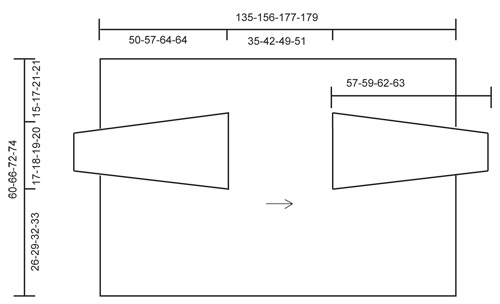
GARTER ST (back and forth): K all rows. 1 ridge = K2 rows. PATTERN-1: ROW 1 (= RS): K all sts. ROW 2-4: K all sts. ROW 5: * K 2 tog, 1 YO *, repeat from *-* until 1 sts remain, finish with K 1. ROW 6: K all sts, do not work YOs twisted; they should make holes. ROW 7-8: K all sts. PATTERN-2: ROW 1 (= RS): K all sts. ROW 2 (= WS): K all sts. ROW 3: * K 2 tog, 1 YO *, repeat from *-* until 1 sts remain, finish with K 1. ROW 4: K all sts, do not work YOs twisted; they should make holes. ROW 5-8: K all sts. BAND: Work band (= 10 sts) as follows: ROW 1 (= RS): K all sts. ROW 2-4: K all sts. ROW 5 (= RS): * K 2 tog, 1 YO *, repeat from *-* 5 times in total, work reversed in the other side of piece, i.e.: 1 YO, K 2 twisted tog. ROW 6: K all sts, do not work YOs twisted; they should make holes. ROW 7-8: K all sts. PATTERN: See diagrams A.1 to A.3. The diagrams show all rows in pattern seen from RS. ---------------------------------------------------------- JACKET: Worked back and forth on circular needle from side to side. Cast on 115-127-139-143 sts on circular needle size 5 mm / US 8 with 1 strand Alpaca and 1 strand Kid-Silk (= 2 strands). Work PATTERN-1 - see explanation above. Then work as follows from RS: Work 10 sts BAND – see explanation above, A.3 (= 6 sts) 1-2-2-2 times in total, A.2 (= 28 sts), A.3 1-1-2-1 times in total, A.1 (= 15 sts) 1-1-1-2 times in total, A.3 1-1-2-1 times in total, A.2, A.3 1-2-2-2 times in total, 10 sts band AT THE SAME TIME dec 0-0-0-1 sts = 115-127-139-142 sts. Continue pattern like this. Repeat A.z until finished measurements. REMEMBER THE KNITTING GAUGE When piece measures 50-57-64-64 cm / 22½"-22½"-25 1/4"-25 1/4", bind off for armhole from RS as follows: Work the first 53-56-62-64 sts, bind off the next 28-30-32-34 sts and work as before over the last 34-41-45-44 sts. On next row cast on 28-30-32-34 new sts over the bind off sts and continue pattern as before. When piece measures 35-42-49-51 cm / 13 3/4"-16½"-19 1/4"-20" from where armhole was bind off, bind off for the other armhole the same way from RS. Continue with pattern. When piece measures 47-54-61-61 cm / 18½"-21 1/4"-24"-24" from where armhole was bind off, work PATTERN-2 – see explanation above, AT THE SAME TIME inc 0-0-0-1 st on first row = 115-127-139-143 sts. Loosely bind off. SLEEVE: Worked back and forth on circular needle. Cast on 33-35-37-39 sts (includes 1 edge st in each side of piece) on circular needle size 5 mm / US 8 with 1 strand of each yarn. Work pattern-1 and 1 edge st in GARTER ST - see explanation above - in each side of piece. When pattern-1 has been worked 1 time vertically, continue in stockinette st with 1 edge st in garter st in each side. When piece measures 9 cm / 3½'', inc 1 st inside 1 edge st in each side of piece. Repeat inc every 3 cm / 1'' 13-13-14-15 more times = 61-63-67-71 sts. Work in stockinette st until piece measures 52-54-57-58 cm / 20½"-21 1/4"-22½"-22 3/4". Bind off edge st in each side of piece at beg of the next 2 rows = 59-61-65-69 sts. Then bind off for sleeve cap in each side of piece at beg of every row as follows: bind off 4 sts 5 times in total = 19-21-25-29 sts. Bind off the remaining sts. Piece measures approx. 57-59-62-63 cm / 22½"-23 1/4"-24 3/8"-24 3/4". ASSEMBLY: Sew in sleeves. Sew underarm seams inside one edge st. |
|||||||||||||||||||||||||
Diagram explanations |
|||||||||||||||||||||||||
|
|||||||||||||||||||||||||
|
|||||||||||||||||||||||||
|
|||||||||||||||||||||||||
|
|||||||||||||||||||||||||
Have you finished this pattern?Tag your pictures with #dropspattern #junegloomjacket or submit them to the #dropsfan gallery. Do you need help with this pattern?You'll find 21 tutorial videos, a Comments/Questions area and more by visiting the pattern on garnstudio.com. © 1982-2025 DROPS Design A/S. We reserve all rights. This document, including all its sub-sections, has copyrights. Read more about what you can do with our patterns at the bottom of each pattern on our site. |
|||||||||||||||||||||||||


With over 40 years in knitting and crochet design, DROPS Design offers one of the most extensive collections of free patterns on the internet - translated to 17 languages. As of today we count 314 catalogs and 11822 patterns - 11812 of which are translated into English (US/in).
We work hard to bring you the best knitting and crochet have to offer, inspiration and advice as well as great quality yarns at incredible prices! Would you like to use our patterns for other than personal use? You can read what you are allowed to do in the Copyright text at the bottom of all our patterns. Happy crafting!
Post a comment to pattern DROPS 161-15
We would love to hear what you have to say about this pattern!
If you want to leave a question, please make sure you select the correct category in the form below, to speed up the answering process. Required fields are marked *.