
Looking for a yarn?


Comments / Questions (96)
![]() Zsofia wrote:
Zsofia wrote:
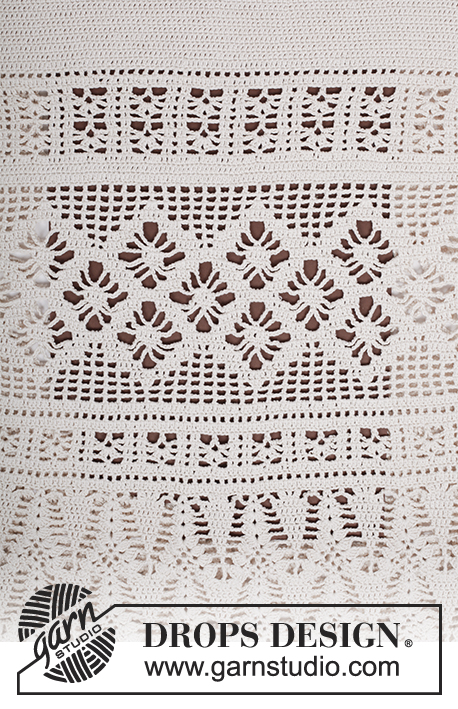
In A.1, specifically A.X middle row, are you sure that the double crochet (US term) should go IN the stitches? If yes, the two sc of previous row? On the pictures it seems that the dc go AROUND the middle chain space.
04.12.2024 - 18:43DROPS Design answered:
Dear Zsofia, the double crochet symbol in the third row is used for working both in or around the stitches, as indicated in the chart key above. In this specific case, the dc are worked around the central chain space. Happy crochetting!
08.12.2024 - 17:58
![]() Diya wrote:
Diya wrote:
In the A3 diagram on row 3,4,5,6 the middle, do I have to DC only in the chain space or also on the previous row DCs and the chain space?
28.08.2024 - 12:09DROPS Design answered:
Dear Diya, the dc (US-English) on rows 3,4,5 and 6 are worked in the chain spaces below. Happy crocheting!
29.08.2024 - 09:31
![]() Linda Sjelvgren wrote:
Linda Sjelvgren wrote:
Förstår ej hur jag ska gå från fram och tillbaka till att virka runt, trots beskrivningen. Innebär detta att man byter varv på arbetet när man för ihop ändarna?
07.08.2024 - 20:14DROPS Design answered:
Hej Linda, Uanset om du virkar fram och tillbaka, börjar du varvet med 3 lm för att komma upp på nästa varv. Se VIRKINFO øverst under Instruktioner :)
14.08.2024 - 14:58
![]() Basil wrote:
Basil wrote:
I am confused on how to go from working back and forth at the beginning of the pattern to working in the round. Do I join to the first double crochet to create a circle? And do I sew the two sides together? Thanks
19.05.2024 - 05:39DROPS Design answered:
Dear Basil, first you work back and forth to create a vent; this will be used for the buttonband and buttonhole band. Then you join to continue in the round. The joining method is explained in CROCHET INFO: 1 slip stitch in the 3rd chain from the beginning of the round and then simply work over the previous stitches. Happy crochetting!
20.05.2024 - 00:19
![]() Beth Noll wrote:
Beth Noll wrote:
After finishing the vent in the side, when you begin working in the round, to you continue to turn after each round or do you just work on the RS?
08.05.2024 - 20:37DROPS Design answered:
Dear Beth, there is no mention in turning the piece when you work on the round, so you should crochet from the right side, on the round. Happy Crafting!
09.05.2024 - 04:51
![]() Anne wrote:
Anne wrote:
The pattern refers to A.1 to A.3, but then it refers to A.X and A.Z. I am so confused! Is this a typo or am I just being dense?
07.05.2024 - 11:10
![]() Camille wrote:
Camille wrote:
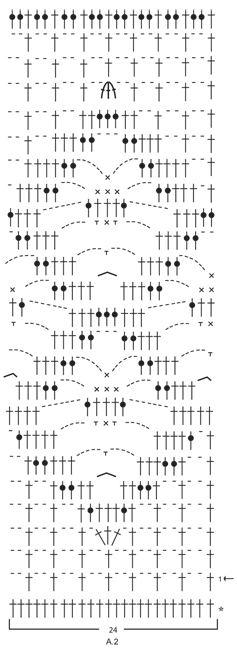
Merci pour votre rapide réponse à ma précédente question, cela m'aide pour le rang 9. En revanche pour le rang 15 cela ne me paraît pas logique puisqu'en faisant 3ml et en finissant le tour par une maille coulée dans la 3eme ml, cela fera presque comme une bride hors ici il faut un trou, et je n'aurais qu'une maille en l'air (avant la mc) au lieu d'en avoir 3. Vouliez-vous dire que ma mc doit se faire dans la 1ere ml lorsque je fini le tour ? Merci encore.
23.02.2024 - 14:27DROPS Design answered:
Bonjour Camille, si vous ne voulez pas ces 3 ml au début du 15ème rang, vous pouvez commencer le tour différemment, par ex par la 2ème des 2 dernières brides du motif précédent, mais sinon, c'est la façon la plus simple, ces 3 mailles en l'air permettront aux 2 ml suivantes d'être à la hauteur des brides à crocheter ensuite (avec 1 ml vous auriez un arceau plus petit). Bon crochet!
23.02.2024 - 15:38
![]() Camille wrote:
Camille wrote:
Bonjour, je ne comprends pas comment démarrer certains rangs de A2. Pour le rang numéro 9 (1er rang = la flèche) par 4 mailles en l'air, mais celles-ci font partie du motif 8 mailles en l'air qui se répète tout le long. Hors si je démarre mon rang par 4 mailles en l'air, celle-ci restent "attachés" au rang précédent la où l'on a fait une maille coulée pour finir le rond. Ce même soucis se pose lors du rang 15. Pouvez-vous m'aider ? Merci.
23.02.2024 - 13:59DROPS Design answered:
Bonjour Camille, remplacez la 1ère maille de chaque tour comme indiqué sous INFO CROCHET, au début du 9ème tour, commencez par 1 ml + les 4 ml du début du tour et terminez par 1 mc dans la 1ère ml du début du tour, au 15ème tour, commencez par 3 ml pour avoir la bonne hauteur, et terminez par 1 mc dans la 3ème ml du début du tour, ces 3 ml ne compteront pas dans le nombre de mailles du tour. Bon crochet!
23.02.2024 - 14:12
![]() Pyggis wrote:
Pyggis wrote:
Hej Jag försöker göra den här kjolen men eftersom jag är så smal måste jag anpassa garn därefter. Om jag vid uppläggning får rätt mått som passar mig kommer det då att funka när knapparna ska dit eller blir den ännu bredare då? Hur många cm extra i så fall ska dit med knappar o knapphål. Vill inte göra om den i onödan hur ska jag tänka?
06.02.2024 - 19:06DROPS Design answered:
Hei Pyggis. Design avd. har dessverre ikke mulighet til å omregne til en mindre størrelse på en allerede skrevet oppskrift. Om du skal hekle den smalere må du passe på at de 6 merkene som skal settes etter 5 rader i høyden vil samsvare med siden (der knappene skal være) / at du har samme maskeantall mellom merkene, bortsett fra 1. og 6. merke. Du må også passe på å ha riktig maskeantallet i forhold diagrammene når de skal hekles. mvh DROPS Design
15.02.2024 - 11:37
![]() Betina wrote:
Betina wrote:
No entiendo la parte del rombo del vestido, podrías hacer un video, me encanta este vestido, muchas gracias
06.01.2024 - 02:42DROPS Design answered:
Hola Betina, todos los videos relevantes para realizar la labor los puedes encontrar en la sección de videos, después de las instrucciones escritas y los diagramas. Si lo que te da problemas es el diagrama a ganchillo puedes leer la siguiente lección: https://www.garnstudio.com/lesson.php?id=69&cid=23.
08.01.2024 - 00:00
|
|||||||||||||||||||||||||||||||||||||
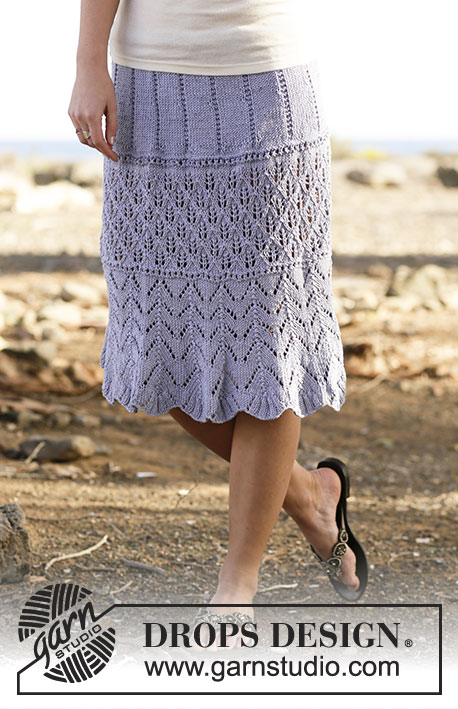
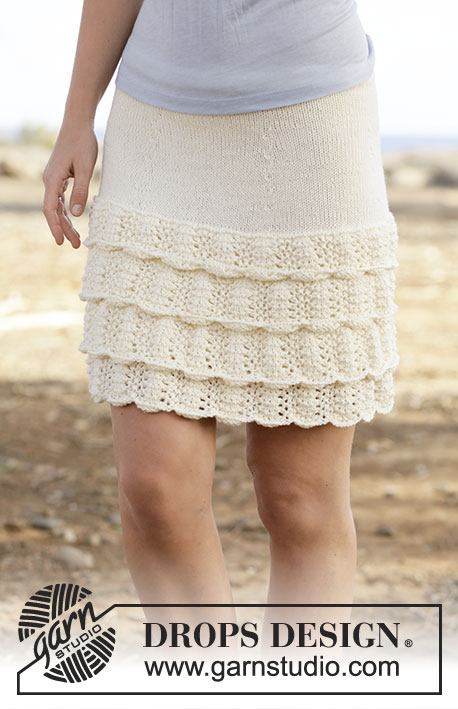
Summer Escape#summerescapeskirt |
|||||||||||||||||||||||||||||||||||||
 |
 |
||||||||||||||||||||||||||||||||||||
Crochet DROPS skirt with double crochet, lace pattern, worked top down in ”Safran”. Size S-XXXL.
DROPS 162-18 |
|||||||||||||||||||||||||||||||||||||
|
CROCHET INFO: Replace first dc from beg of row/round with 3 ch. Finish row with 1 dc in 3rd ch from previous row (when piece is worked back and forth) and finish round with 1 sl st in 3rd ch from beg of round (when piece is worked in the round). DO NOT replace first sc at beg of round but work 1 ch before sc at beg of round. Finish with 1 sl st in first ch on round. INCREASE TIP: Inc 1 dc by working 2 dc in same dc. DECREASE TIP: Work 1 dc but wait with last pull through (= 2 sts on hook), then work next dc but on last pull through, pull yarn through all 3 sts on hook = 1 st dec. PATTERN: See diagrams A.1 to A.3. ---------------------------------------------------------- SKIRT: Work back and forth, top down to after vent in the side, then work in the round. Work 186-209-232-258-279-305 ch (includes 3 ch to turn with) on hook size 3.5 mm/E/4 with Safran. Work first row as follows: 1 dc in 4th ch from hook, 1 dc in each of the next ch 4, * skip ch 1, 1 dc in each of the next 6 ch *, repeat from *-* until 3-5-7-5-5-3 ch remain, skip 1 ch and finish with 1 dc in each of the last 2-4-6-4-4-2 dc = 158-178-198-220-238-260 dc. Then work back and forth with 1 dc in every dc - READ CROCHET INFO. REMEMBER THE CROCHET GAUGE! When 5 rows have been worked vertically, insert 6 markers in the piece as follows: First marker after 14-14-16-20-21-22 dc, then there should be 26-30-33-36-39-43 dc between every marker, there will be 14-14-17-20-22-23 dc after last marker at the end of row. On next row inc 1 dc before all markers – READ INCREASE TIP! Repeat inc every other row 6-6-7-8-9-10 more times - NOTE: Inc alternately before and after markers = 200-220-246-274-298-326 dc. AT THE SAME TIME when 12 rows in total have been worked vertically, end the vent in the side and continue piece in the round, beg round in the side – READ CROCHET INFO! When piece measures 24-24-25-25-25-26 cm / 9½"-9½"-9 3/4"-9 3/4"-9 3/4"-10 1/4", inc 28-32-30-26-38-22 st evenly on next round = 228-252-276-300-336-348 sts. Now work pattern as follows: Work from 1st round in A.1 (= 12 dc) 19-21-23-25-28-29 times in width. When A.X has been worked 1 time vertically, repeat A.X 1 more time before continuing with next round in diagram. Then work 1-2-2-1-2-3 rounds with 1 dc in every dc, AT THE SAME TIME on last round inc 36-36-36-36-24-36 sts evenly = 264-288-312-336-360-384 dc. Now work from 1st round in A.2 (= 11-12-13-14-15-16 repetitions), AT THE SAME TIME on last round inc 12 dc evenly in all sizes = 276-300-324-348-372-396 dc. Continue with A.1 (= 23-25-27-29-31-33 repetitions) 1 time vertically, AT THE SAME TIME on last round inc 12-20-12-20-12-20 dc evenly = 288-320-336-368-384-416 dc. Now work A.3 (= 18-20-21-23-24-26 repetitions). When A.3 has been worked vertically, repeat A.Z 1-1-1-2-2-2 more times vertically. Now work as follows: 1 ch (= 1 sc), ** work * ch 4, 1 sc in next ch-space *, repeat from *-* 2 more times, ch 4, skip 3 dc, 1 sc in next dc **, repeat from **-** the entire round, and finish with 1 sl st in first ch on round. BUTTONHOLE LOOPS: Along the opening on front piece work buttonhole loops as follows (beg at the bottom): 2 sc in first dc, ch 3, skip 1 dc, * work 2 sc in each of the next 2 dc, ch 3, skip 1 dc *, repeat from *-* 3 times in total and finish with 2 sc in last dc at the top, turn and work back as follows: 1 sc in every sc and 3 sc in every ch-space. BUTTON BAND: Along the other side of the opening work 5 rows with sc back and forth (on 1st row work 2 sc in every dc = 24 sc), cut the yarn. Sew the buttons on to the button band. EDGE: Work an edge at top of waist on skirt as follows from RS: Fasten the strand with 1 sl st at the edge of button folding edge, ch 1, * ch 1, skip ch 1, 1 sc in next ch *, repeat from *-* along the entire edge of waist. Fasten off. |
|||||||||||||||||||||||||||||||||||||
Diagram explanations |
|||||||||||||||||||||||||||||||||||||
|
|||||||||||||||||||||||||||||||||||||

|
|||||||||||||||||||||||||||||||||||||
|
|||||||||||||||||||||||||||||||||||||

|
|||||||||||||||||||||||||||||||||||||
Have you finished this pattern?Tag your pictures with #dropspattern #summerescapeskirt or submit them to the #dropsfan gallery. Do you need help with this pattern?You'll find 12 tutorial videos, a Comments/Questions area and more by visiting the pattern on garnstudio.com. © 1982-2025 DROPS Design A/S. We reserve all rights. This document, including all its sub-sections, has copyrights. Read more about what you can do with our patterns at the bottom of each pattern on our site. |
|||||||||||||||||||||||||||||||||||||


With over 40 years in knitting and crochet design, DROPS Design offers one of the most extensive collections of free patterns on the internet - translated to 17 languages. As of today we count 314 catalogs and 11822 patterns - 11812 of which are translated into English (US/in).
We work hard to bring you the best knitting and crochet have to offer, inspiration and advice as well as great quality yarns at incredible prices! Would you like to use our patterns for other than personal use? You can read what you are allowed to do in the Copyright text at the bottom of all our patterns. Happy crafting!
Post a comment to pattern DROPS 162-18
We would love to hear what you have to say about this pattern!
If you want to leave a question, please make sure you select the correct category in the form below, to speed up the answering process. Required fields are marked *.