
Popular categories
Looking for a yarn?


Comments / Questions (88)
![]() Anne Albrechtslund wrote:
Anne Albrechtslund wrote:
Der er flere af de samme firkanter i det diagram der viser hvordan firkanterne skal sys sammen der er 3 der hedder 1D 2 stk 4B 2 stk 3A. Hvordan kan det, det er så slet ikke 2D. Kan i hjælpe mig med et brugbart diagram? Venlig hilsen Anne
20.02.2026 - 10:53DROPS Design answered:
Hei Anne. Ja, det er flere som har det samme navnet / like ruter (og det "mangler" noen nr), men om man leser under RUDEMONTERING, har man en forklaring på hvordan teppet skal monteres. Bare husk: Tallene står for hvilken Mønsterrude det er, bogstaverne står for mønsterfarve. mvh DROPS Design
23.02.2026 - 16:02
![]() Borde Sylvie wrote:
Borde Sylvie wrote:
Bonjour, Je n’arrive pas à faire le carré numéro quatre, je regarde la vidéo mais sur le rang à l’envers je ne saisis pas. Pouvez vous m’aider s il vous plait ? Cordialement Sylvie Borde
13.02.2026 - 19:51DROPS Design answered:
Bonjour Mme Borde, sur l'envers, on va tricoter toutes les mailles à l'endroit (point mousse) sauf la diminution (la maille juste après le jeté, quand on tricote sur l'envers). Bon tricot!
16.02.2026 - 16:09
![]() Wendy Martin Wrote wrote:
Wendy Martin Wrote wrote:
When knitting square 5, waffle pattern, I don’t understand the what you do once you have reached 20cm. …… adjust so that the next row is row 3 - work next row as explained but P st inside st in garter in stead of K. 🤞you can help.
12.01.2026 - 15:07DROPS Design answered:
Dear Mrs Martin, you work until piece measures 20 cm but adjust the length so that you finish with a row 2 in the pattern, ie after a row worked from RS like row 2; then work row 3 but instead of knitting stitches, purl the stitches inside the 2 sts in garter stitch on each side.. Then knit 1 row increasing evenly. Happy knitting!
14.01.2026 - 07:58
![]() Isa wrote:
Isa wrote:
Merci beaucoup pour votre réponse Je n’arrivais pas à réfléchir pour décaler toutes les mailles Je vais décaler d’une maille dans ce cas Bonne journée
06.10.2025 - 09:21
![]() Isa wrote:
Isa wrote:
Bonjour J’ai bien réussis grâce à votre aide de la vidéo pout le diagramme 1 mais je pensais qu’il fallait recommencer au début tous le diagramme mais apparement non car les lignes et trous se trouvent décalés et du coup je suis à nouveau perdue 🫣 Arrivée au dernier rang en haut je ne comprend pas comment je peux continuer sans explications Désolée et merci à vous
04.10.2025 - 18:25DROPS Design answered:
Bonjour Isa, vous devez toujours continuer les diagonales ajourées, comme on le montre dans la vidéo, on décale ainsi le motif ajouré d'1 maille à droite tous les rangs sur l'endroit. Bon tricot!
06.10.2025 - 07:32
![]() Isa wrote:
Isa wrote:
Bonjour Je remercie infiniment la personne de drops qui m’a répondu pour la difficulté à comprendre le point rayure avec le diagramme. Je viens seulement de voir la réponse je me suis avancée sur d’autres carrés en attendant . Je vais donc regarder la vidéo et essayer Merci beaucoup
03.10.2025 - 23:27
![]() Isa wrote:
Isa wrote:
Je souhaiterais avoir le détail du carré au point rayure rang par rang car je ne comprend pas trop à part le début 2 m end et la fin 2 m endroit aussi . Merci par avance
21.09.2025 - 22:48DROPS Design answered:
Bonjour Isa, cette vidéo devrait alors vous aider, nous y montrons comment tricoter le diagramme A.1. Bon tricot!
24.09.2025 - 08:02
![]() Shahida wrote:
Shahida wrote:
Hej, vilka stickor är det jag ska använd. Har svårt att hitta exakt vilka det ska vara.
10.06.2025 - 14:40DROPS Design answered:
Hej Shahida, du kan lave en strikkeprøve med pind nummer 6, hvis du får 15 masker i rätst på 10 cm, så stemmer det med opskrifterne på de forskellige firkanter :)
12.06.2025 - 10:30
![]() Hayley wrote:
Hayley wrote:
I am having problems with the English rib square. After casting on, knitting 3 rows and decreasing evenly over the row I get to ‘Row 1’ of English rib. This does not give any instructions to knit 2 together so following this as written it increases the stitches. You have a video but this only shows rows 2 and 3. Please help! Thanks
25.05.2025 - 13:23DROPS Design answered:
Dear Hailey, you started the square with 3 knit rows (without English rib) and decrease on the 4th knit row. Since you have 33 sts, to decrease 6 sts evenly you will need to decrease by knitting every 4th and 5th or every 5th and 6th stitches together alternately. Then, we start the English rib, where there are no decreases. When working in English rib the number of stitches doesn't vary, because we don't count the yarn overs as stitches; these yarn overs are worked together with stitches in the next row, so they don't get to become stitches themselves. Happy knitting!
25.05.2025 - 16:30
![]() Geneviève Lafortune wrote:
Geneviève Lafortune wrote:
Bonjour, J'aimerais savoir quand vous faites le carré en étoile, je prends 3m. env. Ok. Je les laisse sur ma broche je fais une jetté et quand je tricotte le tout, j'ai combien de mailles sur ma broche? Moi j'en ai 2 est-ce normal?
24.02.2025 - 16:51DROPS Design answered:
Bonjour Mme Lafortune, vous tricotez ces 3 mailles ensemble à l'envers = vous avez 1 maille sur l'aiguille droite, vous faites 1 jeté = 2 mailles sur l'aiguille droite et vous tricotez ces 3 mêmes mailles encore un fois ensemble à l'envers = vous avez 3 mailles sur l'aiguille droite. Retrouvez ici, en vidéo comment tricoter le point d'étoiles. Bon tricot!
25.02.2025 - 09:29
|
||||||||||||||||
A Patch of Comfort#apatchofcomfortblanket |
||||||||||||||||
|
|
||||||||||||||||
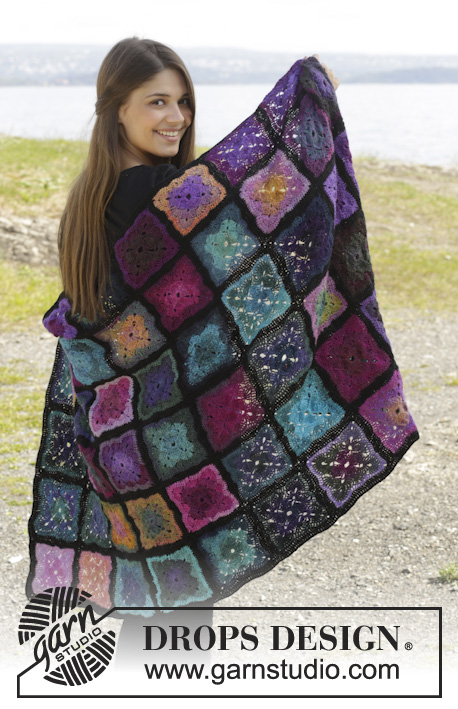
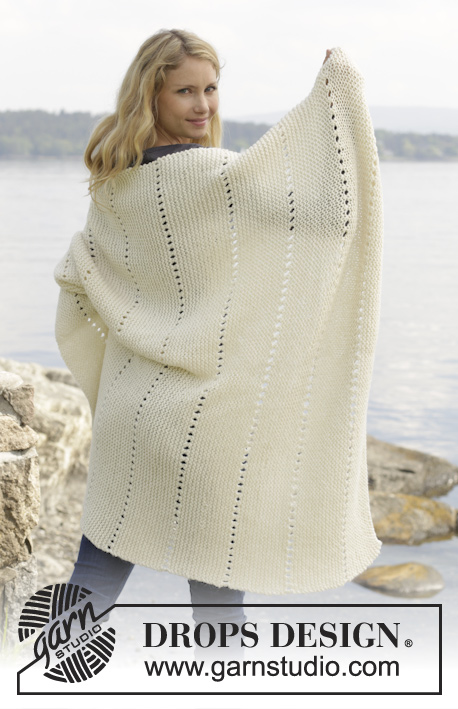
Knitted DROPS blanket with squares in garter st, star pattern, English rib, stripes, waffle pattern and bamboo pattern in ”Nepal"
DROPS 157-21 |
||||||||||||||||
|
SQUARE COLOURS: Square 1 (garter st): 1 beige, 1 light beige, 1 light grey, 3 off white. Square 2 (star pattern): 1 beige, 1 light beige, 2 light grey. Square 3 (English rib): 2 beige, 1 light beige, 1 light grey, 1 off white. Square 4 (stripes): 1 beige, 2 light beige, 1 light grey, 1 off white. Square 5 (waffle pattern): 1 beige, 1 light beige, 1 light grey, 1 off white. Square 6 (bamboo): 1 beige, 1 light beige, 1 light grey, 1 off white. GARTER ST (back and forth on needle): K all rows. 1 ridge = 2 rows K. PATTERN: See diagram A.1. Diagram shows all rows seen from RS. See diagram A.2 for assembly of squares. PATTERN TIP: Diagrams A.1 does not fit vertically when repeated but eyelet rows are continued diagonally upwards as before. SQUARE ASSEMBLY: Number indicate which Pattern square is used, letters indicate pattern colour: A = beige B = light beige C = light grey D = off white ---------------------------------------------------------- BLANKET: Work every square separately and sew tog when finished. Work every square back and forth on needle. Work different number of squares with different number of colours for each square – see SQUARE COLOURS above = 28 squares in total. 1 square measures approx. 22 x 22 cm. SQUARE 1 (GARTER ST): Cast on 33 sts on needle size 6 mm. Work in GARTER ST - see explanation above. REMEMBER THE KNITTING TENSION! Cast off when piece measures approx. 22 cm. SQUARE 2 (STAR PATTERN): Cast on 33 sts on needle size 6 mm. K 3 rows. K 1 row AT THE SAME TIME inc 4 sts evenly = 37 sts. Then work STAR PATTERN as follows: Row 1 (= RS): K 1 row. Row 2 (= WS): K 1, * P 3 tog without lifting them off the needle, 1 YO, P 3 tog in same 3 sts and drop them off the needle, K 1 * repeat from *-* the entire row. Row 3 (= RS): K 1 row. Row 4 (= WS): K 3, * P 3 tog without lifting them off the needle, 1 YO, P 3 tog in same 3 sts and drop them off the needle, K 1 *, repeat from *-* until 2 sts remain, K 2. Repeat rows 1 to 4. REMEMBER THE KNITTING TENSION! When piece measures 20½ cm, K 1 row AT THE SAME TIME dec 4 sts evenly = 33 sts. K 3 rows and cast off. SQUARE 3 (ENGLISH RIB): Cast on 33 sts on needle size 6 mm. K 3 rows. K 1 row AT THE SAME TIME dec 6 sts evenly = 27 sts. Then work ENGLISH RIB as follows: Row 1: K 2, * K 1, 1 YO, slip 1 st as if to P *, repeat from *-* until 3 sts remain, finish with K 3. Row 2: K 2, * 1 YO, slip 1 st as if to P, K YO and slipped st tog *, repeat from *-* until 3 sts remain, finish with 1 YO, slip 1 st as if to P, K 2. Row 3: K 2, * K YO and slipped st tog, 1 YO, slip 1 st as if to P *, repeat from *-* until 4 sts remain, K YO and slipped st tog, K 2. Repeat 2nd and 3rd row upwards. REMEMBER THE KNITTING TENSION! When piece measures 20 cm – adjust to finish after 2nd row and work next row as follows: K 2, * K YO and slipped st tog, slip 1 st as if to P *, repeat from *-* until 4 sts remain, K YO and slipped st tog, K 2. K 1 row AT THE SAME TIME inc 6 sts evenly = 33 sts. K 3 rows and cast off. SQUARE 4 (STRIPES): Cast on 33 sts on needle size 6 mm. K 3 rows. K 1 row AT THE SAME TIME inc 1 st = 34 sts. Work 2 sts in GARTER ST – see explanation above, pattern according to diagram A.1 (1st row = RS) over the next 30 sts, finish with 2 sts in garter st – read PATTERN TIP. REMEMBER THE KNITTING TENSION! When piece measures 20½ cm, K 1 row AT THE SAME TIME dec 1 st = 33 sts. K 3 rows and cast off. SQUARE 5 (WAFFLE PATTERN): Cast on 33 sts on needle size 6 mm. K 3 rows. K 1 row AT THE SAME TIME dec 7 sts evenly = 26 sts. K 1 row. Then work WAFFLE PATTERN as follows: Row 1 (WS): K from WS. Row 2 (RS): K 2, * K 1 in st from previous row and then drop st off left needle, K 1 *, repeat from *-* until 2 sts remain on needle, K 2. Row 3 (WS): K 2, * K 1, lift loop around st and work this K tog with st on needle *, repeat from *-* until 2 sts remain on needle, K 2. Row 4 (RS): K 2, * K 1, K 1 in st from previous row and then drop st off left needle *, repeat from *-* until 2 sts remain on row, K 2. Row 5 (WS): K 2, * lift loop around the st and K this st tog with st on needle, K 1*, repeat from *-* until 2 sts remain on row, K 2. Repeat 2nd-5th row upwards. REMEMBER THE KNITTING TENSION! When piece measures 20 cm – adjust so that next row is row no. 3 – work next row as explained but P st inside st in garter in stead of K. K 1 row AT THE SAME TIME inc 7 sts evenly = 33 sts, K 3 rows, cast off. SQUARE 6 (BAMBOO PATTERN): Cast on 33 sts on needle size 6 mm. K 3 rows. K 1 row AT THE SAME TIME inc 3 sts evenly = 36 sts. Then work BAMBOO PATTERN as follows: Row 1 (= RS): K 1, * 1 YO, K 2, pass YO over 2 K sts *, repeat from *-*, K 1. Row 2 (= WS): K 1, P until 1 st remains on row, finish with K 1. Repeat rows 1 and 2. REMEMBER THE KNITTING TENSION! When piece measures 20½ cm, K 1 row AT THE SAME TIME dec 3 sts evenly = 33 sts. K 3 rows and cast off. ASSEMBLY: Fasten the strands on every square. Sew tog all squares with light beige as shown in diagram A.2 - Read SQUARE ASSEMBLY above. Sew tog edge to edge in outer loops of edge sts to avoid a chunky seam. |
||||||||||||||||
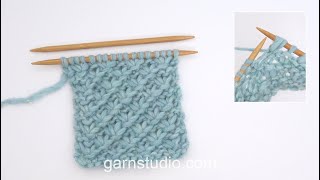
Diagram explanations |
||||||||||||||||
|
||||||||||||||||
 |
||||||||||||||||
Have you finished this pattern?Tag your pictures with #dropspattern #apatchofcomfortblanket or submit them to the #dropsfan gallery. Do you need help with this pattern?You'll find 20 tutorial videos, a Comments/Questions area and more by visiting the pattern on garnstudio.com. © 1982-2026 DROPS Design A/S. We reserve all rights. This document, including all its sub-sections, has copyrights. Read more about what you can do with our patterns at the bottom of each pattern on our site. |
||||||||||||||||


With over 40 years in knitting and crochet design, DROPS Design offers one of the most extensive collections of free patterns on the internet - translated to 17 languages. As of today we count 324 catalogues and 12290 patterns translated into English (UK/cm).
We work hard to bring you the best knitting and crochet have to offer, inspiration and advice as well as great quality yarns at incredible prices! Would you like to use our patterns for other than personal use? You can read what you are allowed to do in the Copyright text at the bottom of all our patterns. Happy crafting!
Post a comment to pattern DROPS 157-21
We would love to hear what you have to say about this pattern!
If you want to leave a question, please make sure you select the correct category in the form below, to speed up the answering process. Required fields are marked *.