DROPS Baby Merino
DROPS Baby Merino
100% Wool
from 4.55 $ /50g
Get the yarn to make this pattern from 9.10$.

The yarn cost is calculated from the pattern’s smallest size and the yarn’s cheapest product type. Looking for an even better price? You might find it on the DROPS Deals!

DROPS Super Sale

First Impression

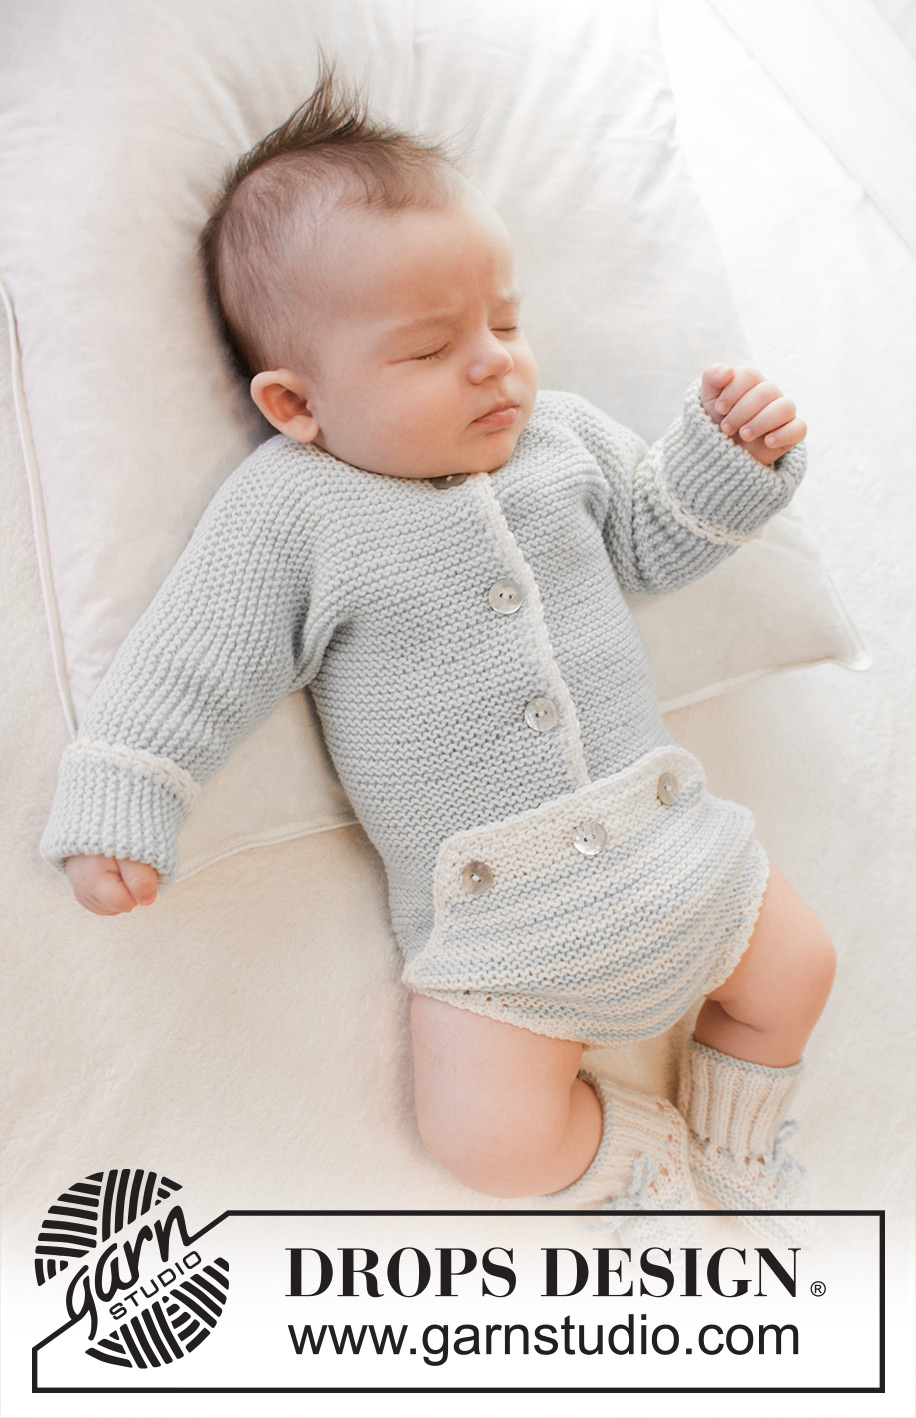
Knitted baby body in garter st with crochet edge in DROPS BabyMerino. Size premature - 4 years.

DROPS Baby 25-26
DROPS design: Pattern no bm-059-by
Yarn group A
-----------------------------------------------------------
Size: (premature) 0/1 - 1/3 - 6/9 - 12/18 months (2 - 3/4) years
Finished measurements:
Bust: (32) 36-40-44-48 (52-56) cm / (12½”) 14”-16”-17”-19” (20½”-22”)
Length from shoulder to leg opening: (20) 24-28-30-32 (36-40) cm / (8”) 9½”-11”-11¾”-12½” (14¼”-15¾”)

Materials:
DROPS BABY MERINO from Garnstudio
(100) 150-150-150-150 (200-200) g color no 28, light mint
50 g for all sizes in color no 02, off white

DROPS CIRCULAR NEEDLE (60 or 80 cm / 24’’ or 32’’) SIZE 3 mm/ US 2.5 - or size needed to get 24 sts x 48 rows in garter st = 10 x 10 cm / 4’’ x 4’’.
DROPS CROCHET HOOK SIZE 2.5 mm/C - for edges.

DROPS MOTHER-OF-PEARL BUTTON, NO 521: (5) 6-6-6-6 (7-7) pieces.

-------------------------------------------------------

Alternative Yarn – See how to change yarns here
Yarn Groups A to F – Use the same pattern and change the yarn here
Yarn usage using an alternative yarn – Use our yarn converter here

-------------------------------------------------------

DROPS Baby Merino
DROPS Baby Merino
100% Wool
from 4.55 $ /50g
Get the yarn to make this pattern from 9.10$.

The yarn cost is calculated from the pattern’s smallest size and the yarn’s cheapest product type. Looking for an even better price? You might find it on the DROPS Deals!

DROPS Super Sale

SAVE 30% on 6 cotton favorites!
Valid until 04.12.2024

Pattern instructions

NOTE: This pattern is written in American English. All measurements in charts are in cm. For conversion from inches to cm - click here. There are different terms for crocheting in American and British English. If this pattern includes crochet, click for "crochet terms" here. For this pattern in British English, please click here.
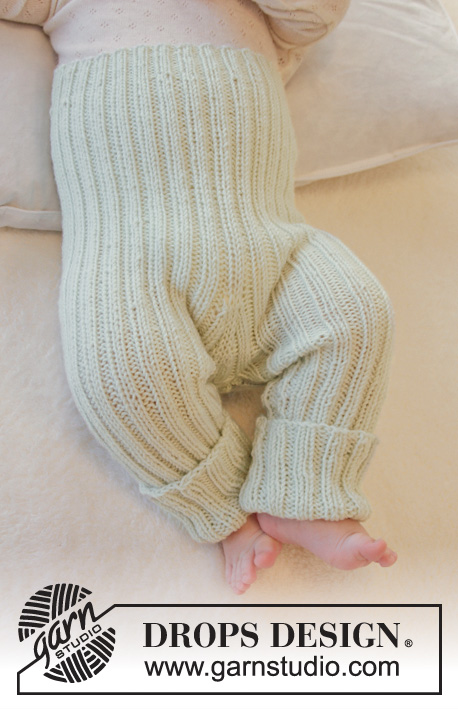
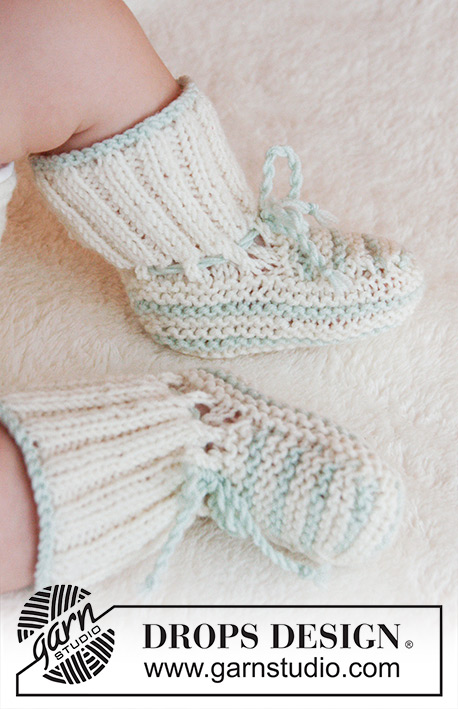
GARTER ST (back and forth on circular needle):
K all rows. 1 ridge = K2 rows.

BUTTONHOLES:
Dec for buttonholes on right band.
1 buttonhole = K tog second and third st from edge and make 1 YO.
Dec for buttonholes when piece measures:
(premature): 4, 10 and 16 cm / 1½”, 4” and 6¼”.
0/1 months: 6, 11, 16 and 20 cm / 2 3/8”,4 3/8”,6 ¼” and 8”.
1/3 months: 7, 12, 18 and 24 cm / 2¾”,4¾”,7” and 9½”.
6/9 months: 8, 14, 20 and 25 cm / 3 1/8”,5½”,8” and 9¾”.
12/18 months: 10, 16, 22 and 28 cm / 4”,6¼”,8¾” and 11”.
(2 years): 10, 15, 20, 25 and 30 cm / 4”,6”,8”,9¾” and 11¾”
(3/4 years): 12, 17, 23, 28 and 34 cm / 4¾”,6¾”,9”,11” and 13 3/8”

STRIPES:
* 2 ridges (i.e K4 rows) in garter st in off white, 2 ridges in garter st in light mint *, repeat from *-*.
----------------------------------------------------------

ONESIE:
Worked back and forth on circular needle.
Beg on front piece, cast on sts for sleeve and work up to the shoulder.
Work the other front piece the same way, place the 2 front pieces tog and work down the back piece, bind off for leg opening, inc out again and work flap.

RIGHT FRONT PIECE:
LOOSELY cast on (24) 27-29-31-34 (36-39) sts (includes 5 band sts towards mid front) on circular needle size 3 mm / US 2.5 with light mint.
READ ALL OF THE FOLLOWING SECTION BEFORE CONTINUING!
Work in GARTER ST - see explanation above (1st row = RS). When piece measures (4) 6-7-8-10 (10-12) cm / (1½”) 2 3/8”-2¾”-3 1/8”-4” (4”-4¾”), bind off for first BUTTONHOLE on band – see explanation above.
When piece measures (12) 15-18-20-22 (24-27) cm / (4¾”) 6”-7”-8”-8¾” (9½”-10 5/8”) (make sure that next row is worked from RS), cast on new sts at the end of every row towards the side for sleeve as follows 2 sts (5) 5-5-4-4 (4-5) times in total, 4 sts (2) 2-2-3-3 (4-5) times in total and then (13) 22-30-33-40 (46-51) sts 1 time = (55) 67-77-84-94 (106-120) sts.
When piece measures (17) 21-25-26-29 (31-35) cm / (6¾”) 8¼”-9¾”-10¼”-11 3/8” (12¼”-13¾”), bind off the outermost 8 sts towards mid front for neck.
Then bind off at beg of every row from neck as follows: bind off 2 sts 2 times in total and then 1 st (3) 3-3-3-4 (4-4) times in total = (40) 52-62-69-78 (90-104) sts.
Continue in garter st until piece measures (20) 24-28-30-33 (36-40) cm / (8”) 9½”-11”-11¾”-13” (14¼”-15¾”).
Insert 1 marker = mid on top of shoulder – AT THE SAME TIME cast on 2 new sts at the end of next row towards the neck = (42) 54-64-71-80 (92-106) sts (last row = WS).
Put all sts on a stitch holder.

LEFT FRONT PIECE:
NOTE: Do not dec for buttonholes on left band.
Cast on and work as right front piece but reversed (i.e. cast on new sts for sleeve at the end of every row from WS (instead of at the end of every row from RS). In addition K 1 row from WS at the end of front piece after casting on 2 sts towards the neck so that last row on both right and left front piece is worked from WS.

BACK PIECE:
Work left front piece on to circular needle (= K from RS), cast on (16) 16-16-16-18 (18-18) new sts (= back of neck) and work right front piece on to circular needle (= K from RS) = (100) 124-144-158-178 (202-230) sts.
NOW MEASURE PIECE FROM MARKERS ON SHOULDERS.
Continue to work in garter st back and forth on needle.
When piece measures (5) 6-7-7-8 (8-8) cm / (2”) 2 3/8”-2¾”-2¾”-3 1/8” (3 1/8”-3 1/8”), bind off sleeve sts at beg of every row in each side as follows: bind off (13) 22-30-33-40 (46-51) sts 1 time, 4 sts (2) 2-2-3-3 (4-5) times in total and 2 sts (5) 5-5-4-4 (4-5) times in total = (38) 44-48-52-58 (62-68) sts remain on row.
Continue until piece measures approx. (20) 24-28-30-33 (36-40) cm / (8”) 9½”-11”-11¾”-13” (14¼”-15¾”) – fold piece double at markers on shoulders and make sure that front and back pieces are the same length. Insert another marker.
THEN MEASURE PIECE FROM THIS MARKER.
Continue in garter st while AT THE SAME TIME dec for leg opening as follows: Dec 1 st at beg of row by K 2 tog inside 1 edge st. Repeat dec at beg of every row (both from RS and from WS) until there are (14) 14-14-14-16 (16-16) sts remain on row ((12) 15-17-19-21 (23-26) sts are now dec in each side and piece measures approx. (5) 6-7-8-9 (10-11) cm / (2”) 2 3/8”-2¾’’-3 1/8’’-3½’’ (4’’-4 3/8’’) from marker).
Then work STRIPES - see explanation above. When 1 repetition with stripes has been worked (= 4 ridges in garter st), beg inc for leg opening (continue stripes as before) and inc as follows: Cast on 1 new st at the end of every row (both from RS and from WS) until there are (22) 28-32-36-42 (46-52) sts on row (= (4) 7-9-11-13 (15-18) inc in each side). Then cast on 2 new sts at the end of the next 8 rows = (38) 44-48-52-58 (62-68) sts on row.

READ ALL OF THE FOLLOWING SECTION BEFORE CONTINUING!
Work without inc until 2 ridges have been worked with off white after 2 ridges with light mint. Insert another marker. Continue stripes as before while AT THE SAME TIME on 1st row from RS dec 1 st at the edge in each side for flap by K the 2 sts tog inside 1 edge st.
Repeat dec at the edge in each side every 4th row (i.e. every other row from RS) (4) 6-8-9-11 (11-14) more times (= (5) 7-9-10-12 (12-15) times in total).
Finish last stripe (i.e. in size premature + 0/1 month + 1/3 months + 3/4 years stop after 2 ridges with light mint, and in size 6/9 months + 12/18 months + 2 years stop after 2 ridges with off white).
Then work in garter st with off white in all sizes while AT THE SAME TIME on 1st row from RS dec 1 st at the edge in each side for flap as before and dec for 3 buttonholes evenly - 1 buttonhole should be 2 cm / 3/4’’ in from each side and 1 buttonhole in the middle.
Repeat dec at the edge in each side on 4th row 1 more time.
After last dec at the top of flap there are (24) 26-26-28-30 (34-34) sts on row, (4) 4-4-6-6 (6-4) ridges at the top in off white have been worked in total and flap measures approx. (6) 8-9-10-12 (12-14) cm / (2 3/8”) 3 1/8”-3½”-4”-4¾” (4¾”-5½”) from last marker. Bind off.

ASSEMBLY:
Sew underarm and side seams tog edge to edge in outer loops of edge sts.

CROCHET EDGE:
Crochet on hook size 2.5 mm/C with off white around the entire opening on body as follows (i.e. along bottom edge on right front piece, up along front piece, around the neck, down along the other front piece, along bottom edge on left front piece and then along leg opening, flap and the other leg opening):
ROUND 1: 1 sc in first st, * ch 1, skip 1 st, 1 sc in next st *, repeat from *-* and finish with 1 sl st in first sc.
ROUND 2: 1 sc in first ch, * ch 2, 1 sc in next ch *, repeat from *-* and finish with 1 sl st in first sc. Fasten off.
Work the same way at the bottom around both sleeves.

MORE ASSEMBLY:
Fold the flap over to RS. Sew on buttons on front pieces (button the middle button on flap through both flap and right front edge). Sew a small stitch or a snap button in each side where leg opening meets side on body so that flap is kept in place (marked by a star on chart).

This pattern has been corrected.

Updated online: 06.07.2017
Number of buttons corrected: DROPS MOTHER-OF-PEARL BUTTON, NO 521: (5) 6-6-6-6 (7-7) pieces.

Diagram

All measurements in charts are in cm.

symbols = knitting direction
diagram
diagram
Do you have a question? See a list of frequently asked questions (FAQ)

Knitting tension is what determines the final measurements of your work, and is usually measured per 10 x 10 cm. It is provided like so: number of stitches in width x number of rows in height - eg: 19 stitches x 26 rows = 10 x 10 cm.

The knitting tension is very individual; some people knit/crochet loosely while others work tightly. You adjust the knitting tension with the needle size, which is why the suggested needle size only serve as a guide! You need to adjust this (up or down) to ensure that YOUR knitting tension matches the knitting tension provided in the pattern. If you work with a different knitting tension than provided you will have a different yarn consumption, and your work will have different measurements than what the pattern suggests.

The knitting tension also determines which yarns can replace each other. As long as you achieve the same knitting tension you can replace one yarn with another.

See DROPS lesson: How to measure your tension/gauge

See DROPS video: How to make a gauge tension swatch

The required amount of yarn is provided in grams, eg: 450 g. To calculate how many balls you’ll need you first need to know how many grams are in 1 ball (25g, 50g or 100g). This information is available if you click on the individual yarn quality on our pages. Divide the amount required with the amount of each ball. For example, if each ball is 50g (the most common amount), the calculation will be as follows: 450 / 50 = 9 balls.

The important thing when changing from one yarn to another is that the knitting/crochet tension remains the same. This is so that the measurements of the finished piece will be the same as on the sketch provided. It is easier to achieve the same knitting tension using yarns from the same yarn group. It is also possible to work with multiple strands of a thinner yarn to achieve the knitting tension of a thicker one. Please try our yarn converter. We recommend you to always work a test swatch.

Please NOTE: when changing yarn the garment might have a different look and feel to the garment in the photo, due to individual properties and qualities of each yarn.

See DROPS lesson: Can I use a different yarn than the one mentioned in the pattern?

All our yarns are categorised into yarn groups (from A to F) according to thickness and knitting tension – group A contains the thinnest yarns and group F the thickest. This makes it easier for you to find alternative yarns to our patterns, should you wish to switch yarn. All yarns within the same group have a similar knitting tension and can easily replace each other. However, different yarn qualities have different structures and properties which will give the finished work a unique look and feel.

Click here for an overview of the yarns in each yarn group

At the top of all our patterns you’ll find a link to our yarn converter, which is a helpful tool should you wish to use a different yarn than suggested. By filling in the yarn quality you wish to replace, the amount (in your size) and number of strands, the converter will present good alternative yarns with the same knitting tension. Additionally it will tell you how much you’ll require in the new qualities and whether you’ll need to work with multiple strands. Most skeins are 50g (some are 25g or 100g).

If the pattern is worked with multiple colours, every colour will have to be converted separately. Similarly, if the pattern is worked with several strands of different yarns (for example 1 strand Alpaca and 1 strand Kid-Silk) you will have to find alternatives for each, individually.

Click here to see our yarn converter

Since different yarns have different qualities and textures we have chosen to keep the original yarn in our patterns. However, you can easily find options among our available qualities by using our yarn converter, or simply pick a yarn from the same yarn group.

It is possible that some retailers still have discontinued yarns in stock, or that someone has a few skeins at home that they would like to find patterns for.

The yarn converter will provide both alternative yarn as well as required amount in the new quality.

If you think it's hard to decide what size to make, it can be a good idea to measure a garment you own already and like the size of. Then you can pick the size by comparing those measures with the ones available in the pattern's size chart.

You'll find the size chart at the bottom of the pattern.

See DROPS lesson: How to read size chart

The needle size provided in the pattern serves only as a guide, the important thing is to follow the knitting tension. And since knitting tension is very individual, you will have to adjust the needle size to ensure that YOUR tension is the same as in the pattern – maybe you’ll have to adjust 1, or even 2 needle sizes, up or down to achieve the correct tension. For this, we recommend that you work test swatches.

Should you work with a different knitting tension than the one provided, the measurements of the finished garment might deviate from the measurement sketch.

See DROPS lesson: How to measure your tension/gauge

See DROPS video: How to make a gauge tension swatch

Working a garment top-down provides more flexibility and room for personal adjustment. For example it is easier to try the garment on while working, as well as making adjustments to length of yoke and shoulder caps.

The instructions are carefully explaining every step, in the correct order. Diagrams are adjusted to the knitting direction and are worked as usual.

The diagram depicts all rows/rounds, and every stitch seen from the right side. It is read from bottom to top, from right to left. 1 square = 1 stitch.

When working back and forth, every other row is worked from the right side and every other row is worked from the wrong side. When working from the wrong side, the diagram will have to be worked reversed: from left to right, knit stitches are purled, purl stitches are knit etc.

When working in the round every round is worked from the right side and the diagram are worked from right to left on all rounds.

See DROPS lesson: How to read knitting diagrams

The diagram depicts all rows/rounds, and every stitch seen from the right side. It is worked from bottom to top, from right to left.

When working back and forth every other row is worked from the right side: from right to left and every other row is worked from the wrong side: from left to right.

When working in the round, every row in the diagram are worked from the right side, from right to left.

When working a circular diagram you start in the middle and work your way outwards, counter clockwise, row by row.

The rows usually start with a given number of chain stitches (equivalent to the height of the following stitch), this will either be depicted in the diagram or explained in the pattern.

See DROPS lesson: How to read crochet diagrams

Instructions for working several diagrams after each other on the same row/round, will often be written like so: “work A.1, A.2, A.3 a total of 0-0-2-3-4 times". This means you work A.1 once, then A.2 is worked once, and A.3 is repeated (in width) the number of times provided for your size – in this case like so: S = 0 times, M = 0 times, L=2 times, XL= 3 times and XXL = 4 times.

The diagrams are worked as usual: begin with the first row in A.1, then work the first row in A.2 etc.

See DROPS lesson: How to read knitting diagrams

See DROPS lesson: How to read crochet diagrams

The total width of the garment (from wrist-to-wrist) will be larger in the larger sizes, despite the actual sleeves being shorter. The larger sizes have longer sleeve caps and wider shoulders, so there will be a good fit in all sizes.

The measurement sketch/schematic drawing provides information regarding the full length of the garment. If it’s a jumper or a jacket the length is measured from the highest point on the shoulder (usually closest to the neckline), and straight down to the bottom of the garment. It is NOT measured from the tip of shoulder. Similarly, the length of yoke is measured from the highest point on the shoulder and down to where yoke is split into body and sleeves.

See DROPS lesson: How to read a schematic drawing

Diagrams are often repeated on the round or in height. 1 repeat is the diagram the way it appears in the pattern. If it says to work 5 repeats of A.1 in the round, then you work A.1 a total of 5 times after/next to each other in the round. If it says to work 2 repeats of A.1 vertically/in height you work the entire diagram once, then begin again at the start and work the entire diagram one more time.

Chain stitches are slightly narrower than other stitches and to avoid working the cast-on edge too tight, we simply chain more stitches to begin with. The stitch count will be adjusted on the following row to fit the pattern and measurement sketch.

The rib edge is more elastic and will contract slightly compared to, for example, stocking stitch. By increasing before the rib edge, you avoid a visible difference in width between the rib edge and the rest of the body.

It’s very easy to cast off too tightly, and by making yarn overs while casting off (and simultaneously casting these off) you avoid a too tight cast off edge.

See DROPS video: How to bind off with yarn overs (yo)

To achieve an even increase (or decrease) you can increase on, for example: every 3rd and 4th row alternately, like so: work 2 rows and increase on the 3rd row, work 3 rows and increase on the 4th. Repeat this until the increase is complete.

See DROPS lesson: Increase or decrease 1 st on every 3rd and 4th row alternately

Should you prefer to work in the round instead of back and forth, you may of course adjust the pattern. You’ll need to add steeks mid-front (usually 5 stitches), and follow the instructions. When you would normally turn and work from the wrong side, simply work across the steek and continue in the round. At the end you’ll cut the piece open, pick up stitches to work bands, and cover the cut edges.

See DROPS video: How to knit steeks and cut open

Should you prefer to work back and forth instead of in the round, you may of course adjust the pattern so you work the pieces separately and then assemble them at the end. Divide the stitches for the body in 2, add 1 edge stitch in each side (for sewing) and work the front and back pieces separately.

See DROPS lesson: Can I adapt a pattern for circular needles into straight needles?

Pattern repeats can vary slightly in the different sizes, in order to get the correct proportions. If you’re not working the exact same size as the garment in the photo, yours might deviate slightly. This has been carefully developed and adjusted so that the complete impression of the garment is the same in all sizes.

Make sure to follow instructions and diagrams for your size!

If you have found a pattern you like which is available in women’s size it’s not very difficult to convert it to men’s size. The biggest difference will be the length of sleeves and body. Start working on the women size that you think would fit across the chest. The additional length will be worked right before you cast off for the armhole/sleeve cap. If the pattern is worked top-down you can add the length right after the armhole or before the first decrease on sleeve.

Regarding additional yarn amount, this will depend on how much length you add, but it is better with a skein too many than too few.

All yarns will have excess fibres (from production) that might come off as lint or shedding. Brushed yarns (ie hairier yarns) have more of these loose, excess fibres, causing more shedding.

Shedding also depends on what is worn under or over the garment, and whether this pulls at the yarn fibres. It’s therefore not possible to guarantee that there will be no shedding

Below are some tips on how to get the best result when working with hairier yarns:

1. When the garment is finished (before you wash it) shake it vigorously so the looser hairs come off. NOTE: do NOT use a lint roller, brush or any method that pulls at the yarn.

2. Place the garment in a plastic bag and put it in your freezer - the temperature will cause the fibres to become less attached to each other, and excess fibres will come off easier.

3. Leave in the freezer for a few hours before taking it out and shaking it again.

4. Wash the garment according to the instructions on the yarn label.

Pilling is a natural process that happens to even the most exclusive of fibers. It's a natural sign of wear and tear that is hard to avoid, and that is most visible in high friction areas of your garment like a sweater's arms and cuffs.

You can make your garment look as new by removing the pilling, using a fabric comb or a pill/lint remover.

Still can't find the answer you need? Then scroll down and leave your question so one of our experts can try to help you. This will be done normally within 5 to 10 working days.
In the meantime, you can read the questions and answers that others have left to this pattern or join the DROPS Workshop on Facebook to get help from fellow knitters/crocheters!

You might also like...

Post a comment to pattern DROPS Baby 25-26

We would love to hear what you have to say about this pattern!

If you want to leave a question, please make sure you select the correct category in the form below, to speed up the answering process. Required fields are marked *.

Comments / Questions (25)

country flag Julia wrote:

Bonsoir ! Je suis coincée à ce niveau : "à la fin de chaque rang sur le côté les mailles pour la manche ainsi : (5) 5-5-4-4 (4-5) fois 2 m, (2) 2-2-3-3 (4-5) fois 4 m et 1 fois (13) 22-30-33-40 (46-51) m = (55) 67-77-84-94 (106-120) m." Est-ce que cela signifie que je rajoute les mailles sur le rang endroit et tricote le rang envers sans ajout, ou je me trompe ? Merci par avance !

20.04.2021 - 23:11

DROPS Design answered:

Bonjour Julia, pour les devants, vous montez les mailles effectivement uniquement en fin de rang côté manche, donc un seul côté, après avoir monté ces mailles pour la manche, tournez, tricotez le rang suivant sur les nouvelles mailles + les autres comme avant, tournez et tricotez le rang suivant comme avant + montez les nouvelles mailles en fin de rang. Continuez ainsi jusqu'à ce que toutes les mailles de la manche ont été montées. Pour le devant droit, vous montez les mailles en fin de rang sur l'endroit, pour le devant gauche, vous les monterez en fin de rang sur l'envers. Bon tricot!

21.04.2021 - 07:58

country flag Sylvia wrote:

I don't understand where says dec for leg opening until there 14sts then says remain on row 17sts

22.03.2020 - 23:36

DROPS Design answered:

Dear Sylvia, in the 3rd size you decrease 1 stitch at the beg of each row (both from RS and from WS) until 14 stitches remain. In other words, you will decrease 17 sts on each side = 48 sts - 17 sts decreased at the beg of RS rows - 17 sts decreased at the beg of WS rows = 14 sts remain. Happy knitting!

23.03.2020 - 11:18

country flag Letizia wrote:

Buongiorno, Sto lavorando la parte destra davanti, a 15 cm de lavoro devo avviare nuove maglie per la manica. C’è scritto di aggiustare il lavoro in modo che il ferro successivo sia lavorato sul diritto, non riesco a capire se gli aumenti li faccio sul rovescio o sul diritto? Grazie:)

26.12.2019 - 09:24

DROPS Design answered:

Buongiorno Letizia. Dipende dal metodo che usa per avviare le maglie. Le alleghiamo un video che può aiutarla. Se usa il primo metodo, sul davanti destro, avvia le maglie sul diritto del lavoro; con il secondo metodo le avvia sul rovescio. Buon lavoro!

27.12.2019 - 08:35

country flag Letizia wrote:

Grazie mille della risposta tempestiva!

24.12.2019 - 18:44

country flag Letizia wrote:

Buongiorno:) Sto per iniziare questo modello e mi chiedevo se l’uso dei Ferri circolari è indispensabile o se posso utilizzare dei Ferri normali. Grazie:)

23.12.2019 - 23:08

DROPS Design answered:

Buonasera Letizia, questo modello è lavorato in piano, quindi può procedere anche con i ferri dritti. Buon lavoro!

24.12.2019 - 17:57

country flag Uschi wrote:

Hallo, woe hält denn die Windelklappe an der Vorderen Seite? Liegt sie nur auf? LG

12.07.2019 - 11:48

DROPS Design answered:

Liebe Uschi, mit 3 Knöpfe wird die Windelklappe halten: der mittlere Knopf ist der vom rechten vorderteil, und dann nähen Sie 1 Knopf auf beiden Seiten (je auf einem Vorderteil) - siehe auch Maßskizze. Viel Spaß beim stricken!

12.07.2019 - 13:14

country flag Uschi wrote:

Hallo, reichen 150 gr, wenn ich keine Streifen arbeiten möchte? LG Uschi

18.03.2019 - 14:20

DROPS Design answered:

Liebe Uschi, da dieses Modell mit Streifen gestrickt wurde, haben wir leider keine Erfahrung um die Menge ohne Streifen, am besten kalkulieren Sie die beiden Farben = 150-200-250 g je nach der Größe. Viel Spaß beim stricken!

18.03.2019 - 15:29

country flag Patricia wrote:

Pas de réponse !!!

10.06.2017 - 09:43

DROPS Design answered:

Bonjour Patricia, votre réflexion a bien été transmise, nous vous remercions d'avance pour votre patience. Bon tricot!

12.06.2017 - 10:22

country flag Patricia wrote:

Merci pour votre réponse mais elle ne répond pas à ma question ! Je suis d'accord pour les 7 boutonnières mais pas pour le nombre de boutons. Si nous suivons vos explications, nous utilisons deux boutonnières, pour un seul bouton. Logiquement donc, il ne faut acheter que 6 boutons. J'aimerais que vous me le confirmiez s'il vous plaît et le cas échéant, que vous corrigiez le modèle pour éviter les erreurs. Merci

06.06.2017 - 16:21

country flag Patricia wrote:

Bonjour, me revoilà ! j'ai fini le tricot en 6/9 mois et j'en suis à coudre les boutons. Vous indiquez 7 boutons mais il n'y a que 6 boutonnières d'utilisées d'après ce que je déduis. Où va le dernier bouton s'il vous plaît ? Merci

06.06.2017 - 14:02

DROPS Design answered:

Bonjour Patricia, on ouvre 4 boutonnières sur le devant (à 8, 14, 20 et 25 cm) + 3 boutonnières sur le rabat. Bon tricot!

06.06.2017 - 15:10