
Looking for a yarn?


Comments / Questions (51)
![]() Elizabeth Fletcher wrote:
Elizabeth Fletcher wrote:
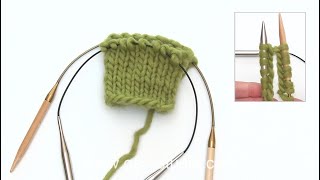
Can you explain the edge of the shawl. It says 4 round needle 80 cms long. How do I knit it ? Do I need a 5th Round needle to knit on too.
13.03.2025 - 18:36DROPS Design answered:
Dear Mrs Fletcher, no not necessary as you can use the end tip of the circular needle to work the stitches at the beginning of the same needle. Happy knitting!
14.03.2025 - 07:28
![]() Connie Hansen wrote:
Connie Hansen wrote:
Skal jeg strikke hver side for sig eller alle fire sider på econ gang
16.01.2025 - 10:57DROPS Design answered:
Hej Connie, du strikker alle 4 sider på en gang rundt på rundpinde :)
16.01.2025 - 14:47
![]() Bente Sørensen wrote:
Bente Sørensen wrote:
Kan man strikke med en rundpind hvis kablet er langt nok til alle masker :)
04.09.2024 - 07:21DROPS Design answered:
Hej Bente, tror ikke maskerne når rundt... :)
06.09.2024 - 12:50
![]() Jane wrote:
Jane wrote:
Når jeg skal strikke retpinden står der jeg skal slå om mel 1 og 2 maske men det viser mønsteret ikke den viser det ved vrangpinden og masker passer ikke
10.07.2024 - 08:57DROPS Design answered:
Hei Jane. Fint om du kan opplyse hvor i oppskriften / diagrammet du er, så er det lettere for oss å hjelpe deg. mvh DROPS Design
10.07.2024 - 12:59
![]() Anke Keil wrote:
Anke Keil wrote:
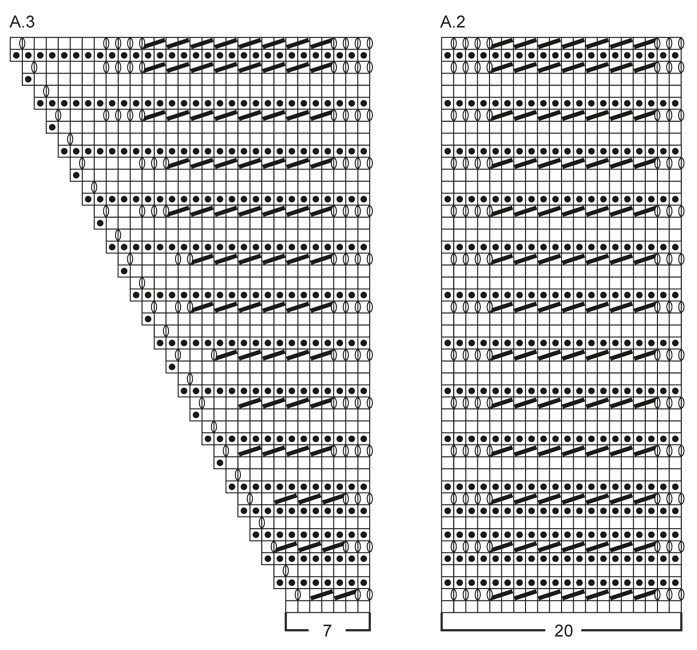
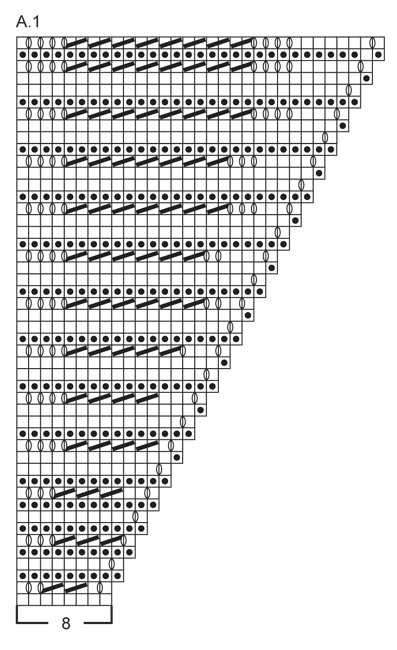
Hallo, ich habe das Diagramm begonnen. Nachdem ich A2 über 140 Maschen gestrickt habe, dann noch die 7 Maschen von A3, soll man ja im Muster weiterstricken. Heißt das, A1, A2 und A3 immer wiederholen oder A1 nur am Anfang und A3 nur am Ende der Reihe und alle übrigen Maschen A2 stricken? Ich rede von den Maschen auf jeweils einer Rundnadel. Man hat doch nur Hinreihen, weil auf Rundnadeln gestrickt wird? Ich freue mich auf eine Antwort. L. G...Anke
12.06.2024 - 00:47DROPS Design answered:
Liebe Frau Keil, A.2 wird an den Seiten gestrickt, in die Ecken stricken Sie A.1 (am Anfang der Runde), dann wiederholen Sie A.2 bis die nächste Ecke, dann stricken Sie A.3 (7 M bei der 1. Reihe), dann an die nächste Seite stricken Sie: A.1, dann wiederholen Sie A.2 und enden Sie die Seite mit A.3 und so stricken Sie an allen Seiten. Viel Spaß beim Stricken!
12.06.2024 - 08:29
![]() Pia Larsen wrote:
Pia Larsen wrote:
Hej: Skal man ikke bruge 5 rundpinde når man strikker kanten? ellers kan jeg ikke se hvordan man kan strikke den, da man bruger 4 pinde til kantmasker, så mangler der en til at strikke med.
07.06.2024 - 09:05DROPS Design answered:
Hei Pia. Om du ønsker å ha en rundpinne for hver side, kan du fint bruke 5 rundpinner. Men du trenger bare 3 +1 rundpinne for å strikke teppet, når man tenker på antall masker og hvor stort det blir. mvh DROPS Design
10.06.2024 - 12:52
![]() Gitte wrote:
Gitte wrote:
Jeg syntes ikke at jeg kan få maske antallet til at passe enten har jeg for mange eller forladt i hver ende . Ved godt at jeg tager ud først og sidst i mønsteret.
13.03.2022 - 09:30DROPS Design answered:
Hej Gitte, sæt et mærke imellem hver rapport, så bliver det lettere at se om du får alle omslag og indtagninger med. God fornøjelse!
15.03.2022 - 14:55
![]() Theresa Wittmann wrote:
Theresa Wittmann wrote:
Hallo, müssen die Umschläge bei den Diagrammen A1/A2/A3 jeweils in der dritten Reihe links verschränkt gestrickt werden? Über Hilfe wäre ich sehr dankbar! Viele Grüße, Theresa W.
12.08.2021 - 17:34DROPS Design answered:
Liebe Frau Wittmann, nein die Umschläge in den Diagrammen gehören zum Lochmuster, dh die werden bei der nächsten Reihe "normal" (= nicht verschränkt) gestrickt. Viel Spaß beim stricken!
13.08.2021 - 07:18
![]() Elin wrote:
Elin wrote:
Hei. Så flott teppe! Jeg vurderer å strikke rettstrikk istedenfor riller. Burde det gå bra så lenge jeg passer på at jeg får 52 cm på hver side?
25.05.2021 - 09:49DROPS Design answered:
Hei Elin, Ja, det burde gå helt fint. God fornøyelse!
26.05.2021 - 07:40
![]() Deborah Phillips wrote:
Deborah Phillips wrote:
What ply wool can I use for this pattern
03.04.2021 - 19:33DROPS Design answered:
Dear Deboray, this pattern is designed for the DROPS Baby Merino yarn (50 g = approx 175 m), which can be substituted for most of the yarn group A (of DROPS yarns). For the substitution you can use our yarn converter yarn coverter HERE . Happy Knitting!
03.04.2021 - 19:45
|
|||||||||||||
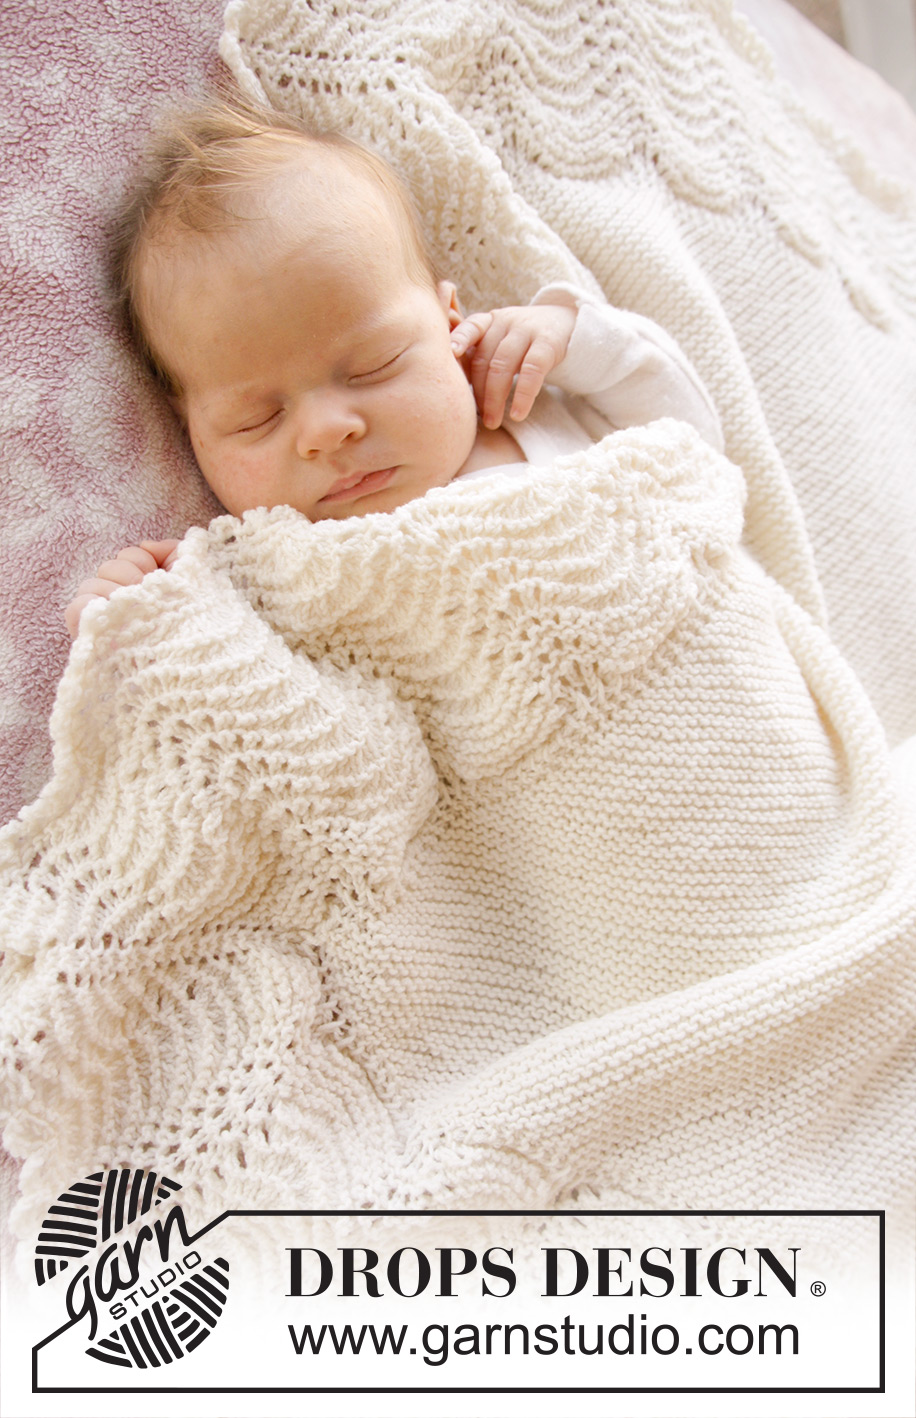
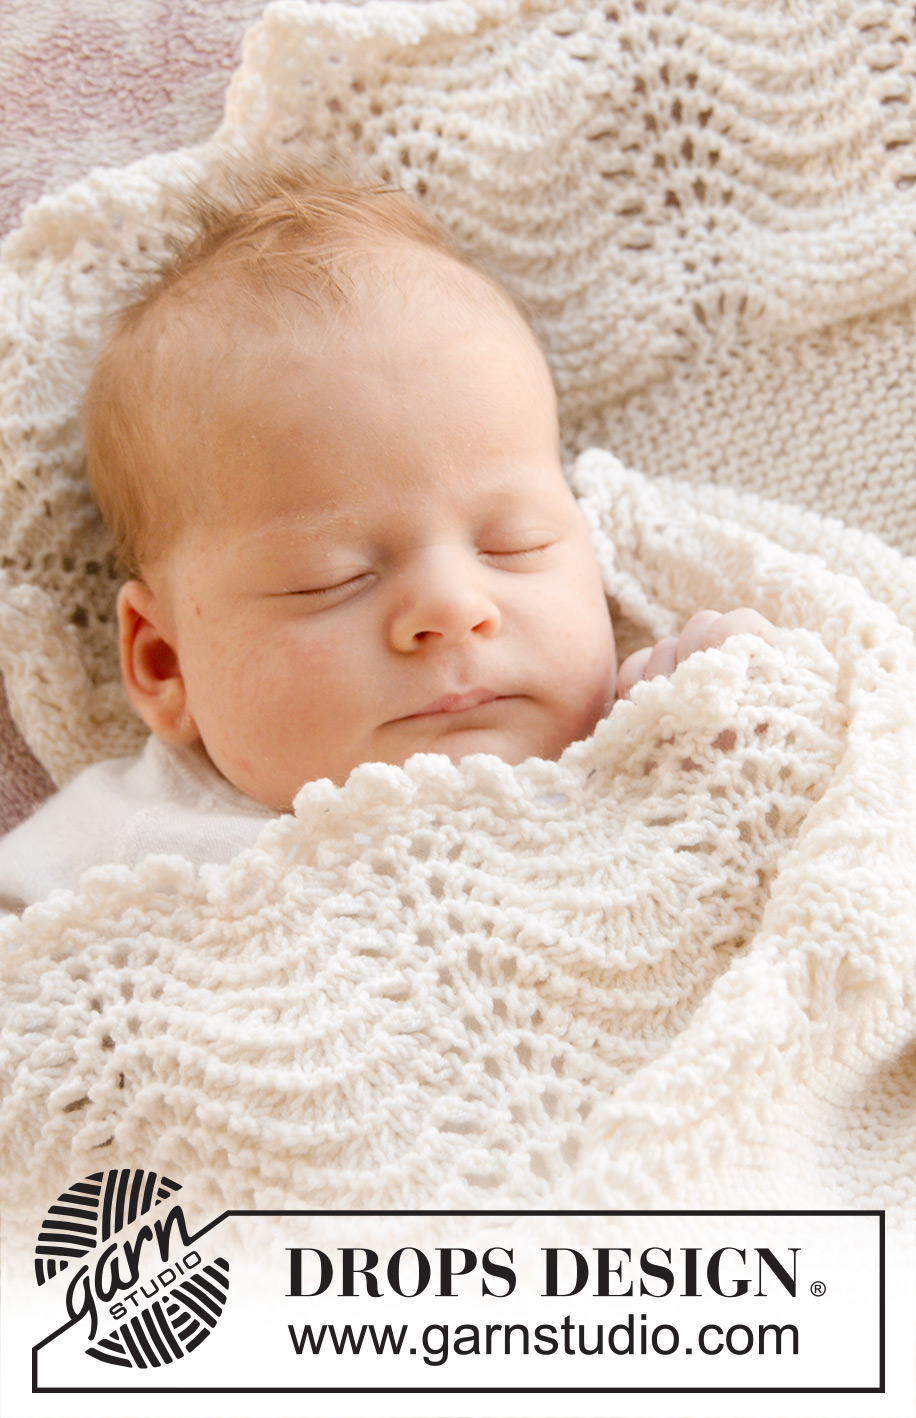
Baby Bliss#babyblissblanket |
|||||||||||||
 |
 |
||||||||||||
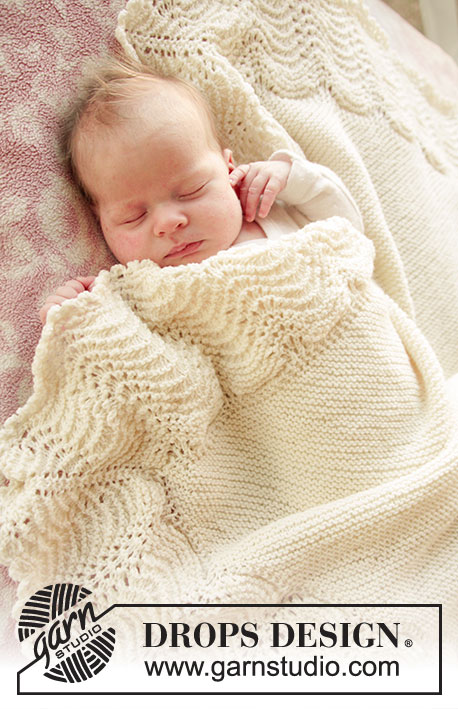
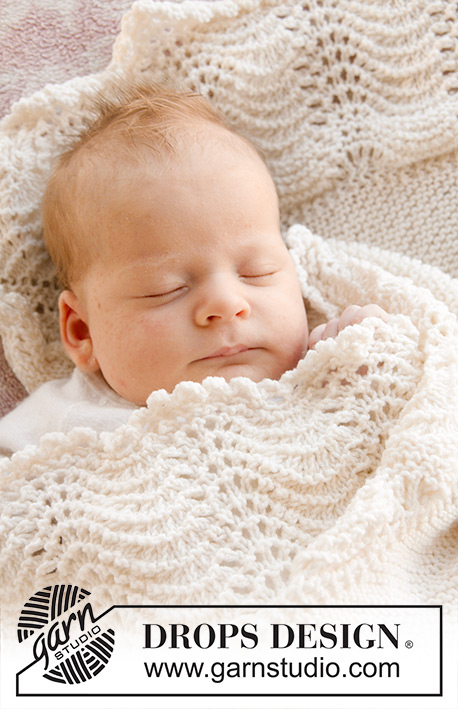
Knitted baby blanket in garter st with wave pattern edge in DROPS BabyMerino
DROPS Baby 25-2 |
|||||||||||||
|
GARTER ST (back and forth on circular needle): K all rows. 1 ridge = K2 rows. PATTERN: See diagrams A.1 to A.3. ---------------------------------------------------------- BLANKET: Worked back and forth on circular needle. Work diagonally from corner to corner, then work edge in Wave pattern in the round on circular needle - NOTE: Because of no of sts use 1 circular needle on each of the 4 sides on blanket. Cast on 3 sts on circular needle size 4 mm / US 6 with Baby Merino. K 1 row. Then work in GARTER ST - see explanation above, AT THE SAME TIME inc as follows at beg of every row: K 1, K 2 in next st and K the rest of row, turn piece. Continue back and forth like this. REMEMBER THE GAUGE! When 76 ridges have been worked (= 155 sts on needle), blanket measures 52 cm / 20½" along each of the 2 sides. Then dec at beg of each row as follows: K 1, K 2 tog, K the rest of row, turn piece. Continue like this until 3 sts remain on needle, slip 1 st as if to K, K 2 tog, psso. Cut the yarn, pull it through st and fasten. Blanket measures 52 cm / 20½" along each of the 4 sides. EDGE IN WAVE PATTERN: Beg in the mid of a corner on blanket and pick up from RS on circular needle size 4 mm / US 6 with off white as follows: * Pick up 1 st in the corner, pick up 1 st at the edge in every ridge and make 1 YO between every st until next corner, pick up 1 st in the corner * = 155 sts along one side of blanket. Beg with next circular needle and repeat from *-* along next side on blanket – Note: When picking up like this there will be 2 sts in each corner. Repeat the same way along the next 2 sides on blanket = 620 sts distributed on 4 circular needles. K 1 round (= 1st round in diagram). Work next round as follows: * Work A.1 (= 8 sts), repeat A.2 over the next 140 sts and work A.3 (= 7 sts) *, repeat from *-* along all 4 sides. Continue pattern like this. When last round in A.1, A.2 and A.3 remains, edge measures approx. 13 cm / 5". Work last round in A.1, A.2 and A.3 AT THE SAME TIME LOOSELY bind off - outer edge will bend according to pattern. CROCHET EDGE: Read US/UK above! Work a finishing edge around the entire blanket on hook size 4 mm / G/6 with off white as follows: Work 1 sc in st before the 2 sts in a corner, ch 4, 1 dc in first ch worked, skip the 2 sts in the corner, 1 sc in next st, * ch 4, 1 dc in first ch worked, skip approx. 2 sts, 1 sc in next st *, repeat from *-* around the entire blanket but make sure that a "loop" is in every corner, finish round with 1 sl st in first sc from beg of round. Fasten off. |
|||||||||||||
Diagram explanations |
|||||||||||||
|
|||||||||||||
|
|||||||||||||
|
|||||||||||||
Have you finished this pattern?Tag your pictures with #dropspattern #babyblissblanket or submit them to the #dropsfan gallery. Do you need help with this pattern?You'll find 17 tutorial videos, a Comments/Questions area and more by visiting the pattern on garnstudio.com. © 1982-2025 DROPS Design A/S. We reserve all rights. This document, including all its sub-sections, has copyrights. Read more about what you can do with our patterns at the bottom of each pattern on our site. |
|||||||||||||


With over 40 years in knitting and crochet design, DROPS Design offers one of the most extensive collections of free patterns on the internet - translated to 17 languages. As of today we count 314 catalogs and 11822 patterns - 11812 of which are translated into English (US/in).
We work hard to bring you the best knitting and crochet have to offer, inspiration and advice as well as great quality yarns at incredible prices! Would you like to use our patterns for other than personal use? You can read what you are allowed to do in the Copyright text at the bottom of all our patterns. Happy crafting!
Post a comment to pattern DROPS Baby 25-2
We would love to hear what you have to say about this pattern!
If you want to leave a question, please make sure you select the correct category in the form below, to speed up the answering process. Required fields are marked *.