
Looking for a yarn?


Comments / Questions (69)
![]() Snodia Shoko wrote:
Snodia Shoko wrote:
Nice drops
13.06.2025 - 20:05
![]() Marianne wrote:
Marianne wrote:
Hej. Har et spørgsmål til blomsten jeg forstår ikke 6. Omg at det skal vendes. Hvordan skal jeg forstå det da jeg synes blomsten bliver underlig hvis jeg prøver.. tak for et dejlig mønster.
01.03.2025 - 23:41DROPS Design answered:
Hej Marianne, kan du vælge en blomst med video - se her: Video - hæklede blomster
06.03.2025 - 14:49
![]() Loup wrote:
Loup wrote:
Que veut dire mc svp merçi
20.02.2025 - 19:40DROPS Design answered:
Bonjour Mme Loup, voici la liste des abréviations utilisées dans ce modèle: mc = maille coulée / ms = maille serrée / ml = maille en l'air / B = bride / DB = double-bride. Bon crochet!
21.02.2025 - 09:43
![]() Geneva Ricks wrote:
Geneva Ricks wrote:
I need to make this for a 4-5 year, how many stitches would I need to subtractions? It’s be a long while since I have crocheted 😬 Thanks
25.10.2024 - 21:08DROPS Design answered:
Dear Geneva, the poncho starts with a chain stitch difference of 10 between the sizes. So, since the smallest size is 88 stitches, you could try working a starting chain of 78 stitches and check if it fits. You could also try if the smallest size fits, since it's a 5/7 size for the neck edge. Then, just continue working the rounds until you reach your desired length. Happy crochetting!
27.10.2024 - 18:58
![]() Carmen Jones wrote:
Carmen Jones wrote:
So when pattern says 3-3-4 what do I do I don't understand
12.08.2024 - 18:15DROPS Design answered:
Hi Carmen, this instruction means that you need to crochet pattern repeat 3-3-4 times. Work the pattern that is written between the asterisks ( * - * ) 3 times or 4 times in a row, depending on what size you are crocheting (for size 5/7 years - 8/10 years crochet 3 times, for size 12/14 years crochet 4 times). Happy crocheting!
13.08.2024 - 07:39
![]() Carmen Jones wrote:
Carmen Jones wrote:
Not sure what 3-3-4 of stiches
12.08.2024 - 18:12DROPS Design answered:
Hi Carmen, there is no info about 3-3-4 sts, but about how many times you need to repeat pattern.
13.08.2024 - 07:33
![]() Rhonda Bartee wrote:
Rhonda Bartee wrote:
I'm crocheting the flower for the front of the Little Sofie poncho and I'm at row 4 and I'm totally confused on how to proceed. Could you please explain so I will understand? Thank you
23.03.2024 - 07:23DROPS Design answered:
Dear Rhonda, round 3 are the upper petals. Now you need to work inside the base of the flower (in round 2) so that the round 4 stitches are behind the round 3 stitches but connected to the 2nd round stitches. Then, you work round 5 as the new petals. So, after finishing the petals you won't work over the petal edges of the flower but rather you start again from the center (round 2) and continue working behind the previous petals, working 3 sets of petals in total. You can also check out a similar flower in the following video: https://www.garnstudio.com/video.php?id=1792&lang=en and pattern with charts: https://www.garnstudio.com/pattern.php?id=11652&cid=19. Happy crochetting!
25.03.2024 - 00:18
![]() Carmen Jones wrote:
Carmen Jones wrote:
The pattern for little girls poncho I not sure when it says 4-4-5 what does it mean
06.03.2024 - 23:15DROPS Design answered:
Hi Carmen, The series of numbers corresponds to the 3 different sizes, so if you are working size 5/7 years you always work according to the first number in each series. Happy crafting!
07.03.2024 - 07:07
![]() Marité wrote:
Marité wrote:
Bonjour, est-ce possible d'avoir le diagramme du poncho ? Merci
28.12.2021 - 21:37DROPS Design answered:
Bonjour Marité, il n'est pas disponible. Comment crocheter des rayures façon "granny" vous trouverez ICI. Bon crochet!
29.12.2021 - 15:31
![]() Anna wrote:
Anna wrote:
Non mi è chiaro se l'altezza del lavoro va presa dalla punta in basso alla spalla o dalla punta in alto a quella in basso. Per il cambio colore con uncinetto il vostro video mostra di girare il lavoro ma le istruzioni di questo lavoro non dicono di girarlo. Avete altro video che spiega?
26.09.2021 - 18:17DROPS Design answered:
Buonasera Anna. la prima misura è quella dal collo alla fine delle spalla .Buon lavoro!
26.09.2021 - 21:11
|
|||||||||||||||||||
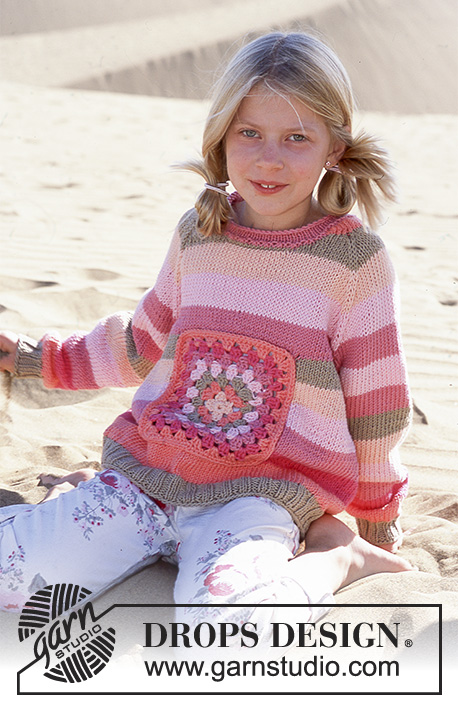
Little Sophie |
|||||||||||||||||||
|
|
|||||||||||||||||||
DROPS Girl’s Crocheted Poncho in Paris with blossom in Safran
DROPS 89-6 |
|||||||||||||||||||
|
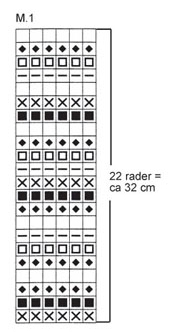
PONCHO: Crochet gauge: 4 dc-groups in width and 7 rows in height = approx. 10 x 10 cm. Stripe Pattern: See chart. 1 row of the chart = 1 crochet row. Crochet info (for points at center front and center back: increased dc-group = 3 dc, ch 1, 3 dc in the same ch-loop. Crochet tips: When changing colors, crochet over the ends of the last color and the new color to fasten them. Poncho: The poncho is crocheted from the neck down. Ch 88-98-108 with hot pink (the chain should measure approx. 54-57-61 cm) and join into a ring with 1 sl st. 1st row: 1 sc in each ch and finish with 1 sl st in 1st sc at start of row = 88-98-108 sc. Follow crochet instructions below in stripes on chart, starting at bottom of chart. 2nd row: The start of the row will be one side (shoulder). Ch 3 (= 1 dc), 1 dc in each of the next 2 sc, ch 1, skip over 2 sc, * 1 dc in each of the next 3 sc, ch 1, skip over 2 sc *, repeat * - * a total of 3-3-4 times (= 4-4-5 dc-groups), 3 dc in the next sc, ch 1 (= center front point), 3 dc in the next sc, ch 1, skip over 2 sc, * 1 dc in each of the next 3 sc, ch 1, skip over 2 sc *, repeat * - * a total of 8-9-10 times, 3 dc in the next sc, ch 1 (= center back point), 3 dc in the next sc, ch 1, skip over 2 sc, * 1 dc in each of the next 3 sc, ch 1, skip over 2 sc *, repeat * - * a total of 4-5-5 times and finish with 1 sl st in ch 3 at start of row = 8-9-10 dc-groups between each point. Then 1 sl st in each of the first 2 dc and the first ch-loop. 3rd row: Ch 3, 2 dc in same ch-loop, ch 1, * 3 dc in the next ch-loop, ch 1 *, repeat * - * a total of 3-3-4 times, crochet an increased dc-group (see instructions above) in ch-loop at center front point, ch 1, * 3 dc in the next ch-loop, ch 1 *, repeat * - * a total of 9-10-11 times, crochet an increased dc-group in ch-loop at center back point, ch 1, * 3 dc in the next ch-loop, ch 1 *, repeat * - * a total of 5-6-6 times and finish with 1 sl st in ch 3 at start of row = 9-10-11 dc-groups between each point. Then 1 sl st in each of the first 2 dc and the first ch-loop. From 4th row to finished measurements: Continue in the same manner as 3rd row – there will be 1 dc-group more between each point after every row. When the piece measures approx. 32-37-44 cm from neck along shoulder (= approx. 22-26-31 rows) – or to desired length – cut yarn and fasten. The piece measures approx. 44-52-62 cm from neck down at center front. BLOSSOM: Materials: SAFRAN Small amount nr 02, pink DROPS 3 mm [US C] crochet hook, or size needed to obtain correct gauge. Crocheted blossom: Ch 4 with Safran and join into a ring with 1 sl st. 1st row: 6 sc in ring, finish with 1 sl st in 1st sc. 2nd row: 1 sc in first sc, * ch 3, 1 sc in the next sc *, repeat * - * a total of 5 times and finish with ch 3 and 1 sl st in first sc at start of row = 6 ch-loops. Ch 1, turn piece and crochet from back side. 3rd row: Crochet as follows in each ch-loop: 1 sc, ch 1, 3 dc, ch 1, 1 sc, finish with 1 sl st in 1st sc at start of row. 4th row: * 1 sc in sc from 2nd row (crochet on back side of petal around sts from previous row, pull yarn tight), ch 4 *, repeat * - * a total of 6 times and finish with 1 sl st in 1st sc at start of row. 5th row: Ch 1, crochet as follows in each ch-loop: 1 sc, ch 1, 5 dc, ch 1, 1 sc, finish with 1 sl st in 1st sc at start of row. 6th row: * 1 sc in sc from 4th row (crochet on back side of the 2 petals around sts from previous row, pull yarn tight), ch 5 *, repeat * - * a total of 6 times and finish with 1 sl st in 1st sc at start of row. 7th row: Ch 1, crochet as follows in each ch-loop: 1 sc, ch 1, 1 dc, 5 tc, 1 dc, ch 1, 1 sc, finish with 1 sl st in 1st sc at start of row. Cut yarn and fasten – sew a small safety pin to back. |
|||||||||||||||||||
Diagram explanations |
|||||||||||||||||||
|
|||||||||||||||||||
|
|||||||||||||||||||
Have you finished this pattern?Tag your pictures with #dropspattern or submit them to the #dropsfan gallery. Do you need help with this pattern?You'll find 12 tutorial videos, a Comments/Questions area and more by visiting the pattern on garnstudio.com. © 1982-2025 DROPS Design A/S. We reserve all rights. This document, including all its sub-sections, has copyrights. Read more about what you can do with our patterns at the bottom of each pattern on our site. |
|||||||||||||||||||


With over 40 years in knitting and crochet design, DROPS Design offers one of the most extensive collections of free patterns on the internet - translated to 17 languages. As of today we count 314 catalogs and 11822 patterns - 11812 of which are translated into English (US/in).
We work hard to bring you the best knitting and crochet have to offer, inspiration and advice as well as great quality yarns at incredible prices! Would you like to use our patterns for other than personal use? You can read what you are allowed to do in the Copyright text at the bottom of all our patterns. Happy crafting!
Post a comment to pattern DROPS 89-6
We would love to hear what you have to say about this pattern!
If you want to leave a question, please make sure you select the correct category in the form below, to speed up the answering process. Required fields are marked *.