DROPS Paris
DROPS Paris
100% Cotton
from 1.60 $ /50g
DROPS Safran
DROPS Safran
100% Cotton
from 2.05 $ /50g
Get the yarn to make this pattern from 14.40$.

The yarn cost is calculated from the pattern’s smallest size and the yarn’s cheapest product type. Looking for an even better price? You might find it on the DROPS Deals!

DROPS SS24
DROPS 89-6
PONCHO:

Sizes: 5/7 years - 8/10 years - 12/14 years

Length at center front: approx. 44 - 52 - 62 cm
[17.25" - 20.5" - 24-3/8"]

Materials: DROPS PARIS
100-150-150 gr nr 27, peach
100-100-150 gr nr 26, beige
100-100-100 gr nr 01, apricot
50-100-100 gr nr 06, hot pink
50 - 50-100 gr nr 33, pink
50 - 50 - 50 gr nr 20, light pink

DROPS 5 mm [US H] crochet hook, or size needed to obtain correct gauge.

-------------------------------------------------------

Alternative Yarn – See how to change yarns here
Yarn Groups A to F – Use the same pattern and change the yarn here
Yarn usage using an alternative yarn – Use our yarn converter here

-------------------------------------------------------

DROPS Paris
DROPS Paris
100% Cotton
from 1.60 $ /50g
DROPS Safran
DROPS Safran
100% Cotton
from 2.05 $ /50g
Get the yarn to make this pattern from 14.40$.

The yarn cost is calculated from the pattern’s smallest size and the yarn’s cheapest product type. Looking for an even better price? You might find it on the DROPS Deals!

Pattern instructions

NOTE: This pattern is written in American English. All measurements in charts are in cm. For conversion from inches to cm - click here. There are different terms for crocheting in American and British English. If this pattern includes crochet, click for "crochet terms" here. For this pattern in British English, please click here.
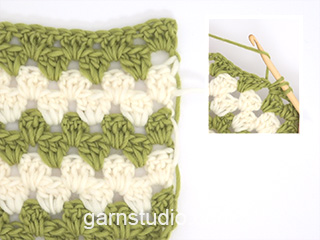
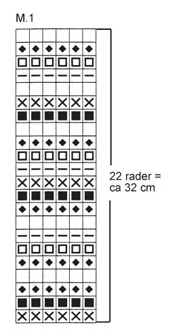
PONCHO:

Crochet gauge: 4 dc-groups in width and 7 rows in height = approx. 10 x 10 cm.

Stripe Pattern: See chart. 1 row of the chart = 1 crochet row.

Crochet info (for points at center front and center back: increased dc-group = 3 dc, ch 1, 3 dc in the same ch-loop.

Crochet tips: When changing colors, crochet over the ends of the last color and the new color to fasten them.

Poncho: The poncho is crocheted from the neck down. Ch 88-98-108 with hot pink (the chain should measure approx. 54-57-61 cm) and join into a ring with 1 sl st.

1st row: 1 sc in each ch and finish with 1 sl st in 1st sc at start of row = 88-98-108 sc. Follow crochet instructions below in stripes on chart, starting at bottom of chart.

2nd row: The start of the row will be one side (shoulder). Ch 3 (= 1 dc), 1 dc in each of the next 2 sc, ch 1, skip over 2 sc, * 1 dc in each of the next 3 sc, ch 1, skip over 2 sc *, repeat * - * a total of 3-3-4 times (= 4-4-5 dc-groups), 3 dc in the next sc, ch 1 (= center front point), 3 dc in the next sc, ch 1, skip over 2 sc, * 1 dc in each of the next 3 sc, ch 1, skip over 2 sc *, repeat * - * a total of 8-9-10 times, 3 dc in the next sc, ch 1 (= center back point), 3 dc in the next sc, ch 1, skip over 2 sc, * 1 dc in each of the next 3 sc, ch 1, skip over 2 sc *, repeat * - * a total of 4-5-5 times and finish with 1 sl st in ch 3 at start of row = 8-9-10 dc-groups between each point.
Then 1 sl st in each of the first 2 dc and the first ch-loop.

3rd row: Ch 3, 2 dc in same ch-loop, ch 1, * 3 dc in the next ch-loop, ch 1 *, repeat * - * a total of 3-3-4 times, crochet an increased dc-group (see instructions above) in ch-loop at center front point, ch 1, * 3 dc in the next ch-loop, ch 1 *, repeat * - * a total of 9-10-11 times, crochet an increased dc-group in ch-loop at center back point, ch 1, * 3 dc in the next ch-loop, ch 1 *, repeat * - * a total of 5-6-6 times and finish with 1 sl st in ch 3 at start of row = 9-10-11 dc-groups between each point.
Then 1 sl st in each of the first 2 dc and the first ch-loop.

From 4th row to finished measurements: Continue in the same manner as 3rd row – there will be 1 dc-group more between each point after every row.
When the piece measures approx. 32-37-44 cm from neck along shoulder (= approx. 22-26-31 rows) – or to desired length – cut yarn and fasten. The piece measures approx. 44-52-62 cm from neck down at center front.


BLOSSOM:

Materials: SAFRAN
Small amount nr 02, pink

DROPS 3 mm [US C] crochet hook, or size needed to obtain correct gauge.

Crocheted blossom: Ch 4 with Safran and join into a ring with 1 sl st.

1st row: 6 sc in ring, finish with 1 sl st in 1st sc.

2nd row: 1 sc in first sc, * ch 3, 1 sc in the next sc *, repeat * - * a total of 5 times and finish with ch 3 and 1 sl st in first sc at start of row = 6 ch-loops. Ch 1, turn piece and crochet from back side.

3rd row: Crochet as follows in each ch-loop: 1 sc, ch 1, 3 dc, ch 1, 1 sc, finish with 1 sl st in 1st sc at start of row.

4th row: * 1 sc in sc from 2nd row (crochet on back side of petal around sts from previous row, pull yarn tight), ch 4 *, repeat * - * a total of 6 times and finish with 1 sl st in 1st sc at start of row.

5th row: Ch 1, crochet as follows in each ch-loop:
1 sc, ch 1, 5 dc, ch 1, 1 sc, finish with 1 sl st in 1st sc at start of row.

6th row: * 1 sc in sc from 4th row (crochet on back side of the 2 petals around sts from previous row, pull yarn tight), ch 5 *, repeat * - * a total of 6 times and finish with 1 sl st in 1st sc at start of row.

7th row: Ch 1, crochet as follows in each ch-loop:
1 sc, ch 1, 1 dc, 5 tc, 1 dc, ch 1, 1 sc, finish with 1 sl st in 1st sc at start of row.

Cut yarn and fasten – sew a small safety pin to back.

Diagram

All measurements in charts are in cm.

symbols = no 06, hot pink
symbols = no 1, apricot
symbols = no 27, peach
symbols = no 26, beige
symbols = no 20, light pink
symbols = no 33, pink
diagram
Do you have a question? See a list of frequently asked questions (FAQ)

Knitting tension is what determines the final measurements of your work, and is usually measured per 10 x 10 cm. It is provided like so: number of stitches in width x number of rows in height - eg: 19 stitches x 26 rows = 10 x 10 cm.

The knitting tension is very individual; some people knit/crochet loosely while others work tightly. You adjust the knitting tension with the needle size, which is why the suggested needle size only serve as a guide! You need to adjust this (up or down) to ensure that YOUR knitting tension matches the knitting tension provided in the pattern. If you work with a different knitting tension than provided you will have a different yarn consumption, and your work will have different measurements than what the pattern suggests.

The knitting tension also determines which yarns can replace each other. As long as you achieve the same knitting tension you can replace one yarn with another.

See DROPS lesson: How to measure your tension/gauge

See DROPS video: How to make a gauge tension swatch

The required amount of yarn is provided in grams, eg: 450 g. To calculate how many balls you’ll need you first need to know how many grams are in 1 ball (25g, 50g or 100g). This information is available if you click on the individual yarn quality on our pages. Divide the amount required with the amount of each ball. For example, if each ball is 50g (the most common amount), the calculation will be as follows: 450 / 50 = 9 balls.

The important thing when changing from one yarn to another is that the knitting/crochet tension remains the same. This is so that the measurements of the finished piece will be the same as on the sketch provided. It is easier to achieve the same knitting tension using yarns from the same yarn group. It is also possible to work with multiple strands of a thinner yarn to achieve the knitting tension of a thicker one. Please try our yarn converter. We recommend you to always work a test swatch.

Please NOTE: when changing yarn the garment might have a different look and feel to the garment in the photo, due to individual properties and qualities of each yarn.

See DROPS lesson: Can I use a different yarn than the one mentioned in the pattern?

All our yarns are categorised into yarn groups (from A to F) according to thickness and knitting tension – group A contains the thinnest yarns and group F the thickest. This makes it easier for you to find alternative yarns to our patterns, should you wish to switch yarn. All yarns within the same group have a similar knitting tension and can easily replace each other. However, different yarn qualities have different structures and properties which will give the finished work a unique look and feel.

Click here for an overview of the yarns in each yarn group

At the top of all our patterns you’ll find a link to our yarn converter, which is a helpful tool should you wish to use a different yarn than suggested. By filling in the yarn quality you wish to replace, the amount (in your size) and number of strands, the converter will present good alternative yarns with the same knitting tension. Additionally it will tell you how much you’ll require in the new qualities and whether you’ll need to work with multiple strands. Most skeins are 50g (some are 25g or 100g).

If the pattern is worked with multiple colours, every colour will have to be converted separately. Similarly, if the pattern is worked with several strands of different yarns (for example 1 strand Alpaca and 1 strand Kid-Silk) you will have to find alternatives for each, individually.

Click here to see our yarn converter

Since different yarns have different qualities and textures we have chosen to keep the original yarn in our patterns. However, you can easily find options among our available qualities by using our yarn converter, or simply pick a yarn from the same yarn group.

It is possible that some retailers still have discontinued yarns in stock, or that someone has a few skeins at home that they would like to find patterns for.

The yarn converter will provide both alternative yarn as well as required amount in the new quality.

If you think it's hard to decide what size to make, it can be a good idea to measure a garment you own already and like the size of. Then you can pick the size by comparing those measures with the ones available in the pattern's size chart.

You'll find the size chart at the bottom of the pattern.

See DROPS lesson: How to read size chart

The needle size provided in the pattern serves only as a guide, the important thing is to follow the knitting tension. And since knitting tension is very individual, you will have to adjust the needle size to ensure that YOUR tension is the same as in the pattern – maybe you’ll have to adjust 1, or even 2 needle sizes, up or down to achieve the correct tension. For this, we recommend that you work test swatches.

Should you work with a different knitting tension than the one provided, the measurements of the finished garment might deviate from the measurement sketch.

See DROPS lesson: How to measure your tension/gauge

See DROPS video: How to make a gauge tension swatch

Working a garment top-down provides more flexibility and room for personal adjustment. For example it is easier to try the garment on while working, as well as making adjustments to length of yoke and shoulder caps.

The instructions are carefully explaining every step, in the correct order. Diagrams are adjusted to the knitting direction and are worked as usual.

The diagram depicts all rows/rounds, and every stitch seen from the right side. It is read from bottom to top, from right to left. 1 square = 1 stitch.

When working back and forth, every other row is worked from the right side and every other row is worked from the wrong side. When working from the wrong side, the diagram will have to be worked reversed: from left to right, knit stitches are purled, purl stitches are knit etc.

When working in the round every round is worked from the right side and the diagram are worked from right to left on all rounds.

See DROPS lesson: How to read knitting diagrams

The diagram depicts all rows/rounds, and every stitch seen from the right side. It is worked from bottom to top, from right to left.

When working back and forth every other row is worked from the right side: from right to left and every other row is worked from the wrong side: from left to right.

When working in the round, every row in the diagram are worked from the right side, from right to left.

When working a circular diagram you start in the middle and work your way outwards, counter clockwise, row by row.

The rows usually start with a given number of chain stitches (equivalent to the height of the following stitch), this will either be depicted in the diagram or explained in the pattern.

See DROPS lesson: How to read crochet diagrams

Instructions for working several diagrams after each other on the same row/round, will often be written like so: “work A.1, A.2, A.3 a total of 0-0-2-3-4 times". This means you work A.1 once, then A.2 is worked once, and A.3 is repeated (in width) the number of times provided for your size – in this case like so: S = 0 times, M = 0 times, L=2 times, XL= 3 times and XXL = 4 times.

The diagrams are worked as usual: begin with the first row in A.1, then work the first row in A.2 etc.

See DROPS lesson: How to read knitting diagrams

See DROPS lesson: How to read crochet diagrams

The total width of the garment (from wrist-to-wrist) will be larger in the larger sizes, despite the actual sleeves being shorter. The larger sizes have longer sleeve caps and wider shoulders, so there will be a good fit in all sizes.

The measurement sketch/schematic drawing provides information regarding the full length of the garment. If it’s a jumper or a jacket the length is measured from the highest point on the shoulder (usually closest to the neckline), and straight down to the bottom of the garment. It is NOT measured from the tip of shoulder. Similarly, the length of yoke is measured from the highest point on the shoulder and down to where yoke is split into body and sleeves.

See DROPS lesson: How to read a schematic drawing

Diagrams are often repeated on the round or in height. 1 repeat is the diagram the way it appears in the pattern. If it says to work 5 repeats of A.1 in the round, then you work A.1 a total of 5 times after/next to each other in the round. If it says to work 2 repeats of A.1 vertically/in height you work the entire diagram once, then begin again at the start and work the entire diagram one more time.

Chain stitches are slightly narrower than other stitches and to avoid working the cast-on edge too tight, we simply chain more stitches to begin with. The stitch count will be adjusted on the following row to fit the pattern and measurement sketch.

The rib edge is more elastic and will contract slightly compared to, for example, stocking stitch. By increasing before the rib edge, you avoid a visible difference in width between the rib edge and the rest of the body.

It’s very easy to cast off too tightly, and by making yarn overs while casting off (and simultaneously casting these off) you avoid a too tight cast off edge.

See DROPS video: How to bind off with yarn overs (yo)

To achieve an even increase (or decrease) you can increase on, for example: every 3rd and 4th row alternately, like so: work 2 rows and increase on the 3rd row, work 3 rows and increase on the 4th. Repeat this until the increase is complete.

See DROPS lesson: Increase or decrease 1 st on every 3rd and 4th row alternately

Should you prefer to work in the round instead of back and forth, you may of course adjust the pattern. You’ll need to add steeks mid-front (usually 5 stitches), and follow the instructions. When you would normally turn and work from the wrong side, simply work across the steek and continue in the round. At the end you’ll cut the piece open, pick up stitches to work bands, and cover the cut edges.

See DROPS video: How to knit steeks and cut open

Should you prefer to work back and forth instead of in the round, you may of course adjust the pattern so you work the pieces separately and then assemble them at the end. Divide the stitches for the body in 2, add 1 edge stitch in each side (for sewing) and work the front and back pieces separately.

See DROPS lesson: Can I adapt a pattern for circular needles into straight needles?

Pattern repeats can vary slightly in the different sizes, in order to get the correct proportions. If you’re not working the exact same size as the garment in the photo, yours might deviate slightly. This has been carefully developed and adjusted so that the complete impression of the garment is the same in all sizes.

Make sure to follow instructions and diagrams for your size!

If you have found a pattern you like which is available in women’s size it’s not very difficult to convert it to men’s size. The biggest difference will be the length of sleeves and body. Start working on the women size that you think would fit across the chest. The additional length will be worked right before you cast off for the armhole/sleeve cap. If the pattern is worked top-down you can add the length right after the armhole or before the first decrease on sleeve.

Regarding additional yarn amount, this will depend on how much length you add, but it is better with a skein too many than too few.

All yarns will have excess fibres (from production) that might come off as lint or shedding. Brushed yarns (ie hairier yarns) have more of these loose, excess fibres, causing more shedding.

Shedding also depends on what is worn under or over the garment, and whether this pulls at the yarn fibres. It’s therefore not possible to guarantee that there will be no shedding

Below are some tips on how to get the best result when working with hairier yarns:

1. When the garment is finished (before you wash it) shake it vigorously so the looser hairs come off. NOTE: do NOT use a lint roller, brush or any method that pulls at the yarn.

2. Place the garment in a plastic bag and put it in your freezer - the temperature will cause the fibres to become less attached to each other, and excess fibres will come off easier.

3. Leave in the freezer for a few hours before taking it out and shaking it again.

4. Wash the garment according to the instructions on the yarn label.

Pilling is a natural process that happens to even the most exclusive of fibers. It's a natural sign of wear and tear that is hard to avoid, and that is most visible in high friction areas of your garment like a sweater's arms and cuffs.

You can make your garment look as new by removing the pilling, using a fabric comb or a pill/lint remover.

Still can't find the answer you need? Then scroll down and leave your question so one of our experts can try to help you. This will be done normally within 5 to 10 working days.
In the meantime, you can read the questions and answers that others have left to this pattern or join the DROPS Workshop on Facebook to get help from fellow knitters/crocheters!

You might also like...

Little Sophie Poncho

Zboudreau, United States

Little Sophie

Coolkero, Sweden

Little Sophie

gohamago76, Norway

Little Sophie

Nicky, United Kingdom

Post a comment to pattern DROPS 89-6

We would love to hear what you have to say about this pattern!

If you want to leave a question, please make sure you select the correct category in the form below, to speed up the answering process. Required fields are marked *.

Comments / Questions (63)

country flag Martina wrote:

Hallo, Ich hab eine Frage zur Farbfolge. In der Anleitung wird der Beginn mit Rosa beschrieben, im Diagramm mit Pink. Heißt das ich beginne mit Rosa die erste Reihe und die 2.Reihe mit Pink oder verstehe ich das Falsch? Ganz herlichen Dank für ihre Anwort und schöne Grüße

16.01.2016 - 07:43

DROPS Design answered:

Sie müssen mit Pink beginnen, hier liegt ein Fehler in der Anleitung vor, der gleich behoben wird.

23.01.2016 - 17:58

country flag Astrid wrote:

Ja ik kom er ook niet helemaal uit. Met name de laatste regel van 3e toer. Na het antwoord op Gerda zelfs nog niet. Als je dus steeds maar 2 vasten haakt op 2 ( van de 3) stokjes en 1 vaste in de openingen, wordt de toer wel strakker. Want ik neem aan dat zo de gehele toer verder gehaakt moet worden?

31.08.2015 - 12:56

DROPS Design answered:

Hoi Astrid. Het gaat uitsluitend om hoe je de toer eindigt. Je eindigt met 1 hv in de 3e l van het begin van de toer. Daarna haak je 1 hv in de volgende 2 stk en de eerste l-lus (einde van de toer). Hierna werk je door met toer 3 en eindigt ook weer de toer (en opvolgende toeren) met 1 hv in de 3e l van het begin + 1 hv in de 2 volgende stk + eerste l-lus. De toeren worden hierdoor niet strakker.

01.09.2015 - 16:51

country flag Gerda wrote:

Na de 2e en 3e toer van deze poncho staat de laatste zin: Haak dan 1 hv in iedere van de eerste 2 stk en de eerste l-lus. Dat begrijp ik niet. Je haakt toch steeds 3 stokjes? Ik kom er niet uit!

09.07.2015 - 13:56

DROPS Design answered:

Hoi Gerda. Je slaat het eerste stk (de 3 l) over en haakt 1 hv in de twee volgende stk en en hv om het eerste l-lus - of haak 1 hv in de 3e l van het begin, dan de 2 stk en de l-lus. Ik denk niet dat het zo een groot verschil maakt.

30.07.2015 - 13:48

country flag Ilse Van Eck wrote:

Goedemorgen, ik wil graag voor mijn dochter deze leuke poncho haken, maar het is vrij dun draad waar ik mee haak. 50 gr ca. 180 mtr. Met 108 lossen zit ik op ongeveer 45 cm ipv 61. Nu is mijn vraag met welke meervoud in lossen kan ik het aanvullen naar 61 cm om het patroon verder aan te kunnen houden.

08.06.2015 - 09:39

DROPS Design answered:

Hoi Ilse. Je moet dan het patroon opnieuw berekenen. Haak een proeflapje en tel hoeveel stk-groepen x toeren dat je hebt op 10 x 10 cm en pas het patroon aan.

08.06.2015 - 14:06

country flag Patricia wrote:

Hallo, ik kom niet uit als ik 88 losse op zet. Ik heb het al een aantal keer uitgehaald en opnieuw gedaan, maar ik blijf aan de ene kant 8 stk-groepen en de ander kant 9 stk-groepen houden. Ik heb dit opgelost door de losse te minderen en nu kom ik wel uit aan beide kanten met 8 stk-groepen..

29.05.2015 - 12:59

country flag Maryse wrote:

Sur ce patron il y a erreur. J'ai essayé à 98 et à 108 mailles mais rien à faire à la fin du 2 ieme rang impossible de le finir avec soit 9 ou 10 groupes de brides entre chaque point . il y a trop de mailles restantes. Je suis bien déçu j'espère que vous pourrez faire les corrections rapidement. Merci Maryse Desmarais de Sherbrooke Québec.

27.04.2015 - 00:05

DROPS Design answered:

Bonjour Maryse, le nombre de mailles est juste ainsi, vérifiez bien que vous avez le bon nombre de groupes de B, soit 4-5 groupes de B au début (on répète 3-4 fois de *-* soit 4-5 groupes de B), avant la pointe du devant. Bon crochet!

27.04.2015 - 14:17

country flag Daphne Tollenaar wrote:

Hallo ik snap niet zo goed hoeveel wol in nou nodig heb voor bv 100-150-150 gr nr. 27, perzik. Heb ik dan in totaal 8 bollen nodig van 50gr? Alvast bedankt voor het antwoord. MvG Daphne Tollenaar

20.02.2015 - 10:47

DROPS Design answered:

Hoi Daphne. Elk aantal is voor een maat. Er zijn 3 maten voor deze poncho, dus voor bijvoorbeeld maat 5/7 jaar heb je 100 gr Paris 27, 100 gr 26 enzovoort.

20.02.2015 - 15:35

country flag Alma wrote:

Ik ben begonnen aan de poncho, kleinste maat, maar ik kom niet uit met 88 lossen. Volgens mij moeten het 92 lossen zijn. Ik ben al tig keer opnieuw begonnen.

16.10.2014 - 19:07

DROPS Design answered:

Ik heb de hele tweede toer voor u nagerekend en 88 lossen klopt precies. Ik heb helaas geen idee waarom u denkt dat u 4 lossen tekort komt. Ik raad u aan de toer nog eens goed door te lezen en steeds het aantal steken waarin u haakt te tellen, dan zult u zien dat het patroon klopt.

17.10.2014 - 09:52

country flag Brosens Leen wrote:

Beste, ik heb juist het patroon vaan deze poncho bekeken (hij is echt wel super mooi) en ik vraag me af of je ook weet met hoeveel steken ik moet beginnen voor een poncho voor een baby van 6 maand. Alvast bedankt

03.09.2014 - 13:10

DROPS Design answered:

De poncho is ontworpen voor kinderen vanaf 5 jaar en baby's hebben heel andere lichaamsverhoudingen. Wij ondersteunen geen persoonlijke aanpassingen op patronen, maar het staat u uiteraard vrij om zelf te experimenteren.

03.09.2014 - 15:04

country flag Michele Korfhage wrote:

I love this poncho and want to make it for my grand daughter. is there a video....i couldnt find one

23.07.2014 - 02:50

DROPS Design answered:

Dear Mrs Korfhage, you will find all relevant videos to that pattern clicking on the tab "Videos" at the right side of the picture. Happy crocheting!

23.07.2014 - 08:58