
Looking for a yarn?


Comments / Questions (48)
![]() Arti wrote:
Arti wrote:
Is there a video to show how to reduce 3 at to 2 at in 3rd row of pattern?
17.04.2025 - 06:35DROPS Design answered:
Dear Arti, the technique used is like when binding off binding off , however, instead of slipping 1 stitch over the previous stitch you slip it over the 2nd and 3rd stitches. Happy knitting!
20.04.2025 - 22:28
![]() Marie-Claire wrote:
Marie-Claire wrote:
Superbe j\'adore
07.03.2025 - 09:21
![]() Lies wrote:
Lies wrote:
Moet ik eerst met 228 steken boordsteek breien en dan het patroon van 148-14 ?
14.04.2016 - 17:12DROPS Design answered:
Hoi Lies. Je breit eerst 1 nld av aan de verkeerde kant en dan brei je volgens de beschrijving voor je gekozen maat (bijvoorbeeld maat S of M): 2 st in RIBBELST – zie uitleg boven, 2 st r, 2 st av, 2 st r, 2 st av (= voorbies), brei A.1 (= 14 st), brei A.2 (= 30 st) 2 keer in totaal, plaats 1 markeerder (= zijkant), brei A.3 (= 30 st) 2 keer in totaal, brei A.1 2 keer in totaal, A.2 2 keer in totaal, plaats 1 markeerder (= zijkant), brei A.3 2 keer in totaal, A.1 een keer en eindig met 2 st av, 2 st r, 2 st av, 2 st r en 2 st in RIBBELST (= voorbies).
15.04.2016 - 10:01
![]() Kirsten wrote:
Kirsten wrote:
Bei den Abnahmen für den Halsausschnitt steht, dass die Abnahmen 4-4-14-13-12-12 x wiederholt werden sollen. Das erscheint mir für die Größen L-XXXL extrem viel.
19.01.2016 - 10:14DROPS Design answered:
Es ist richtig, wie es dort steht. Denn dafür nehmen Sie in den kleineren Größen anschließend etwas öfter in jeder 6. R ab als in den größeren Größen, so relativiert sich das wieder.
24.01.2016 - 20:50
![]() Debbie wrote:
Debbie wrote:
In the graphs for 148-14 Calista, it shows a black box - translated to no stitch, skip this square..... Do you just slip that stitch or just ignore that box in the pattern and continue with the next stitch. Example 7a k2, p2, k1, yo, p2, black box here ??????
20.06.2015 - 15:16DROPS Design answered:
Dear Debbie, on previous row you have dec 1 st, so that this st doesn't inc anymore on this row, make a YO as shown in diagram and work the sts as in diagram, on next row, the st is "back" there, then will be dec again etc... ie on row 1 in A.7 work: K2, P2, K1, YO, K1, P2, (skip the black box), K5, ... Happy knitting!
22.06.2015 - 10:23
![]() Sissi Hark wrote:
Sissi Hark wrote:
Hallo, welches Lochmuster wird für die Maschenprobe benötigt? Vielen Dank vorab.
13.06.2015 - 09:43DROPS Design answered:
Die machen Sie am besten im Muster A.6 oder A.7.
15.06.2015 - 21:17Mervat wrote:
Hi ... what should i do if i want to make long sleeve?? thank you
14.04.2015 - 16:51DROPS Design answered:
Dear Mrs Mervat, you can cast on more sts for the sleeves (figure out how many extra sts depening on how long you like the sleeves - remember to make sure you will have enough yarn) - you can get help from a similar pattern with long sleeves or contact your DROPS store for any individual assistance. Happy knitting!
15.04.2015 - 08:42
![]() Zahide wrote:
Zahide wrote:
Ik zou deze vest met Drops Safran en met lange mouwen willen breien. Hoe doe ik dit?
08.10.2014 - 00:05DROPS Design answered:
Hoi Zahide. DROPS Safran is dunner dan de Cotton Light, dus je zou waarschijnlijk het patroon opnieuw moeten berekenen voor de juiste afmetingen. Verder moet je meer steken opzetten voor de mouwen. Je kan het doen met hulp van de stekenverhouding, maar heb je hier weinig ervaring mee zou ik aanraden om dit niet te doen of hulp te krijgen van iemand die het wel kan. Succes.
09.10.2014 - 13:51
![]() ANNA wrote:
ANNA wrote:
Continuare a coste in questo modo fino a quando il diagramma è stato lavorato in verticale, il lavoro misura circa 4 cm e ci sono 228-228-267-267-312-312 m. sul f.: COME E' POSSIBILE CHE LE MAGLIE SIANO MENO DI QUELLE DELL'AVVIO? NON SONO STATE FATTE DIMINUZIONI! PER LA TAGLIA XL AVEVO MONTATO 368 MAGLIE ORA DOVREBBERO ESSERE 267..... IL SITO E' BELLISSIMO, GRAZIE. ANNA
09.05.2014 - 10:59DROPS Design answered:
Buongiorno Anna. Il numero delle maglie passa da 368 a 267 quando lavora l'ultima riga dei diagrammi A1, A2, A3 e A4. In quest'ultima riga infatti, in corrispondenza dei triangolini neri, deve lavorare 2 m insieme a dir. In questo modo si riduce il numero complessivo delle m. Ci riscriva se ancora in difficoltà. Buon lavoro!
09.05.2014 - 12:37
![]() Winnie Søgaard Thomsen wrote:
Winnie Søgaard Thomsen wrote:
Hej. jeg kan godt forstå et en side som jeres har reklamer, men jeg bliver lidt irriteret over hver gang jeg vil printe en opskrift ud , printes der automatisk en reklame for sokkelicious ud. det koster en krig i blæk til ingen verdens nytte.Jeg er ellers meget glad for jeres sider, som jeg har brugt rigtig meget. venlig hilsen winnie
27.02.2014 - 12:17DROPS Design answered:
Hej Winnie. Du kan altid vaelge det antal sider du vil printe ud naar din printmenu kommer frem. Paa den maade behöver du ikke at printe reklamerne ud.
27.02.2014 - 16:10
|
|||||||||||||||||||||||||
Calista#calistacardigan |
|||||||||||||||||||||||||
 |
 |
||||||||||||||||||||||||
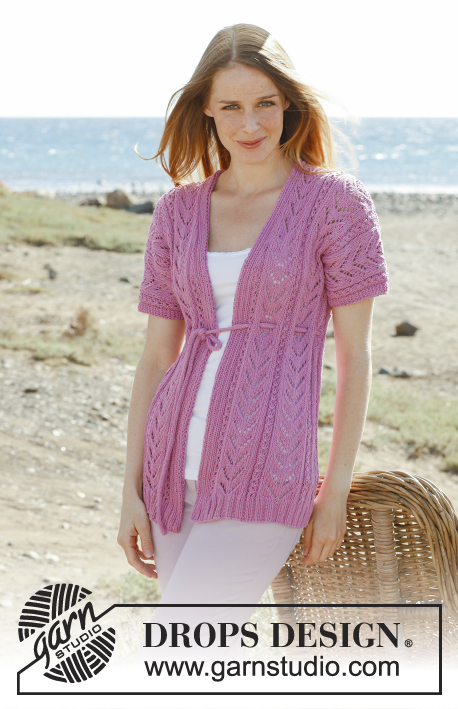
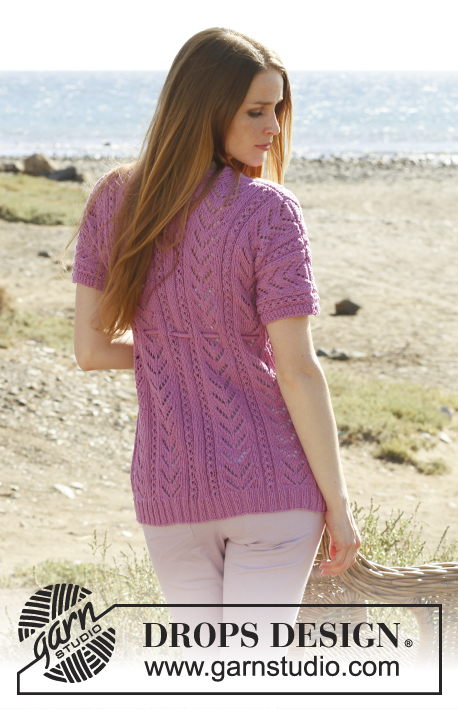
Knitted DROPS jacket with lace pattern in ”Cotton Light” or "Belle". Size: S - XXXL.
DROPS 148-14 |
|||||||||||||||||||||||||
|
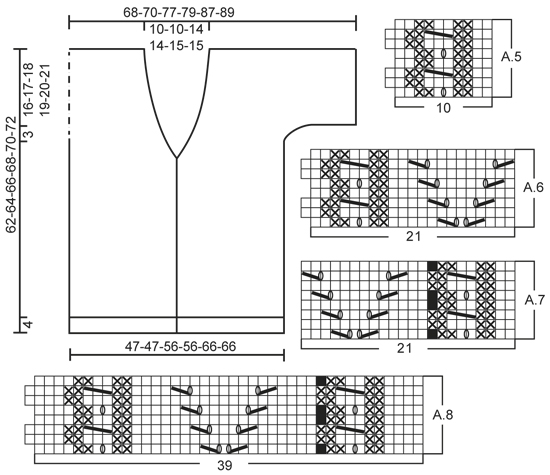
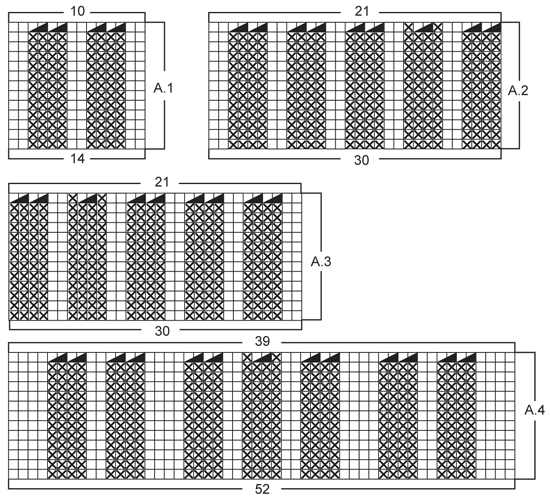
GARTER ST (back and forth on circular needle): K all rows. 1 ridge = 2 rows K. PATTERN: See diagrams A.1 to A.8. Diagrams show all rows in pattern seen from RS. DECREASE TIP (applies to neckline): Dec inside the outermost 11 sts in each side (= band + 1 st). All dec are done from RS! Dec after 11 sts as follows: Slip 1 st as if to K, K 1, psso. Dec before 11 sts as follows: K 2 tog. ---------------------------------------------------------- BODY: Worked back and forth on circular needle from mid front. Cast on 316-316-368-368-436-436 sts (incl 10 band sts in each side towards mid front) on circular needle size 3 mm / US 2.5 with Cotton Light or "Belle". P 1 row from WS. Work next row as follows from RS: SIZE S + M: 2 sts in GARTER ST – see explanation above, K 2, P 2, K 2, P 2 (= band), work A.1 (= 14 sts), work A.2 (= 30 sts) 2 times in total, insert 1 marker (= side), work A.3 (= 30 sts) 2 times in total, work A.1 2 times in total, A.2 2 times in total, insert 1 marker (= side), work A.3 2 times in total, A.1 one time and finish with P 2, K 2, P 2, K 2 and 2 sts in GARTER ST (= band). SIZE L + XL: 2 sts in GARTER ST – see explanation above, K 2, P 2, K 2, P 2 (= band), work A.1 (= 14 sts) 2 times in total, work A.2 (= 30 sts) 2 times in total, insert 1 marker (= side), work A.3 (= 30 sts) 2 times in total, work A.4 (= 52 sts), A.2 2 times in total, insert 1 marker (= side), work A.3 2 times in total, A.1 2 times in total and finish with P 2, K 2, P 2, K 2 and 2 sts in GARTER ST (= band). Size XXL + XXXL: 2 sts in GARTER ST – see explanation above, K 2, P 2, K 2, P 2 (= band), work A.1 (= 14 sts), work A.2 (= 30 sts) 3 times in total, insert 1 marker (= side), work A.3 (= 30 sts) 3 times in total, work A.1 2 times in total, A.2 3 times in total, insert 1 marker (= side), work A.3 3 times in total, A.1 (= 14 sts) and finish with P 2, K 2, P 2, K 2 and 2 sts in GARTER ST (= band). ALL SIZES: Continue rib like this until diagrams have been worked vertically (move the markers upwards when working), piece measures approx. 4 cm / 1½'' and there are 228-228-267-267-312-312 sts on needle. Switch to circular needle size 3.5 mm / US 4, and work 1 row from WS with K over K and P over P. Work next row as follows from RS: SIZE S + M: 10 band sts as before, A.5 (= 10 sts), work A.6 (= 21 sts) 2 times in total, (marker), work A.7 (= 21 sts) 2 times in total, work A.5 2 times in total, work A.6 2 times in total, (marker), work A.7 2 times in total, work A.5 (= 10 sts) and finish with 10 band sts as before. SIZE L + XL: 10 band sts as before, work A.5 (= 10 sts) 2 times in total, work A.6 (= 21 sts) 2 times in total, (marker), work A.7 (= 21 sts) 2 times in total, work A.8 (= 39 sts), work A.6 2 times in total, (marker), work A.7 2 times in total, work A.5 2 times in total and finish with 10 band sts as before. Size XXL + XXXL: 10 band sts as before, work A.5 (= 10 sts), work A.6 (= 21 sts) 3 times in total, (marker), work A.7 (= 21 sts) 3 times in total, work A.5 2 times in total, work A.6 3 times in total, (marker), work A.7 3 times in total, work A.5 (= 10 sts) and finish with 10 band sts as before. ALL SIZES: Continue pattern like this upwards. REMEMBER THE GAUGE! When piece measures 40-41-42-43-44-45 cm / 15¾''-16 1/8''-16½''-17''-17¼''-17¾'', work 2 rows back and forth only over the outermost 10 sts in one side of piece (i.e. only over band, the other sts are not worked), turn piece, work 1 row pattern as before and then repeat over the outermost 10 sts in the other side (this is done to make the neckline fold nicely). On next row from RS, dec 1 st in each side towards mid front for neck line – READ DECREASE TIP. Repeat dec for neck in each side every 4th row (i.e. every other row from RS), 4-4-14-13-12-12 more times and then every 6th row a total of 6-6-1-2-3-3 times. AT THE SAME TIME when piece measures 43-44-45-46-47-48 cm / 17''-17¼''-17¾''-18''-18½''-19'', divide the piece at the markers and finish front and back piece separately. BACK PIECE: = 104-104-123-123-146-146 sts. Work pattern back and forth on needle as before. AT THE SAME TIME cast on new sts for sleeves at the end of every row in each side as follows: Cast on 5 sts 3 times in total and then 8-10-8-10-8-10 sts 1 time = 150-154-169-173-192-196 sts – NOTE: Work the inc sts gradually in A.6/A.7. When all sts have been cast on, continue the pattern as before but work the outermost 4 sts in each side in garter st (in size S + L + XXL the pattern ends with 2 P inside 4 sts in garter st in each side and in size M + XL + XXXL the pattern ends with 2 K inside 4 sts in garter st in each side). When piece measures 60-62-64-66-68-70 cm / 23 5/8''-24 3/8''-25¼''-26''-26¾''-27½'', bind off the middle 20-20-29-29-30-30 sts for neck and finish each shoulder separately. Then bind off 1 st on next row from neck = 64-66-69-71-80-82 sts remain on needle. Continue the pattern with 1 st in garter st towards the neck and 4 sts in garter st towards the sleeve (the sts that do not fit the pattern are worked in stockinette st). When piece measures 62-64-66-68-70-72 cm / 24½''-25¼''-26''-26¾''-27½''-28½'', loosely bind off all sts. Repeat on the other shoulder. RIGHT FRONT PIECE: Continue pattern and dec for neck as before. AT THE SAME TIME cast on new sts for sleeve at the end of every row towards the side as on back piece. After all dec for neck, 74-76-79-81-90-92 sts remain on needle (the sts that do not fit the pattern towards the neck are worked in stockinette st). When piece measures 62-64-66-68-70-72 cm / 24½''-25¼''-26''-26¾''-27½''-28½'', bind off the outermost 64-66-69-71-80-82 sts on shoulder = 10 sts remain on needle for neck edge. Continue rib as before but work the outermost sts towards the neck in garter st. When neck edge measures approx. 7-7-9-9-10-10 cm / 2 3/4"-2 3/4"-3½"-3½"-4"-4" from shoulder, slip sts on a stitch holder. LEFT FRONT PIECE: Work as right front piece but reversed. ASSEMBLY: Sew the shoulder seams. Sew neck edge tog mid back - sew st by st with grafting/kitchener sts and sew neck edge to neckline in the back of neck. BELT: Cast on 4 sts on double pointed needles size 3 mm / US 2.5 with Cotton Light or "Belle". K 1 row, * move the sts to the right side of needle without turning the piece, tighten thread on the back and K 1 row from the same side as previous row *. Repeat from *-* (working like this forms a round tie in stockinette st without working P). NOTE: It is important to tighten the thread on the back to make the tie look nice. When tie measures approx. 150 to 200 cm / 60"-80", cut the yarn and pull it through the 4 sts, tighten tog and fasten. Thread the belt up and down through the holes in the pattern - try the jacket on for correct placement. |
|||||||||||||||||||||||||
Diagram explanations |
|||||||||||||||||||||||||
|
|||||||||||||||||||||||||
|
|||||||||||||||||||||||||
|
|||||||||||||||||||||||||
Have you finished this pattern?Tag your pictures with #dropspattern #calistacardigan or submit them to the #dropsfan gallery. Do you need help with this pattern?You'll find 17 tutorial videos, a Comments/Questions area and more by visiting the pattern on garnstudio.com. © 1982-2025 DROPS Design A/S. We reserve all rights. This document, including all its sub-sections, has copyrights. Read more about what you can do with our patterns at the bottom of each pattern on our site. |
|||||||||||||||||||||||||


With over 40 years in knitting and crochet design, DROPS Design offers one of the most extensive collections of free patterns on the internet - translated to 17 languages. As of today we count 314 catalogs and 11822 patterns - 11812 of which are translated into English (US/in).
We work hard to bring you the best knitting and crochet have to offer, inspiration and advice as well as great quality yarns at incredible prices! Would you like to use our patterns for other than personal use? You can read what you are allowed to do in the Copyright text at the bottom of all our patterns. Happy crafting!
Post a comment to pattern DROPS 148-14
We would love to hear what you have to say about this pattern!
If you want to leave a question, please make sure you select the correct category in the form below, to speed up the answering process. Required fields are marked *.