DROPS Fabel uni colour 75% Wool, 25% Polyamide |
3.00 $ /50g |
Order | |
DROPS Fabel 75% Wool, 25% Polyamide |
3.25 $ /50g |
Order | |
DROPS Fabel long print 75% Wool, 25% Polyamide |
3.50 $ /50g |
Order |
Clicking the ORDER button will redirect you to Wool Warehouse Direct Ltd website
Arched (white) No. 521
OrderClicking the ORDER button will redirect you to Wool Warehouse Direct Ltd website
Clicking the ORDER button will redirect you to Wool Warehouse Direct Ltd website
The yarn cost is calculated from the pattern’s smallest size and the yarn’s cheapest product type. Looking for an even better price? You might find it on the DROPS Deals!
Change language:
English (US/in)
-------------------------------------------------------
Alternative Yarn – See how to change yarns here
Yarn Groups A to F – Use the same pattern and change the yarn here
Yarn usage using an alternative yarn – Use our yarn converter here
-------------------------------------------------------
DROPS Fabel uni colour 75% Wool, 25% Polyamide 3.00 $ /50g Order |
|
DROPS Fabel print 75% Wool, 25% Polyamide 3.25 $ /50g Order |
|
DROPS Fabel long print 75% Wool, 25% Polyamide 3.50 $ /50g Order |
Clicking the ORDER button will redirect you to Wool Warehouse Direct Ltd website
Arched (white) No. 521
OrderClicking the ORDER button will redirect you to Wool Warehouse Direct Ltd website
Clicking the ORDER button will redirect you to Wool Warehouse Direct Ltd website
The yarn cost is calculated from the pattern’s smallest size and the yarn’s cheapest product type. Looking for an even better price? You might find it on the DROPS Deals!
This pattern has been corrected. Click here to see the correction/s.
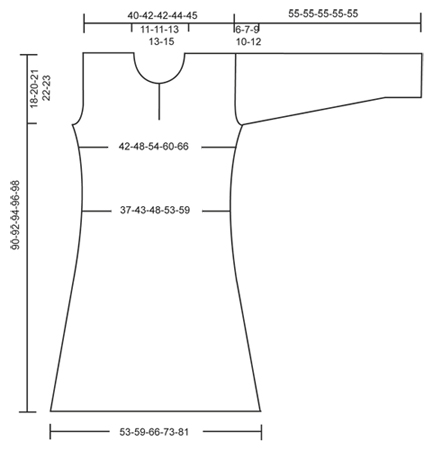
All measurements in charts are in cm.
= K from RS, P from WS | |
= inc by K 2 sts in this st | |
= slip 1 st as if to K, K 1, psso | |
= K 2 tog | |
= silver fox | |
= black | |
= salt and pepper | |
= off white |
Each of our patterns has specific tutorial videos to help you.
These step-by-step tutorials might also help you:
Why is the knitting/crochet tension so important?
Knitting tension is what determines the final measurements of your work, and is usually measured per 10 x 10 cm. It is provided like so: number of stitches in width x number of rows in height - eg: 19 stitches x 26 rows = 10 x 10 cm.
The knitting tension is very individual; some people knit/crochet loosely while others work tightly. You adjust the knitting tension with the needle size, which is why the suggested needle size only serve as a guide! You need to adjust this (up or down) to ensure that YOUR knitting tension matches the knitting tension provided in the pattern. If you work with a different knitting tension than provided you will have a different yarn consumption, and your work will have different measurements than what the pattern suggests.
The knitting tension also determines which yarns can replace each other. As long as you achieve the same knitting tension you can replace one yarn with another.
See DROPS lesson: How to measure your tension/gauge
See DROPS video: How to make a gauge tension swatch
How do I know how many balls of yarn I need?
The required amount of yarn is provided in grams, eg: 450 g. To calculate how many balls you’ll need you first need to know how many grams are in 1 ball (25g, 50g or 100g). This information is available if you click on the individual yarn quality on our pages. Divide the amount required with the amount of each ball. For example, if each ball is 50g (the most common amount), the calculation will be as follows: 450 / 50 = 9 balls.
Can I use a different yarn than what the pattern suggests?
The important thing when changing from one yarn to another is that the knitting/crochet tension remains the same. This is so that the measurements of the finished piece will be the same as on the sketch provided. It is easier to achieve the same knitting tension using yarns from the same yarn group. It is also possible to work with multiple strands of a thinner yarn to achieve the knitting tension of a thicker one. Please try our yarn converter. We recommend you to always work a test swatch.
Please NOTE: when changing yarn the garment might have a different look and feel to the garment in the photo, due to individual properties and qualities of each yarn.
See DROPS lesson: Can I use a different yarn than the one mentioned in the pattern?
What are the yarn groups?
All our yarns are categorised into yarn groups (from A to F) according to thickness and knitting tension – group A contains the thinnest yarns and group F the thickest. This makes it easier for you to find alternative yarns to our patterns, should you wish to switch yarn. All yarns within the same group have a similar knitting tension and can easily replace each other. However, different yarn qualities have different structures and properties which will give the finished work a unique look and feel.
How do I use the yarn converter?
At the top of all our patterns you’ll find a link to our yarn converter, which is a helpful tool should you wish to use a different yarn than suggested. By filling in the yarn quality you wish to replace, the amount (in your size) and number of strands, the converter will present good alternative yarns with the same knitting tension. Additionally it will tell you how much you’ll require in the new qualities and whether you’ll need to work with multiple strands. Most skeins are 50g (some are 25g or 100g).
If the pattern is worked with multiple colours, every colour will have to be converted separately. Similarly, if the pattern is worked with several strands of different yarns (for example 1 strand Alpaca and 1 strand Kid-Silk) you will have to find alternatives for each, individually.
Why do you show discontinued yarns in the patterns?
Since different yarns have different qualities and textures we have chosen to keep the original yarn in our patterns. However, you can easily find options among our available qualities by using our yarn converter, or simply pick a yarn from the same yarn group.
It is possible that some retailers still have discontinued yarns in stock, or that someone has a few skeins at home that they would like to find patterns for.
The yarn converter will provide both alternative yarn as well as required amount in the new quality.
What size should I knit?
If you think it's hard to decide what size to make, it can be a good idea to measure a garment you own already and like the size of. Then you can pick the size by comparing those measures with the ones available in the pattern's size chart.
You'll find the size chart at the bottom of the pattern.
See DROPS lesson: How to read size chart
Why do I get the wrong knitting tension with the suggested needle size?
The needle size provided in the pattern serves only as a guide, the important thing is to follow the knitting tension. And since knitting tension is very individual, you will have to adjust the needle size to ensure that YOUR tension is the same as in the pattern – maybe you’ll have to adjust 1, or even 2 needle sizes, up or down to achieve the correct tension. For this, we recommend that you work test swatches.
Should you work with a different knitting tension than the one provided, the measurements of the finished garment might deviate from the measurement sketch.
See DROPS lesson: How to measure your tension/gauge
See DROPS video: How to make a gauge tension swatch
Why is the pattern worked top-down?
Working a garment top-down provides more flexibility and room for personal adjustment. For example it is easier to try the garment on while working, as well as making adjustments to length of yoke and shoulder caps.
The instructions are carefully explaining every step, in the correct order. Diagrams are adjusted to the knitting direction and are worked as usual.
How do I work according to a knitting diagram?
The diagram depicts all rows/rounds, and every stitch seen from the right side. It is read from bottom to top, from right to left. 1 square = 1 stitch.
When working back and forth, every other row is worked from the right side and every other row is worked from the wrong side. When working from the wrong side, the diagram will have to be worked reversed: from left to right, knit stitches are purled, purl stitches are knit etc.
When working in the round every round is worked from the right side and the diagram are worked from right to left on all rounds.
See DROPS lesson: How to read knitting diagrams
How do I work according to a crochet diagram?
The diagram depicts all rows/rounds, and every stitch seen from the right side. It is worked from bottom to top, from right to left.
When working back and forth every other row is worked from the right side: from right to left and every other row is worked from the wrong side: from left to right.
When working in the round, every row in the diagram are worked from the right side, from right to left.
When working a circular diagram you start in the middle and work your way outwards, counter clockwise, row by row.
The rows usually start with a given number of chain stitches (equivalent to the height of the following stitch), this will either be depicted in the diagram or explained in the pattern.
See DROPS lesson: How to read crochet diagrams
How do I work several diagrams simultaneously on the same row/round?
Instructions for working several diagrams after each other on the same row/round, will often be written like so: “work A.1, A.2, A.3 a total of 0-0-2-3-4 times". This means you work A.1 once, then A.2 is worked once, and A.3 is repeated (in width) the number of times provided for your size – in this case like so: S = 0 times, M = 0 times, L=2 times, XL= 3 times and XXL = 4 times.
The diagrams are worked as usual: begin with the first row in A.1, then work the first row in A.2 etc.
See DROPS lesson: How to read knitting diagrams
See DROPS lesson: How to read crochet diagrams
Why are the sleeves shorter in larger sizes?
The total width of the garment (from wrist-to-wrist) will be larger in the larger sizes, despite the actual sleeves being shorter. The larger sizes have longer sleeve caps and wider shoulders, so there will be a good fit in all sizes.
Where on the garment is the length measured?
The measurement sketch/schematic drawing provides information regarding the full length of the garment. If it’s a jumper or a jacket the length is measured from the highest point on the shoulder (usually closest to the neckline), and straight down to the bottom of the garment. It is NOT measured from the tip of shoulder. Similarly, the length of yoke is measured from the highest point on the shoulder and down to where yoke is split into body and sleeves.
See DROPS lesson: How to read a schematic drawing
What is a repeat?
Diagrams are often repeated on the round or in height. 1 repeat is the diagram the way it appears in the pattern. If it says to work 5 repeats of A.1 in the round, then you work A.1 a total of 5 times after/next to each other in the round. If it says to work 2 repeats of A.1 vertically/in height you work the entire diagram once, then begin again at the start and work the entire diagram one more time.
Why does the piece start with more chain stitches than it’s worked with?
Chain stitches are slightly narrower than other stitches and to avoid working the cast-on edge too tight, we simply chain more stitches to begin with. The stitch count will be adjusted on the following row to fit the pattern and measurement sketch.
Why increase before the rib edge when the piece is worked top-down?
The rib edge is more elastic and will contract slightly compared to, for example, stocking stitch. By increasing before the rib edge, you avoid a visible difference in width between the rib edge and the rest of the body.
Why increase in the cast-off edge?
It’s very easy to cast off too tightly, and by making yarn overs while casting off (and simultaneously casting these off) you avoid a too tight cast off edge.
See DROPS video: How to bind off with yarn overs (yo)
How do I increase/decrease on every 3rd and 4th row/round alternately?
To achieve an even increase (or decrease) you can increase on, for example: every 3rd and 4th row alternately, like so: work 2 rows and increase on the 3rd row, work 3 rows and increase on the 4th. Repeat this until the increase is complete.
See DROPS lesson: Increase or decrease 1 st on every 3rd and 4th row alternately
How can I work a jacket in the round instead of back and forth?
Should you prefer to work in the round instead of back and forth, you may of course adjust the pattern. You’ll need to add steeks mid-front (usually 5 stitches), and follow the instructions. When you would normally turn and work from the wrong side, simply work across the steek and continue in the round. At the end you’ll cut the piece open, pick up stitches to work bands, and cover the cut edges.
See DROPS video: How to knit steeks and cut open
Can I work a jumper back and forth instead of in the round?
Should you prefer to work back and forth instead of in the round, you may of course adjust the pattern so you work the pieces separately and then assemble them at the end. Divide the stitches for the body in 2, add 1 edge stitch in each side (for sewing) and work the front and back pieces separately.
See DROPS lesson: Can I adapt a pattern for circular needles into straight needles?
Why is the pattern slightly different than what I see in the photo?
Pattern repeats can vary slightly in the different sizes, in order to get the correct proportions. If you’re not working the exact same size as the garment in the photo, yours might deviate slightly. This has been carefully developed and adjusted so that the complete impression of the garment is the same in all sizes.
Make sure to follow instructions and diagrams for your size!
How do I make a women’s size garment into a men’s size one?
If you have found a pattern you like which is available in women’s size it’s not very difficult to convert it to men’s size. The biggest difference will be the length of sleeves and body. Start working on the women size that you think would fit across the chest. The additional length will be worked right before you cast off for the armhole/sleeve cap. If the pattern is worked top-down you can add the length right after the armhole or before the first decrease on sleeve.
Regarding additional yarn amount, this will depend on how much length you add, but it is better with a skein too many than too few.
How do I prevent a hairy garment from shedding?
All yarns will have excess fibres (from production) that might come off as lint or shedding. Brushed yarns (ie hairier yarns) have more of these loose, excess fibres, causing more shedding.
Shedding also depends on what is worn under or over the garment, and whether this pulls at the yarn fibres. It’s therefore not possible to guarantee that there will be no shedding
Below are some tips on how to get the best result when working with hairier yarns:
1. When the garment is finished (before you wash it) shake it vigorously so the looser hairs come off. NOTE: do NOT use a lint roller, brush or any method that pulls at the yarn.
2. Place the garment in a plastic bag and put it in your freezer - the temperature will cause the fibres to become less attached to each other, and excess fibres will come off easier.
3. Leave in the freezer for a few hours before taking it out and shaking it again.
4. Wash the garment according to the instructions on the yarn label.
Why does my garment pill?
Pilling is a natural process that happens to even the most exclusive of fibers. It's a natural sign of wear and tear that is hard to avoid, and that is most visible in high friction areas of your garment like a sweater's arms and cuffs.
You can make your garment look as new by removing the pilling, using a fabric comb or a pill/lint remover.
Buenos Aires |
|||||||||||||||||||||||||
|
|||||||||||||||||||||||||
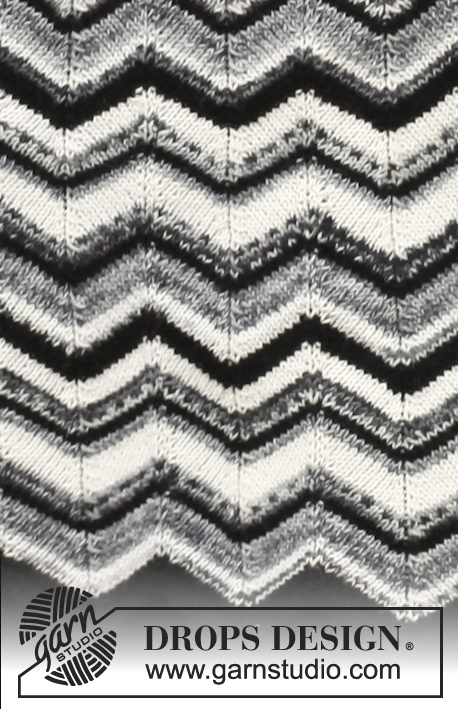
Knitted DROPS dress with stripes, zigzag pattern and split in front of neck in ”Fabel”. Size: S - XXXL.
DROPS 140-30 |
|||||||||||||||||||||||||
PATTERN: See diagrams A-1 to A-8 for zigzag pattern, diagrams show all rows in pattern from RS. See diagram A-9 for stripes. ---------------------------------------------------------- BODY: Worked in the round on circular needle. LOOSELY cast on 308-352-396-440-484 sts on circular needle size 3.5 mm / US 4 with black (it is important to cast on loosely to avoid a tight cast on edge). P 1 round, K 1 round and P 1 round. Insert a marker at beg of round and a marker after 154-176-198-220-242 sts (these marks the sides). Continue with diagram A-1 (= 14-16-18-20-22 repetitions on the round) and stripes according to A-9 until finished measurements. REMEMBER THE GAUGE! When piece measures 20-21-22-23-24 cm / 8"-8 1/4"-8 3/4"-9"-9½", work A-2 one time in the round = 280-320-360-400-440 sts. Continue with A-3. When piece measures 35-36-37-38-39 cm / 13 3/4"-14 1/4"-14½"-15"-15 1/4", work A-4 one time in the round = 252-288-324-360-396 sts. Continue with A-5. When piece measures 45-46-47-48-49 cm / 17¾''-18''-18½''-19''-19¼'', work A-6 one time in the round = 224-256-288-320-352 sts. Continue with A-7. When piece measures 57-58-59-60-61 cm / 22½"-22 3/4"-23 1/4"-23 5/8"-24", work A-8 one time in the round = 252-288-324-360-396 sts. Continue with A-5. When piece measures approx. 72-72-73-74-75 cm / 28 3/8"-28 3/8"-28 3/4"-29 1/8"-29½", work next round as follows (make sure this is a round without inc and dec): bind off the first 3-3-4-5-6 sts, work 60-69-77-85-93 sts, insert a marker (marks split mid front), work 60-69-77-85-93 sts, bind off 6-6-8-10-12 sts, work 120-138-154-170-186 sts and bind off the last 3-3-4-5-6 sts, cut the thread. Finish each piece separately. BACK PIECE: = 120-138-154-170-186 sts. Continue with pattern but work the outermost 6-6-14-22-30 sts in each side in stockinette st. At the same time bind off for armholes at beg of every row in each side: 3 sts 0-0-1-2-3 times, 2 sts 0-1-3-4-5 times and 1 st 0-4-5-5-6 times = 120-126-126-132-136 sts. Continue pattern - there are now 6-0-0-3-5 sts in stockinette st in each side. When piece measures 87-89-91-93-95 cm / 34 1/4"-35"-35 3/4"-36 5/8"-37 3/8", bind off the middle 34-34-40-40-46 sts for neck. Each shoulder = 43-46-43-46-45 sts, work separately, continue pattern as before but work in addition the 1-1-7-7-4 outermost sts towards neck in stockinette st. When piece measures 88-90-92-94-96 cm / 34 5/8"-35½"-36 1/4"-37"-37 3/4", work 2 repetitions of A-5 without inc, i.e. dec 4-5-4-5-4 sts on every K row 2 times = 35-36-35-36-37 sts on shoulder. Bind off sts on next row. LEFT FRONT PIECE: = 60-69-77-85-93 sts. READ ALL OF THE FOLLOWING SECTION BEFORE CONTINUING! Continue pattern, work the outermost 6-6-14-22-30 sts towards armhole in stockinette st, work the outermost 3 sts towards mid front in pattern but in garter st, i.e. K from WS. AT THE SAME TIME bind off for armhole in the side as on back piece = 60-63-63-66-68 sts. When piece measures 80-81-82-83-84 cm / 31½"-32"-32 1/4"-32 3/4"-33", bind off for neck at beg of every row from WS: 9 sts 1 time, 3 sts 1 time, 2 sts 1-1-2-2-3 times and 1 st 3-3-4-4-5 times – work the sts that do not fit the pattern when binding off in stockinette st = 43-46-43-46-45 sts remain on shoulder. When piece measures 88-90-92-94-96 cm / 34 5/8"-35½"-36 1/4"-37"-37 3/4", work A-5 two more times vertically but without inc just dec, i.e. 4-5-4-5-4 sts less on every K row 2 times = 35-36-35-36-37 sts remain on needle. On next row from RS, bind off. RIGHT FRONT PIECE: Work as left front piece but bind off for neck at beg of every row from RS. Make sure to finish on the same stripe in A-9 as on left front piece. SLEEVE: Worked in the round on double pointed needles. LOOSELY cast on 74-76-80-84-90 sts on double pointed needles size 3.5 mm / US 4 with black. Insert a marker at beg of round (= mid under sleeve). P 1 round, K 1 round and P 1 round. Continue like this (in stripes according to A-9): 1-2-4-6-0 sts in stockinette st, A-5 4-4-4-4-5 times and 1-2-4-6-0 sts in stockinette st. When piece measures 15-13-12-12-11 cm / 6"-5 1/8"-4 3/4"-4 3/4"-4 3/8", inc 1 st on each side of marker mid under sleeve – work the inc sts in stockinette st. Repeat inc every 3½-2½-2-1½-1½ cm / 1 1/4"-7/8"-3/4"-½"-½" 9-13-16-19-20 more times = 94-104-114-124-132 sts. When piece measures 49-48-46-45-43 cm / 19 1/4"-19"-18"-17 3/4"-17" (shorter measurements in the larger sizes because of longer sleeve cap and wider shoulders), bind off 8 sts mid under sleeve and work back and forth until finished measurements. Continue pattern - AT THE SAME TIME bind off for sleeve cap at beg of every row in each side: 3 sts 1 time and then 2 sts in each side until piece measures 54 cm / 21 1/4", then bind off 3 sts 1 time in each side. Bind off the remaining sts, the piece measures approx. 55 cm / 21½''. ASSEMBLY: Sew shoulder seams. Pick up approx. 80 to 100 sts around the neck on circular needle size 3.5 mm / US 4 with black - beg mid front at split. K 1 row from WS, then bind off with K from RS. Crochet 1 row with black and sc around the neck and split (beg mid back) – at the same time crochet 1 buttonhole loop at the top on right side of split, beg when 1 cm / 3/8'' remains of split, ch 5, then 1 sc at the top of split, work until mid back and cut the thread. Sew in sleeves and sew on 1 button on left side at the top of split. |
|||||||||||||||||||||||||
Diagram explanations |
|||||||||||||||||||||||||
|
|||||||||||||||||||||||||
Have you made this or any other of our designs? Tag your pictures in social media with #dropsdesign so we can see them! Do you need help with this pattern?You'll find tutorial videos, a Comments/Questions area and more by visiting the pattern on garnstudio.com. © 1982-2024 DROPS Design A/S. We reserve all rights. This document, including all its sub-sections, has copyrights. Read more about what you can do with our patterns at the bottom of each pattern on our site. |
With over 40 years in knitting and crochet design, DROPS Design offers one of the most extensive collections of free patterns on the internet - translated to 17 languages. As of today we count 309 catalogs and 11629 patterns - 11620 of which are translated into English (US/in).
We work hard to bring you the best knitting and crochet have to offer, inspiration and advice as well as great quality yarns at incredible prices! Would you like to use our patterns for other than personal use? You can read what you are allowed to do in the Copyright text at the bottom of all our patterns. Happy crafting!
Comments / Questions (44)
Anna Kindborg wrote:
Jag har lagt min nystickade klänning i blöt i kallt vatten och nu är den alldeles för stor. Kan jag rädda den? Hur gör jag,? Det känns otroligt sorgligt...
24.04.2023 - 00:51DROPS Design answered:
Hei Anna. Følg vaskeanvisningen på garnet. Har du strikket med DROPS Fabel skal dette garnet vaskes i maskin på 40°C Finvask eller 40°C Ullvask 40°C , bruk ikke tøymykner, la den tørke flatt i fasong og ikke la det ligge i bløt. mvh DROPS Design
24.04.2023 - 14:15Mimi wrote:
Bonjour, je suis en train de faire votre modèle, il est très agréable à travailler. Mais j'ai un problème, ça roulotte en bas, j'ai peur du résultat final si le bas de la robe demeure ainsi... J'ai fais les rangs endroits envers comme Indiqué Dois reprendre et faire quelques rangs de côtes 1x1 ou 2x2? Qu'en pensez vous ?
23.03.2023 - 13:51DROPS Design answered:
Bonjour Mimi, vous pourrez simplement bloquer la robe à la fin: humidifiez-la et laissez-la bien sécher à plat (avec des épingles inoxydables si besoin) - la bordure ne roulera plus. Bon tricot!
23.03.2023 - 14:52Mirella Kort wrote:
Ontzettend leuk jurkje. Is het ook mogelijk om deze in een effen kleur te breien? Dus niet in patroon? Vriendelijke groet Mirella
17.01.2023 - 16:31DROPS Design answered:
Dag Mirella,
Jazeker, dat kan. Je kunt dan telpatroon A-9 gewoon negeren. Hoeveel garen je nodig hebt voor een effen jurk weet ik niet precies. Het zal iets minder zijn dan het totaal aantal bollen, maar je kunt overgebleven bollen vaak inleveren bij de winkel waar je ze hebt gekocht. Je kunt de winkel vragen naar de termijn en de voorwaarden.
18.01.2023 - 17:55Annika Ejby Ruff wrote:
Hvis jeg vil lave den som kjole skal jeg så gøre det i starten. Altså lægge til for neden.
10.12.2022 - 20:31DROPS Design answered:
Hei Annika. Ja, men husk å øke garnmengden. Men dette kommer an på hvor mye lengre du ønsker kjolen. mvh DROPS Design
12.12.2022 - 14:28Alessandra Vonlanthen wrote:
Hallo! Ich fragte mich, ob man besser die Fäden der vier verschiedenen Farben einfach immer mitführt. Weil sonst gibt es so viel u vernähen. Haben Sie einen Tipp dafür?
17.03.2021 - 21:32DROPS Design answered:
Liebe Frau Vonlanthen, dieses Video zeigt, wie man die Fäden mitführen kann, es kann Ihnen sicher weiterhelfen. Viel Spaß beim stricken!
18.03.2021 - 09:41Anna De La Motte wrote:
Jag ska börja sticka zick-zach klänningen 140/30 Jag undrar om man ska minska och öka maskor på första varvet ? I videon ser det ut som att jag bara ska minska på första varvet och på tredje varvet ska jag både minska och öka
15.12.2020 - 14:45DROPS Design answered:
Hei Anna. Videoen er en generell video på hvordan strikker sikk-sakk mønster. Ved denne kjolen, strikkes etter diagrammene. Her skal det både økes og minskes ved første omgang. Det økes slik at det ikke skal stamme og det minskes for å lage sikk-sakk mønstret. God Fornøyelse!
21.12.2020 - 12:32Inge Janssen wrote:
De overgang van de rondes worden bij mij niet mooi. Er zitten gaatjes. En dat is niet alleen bij de kleurwissels. Hoe kan ik dit netter doen?
15.11.2020 - 13:19DROPS Design answered:
Dag Inge,
Bijeen van de video's bij het patroon staat een tip hoe je strepen in de rondte kunt breien zonder een verspring. Dit is misschien dit direct een antwoord op jouw vraag, maar kan wellicht helpen om het beter te krijgen bij de kleurwissels. Misschien dat je bij de overgang zonder kleurwisseling iets beter op de draadspanning moet letten...?
15.11.2020 - 18:13Maria wrote:
Hei, mistä otan työn mitan? kun helma on zix zakkinen. Otanko sen pisimmästä vai lyhyemmästä kohdasta?
16.09.2020 - 21:40DROPS Design answered:
Hei, mitat otetaan kärjen pisimmästä kohdasta.
23.09.2020 - 17:20Rochat Andréa wrote:
Bonjour, j'ai commencé le modèle 140-30 et ai terminé le diagramme A-1. Je vais débuter le diagramme A-2 mais je ne comprends pas la 2ème ligne. Pouvez-vous m'aider afin que je puisse continuer ma robe ! D'avance, je vous en remercie ! Salutations !
03.11.2018 - 01:55DROPS Design answered:
Bonjour Mme Rochat, le diagramme A.2 permet de diminuer le nombre de mailles à intervalles réguliers, au 1er tour, tricotez: 9 m end, vous diminuez 2 fois 1 m (comme avant dans A.1) et terminez par 9 m end = 20 m. Au 2ème tour de A.2, tricotez ces 20 m à l'endroit (= vous avez diminué 2 m dans chaque A.2 tout le tour). Tricotez ensuite A.3 jusqu'à la hauteur indiquée. Bon tricot!
05.11.2018 - 08:36Trine R wrote:
Som en bruger tidligere skriver, er jeg nu i samme båd. Strikker nu prøve på pind 2.5 og har 24 m på 10 cm i bredden v. diagram A-3. Kan det virkelig være rigtigt?
08.03.2017 - 20:25DROPS Design answered:
Hej Trine. Jeg ved ikke hvordan du maaler, men jeg har lige testet og jeg sidder med 30 m i bredden paa pinde 3 mm, saa det burde vaere muligt. Pröv eventuelt at vaske din pröve og maal fladt.
09.03.2017 - 13:57