
Looking for a yarn?


Comments / Questions (12)
![]() Maria wrote:
Maria wrote:
Jak zrobić tą białą łatkę na oku?
27.02.2023 - 17:20DROPS Design answered:
Witaj Mario, wykonujesz kółko oczkami ścisłymi i końcówką nitki przyszywasz je do głowy kotka. Patrz część OKO w opisie. Pozdrawiamy!
28.02.2023 - 08:11
![]() Buka wrote:
Buka wrote:
Super
02.02.2022 - 13:12
![]() Maja Kuna wrote:
Maja Kuna wrote:
Jakim ściegiem przyszyć i na jakich rzęach?
31.12.2021 - 17:10DROPS Design answered:
Witaj Maju, co do miejsc zszycia spójrz na zdjęcie. Przyszywaj drobnym starannym ściegiem, np. jak na filmie TUTAJ. Pozdrawiamy!
01.01.2022 - 23:27
![]() Mom wrote:
Mom wrote:
Näyttää hauskalta!
07.03.2021 - 17:24
![]() Em wrote:
Em wrote:
How do you assemble the cat and how do you do the winking eye
05.11.2016 - 13:02DROPS Design answered:
Dear Em, you can first add pins to find place for each piece then sew them tog with yarn and thread needle. The eye will be embroider on the face - see here. Happy crocheting!
07.11.2016 - 09:03
![]() Monika wrote:
Monika wrote:
We wzorze sc przetłumaczono jako os. Czy nie powinny to byc polslupki??
15.09.2016 - 20:16DROPS Design answered:
Witaj Moniko. Wszystko jest w porządku: sc (single crochet US) to to samo co dc (double crochet UK), a po polsku oś (oczko ścisłe). Półsłupek wykonujemy jak TUTAJ. POWODZENIA!
19.09.2016 - 17:49
![]() Klára wrote:
Klára wrote:
Ahoj všichni já jsem to dělala přesně podle návodu a skončilo to tak že ta kočka má úplně OBROVSKOU HLAVU takže to moc nevyšlo ale jinak OK :)
21.02.2016 - 19:30
![]() Marianne wrote:
Marianne wrote:
Klopt het dat de staart niet gevuld dient te worden? Dit lijkt niet te kloppen met wat ik op de afbeelding zie.
14.04.2014 - 15:21DROPS Design answered:
Hoi Marianne. Ja, dat klopt. De staart is te klein om gevuld te worden. Je mag het natuurlijk altijd proberen als je dat mooier vindt.
15.04.2014 - 12:06
![]() Babs wrote:
Babs wrote:
Ok bedankt!
17.12.2013 - 13:42
![]() Babs wrote:
Babs wrote:
Is het de bedoeling dat je de opening van de kop en het lijfje sluit (dicht maakt) voordat je ze aan elkaar naait? Alvast bedankt!
17.12.2013 - 11:33DROPS Design answered:
Hoi Babs. Nee, je sluit niet de openingen (zowel het lijf als de kop eindigt met 12 v op de toer. Je naait de openingen aan elkaar.
17.12.2013 - 11:59
|
|
Sylvester#dropssylvester |
|
 |
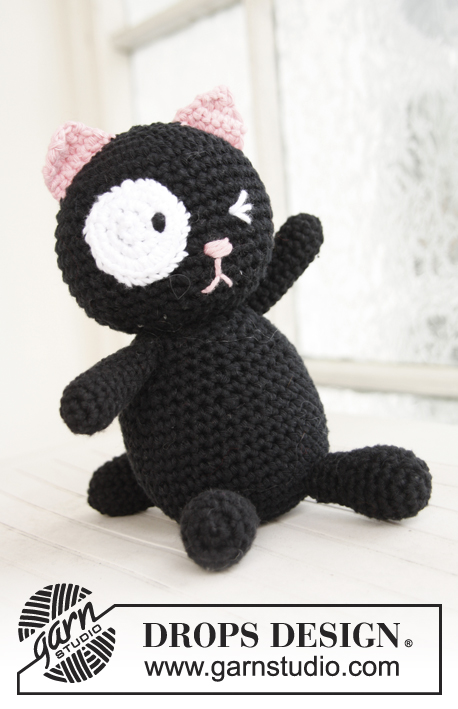 |
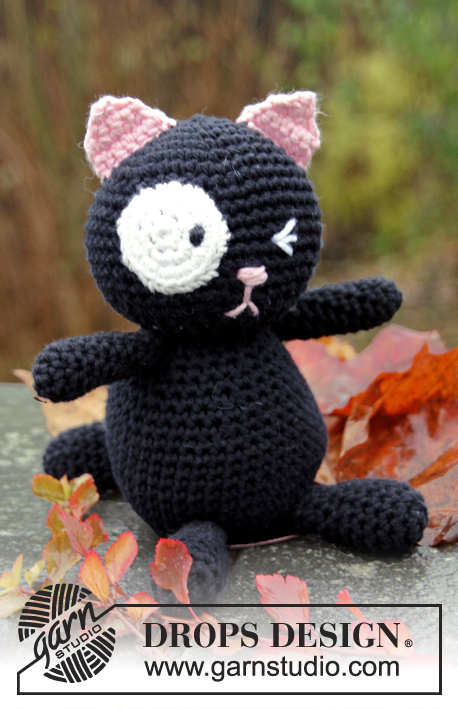
Crochet cat in DROPS Paris
DROPS Baby 21-44 |
|
|
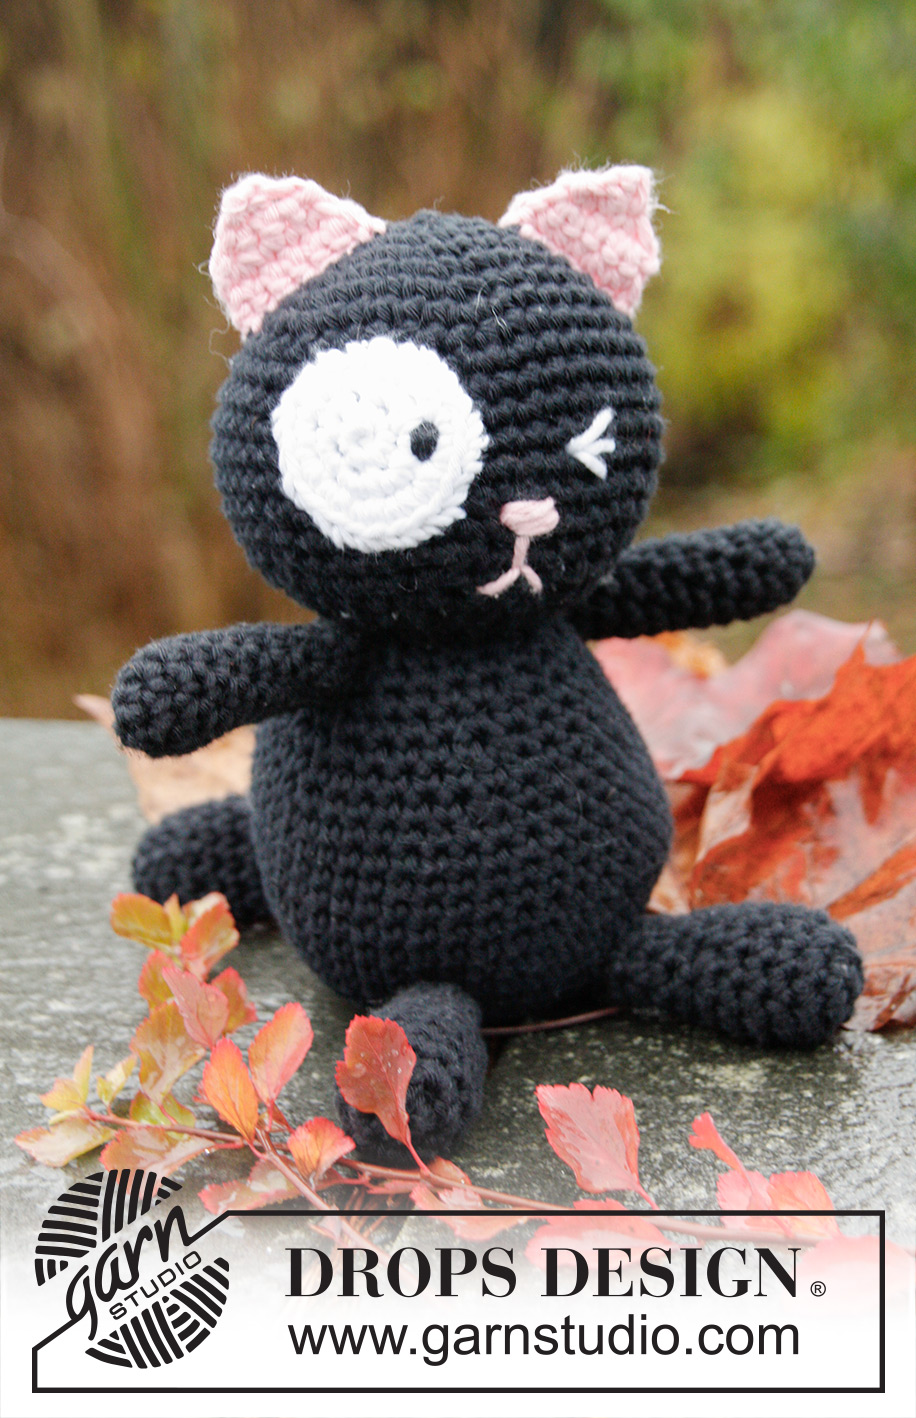
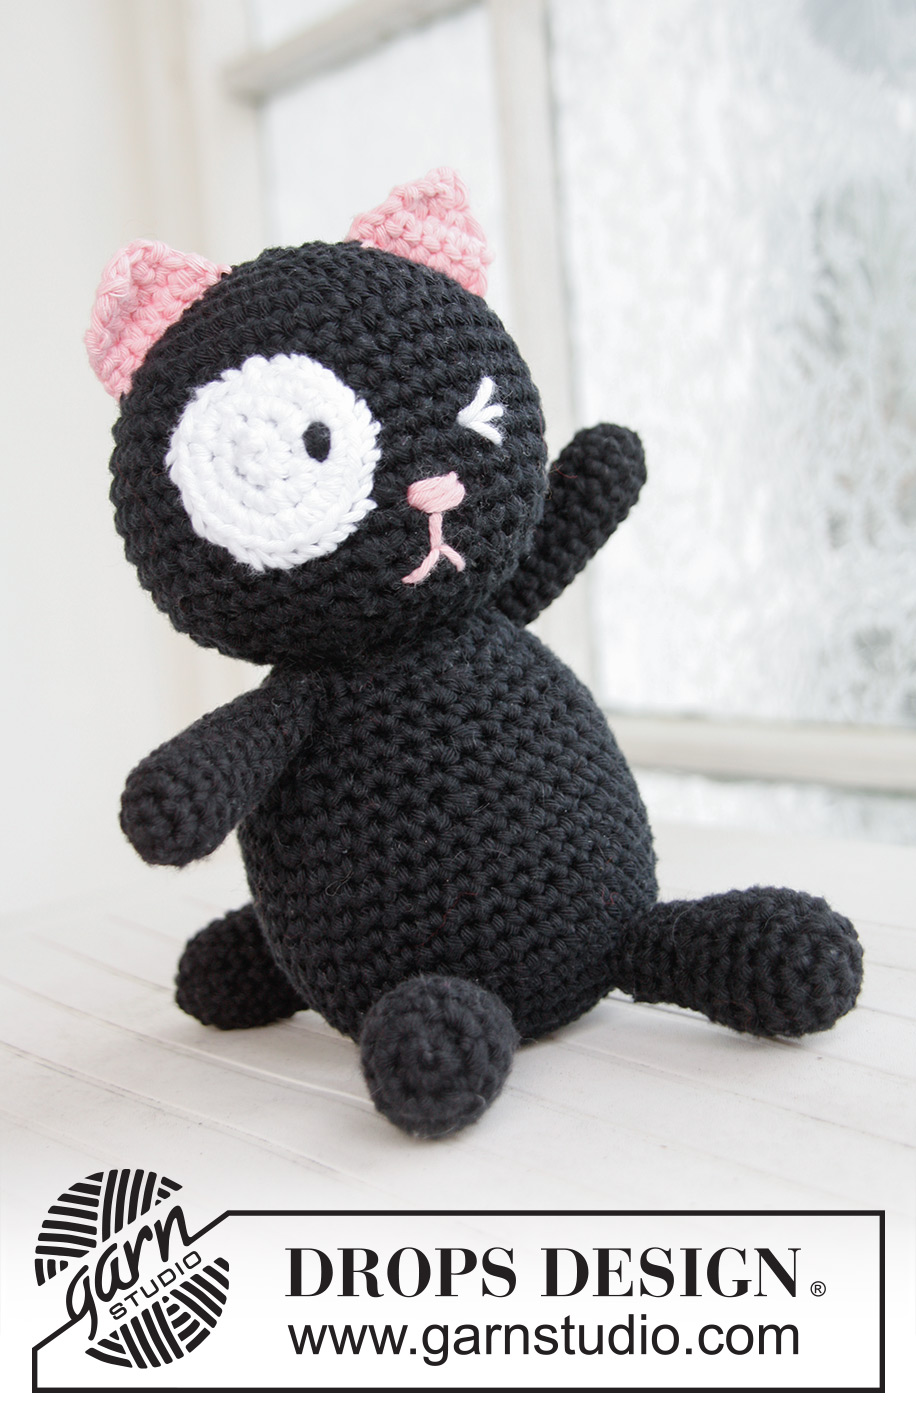
CROCHET INFO: MAGIC CIRCLE: When piece is worked in the round, start with this technique to avoid holes in the middle (instead of ch-ring): Hold the yarn end and wind the yarn one time around the index finger to make a loop. Hold the loop with left thumb and middle finger, place the yarn over left index finger. Insert hook through the loop, make a YO and pull yarn through loop, ch 1, then work sc's around the loop. When the desired no of sc have been reached, pull the yarn end to tighten the loop. Fasten the yarn end on the back side. Continue to work in the round in a circle. WORK IN THE ROUND IN A CIRCLE: After last sc on the round, continue to next round with 1 sc in next sc (= the first sc from previous round). NOTE: Insert a marker at the beg of round between last sc and first sc on the round, move the marker upwards. WORKING 2 SC TOG: * Insert hook in next st, get yarn *, repeat from *-* one more time, make a YO and pull yarn through all 3 sts on hook. -------------------------------------------------------- HEAD: Worked in the round in a circle with black on hook size 4 mm / G/6. Start at the top of head by making a magic circle - Read explanation above. ROUND 1: Work 6 sc around loop. Read WORK IN THE ROUND IN A CIRCLE above. ROUND 2: 2 sc in every sc around = 12 sc. ROUND 3: * 1 sc in next sc, 2 sc in next sc *, repeat from *-* around = 18 sc. ROUND 4: * 1 sc in the next 2 sc, 2 sc in next sc *, repeat from *-* around = 24 sc. ROUND 5: * 1 sc in the next 3 sc, 2 sc in next sc *, repeat from *-* around = 30 sc. ROUND 6: * 1 sc in the next 4 sc, 2 sc in next sc *, repeat from *-* around = 36 sc. ROUND 7: * 1 sc in the next 5 sc, 2 sc in next sc *, repeat from *-* around = 42 sc. ROUND 8: Work 1 sc in every sc = 42 sc. ROUND 9: * 1 sc in the next 6 sc, 2 sc in next sc *, repeat from *-* around = 48 sc. ROUND 10-13: Work 1 sc in every sc = 48 sc. ROUND 14: * 1 sc in the next 6 sc, then crochet the next 2 sc tog * - Read explanation above, repeat from *-* around = 42 sc. ROUND 15: * 1 sc in the next 5 sc, then crochet the next 2 sc tog *, repeat from *-* around = 36 sc. ROUND 16: Work 1 sc in every sc = 36 sc. ROUND 17: * 1 sc in the next 4 sc, then crochet the next 2 sc tog *, repeat from *-* around = 30 sc. ROUND 18: Work 1 sc in every sc = 30 sc. ROUND 19: * 1 sc in the next 3 sc, then crochet the next 2 sc tog *, repeat from *-* around = 24 sc. ROUND 20: * 1 sc in the next 2 sc, then crochet the next 2 sc tog *, repeat from *-* around = 18 sc. ROUND 21: * 1 sc in next sc, then crochet the next 2 sc tog *, repeat from *-* around = 12 sc. Cut the yarn and fill the head with some poly stuffing. BODY: Worked in the round in a circle with black on hook size 4 mm / G/6. Start by making a magic circle at the bottom of body. ROUND 1: Work 6 sc around loop. ROUND 2: 2 sc in every sc around = 12 sc. ROUND 3: * 1 sc in next sc, 2 sc in next sc *, repeat from *-* around = 18 sc. ROUND 4: * 1 sc in the next 2 sc, 2 sc in next sc *, repeat from *-* around = 24 sc. ROUND 5: * 1 sc in the next 3 sc, 2 sc in next sc *, repeat from *-* around = 30 sc. ROUND 6: * 1 sc in the next 4 sc, 2 sc in next sc *, repeat from *-* around = 36 sc. ROUND 7: * 1 sc in the next 5 sc, 2 sc in next sc *, repeat from *-* around = 42 sc. ROUND 8-16: Work 1 sc in every sc = 42 sc. ROUND 17: * 1 sc in the next 5 sc, then crochet the next 2 sc tog *, repeat from *-* around = 36 sc. ROUND 18: Work 1 sc in every sc = 36 sc. ROUND 19: * 1 sc in the next 4 sc, then crochet the next 2 sc tog *, repeat from *-* around = 30 sc. ROUND 20: Work 1 sc in every sc = 30 sc. ROUND 21: * 1 sc in the next 3 sc, then crochet the next 2 sc tog *, repeat from *-* around = 24 sc. ROUND 22: * 1 sc in the next 2 sc, then crochet the next 2 sc tog *, repeat from *-* around = 18 sc. ROUND 23: * 1 sc in next sc, then crochet the next 2 sc tog *, repeat from *-* around = 12 sc. Cut the yarn and keep 30 cm / 12" for assembly. Fill the body with some poly stuffing. LEG: Worked in the round in a circle with black on hook size 4 mm / G/6. Start at edge of leg by making a magic circle. ROUND 1: Work 6 sc around loop. ROUND 2: 2 sc in every sc around = 12 sc. ROUND 3-6: Work 1 sc in every sc = 12 sc. ROUND 7: * 1 sc in next sc, then crochet the next 2 sc tog *, repeat from *-* around = 8 sc. ROUND 8-11: Work 1 sc in every sc = 8 sc. Cut the yarn and keep 30 cm / 12" for assembly. Work another leg the same way. Fill the legs with some poly stuffing. ARM: Worked in the round in a circle with black on hook size 4 mm / G/6. Start at edge of arm by making a magic circle. ROUND 1: Work 4 sc around loop. ROUND 2: 2 sc in every sc around = 8 sc. ROUND 3-12: Work 1 sc in every sc = 8 sc. Cut the yarn and keep 30 cm / 12" for assembly. Work another arm the same way. Fill the arm with some poly stuffing. TAIL: Worked in the round in a circle with black on hook size 4 mm / G/6. Start by making a magic circle. ROUND 1: Work 4 sc around loop. ROUND 2: 2 sc in every sc around = 8 sc. ROUND 3: * 1 sc in next sc, 2 sc in next sc *, repeat from *-* around = 12 sc. ROUND 4-7: Work 1 sc in every sc = 12 sc. ROUND 8: * 1 sc in next sc, then crochet the next 2 sc tog *, repeat from *-* around = 8 sc. ROUND 9-11: Work 1 sc in every sc = 8 sc. Cut the yarn and keep 30 cm / 12" for assembly. Do not fill. EYE: Worked in the round in a circle with white on hook size 3.5 mm/E/4. Start by making a magic circle. ROUND 1: Work 7 sc around loop. ROUND 2: 2 sc in every sc around = 14 sc. ROUND 3: * 1 sc in next sc, 2 sc in next sc *, repeat from *-* around = 21 sc. Cut the yarn and keep 30 cm / 12" for assembly. EAR: Worked back and forth with light pink on hook size 3.5 mm/E/4. Start by ch 2. ROW 1: Work 2 sc in first ch = 2 sc. ROW 2: Turn piece, ch 1, 2 sc in every sc = 4 sc. ROW 3: Turn piece, ch 1, * 2 sc in the first sc, 1 sc in the next 2 sc, 2 sc in the last sc = 6 sc. ROW 4: Turn piece, ch 1, 1 sc in every sc = 6 sc. Cut the yarn and keep 30 cm / 12" for assembly. Work another ear the same way. ASSEMBLY: Sew the ears at the top of head, sew on the white (right) eye. Embroider the left eye with white, the black pupil on the right eye and mouth and nose with light pink at the front of head, see picture. Sew the head on to body with neat little stitches. Sew the legs and arms on the body, sew the tail to the back of body. |
|
Have you finished this pattern?Tag your pictures with #dropspattern #dropssylvester or submit them to the #dropsfan gallery. Do you need help with this pattern?You'll find 4 tutorial videos, a Comments/Questions area and more by visiting the pattern on garnstudio.com. © 1982-2025 DROPS Design A/S. We reserve all rights. This document, including all its sub-sections, has copyrights. Read more about what you can do with our patterns at the bottom of each pattern on our site. |
|


With over 40 years in knitting and crochet design, DROPS Design offers one of the most extensive collections of free patterns on the internet - translated to 17 languages. As of today we count 314 catalogs and 11821 patterns - 11811 of which are translated into English (US/in).
We work hard to bring you the best knitting and crochet have to offer, inspiration and advice as well as great quality yarns at incredible prices! Would you like to use our patterns for other than personal use? You can read what you are allowed to do in the Copyright text at the bottom of all our patterns. Happy crafting!
Post a comment to pattern DROPS Baby 21-44
We would love to hear what you have to say about this pattern!
If you want to leave a question, please make sure you select the correct category in the form below, to speed up the answering process. Required fields are marked *.